Want to know exactly how many people visit your WordPress site, which content they love, and what makes them stick around (or leave)? Awesome! Proper WordPress visitor tracking is essential for growing your traffic and engagement.
Understanding your visitors’ behavior helps you make smart, data-driven decisions about your content, design, and marketing strategies. But I know from experience that setting up tracking can feel overwhelming, especially if you’re new to analytics.
The good news is that WordPress visitor tracking doesn’t have to be complicated. I’ll show you exactly how to track visitors on your WordPress site using MonsterInsights, my favorite tool for making Google Analytics simple and actionable.
Set Up WordPress Visitor Tracking Today!
Why track your website traffic?
When you start a business, you invest your time, money, and expertise into making it succeed. You probably have goals in mind, like hitting a specific revenue target or reaching a certain number of customers. But here’s the thing: to achieve those goals, you need to keep track of the numbers that matter most, and that includes your website traffic.
By tracking the number of visitors to your WordPress site, you can gain a deeper understanding of your audience and how they interact with your content. You’ll be able to see where your visitors are coming from (from a search engine, a referral link on another website, an email, etc.) what pages they’re spending the most time on, and even what actions they take on your site.
This data about your site’s performance is like gold for your business because it helps you make informed decisions about how to optimize your site and attract even more visitors.
Google Analytics is the most popular free tool for visitor tracking, but it unfortunately has a pretty steep learning curve. But don’t lose heart! MonsterInsights simplifies Google Analytics so that you can easily track your WordPress site visitors and see all of your most important metrics. Let’s take a look at how.
WordPress Visitor Tracking Video Tutorial
Watch our video tutorial to see how you can check the number of visitors to your site or read our step-by-step tutorial.
How to Track Website Traffic on Your WordPress Site
Website Analytics tools are most commonly used to check the number of visitors that come to your website. These tools can provide data and metrics for your audience’s total number, topics of interest, and behaviors on your site. There are tons of benefits of using website analytics!
While there are different website analytics tools on the market, MonsterInsights is the best WordPress plugin for tracking visitors, and it’s the most user-friendly tool for beginners.

MonsterInsights helps you set up Google Analytics on your WordPress site quickly and easily and lets you view your website’s analytics in easy-to-understand reports right inside your WordPress dashboard. In short, it makes WordPress visitor tracking easy.
Grab a license to get tons of added features like form tracking, eCommerce tracking, video play tracking, form submissions tracking, and more, or get started with our free version for basic Google Analytics plus outbound link tracking, file download tracking, a built-in headline analyzer, and more.
Here’s how to get started.
WordPress Visitor Tracking Tutorial
Follow these steps to get visitor tracking set up quickly and easily!
Step 1: Install MonsterInsights
Normally, you’d have to insert your Google Analytics tracking code into your WordPress website’s code.
But with MonsterInsights, you don’t need to worry about touching any code.
Instead, you can get started by downloading MonsterInsights and installing it on your WordPress site. To do that, you’ll need to log into your MonsterInsights account and download the plugin zip file. (Or jump to the instructions for the free version, MonsterInsights Lite.)
Once you have the zip file, navigate to the site where you want to install MonsterInsights and go to the WordPress admin dashboard.
Then navigate to Plugins » Add New and click the Add New button at the top.

On the next screen, you can click the Choose File button to select the zip file you just downloaded. Then click the Install Now button to upload the file and install the plugin on your site.

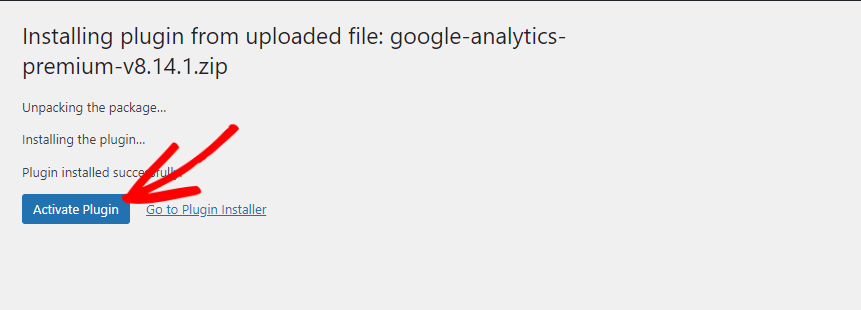
Once the plugin has been uploaded and installed, you can click the Activate Plugin button to activate it on your site.
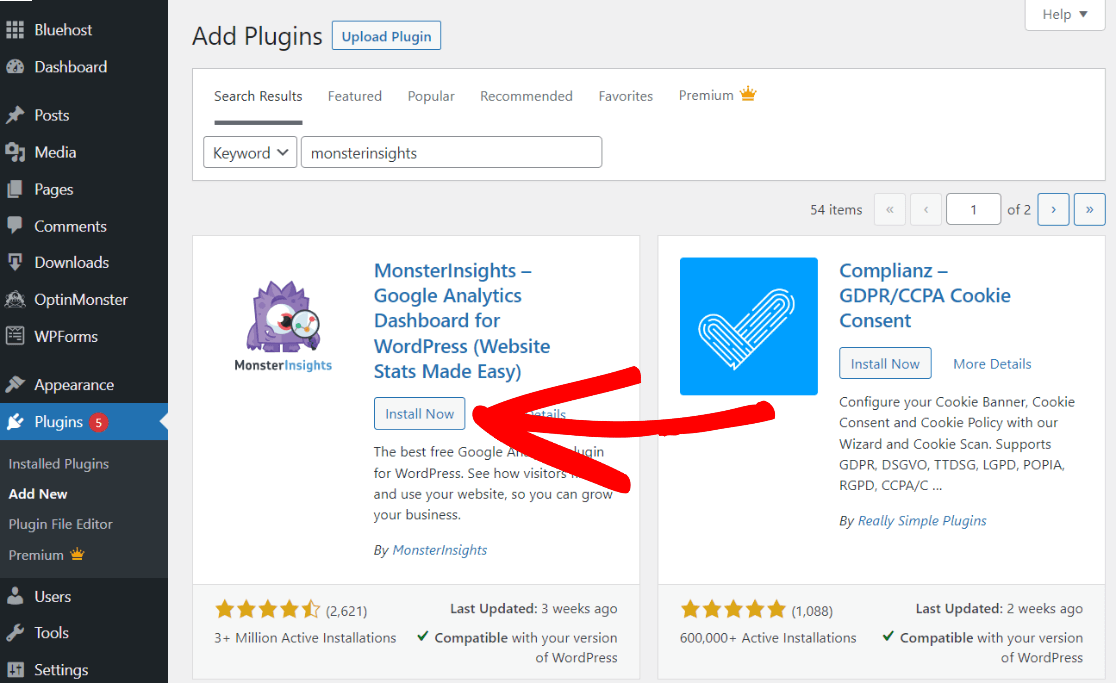
Or, if you’re installing the free version, find MonsterInsights on the Add Plugins page and click Install Now and Activate.
After the plugin is activated, the plugin setup wizard will open to guide you through the step-by-step setup process.
At first, you’ll see the ‘Welcome to MonsterInsights!’ message and options to choose the category of your website. There are three options: Business website, Publisher (Blog), and eCommerce.
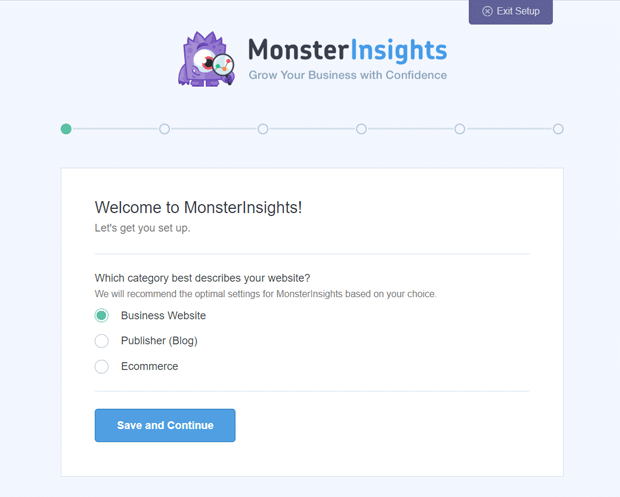
Select a category that best describes your website, and then click the ‘Save and Continue’ button.
If you want to skip the setup wizard for now, you can click the ‘Exit Setup’ button at the top.
On the next screen, you’ll need to connect the MonsterInsights plugin to your website by providing your license key (skip this step if you are using Lite).
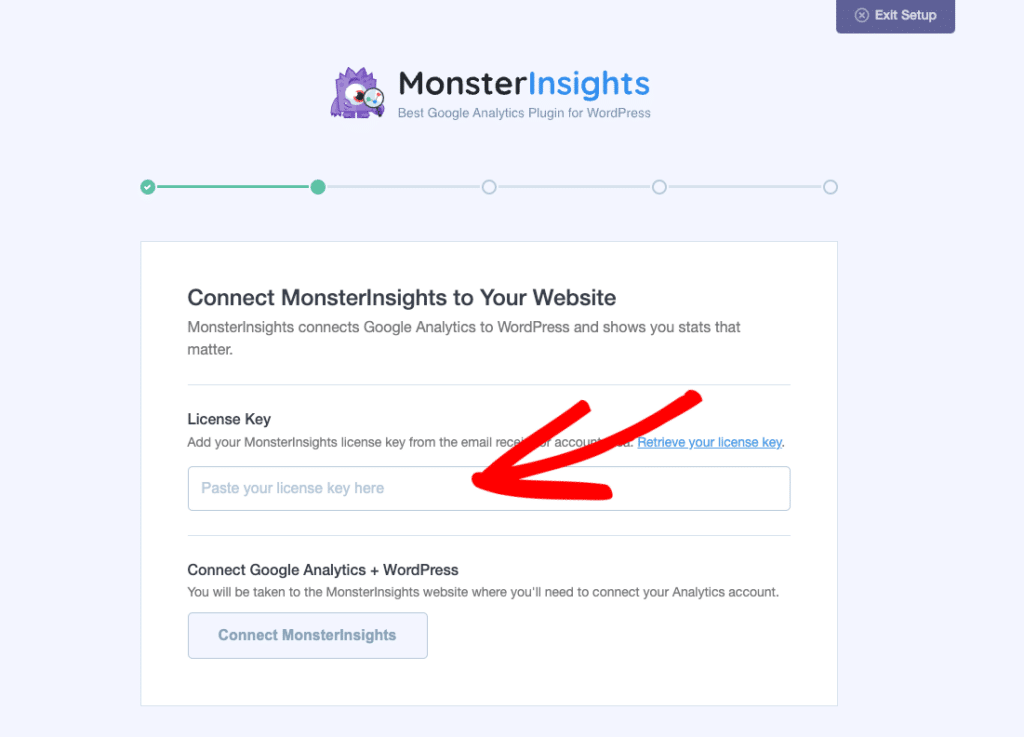
You can find your MonsterInsights license key in your email receipt or account area on the plugin website.
Step 2: Connect MonsterInsights to Google Analytics
Head back to your WordPress window and click on the Connect MonsterInsights button.
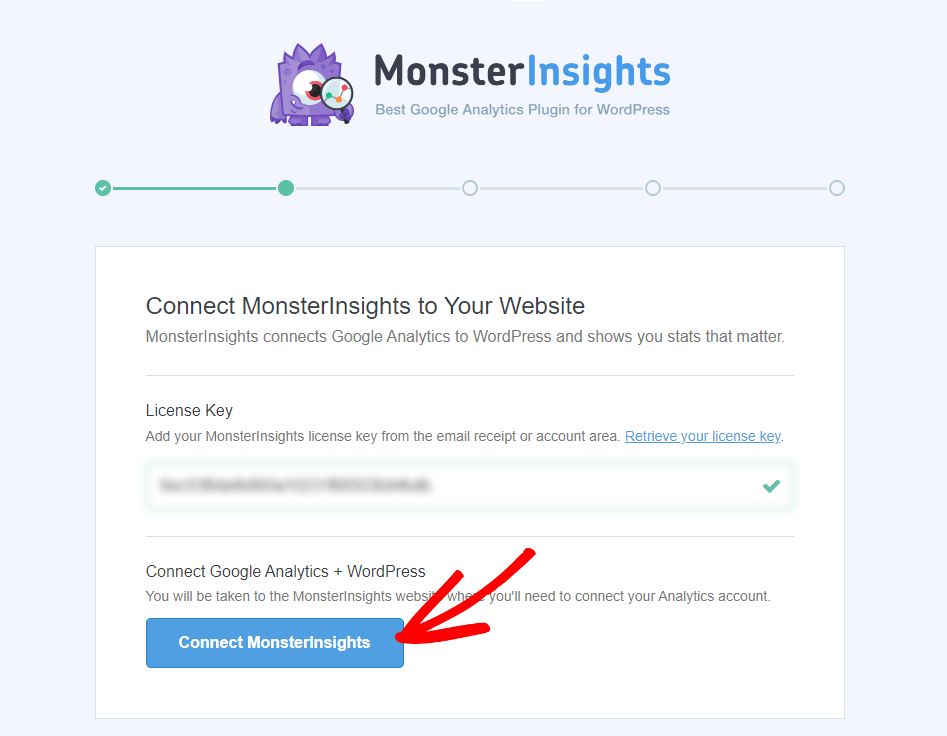
After that, you’ll see an option to connect your Google Analytics account with your MonsterInsights account. Select your account to continue authentication.
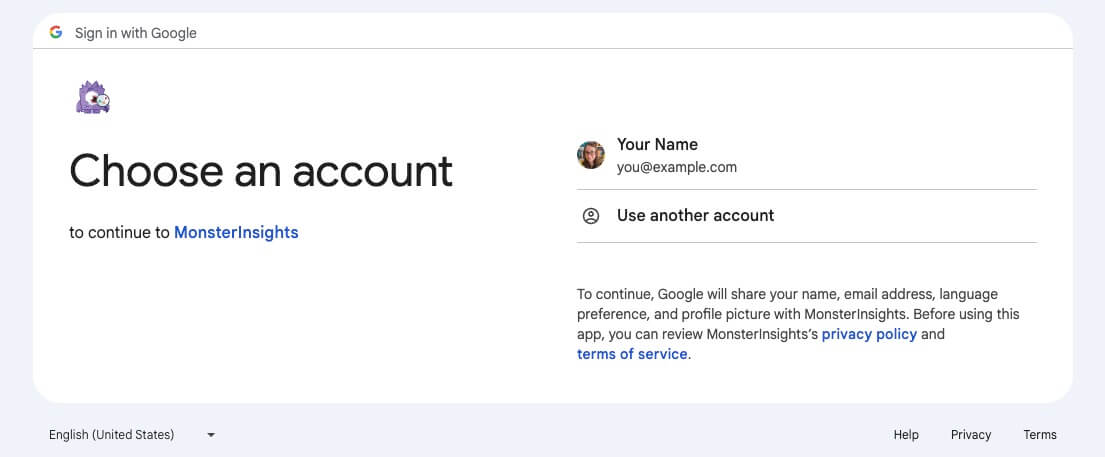
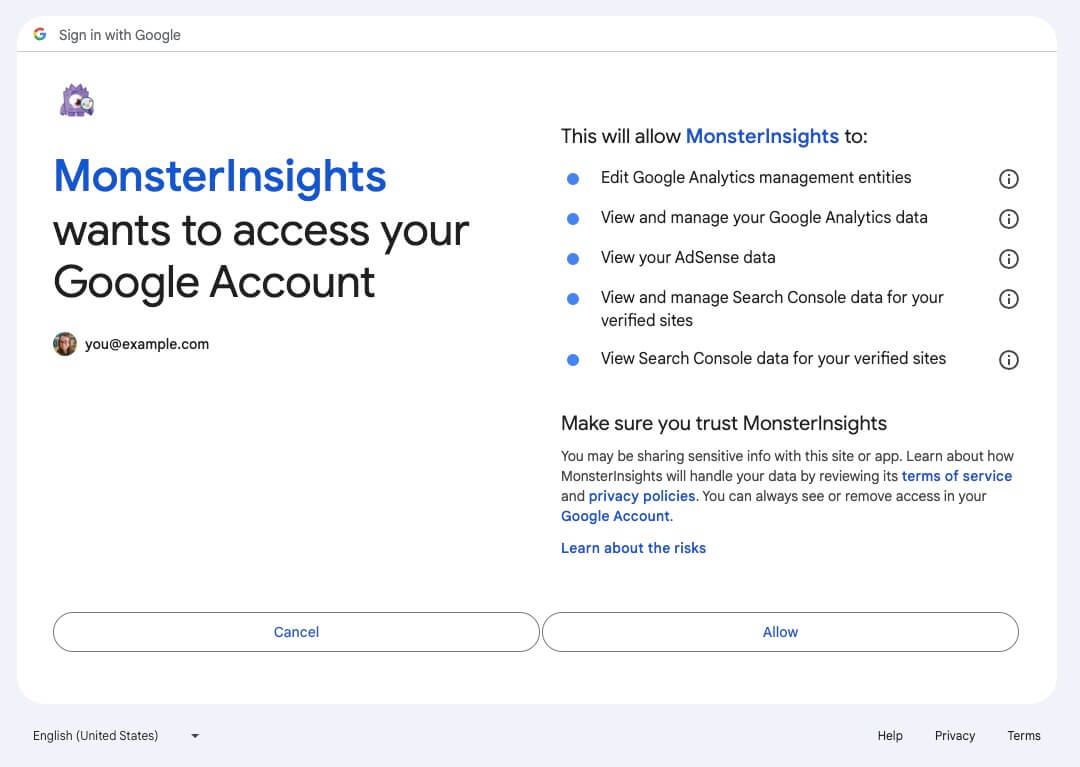
Next, you’ll need to click Allow to allow MonsterInsights the proper permissions.
After that, you’ll need to pick a profile to complete the connection. If you’ve multiple websites connected to your Google Analytics account, then you’ll need to choose the right website property here.
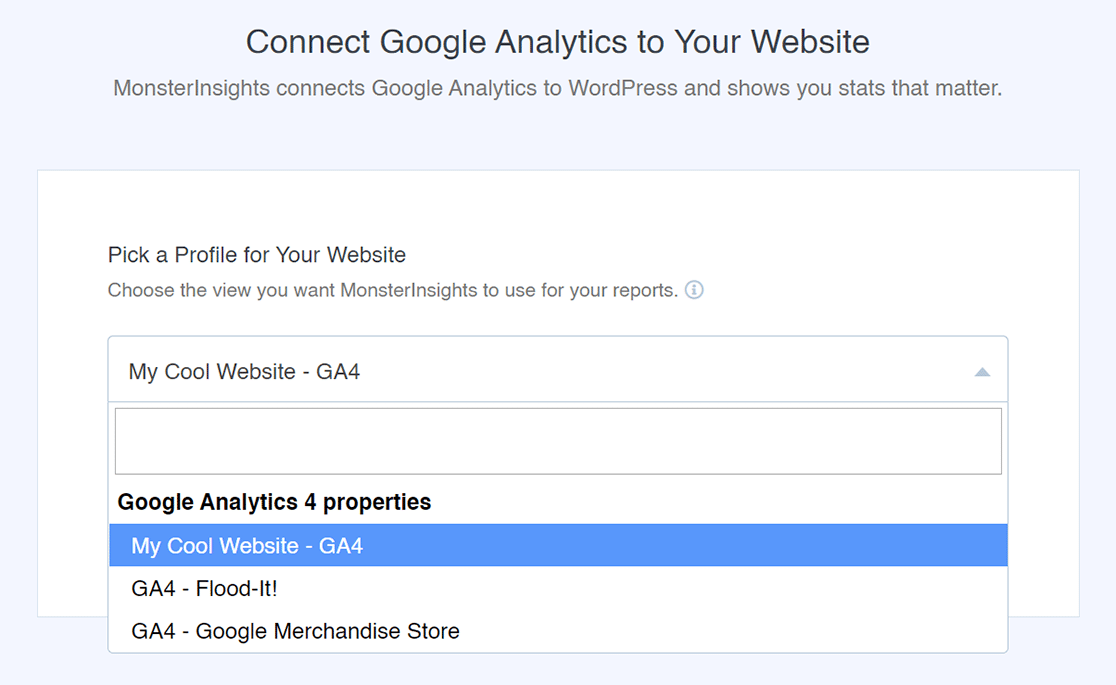
Choose your property, and then click the ‘Complete Connection’ button.
After that, it’ll finalize the authentication process in a few seconds and then take you back to your MonsterInsights setup page.
Now you can see the recommended settings for the Google Analytics plugin.
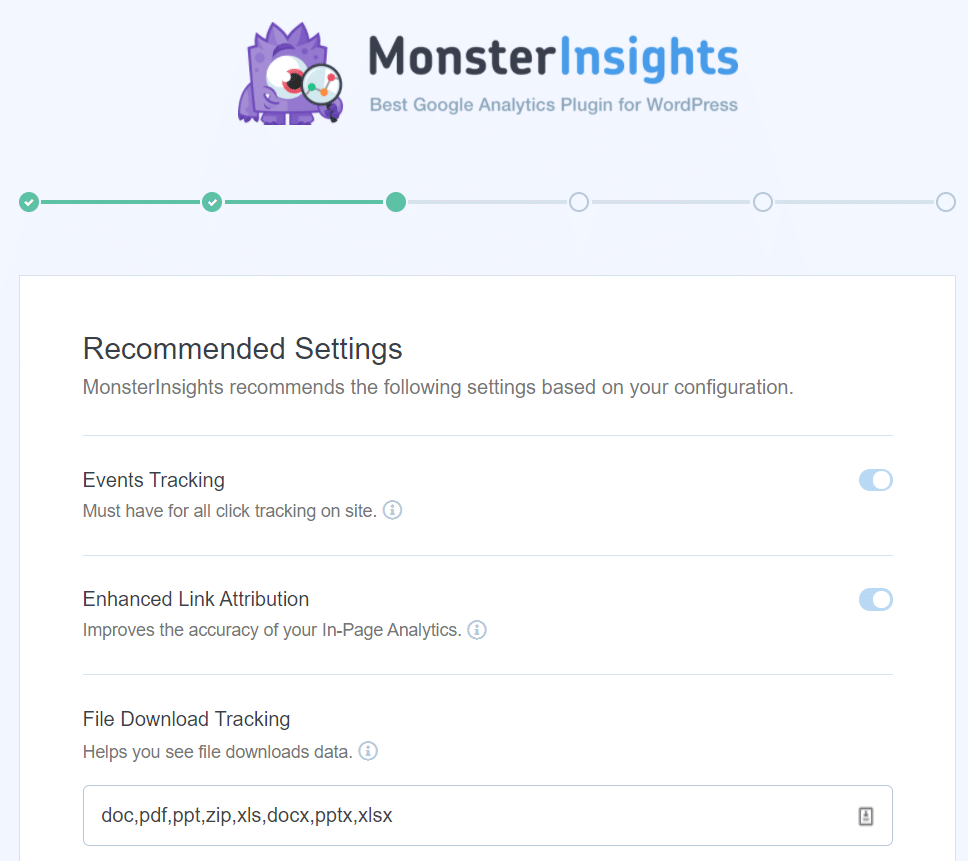
This page includes some of the most important settings as the following:
- Events tracking – Enabled by default.
- Enhanced Link Attribution – Enabled by default.
- File Download Tracking – Most used file types (doc,exe,js,pdf,ppt,tgz,zip,xls) added by default.
As you scroll down, you’ll see more settings.
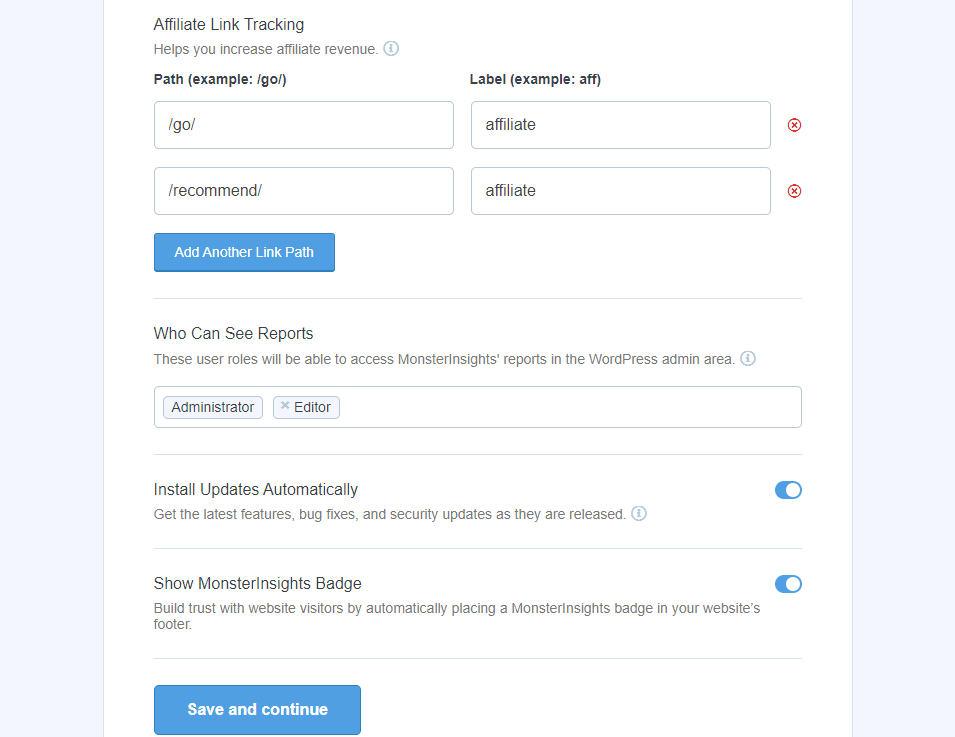
- Affiliate Link Tracking – It has 2 affiliate link paths added by default, and lets you add more affiliate link paths.
- Access to MonsterInsights’s Reports – You can choose who can see MonsterInsights’s reports.
- Automatic Plugin Updates – You can enable or disable the option to install updates automatically.
- Show MonsterInsights Badge – Choose whether or not you want to show a MonsterInsights badge in your website’s footer. You’ll be able to access a few options for how this looks later.
Review and configure these recommended settings, and then click the ‘Save and Continue’ button at the end.
On the next screen, you’ll see options for even more tracking options, addons, and helpful plugins.
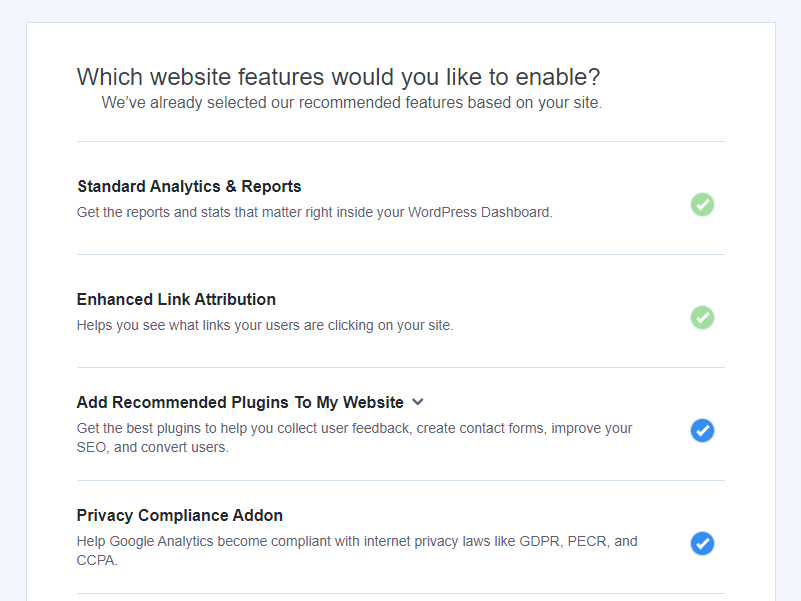
The first four items are:
- Standard Analytics & Reports – The standard MonsterInsights reports you’ll get in your WordPress dashboard.
- Enhanced Link Attribution – This can help you see where users click on your site.
- Add Recommended Plugins To My Website – We recommend adding four plugins to your website here. Check this option to install all four or expand it to pick and choose from the plugins:
- UserFeedback – Ask visitors questions about how they use your website, what content they prefer, what you could improve, or anything else you want to know.
- All In One SEO – The best WordPress SEO plugin that integrates with MonsterInsights
- Website Backup and Migration – Back up your website’s files and databases for free with Duplicator, the #1 backup plugin for WordPress.
- Smart Form Builder by WPForms – The most popular WordPress form plugin, trusted by over 5 million websites. Easily create contact forms, payment forms, surveys and more.
- Conversion Tools – Get OptinMonster, the #1 conversion optimization plugin to convert your growing website traffic into subscribers, leads, and sales.
- Privacy Compliance Addon – Helps Google Analytics become compliant for GDPR, CCPA, and more
When you scroll down, you’ll find even more options:
- Advanced Reports – Get access to advanced reports inside MonsterInsights, such as search keywords, a real-time report, publishers and eCommerce reports, and more
- eCommerce Tracking – Instantly enable eCommerce tracking
- 20+ Advanced Tracking – Even more advanced tracking, such as author tracking, form conversion tracking, scroll tracking, and more
- Media Tracking – Enable embedded video tracking. See how many times videos are watched, how far they were watched on average, and more.
After that, you’ll see a new screen with this message ‘Awesome! Tracking and Analytics are All Setup!’. This means that the setup process is complete and that you’ve successfully installed Google Analytics on your WordPress site.
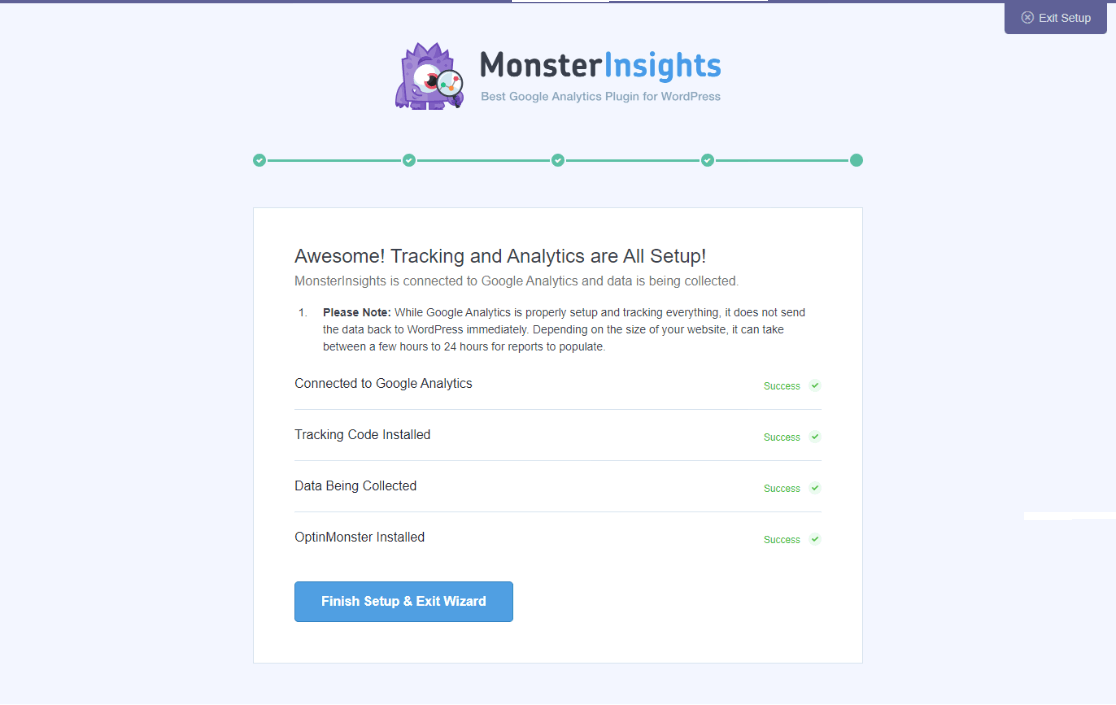
This screen also notifies you about when you can start seeing your website reports. Depending on the size of your website, it can take between a few hours to 24 hours. Don’t forget to click on the Finish Setup & Exit Wizard button.
See How Many Visitors Are On Your WordPress Site
Once the setup is complete, Google Analytics starts gathering information on your website visitors.
Google takes a few hours to gather your site information and data, so you may not find any data immediately after the setup process.
After a few hours, you’ll be able to see the website traffic on your WordPress website inside your MonsterInsights reports. Let’s take a quick look at the reports you’ll now be able to access in your WordPress dashboard:
1. Overview Report
With MonsterInsights, you can easily set up WordPress visitor tracking and check the number of website visitors in your dashboard. You don’t need to open your Google Analytics account every time you want to see your Analytics reports.
The plugin adds a Google Analytics dashboard widget that lets you view your website visitor reports right in your dashboard, with no clicks required.
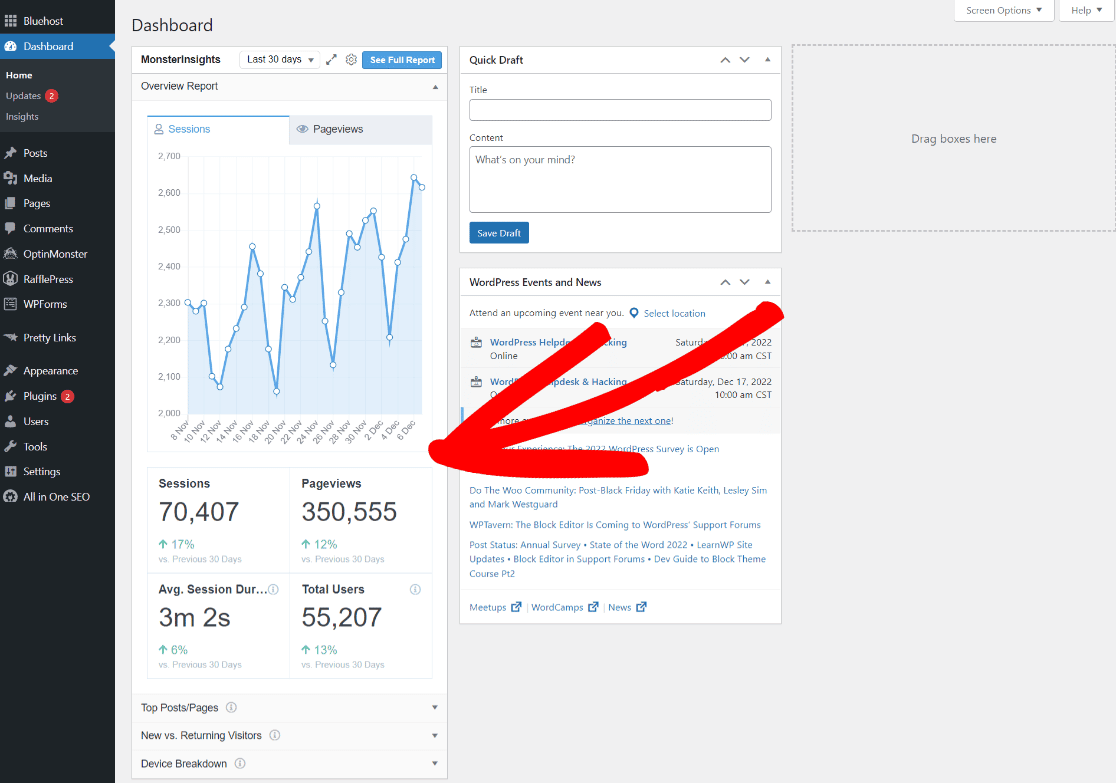
The MonsterInsights dashboard widget allows you to have a quick glance at your website reports.
To view your full reports, visit Insights » Reports from your admin panel. This will open the Overview Report.
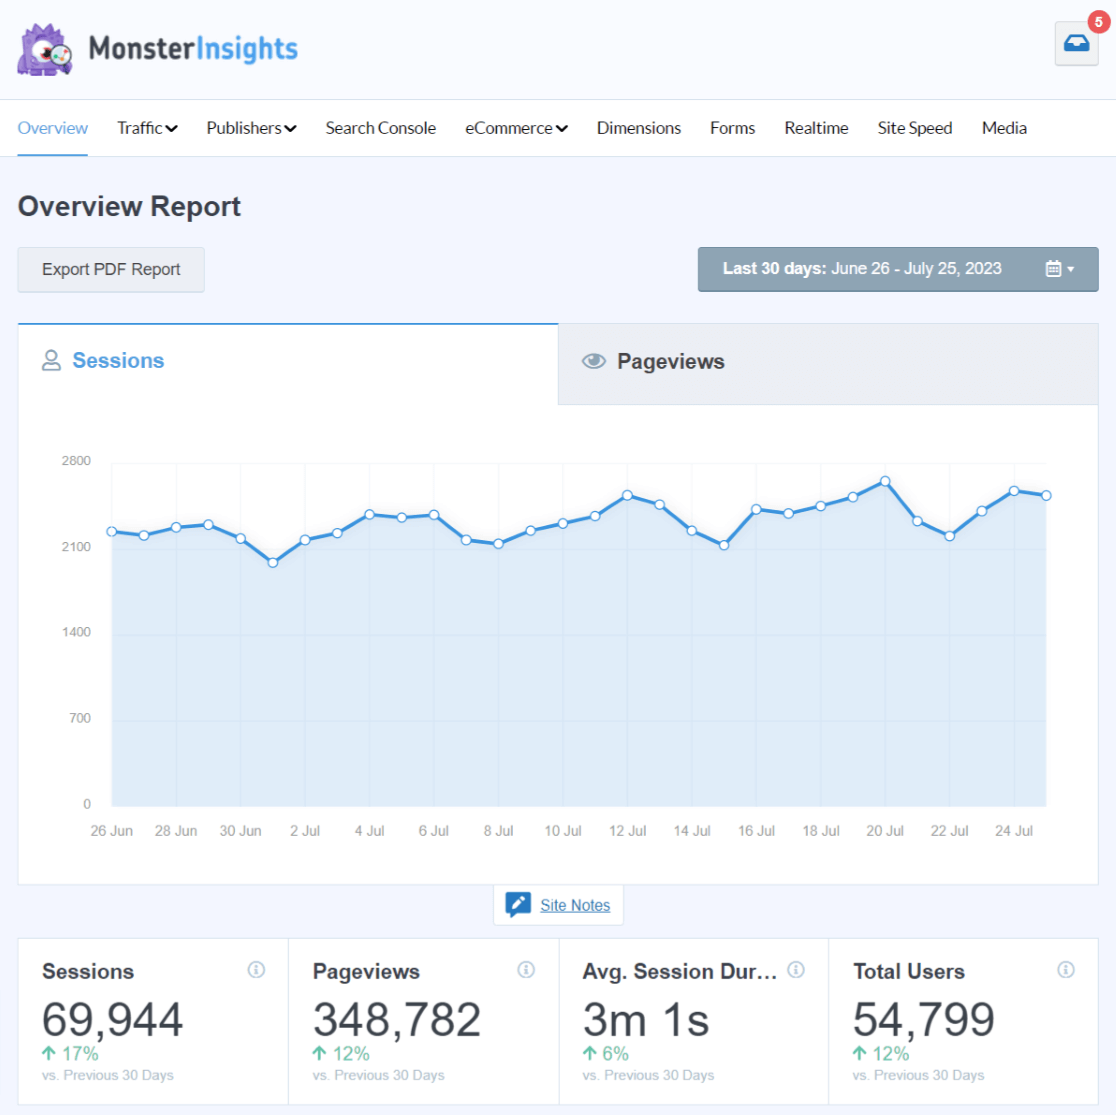
The Overview Report includes some of the key metrics that are useful for getting to know your website visitors.
The first section (screenshot above) shows a visual graph for the total number of sessions and pageviews your site has gotten in a defined range of time.
You can set the time range to 7 days, 30 days, or any days you desire.
Just below the graph, you’ll see quick data showing the total number of sessions, sessions, average session duration, and total users.
Then, you’ll see New vs. Returning Visitors and Device Breakdown data in percentages in pie-charts below that.
As you keep scrolling down the Overview Report page, you’ll see the Top 10 Countries where your visitors are located.
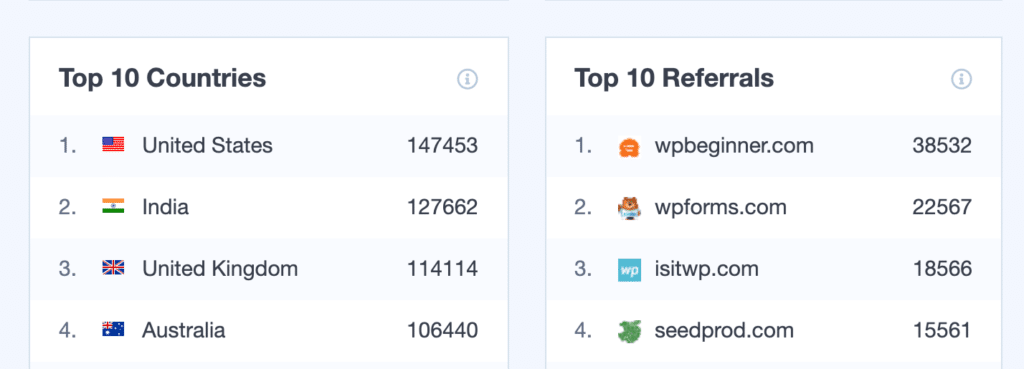
You can see where you get the most visits from and the actual number of visitors.
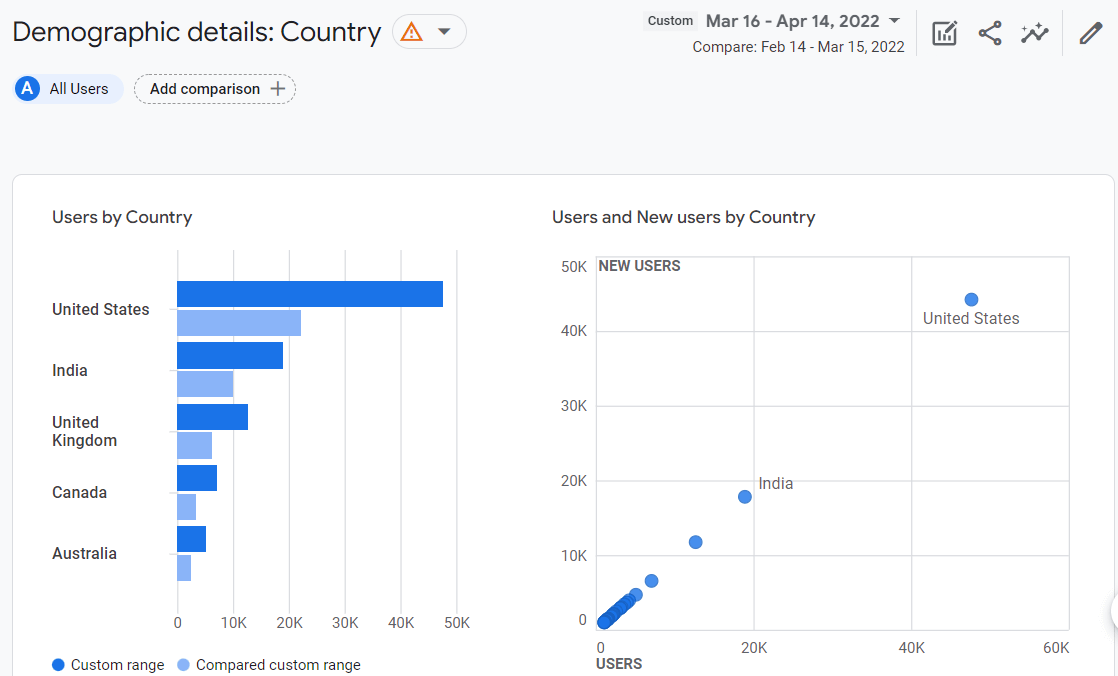
If you want to see a detailed report, you can always click the View Full Report button at the bottom of each report. There is a View All Countries Report link for the countries report.
On clicking this link, it’ll redirect you to your Google Analytics account page. There, you’ll see a more detailed report.
The last section of the Overview Report is Top Posts / Pages.
You can view the most popular posts and pages on your site and the total number of visits they received from there.
2. See How Many Visitors are on Your Site Right Now (Realtime)
Want to know how many visitors are on your site right now?
With MonsterInsights, you can see your realtime website visitors and their activity, right in your dashboard. Go to Insights » Reports from your admin panel and click on the Realtime option at the top.
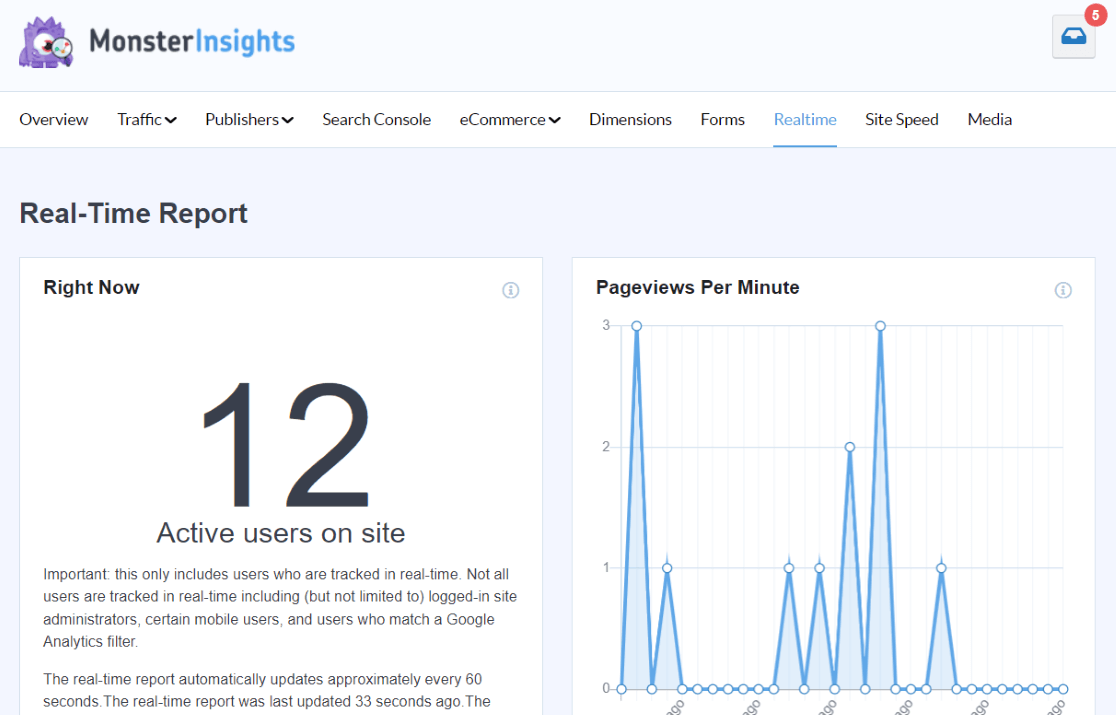
Now you can see the number of active users on your site at any given moment, their geographic locations, the pages they’re viewing, and more.
The Google Analytics realtime reports are useful to view and analyze the reports of your marketing campaigns, announcements, and more.
For more details, see our complete guide on Google Analytics realtime reports.
2. Traffic Reports
For a ton of information about the traffic to your website, check out the Traffic tab in MonsterInsights. In the tab, you’ll find:
- Traffic Overview: See the sources of all the traffic to your website, plus whether the traffic was engaged or completed a conversion
- Landing Page Details: See which pages your traffic landed on, plus how many visitors were engaged or completed a conversion
- Source/Medium: Dive further into exactly which channels your traffic used to find your website
- Technology: See which browsers and devices were used to access your website
- Campaigns: See which campaigns your traffic clicked on, plus how well the traffic performed on your site
- Social: Find out if social media drove any visits to your website
3. Publishers Reports
Next to the Overview Report tab, you’ll see the Publishers tab. You can view some of the other key metrics for checking your site visitors’ numbers from there.
You can view the following data from the Publishers Overview report:
- Top landing pages
- Top outbound links
- Top affiliate links
- Top download links
- Demographics and Interest categories
- Average scroll depth
All of these reports are super beneficial for understanding your audience and what they’re most interested in on your site!
You’ll also find the Pages Report under Publishers. This report shows you the metrics you need, like engaged sessions and bounce rate, for all of the top pages that were visited on your website.
4. eCommerce Report
You can see the number of visitors, pageviews, transactions, etc. for your shop pages from the eCommerce tab.
MonsterInsights comes with a powerful eCommerce addon that simplifies and automates advanced eCommerce tracking in WordPress. It works with WooCommerce, Easy Digital Downloads, GiveWP, MemberPress, and more.
In the eCommerce report, you’ll see data such as your shop’s conversion rate, the number of transactions, how much revenue you’ve generated, and the average order value.
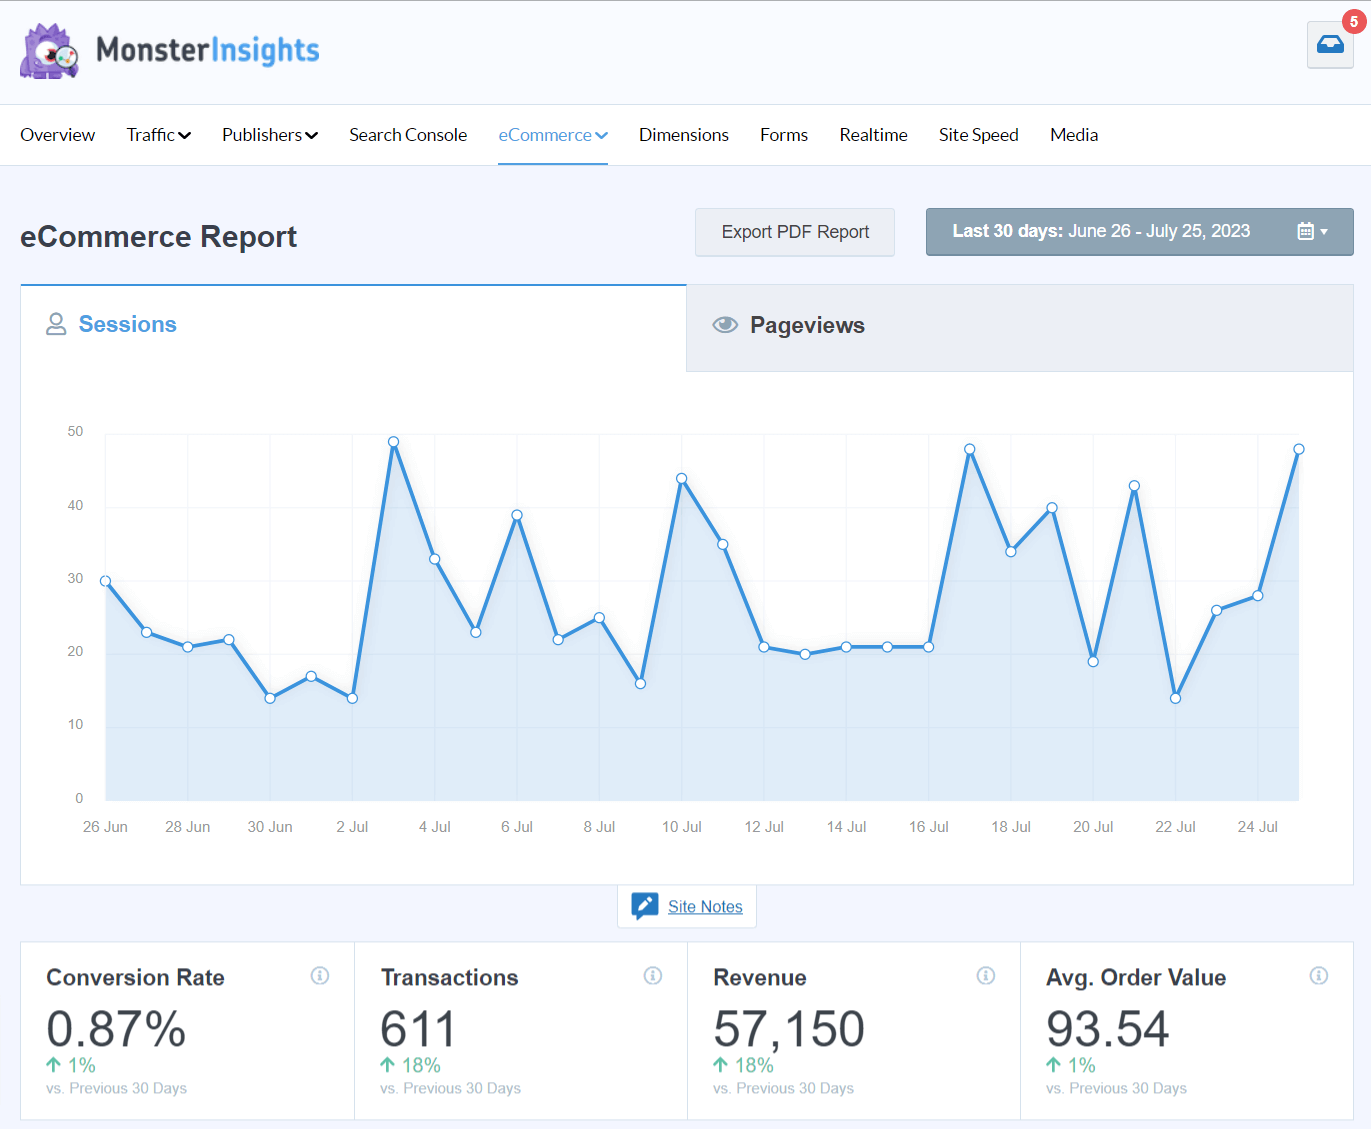
You can also see a list of your eCommerce shop’s top products. That way you’ll know which products to continue promoting.
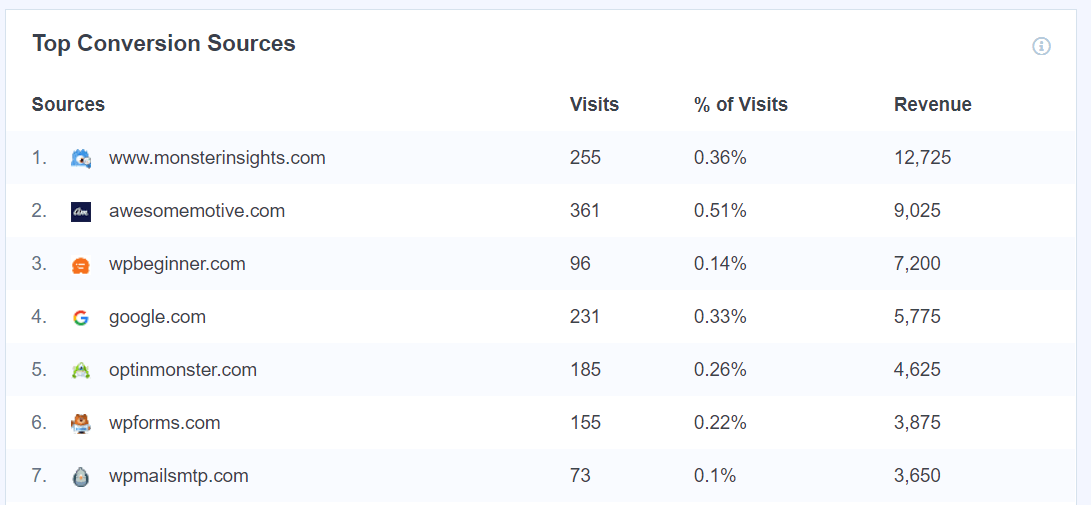
Another way to understand your eCommerce traffic is by looking at the conversion sources. These are websites that send highly converting traffic to your site.
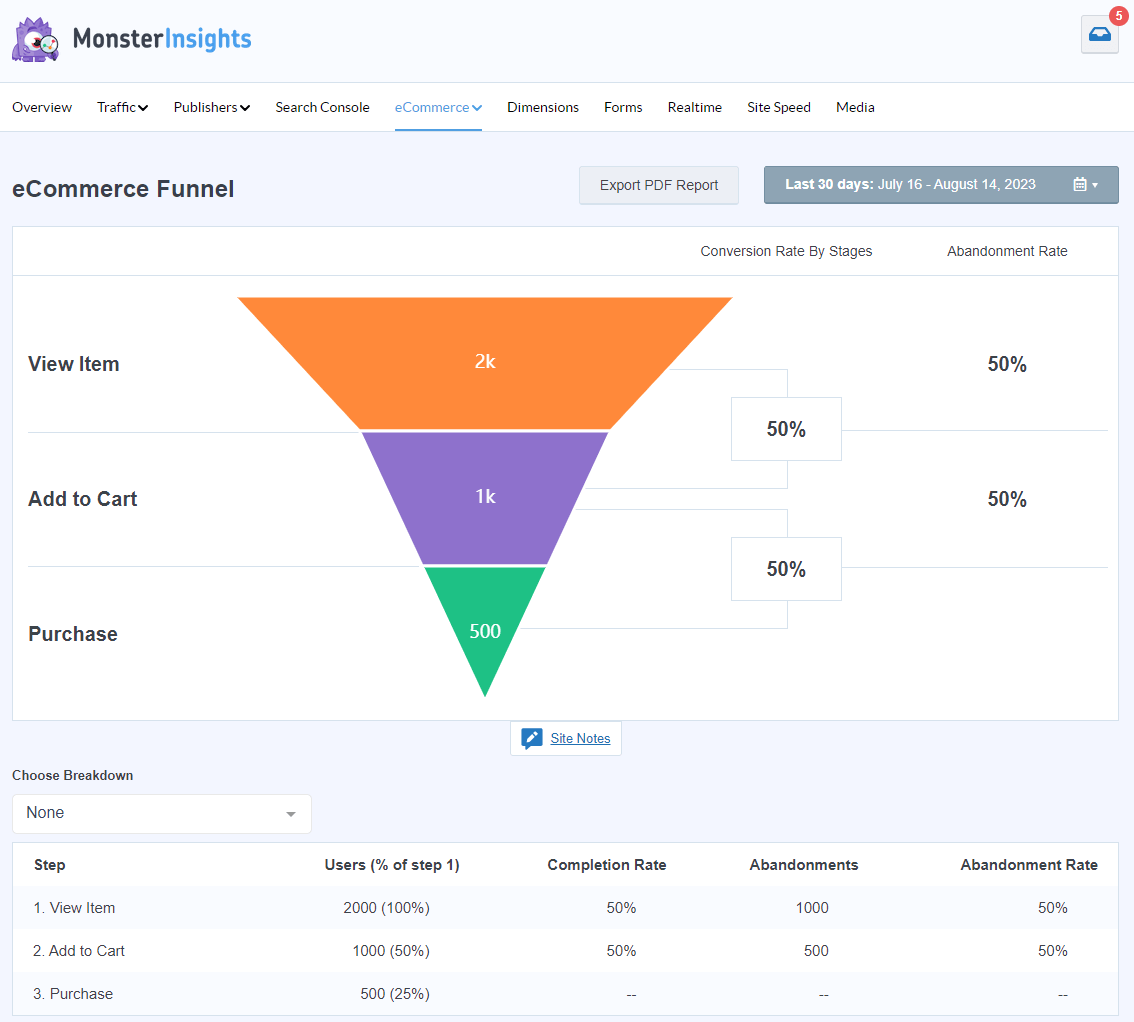
You’ll also find the Funnel report in the eCommerce section. This super helpful report will tell you where your prospective buyers are dropping out of the purchase funnel:
5. Search Console Report
The Search Console report shows you the top 50 Google search terms your site’s ranking for.
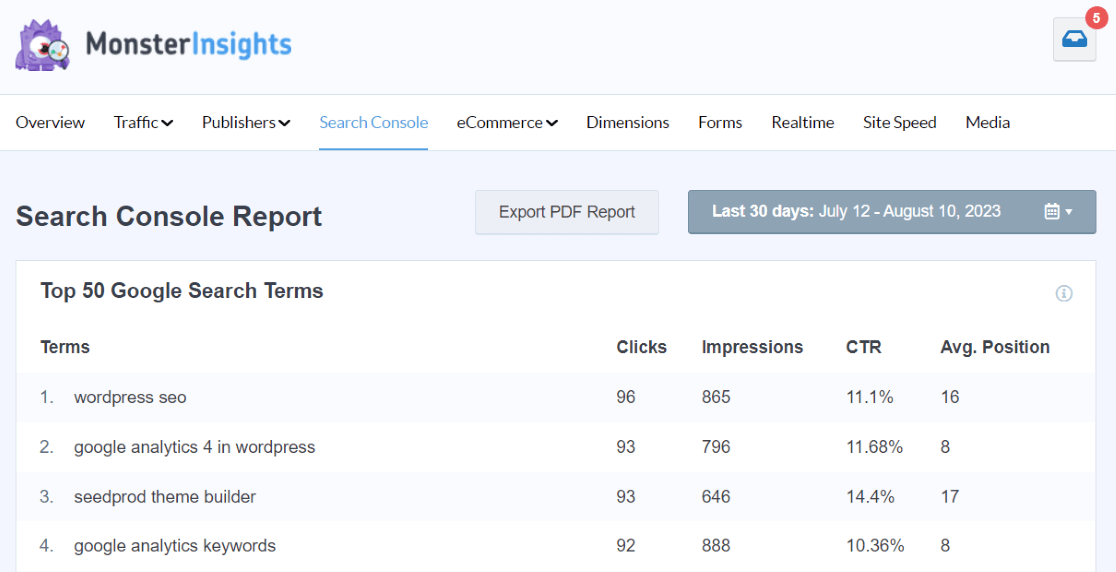
From this report, you can view which keywords are driving you the most visitors. This helps you with keyword research and SEO.
If you’re new to Search Console, here’s our step-by-step tutorial on how to configure and use Google Search Console.
6. Custom Dimensions Report
The Custom Dimensions report lets you track the following custom data:
- Most popular authors
- Most popular post types
- Most popular categories
- Most popular tags
- Best SEO score
- And more!
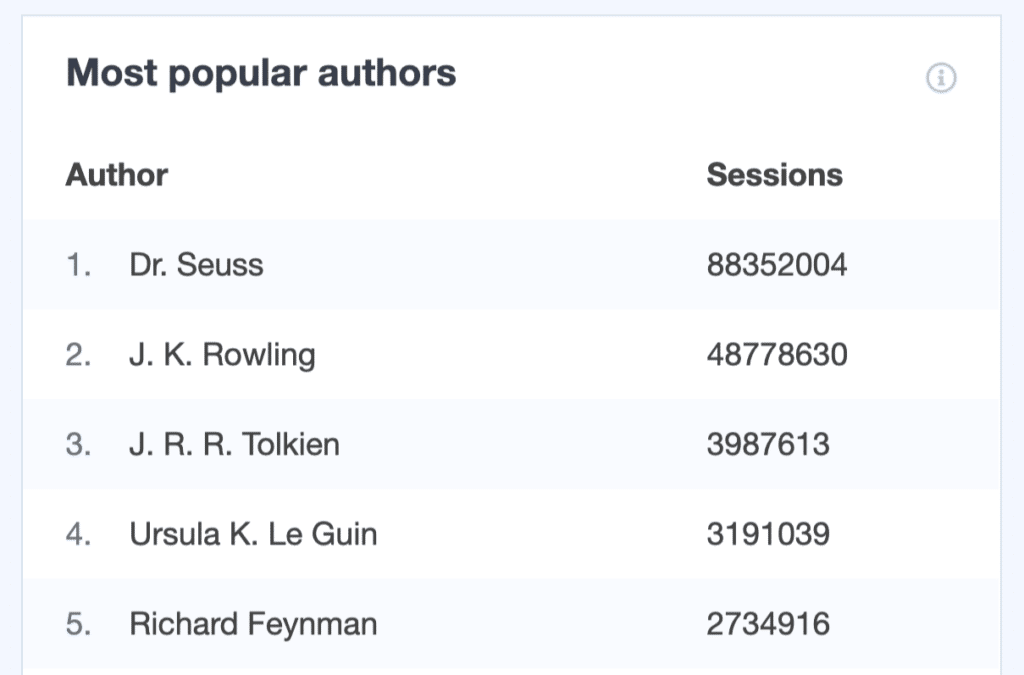
Using these metrics, you can get a clue as to what users find most interesting on your site. Then, you can analyze and plan informed business strategies.
If you want to learn more about this, you can check out our helpful guide on using custom dimensions.
7. Forms Report
Contact forms are the main points of user interaction on your site. By tracking forms, you can see how many site visitors view and submit your forms.
In order to track forms, you need to install the MonsterInsights Forms addon. It’s available only in the Pro version of the plugin.
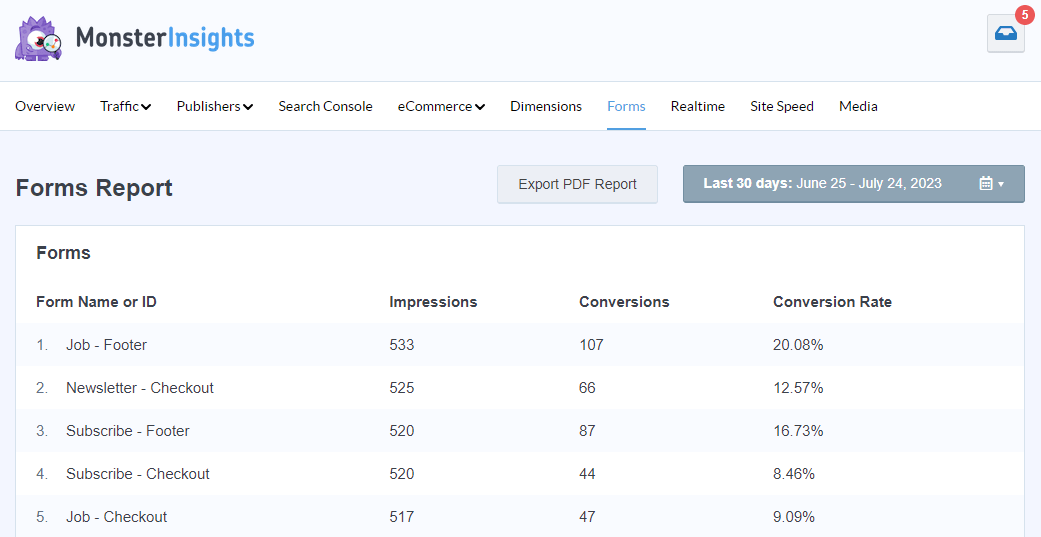
MonsterInsights supports all the major contact form plugins and provides you with a comprehensive report for your form conversions.
8. Media Report
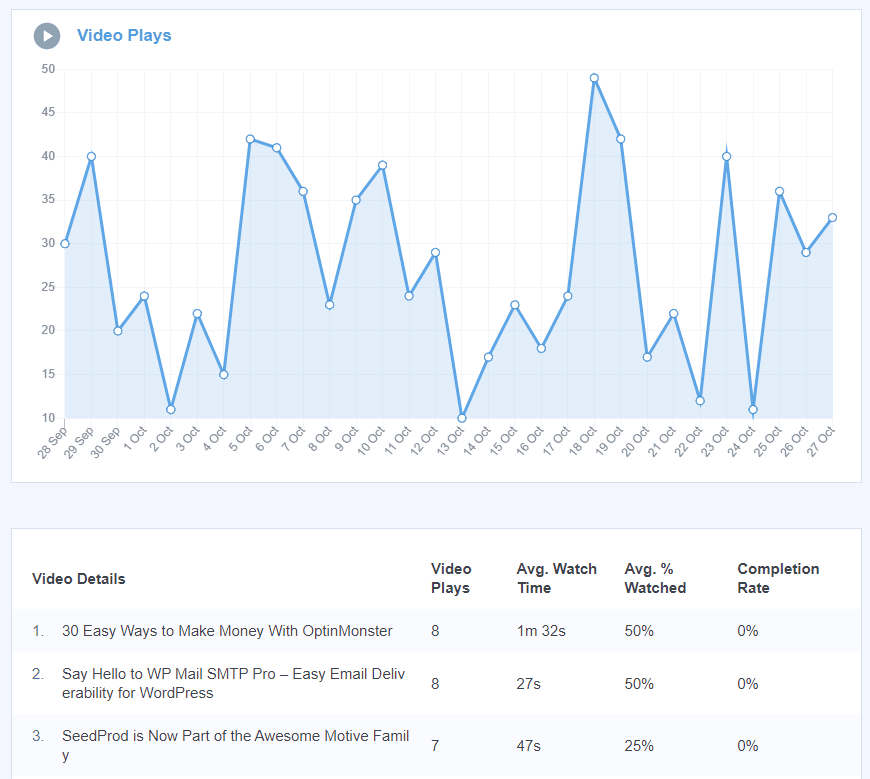
Last but not least, our Media tab shows you which videos on your site are being watched, along with how much of each video is getting watched. With these insights, you can improve your videos and drive more business.
For a full tour of the entire MonsterInsights reports dashboard, check out Your Ultimate Guide to MonsterInsights Dashboard Reports.
Set Up WordPress Visitor Tracking Today!
Frequently Asked Questions
Can you track visitors on WordPress?
Yes, you can track WordPress site visitors using a plugin or by installing a tracking code snippet. MonsterInsights is the best Google Analytics plugin for WordPress, but other options include WPCode, Jetpack, ExactMetrics, and Google Site Kit.
How do I see the visitor count on my WordPress website?
The best way to see your visitor count is with a Google Analytics plugin like MonsterInsights. If you want to display a visitor counter for everyone to see on your website, you can also use MonsterInsights or a simple plugin like Elfsight.
Does WordPress count me as a visitor?
Yes, you’ll be tracked as a visitor to your own website unless you use a tool or plugin like MonsterInsights that filters out your own visits.
How do I track where visitors on my site are coming from?
Tracking where visitors on your site are coming from is best done with Google Analytics. The places your visitors come from are called traffic sources.
How do I see my website traffic on WordPress?
If you want to see website traffic on WordPress, the easiest way is to install a Google Analytics plugin. I recommend MonsterInsights! You can use the Lite version for simple analytics or grab a license for more detailed stats.
I hope this guide helped you to learn how to set up WordPress visitor tracking.
If you liked this article, you might want to check out:
10 Best Ways to Measure SEO Performance in Google Analytics
MonsterInsights vs. Jetpack Stats: A Detailed Comparison
How to Do Keyword Research for SEO: Quick-Start Guide
10 WordPress SEO Optimization Tips to Grow Your Business
Finally, don’t forget to follow us on YouTube for more helpful Google Analytics tips and tutorials.
