
Are you looking to create a WordPress contact form? Whether you’re running a business site, a blog, or an online store, a well-designed contact form is essential for engaging with your visitors and customers.
Contact forms provide an easy way for your site visitors to reach out to you without exposing your email address to potential spammers. Plus, they can be customized to collect exactly the information you need. Don’t worry if you’re not tech-savvy – with the right tools, creating a contact form is simpler than you might think.
In this post, we’ll explore some cool uses for contact forms, recommend the best contact form plugin, and provide a step-by-step tutorial on how to create and customize your own contact form. Let’s dive in!
WordPress Contact Form Uses
Contact forms are incredibly versatile and can be used for much more than just making basic contact with your visitors. Here’s a breakdown of some popular and creative ways to use contact forms on your WordPress site:
- Basic Contact Form: The most common use is a simple contact form that allows visitors to send you messages directly from your website. This typically includes fields for name, email, subject, and message.
- Job Application Form: You can quickly streamline your hiring process by creating a custom job application form. The form should include fields for personal information, work experience, education, and file uploads for resumes and cover letters.
- Request a Quote Form: For service-based businesses, a Request a Quote form can help qualify leads and gather necessary information to provide accurate estimates.
- Feedback and Surveys: Collect valuable customer feedback or conduct surveys to gain insights into user preferences and experiences.
- Event Registration: Create forms for event sign-ups, including details like attendee information, meal preferences, and session choices.
- Support Ticket System: Set up a basic support ticket system using a contact form that allows users to select issue categories and provide necessary details.
- Newsletter Sign-up: A contact form can be as simple as just a name and email address for a newsletter signup form.
- Appointment Booking: Set up a form for clients to request appointments, including preferred dates, times, and services.
- Product Pre-orders: Use a contact form to gauge interest and collect pre-orders for upcoming product launches.
- Contest Entry: Run contests or giveaways using a customized entry form to collect participant information and responses.
With the awesome flexibility of WordPress contact forms, you can create customized forms for many different aspects of your business or website needs.
Now, let’s move on to our tutorial for how to create a WordPress contact form, embed it on your site, and track your form submissions.
How to Add a WordPress Contact Form
Adding a WordPress contact form is easy and requires no coding! Follow these steps, and your contact form will be ready in no time:
- Step1: Choose and install a contact form plugin like WPForms (you can start for free)
- Step 2: Create a contact form from scratch or with a template
- Step 3: Publish your form and add it to your page
Step 1: Choose the Best Contact Form Plugin
The first thing you’ll need to do is choose the best contact form plugin for your site.
With so many contact form plugin choices available, the process of finding the right one for your website can be an exhausting process.
We highly recommend WPForms. With its wide variety of features and addons and over 1,800 form templates to start with, it’s the best contact form plugin out there. It’s super easy to use but powerful enough to handle any complex forms you need.
If simple forms are all you need, you can use WPForms Lite for free. If you need a few more features, premium versions of WPForms start at only $49.50 per year.

Now that we’ve decided on WPForms, let’s go ahead and walk through how to install it on your site.
Step 2: Install WPForms on Your Site
For this tutorial, we’ll use WPForms Lite. If you need more features, though, head to wpforms.com/pricing to grab your license and get the WPForms Pro plugin version.
To start, open your WordPress dashboard and head to Plugins » Add New.
In the search field, type WPForms to find the plugin.
Once you find the right one, click the Install Now button.
After it’s installed, you’ll need to click Activate to complete the installation process.

That’s it! WPForms is installed and ready to go.
Step 3: Create a Contact Form in WordPress
Now that you’ve successfully installed WPForms, you’re ready to make a contact form in WordPress.
Go ahead and click on WPForms in your sidebar, then click on the Add New button:

It’ll open the form setup page. Enter your form name and select the Simple Contact Form.

This will open the WPForms drag-and-drop form builder, and there, you’ll see a ready-to-use simple contact form. It’s a pre-made form in WPForms.

The pre-made form has several basic fields included by default: Name, Email, and Message box. If this suits your needs, you can go ahead and click the Save button at the top.
Here, you can add additional fields to your contact form simply by dragging them from the left to the right.
If you’re using WPForms Lite, you can only access the standard fields on your form. If you want to use Fancy Fields and Payment Fields, for example, you’ll need to purchase WPForms Pro. It allows you to create advanced forms like order forms, donation forms, survey forms, and much more.
If you want to customize the form, you can simply drag the fields and reorder them. Also, you can customize the form fields by clicking the Field Options tab.

Once you’re done customizing, you can save it.
Step 4: Configure Form Notifications and Confirmations
Now that you’ve created your contact form, you’ll need to configure your form notifications and confirmations properly.
A form notification is an email you’ll get after a user submits a message via the contact form on your site.
To configure your form notifications, go to Settings » Notifications in your form creation area.

You’ll see default settings already there which you can simply leave untouched if you want the administrator email to receive the messages. This feature makes it easy for beginners.
Also of interest: a form confirmation is what your website visitor sees after submitting a message via the form on your site. It can be a thank you email, display a page, or redirect them to a specific URL.
To configure your form confirmation, go to Settings » Confirmation in your form creation area.

You can see the form confirmation type Message by default which you can leave as is or change it to Show page or Go to URL.
If you made any changes, make sure to click the Save button.
Step 5: Add Your WordPress Contact Form on a Page
Now that you’ve created and configured your contact form settings, let’s look at
how to add a form to a page in WordPress.
Go ahead and create a new page or open to edit an existing page where you want to add the contact form. Go ahead and add a new block and search for the WPForms block:

Then, choose the form you want to insert on the page:

That’s it! After you update the page, your new form will be live on your site.
There, that’s how to add a contact form to a WordPress page or post quickly and easily with WPForms.
Step 6: Add Your Contact Form in Sidebars
Now, if you want to add your contact form in the sidebars or other widget-ready areas, like your site’s footer, you can use the WPForms widget.
Go to Appearance » Widgets in your WordPress dashboard and navigate to the WPForms widget. Then, choose the form you want from the dropdown.

That’s it! Once you save your widgets, the form will be live on your site in the widget area:

Track Your WordPress Contact Form Conversions
Now that you’ve added a contact form to your site, it’s important to know how your forms are doing.
By tracking your WordPress contact forms, you can see the total number of views and conversions your forms are triggering and the conversion rate for your forms.
If you’d like to get started with forms tracking, the best way is to use the MonsterInsights Google Analytics plugin.

It has a powerful forms tracking addon that automatically tracks your form conversions.
It’s a user-friendly tool that you can configure in just a few clicks without having to touch any code. Just install and activate MonsterInsights Forms, and the plugin will start tracking your forms automatically.
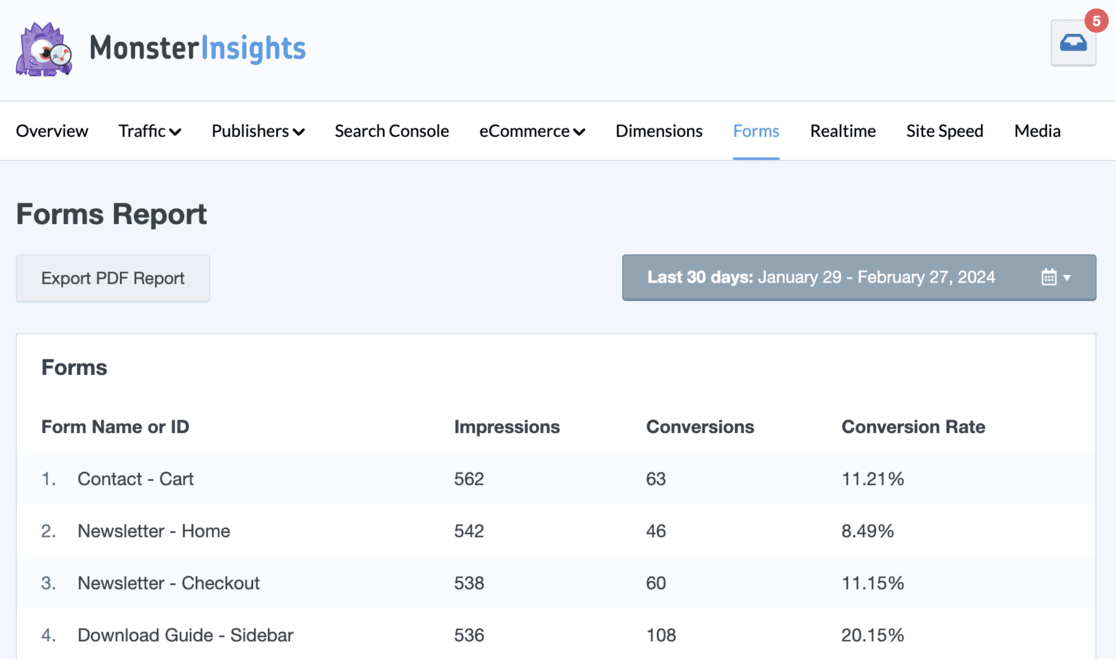

Not to mention, it integrates with WPForms as well as all the other popular WordPress form plugins.
Read our complete guide on how to track WordPress form conversions for beginners.
And that’s it!
I hope this article helped you learn how to create a WordPress contact form. If you liked this article, you might want to check out:
- 10 Best WordPress Contact Form Plugins Compared
- A Complete Guide to GA4 Conversion Tracking for WordPress
- How to Set up Google Analytics Social Media Tracking
And don’t forget to follow us on YouTube for more helpful WordPress and Google Analytics tips.
Frequently Asked Questions
How do I add a contact form to WordPress?
Add a contact form to WordPress by installing a plugin like WPForms. Once installed, create a new form using the plugin’s drag-and-drop builder. Customize fields and settings, then embed the form on the page where you want it to appear.
Does WordPress have a built-in contact form?
WordPress does not include built-in contact form capabilities. However, adding one is straightforward using plugins.
Is there a free contact form for WordPress?
Yes, there is a free contact form for WordPress. WPForms offers a lite version that’s available for free. It’s easy to use and lets you create basic contact forms quickly.
What is the best contact form plugin for WordPress?
The best contact form plugin for WordPress is WPForms. It’s user-friendly, powerful, and offers a wide range of features in its free and premium versions, making it a great choice for any WordPress site.