


You add a call-to-action button, an affiliate link, or a “download the guide” link to a page. A week later, you check Google Analytics and see the pageviews — but nothing tells you if anyone actually clicked.
That’s the gap GA4 leaves open by default. It counts the visit, but it doesn’t automatically tell you whether the button, link, or download on that page actually got used.
Link and button click tracking closes that gap. Once it’s set up, you’ll know exactly which buttons, downloads, and affiliate links are earning clicks — and which ones visitors are scrolling right past.
This guide covers the WordPress setup first, then the Google Tag Manager version for everyone else.
In This Article:
Why Track Link and Button Clicks in Google Analytics 4?
Tracking clicks in GA4 matters because that data shows you what’s actually working on your site. Without it, you’re guessing at which buttons, links, and downloads are pulling their weight.
Link click tracking adds a whole new layer of report data you can use to grow traffic, leads, or revenue. Here are a few examples:
- Affiliate link clicks will lead your users to buy your referral products and let you earn some referral income.
- Add to Cart clicks will lead customers to buy a product from your store.
- Form Submit clicks will let your users send a message using your online contact form.
- File download links will let users download files from your site.
- Outbound links will redirect your readers to other websites (resources) you suggest they visit.
- Call-to-action clicks will take your users to your product landing pages, donate pages, or another critical conversion page.
- Click-to-call links are great for generating calls from users on mobile devices.
- Video play clicks are fantastic to track, so you know if your visitors are watching your videos.
Tracking these clicks helps you understand how people actually navigate and interact with your site.
For instance, click tracking can tell you which outbound or affiliate links are getting clicked, which forms are getting submitted the most often, and how many visitors are clicking to call you. Then you can analyze the reports and make improvements.
Once you’ve optimized your links and buttons based on that data, they tend to get more engagement and stronger SEO signals. More engagement on a page usually means more conversions, too.
In short, click tracking shows you precisely how visitors interact with your site — so you can make informed decisions instead of guesses.
How to Track Link Clicks with MonsterInsights
Google Analytics 4 tracks some of this on its own through enhanced measurement, but it doesn’t cover every click type, and building the event reports yourself gets technical fast.
That’s why I recommend a dedicated tool to handle it for you — either Google Tag Manager (GTM) or MonsterInsights. GTM does the job, but it has a real learning curve: you’ll need to build your own triggers and tags for every click type you want to track.
If your site runs on WordPress, MonsterInsights, the WordPress analytics plugin, is the faster route. It connects WordPress to GA4 and turns on most of the click tracking below automatically, no GTM triggers required.
To get started, install MonsterInsights and run through its setup wizard, which walks you through authorizing your Google account and connecting your GA4 property — no code required.

Our guide on properly setting up Google Analytics in WordPress covers the full walkthrough. Or, jump down to the Google Tag Manager instructions if you’re not on WordPress.
Once you’re connected, MonsterInsights starts tracking outbound link clicks and file downloads right away — nothing to configure. A few click types need one more step first: activating the addon that powers them. Here’s what’s tracked automatically, what needs an addon, and which plan each one requires.
Worth Knowing
Not every click type needs the same setup. Outbound links and file downloads track automatically once you’re connected. Forms, eCommerce, and media clicks need one extra addon step — and different plan minimums.
Affiliate Link Click Tracking
MonsterInsights makes affiliate link tracking easy in WordPress. Use a plugin like Pretty Links to make your links look nice, give them all a trackable prefix (word in the URL), tell MonsterInsights what prefix you’re using, and watch that data come into your reports.

Or, if you’re using ThirstyAffiliates to manage your affiliate links, you don’t need to configure anything to track your affiliate links in MonsterInsights. We integrate right into that plugin to automatically track your affiliate links.
You can view your affiliate link tracking reports by going to Insights » Reports » Publishers from your WordPress dashboard. Affiliate tracking is available on the Plus plan and above.

You can always click the View All Affiliate Links Report button at the bottom of the MonsterInsights report to see more detail in Google Analytics.
For a full walkthrough, see our guide on setting up affiliate link tracking.
eCommerce Click Tracking (Pro+)
MonsterInsights eCommerce tracking covers WooCommerce, Easy Digital Downloads, GiveWP, LifterLMS, MemberPress, MemberMouse, or Restrict Content Pro. The eCommerce report shows total Add to Cart clicks, total Remove from Cart clicks, and total purchase-complete clicks for your store.
This report requires the Pro plan or higher. Once you’re on Pro, head to Insights » Addons and enable the toggle on the eCommerce addon — that’s the whole setup.

Now you can view your eCommerce reports by going to Insights » Reports » eCommerce.

Scroll down on that same report and you’ll see the click totals themselves.

Want a funnel view of your checkout process instead? Head to the MonsterInsights Funnel report — no building required.

Either report makes it easy to spot exactly where shoppers are dropping off before they complete a purchase.
Form Submit Button Click Tracking (Pro+)
MonsterInsights comes with a Forms addon that automates form conversion tracking. Once it’s active, you can see which forms get the most views and submissions — a submission counts each time a visitor clicks the Submit or Send button on a form.
Form tracking requires the Pro plan or higher. To turn it on, go to Insights » Addons and enable the toggle on the Forms addon.
That’s it — setup’s done. Now you can view your form conversion reports by going to Insights » Reports » Forms.
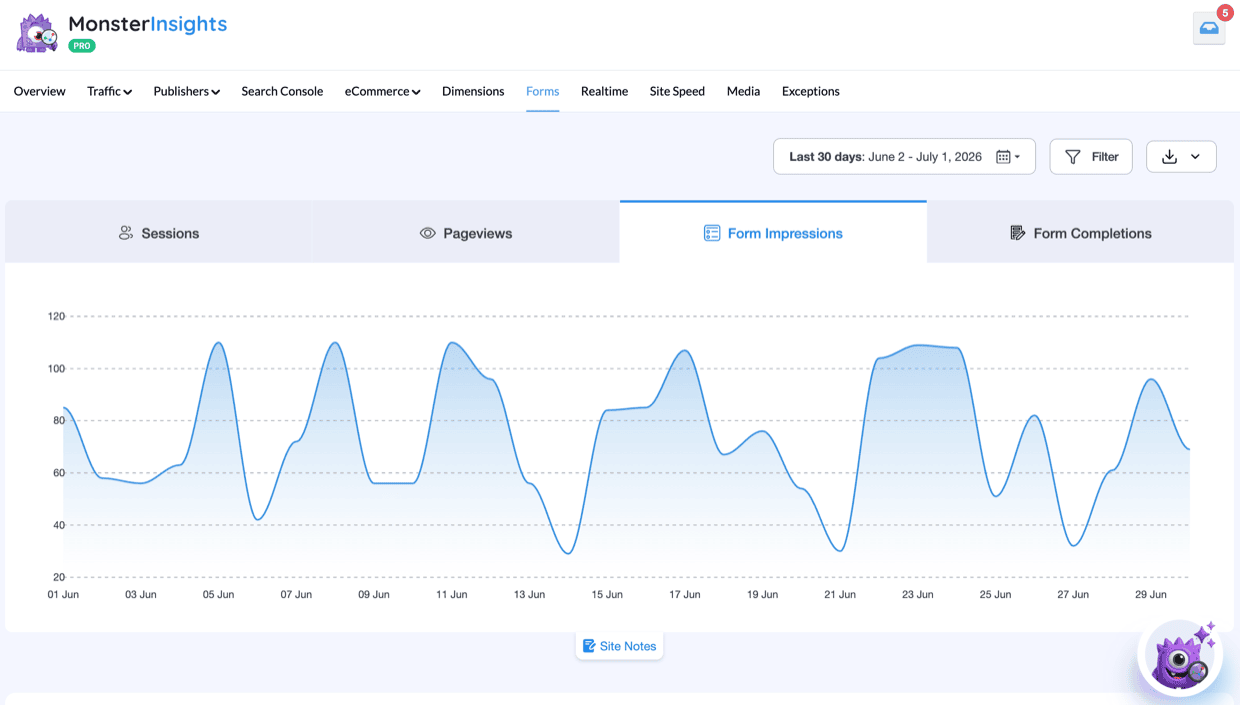
The report shows impressions alongside conversions for each form — conversions being the total clicks on that form’s Submit or Send button.
Our guide to tracking form submissions in Google Analytics covers this in more detail.
File Download Button Click Tracking (Plus+)
If you’ve added downloadable resources to your site, tracking those downloads shows you which resources people actually want — useful for deciding what to create next.
File download tracking is included on the Plus plan and above, and it’s automatic once you’re connected — there’s no toggle to flip. MonsterInsights tracks clicks on the most common file types (like PDFs and ZIPs) by default.
Want to track additional file types? Head to Insights » Settings and scroll to the Engagement section, then add the extra file extensions to the File Downloads field, separated by commas.

You can see your download reports by going to Insights » Reports » Publishers.

Once you know which files people actually download, you’ll have a much better sense of what to create more of.
Outbound Link Click Tracking (Plus+)
MonsterInsights automatically tracks your outbound link clicks and shows the reports in the Publishers report tab. You’ll need at least the Plus plan to view the Publishers report.
Once you’re set up, go to Insights » Reports » Publishers from your WordPress dashboard to view your outbound link reports.

If one particular link is pulling in most of the clicks, that’s worth featuring more prominently elsewhere on your site.
Media/Video Click Tracking (Plus+)
Want to know how many people click play on the videos embedded on your site, and whether they watch to the end? The MonsterInsights Media addon covers that.
Media tracking requires the Plus plan or higher. Go to Insights » Addons and enable the toggle on the Media addon.

Toggle tracking on for whichever video types you have embedded, and MonsterInsights will start sending that data to your reports.

Our guide on tracking video plays in Google Analytics walks through the full setup.
Custom Link Click Tracking
Beyond the automated options above, MonsterInsights also lets you track custom links, like a specific call-to-action button, using Custom Link Attribution.
This works by adding data attributes directly to the link’s HTML — there’s no settings page involved. Add an Event category, Event action, and Event label to the link’s markup, like this:
<a href="https://www.monsterinsights.com" data-vars-ga-category="Custom Category" data-vars-ga-action="Custom Action" data-vars-ga-label="Custom Label">Example</a>
Once those attributes are in place, MonsterInsights sends that click data to GA4 automatically.
Our guide to Google Analytics custom event tracking in WordPress covers the full tutorial.
Link Click Tracking with Google Tag Manager
If you’re not using WordPress, you’ll need Google Tag Manager to track your link clicks. Let’s look at the general steps you’ll follow any time you set up tracking in GTM.
For this tutorial, I’ll assume you have a Google Tag Manager account and have installed the GTM code on your website.
Each link tracking setup is slightly different, but we’ll walk through the general tracking steps together.
Step 1: Create a Link Click Trigger
First, you want Google Tag Manager to start “listening” for clicks on your site. To do that, set up a new trigger.
To start, click on Triggers:

Then, click the New button:

Next, give your trigger a name like “all link clicks” and click in the box to edit it:

Now, click Just links:

Finally, leave everything as it is and click Save:

I’ll update this trigger later with a specific click, but for now, I want it to track all clicks for testing purposes.
Step 2: Enable Click Variables
Now that you’ve turned on click tracking, you need to tell Google Tag Manager which clicks to track. GTM comes with several built-in variables you just have to enable to use.
To enable those variables, head to Variables and click Configure:
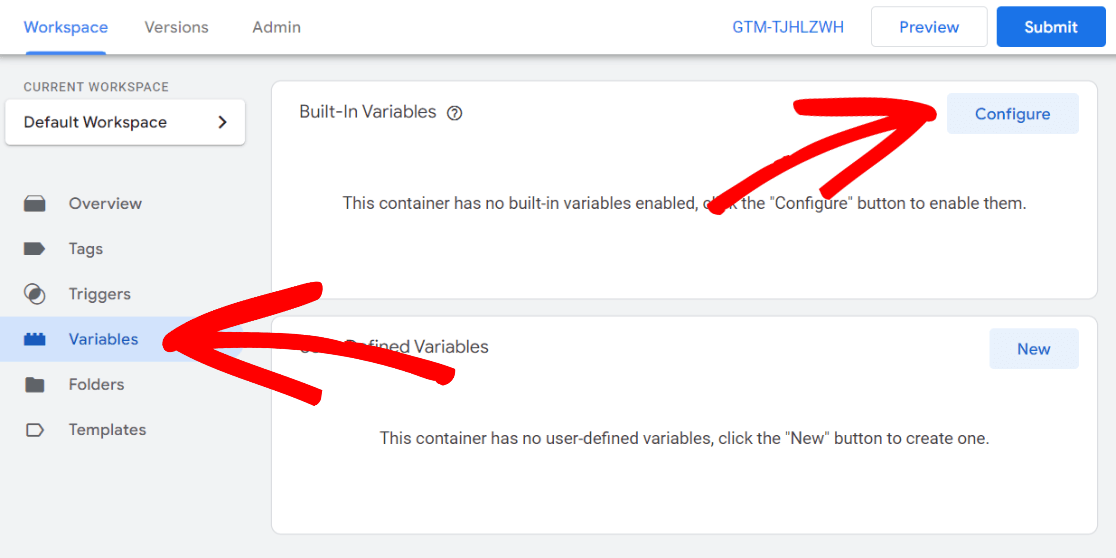
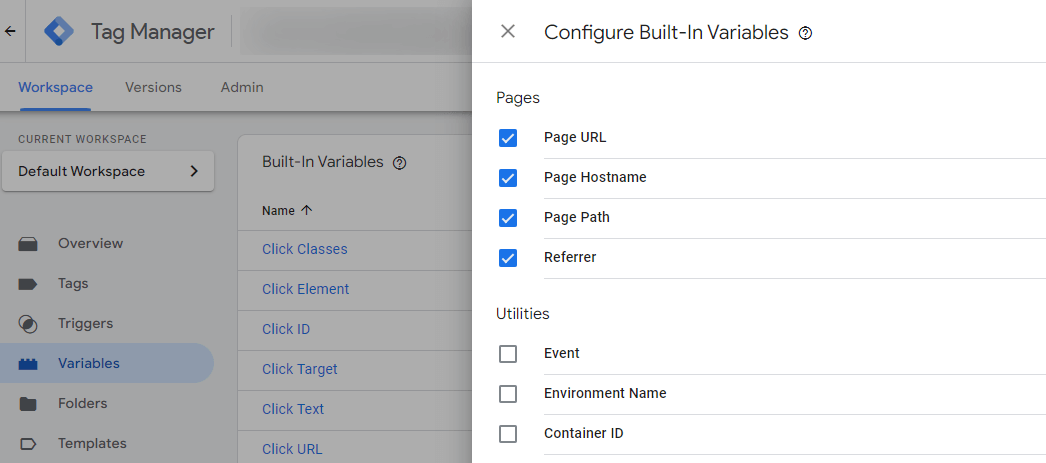
Now, check the ones you’d like to use from the list.
Don’t know which ones you’ll need? The items under Pages and Clicks are the most common. If you plan to set up form submission tracking, check all of the Forms ones. Want to track video clicks or scroll tracking? Enable the Video and Scrolling options.
There’s no harm in enabling some that you won’t use.
Step 3: Use Preview Mode to Find a Click
Now it’s time to set up tracking for the specific link or type of link you want to track. Head back to your Google Tag Manager home and click the Preview button:
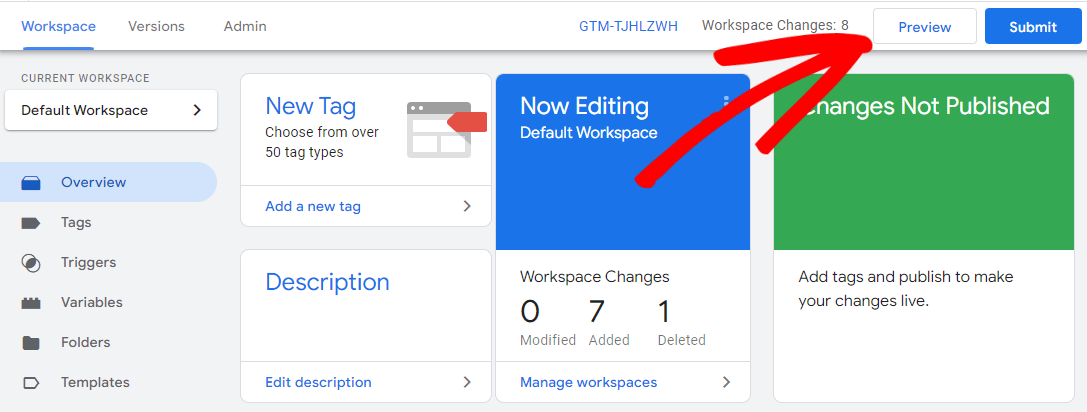
A new window will open to connect to your site. Keep both your Google Tag Manager and website preview windows open.
Now, let’s say you want to track outbound clicks on your Instagram icon, to see how many visitors click over to follow you.
In your website preview window, I’ll click the Instagram icon.
Back in your Google Tag Manager window, you’ll see an event pop up in your sidebar called Link Click, because the All Link Clicks trigger you set up before is watching for all link clicks. Click on Link Click, then toggle to the Variables tab.
You’ll find the information you need to create your tracking tag here. We’ve found that the click text for that icon is “INSTAGRAM,” and the click URL is the Instagram profile. I can use these to create my tracking tag.
Other variables worth a closer look for additional click tracking are Click classes and Click ID.

Step 4: Update Your Event Trigger
Now that you know what variables fire when you click the Instagram icon, go back and update the trigger you made so it’s tracking Instagram icon clicks specifically.
Navigate back to the Triggers tab and click on the All Clicks trigger you created in step 1:

Then, click anywhere in the Trigger Configuration box to edit it:
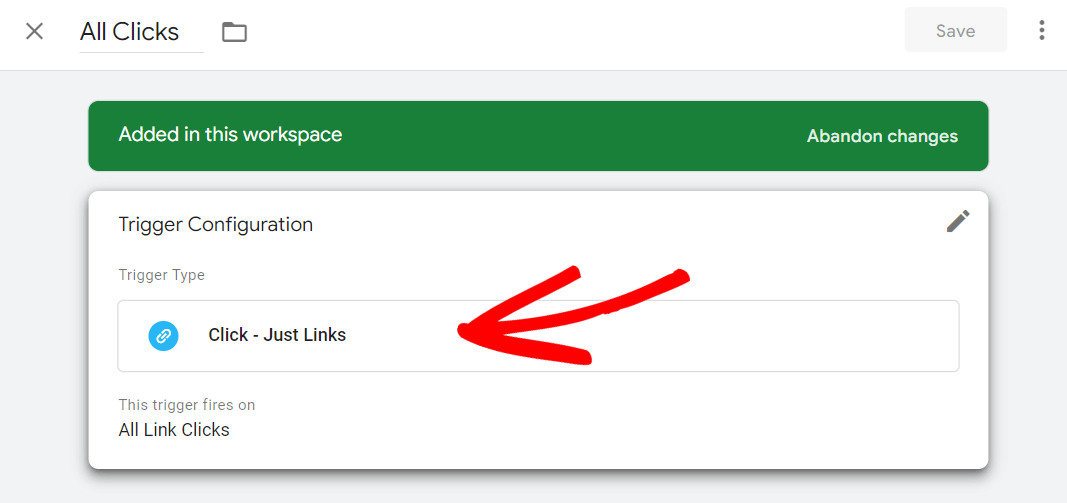
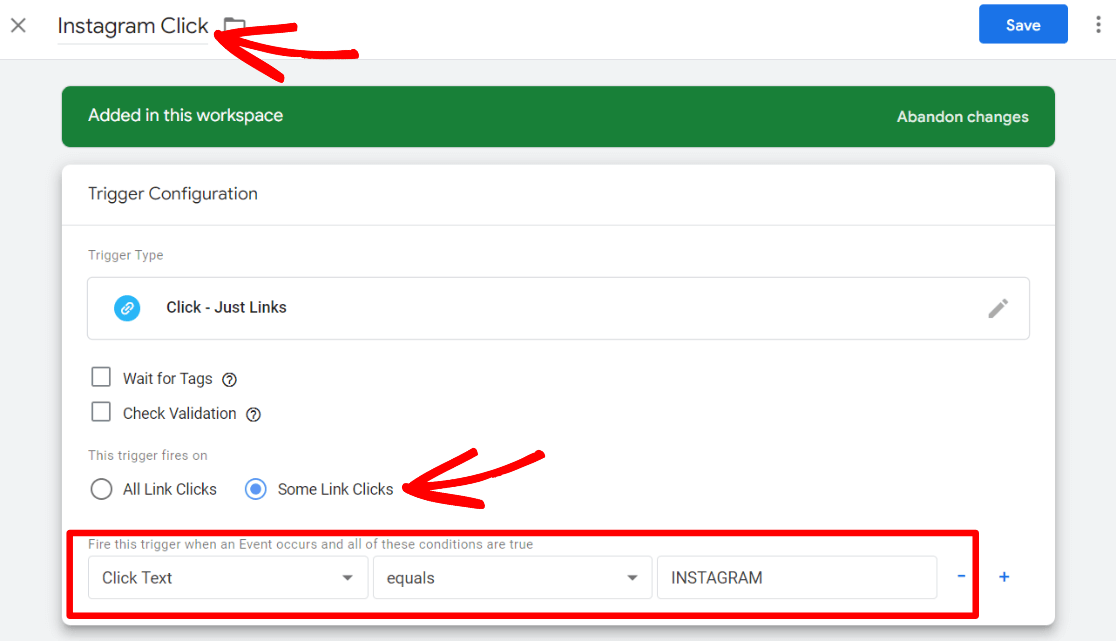
Leave the trigger type as just links, since the Instagram icon has a Click URL (link). But since it should fire only on the Instagram click, choose Some Link Clicks.
Remember, the click text on the icon is “INSTAGRAM.” Use that to set the condition to Click text equals INSTAGRAM, and rename the trigger to Instagram Click. Click the blue Save button when you’re done:
Step 5: Create a Tag
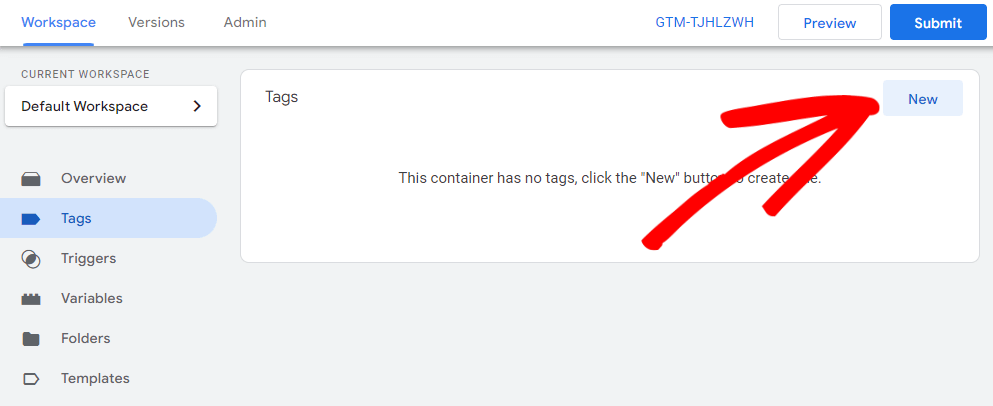
Now that you know what you’re tracking and your trigger is ready, create your new tag. Head to Tags » New:
I’ll call my tag Instagram Click, then click into the Tag Configuration:

Then choose the Google Analytics tag type, then Google Analytics: GA4 Event.
The Tag Configuration screen opens. Enter your Measurement ID, then create an Event Name — anything you’d like, as long as it doesn’t match an event GA4 already uses. Remember it, since you’ll need it later.
In my example, I’ll use insta_click.
(Make sure you already have Google Analytics set up as a tag and tracking page views — for instructions, see our guide on adding GA4 to Google Tag Manager.)

Next, scroll down to the Triggering section:
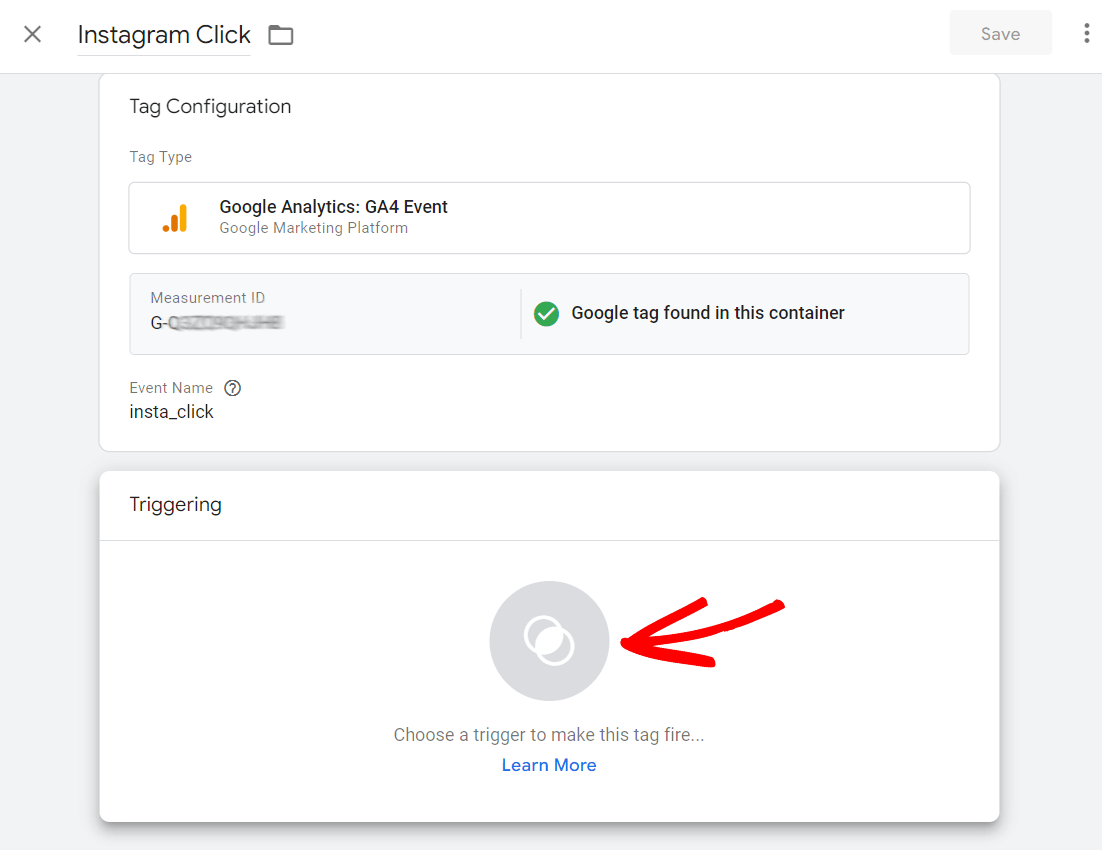
Choose the Instagram click trigger you created:

Finally, click the blue Save button.
Your click tracking tag is ready! Don’t forget to go back and click the Submit button in your Google Tag Manager workspace to push your changes live:

Step 6: Create a Custom Dimension in GA4
You’re almost there! The final step is creating your new custom dimension in Google Analytics 4, so the insta_click event shows up in your reports.
To do that, open GA4, click the Admin cog, then find Custom definitions in the Data display box:

Next, click Create custom dimension. In the box that opens, use whatever name you’d like for your dimension, leave the Scope as Event, and type in the Event name you chose in step 5 (insta_click):
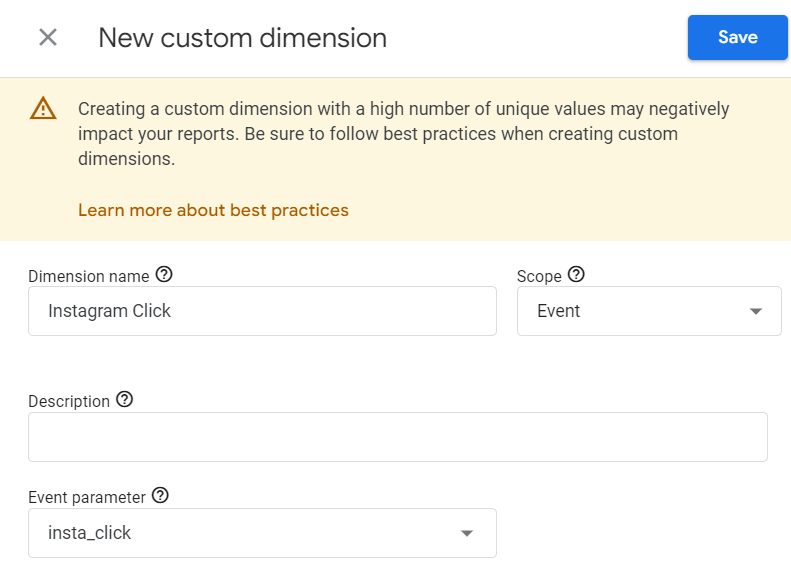
Click the Save button.
With that, you’ve successfully set up link click tracking in Google Tag Manager! You’ll repeat this process for any other click you want to track.
Remember, MonsterInsights tracks outbound link clicks out of the box, so on a WordPress site, you’d see those Instagram profile clicks in Analytics without any GTM setup at all.
Skip the Tag Manager Learning Curve
If building GTM triggers for every button and link sounds like more work than you want, MonsterInsights tracks outbound links, downloads, and more automatically on a WordPress site — no triggers required.
See MonsterInsights PlansFAQs About Tracking Link and Button Clicks in Google Analytics
How do I track clicks in Google Analytics?
If you’re using WordPress, you can use a plugin like MonsterInsights to automatically track clicks in Google Analytics. If you’re not using WordPress, you’ll need to use Google Tag Manager.
Can Google Analytics track how often a link is clicked?
Yes, but only if link click tracking is set up! You need to tell Google Analytics which links to track before it’ll tell you how often they’re clicked.
What is click tracking in SEO?
Click tracking in SEO means tracking clicks on certain links or elements on your site, and then using that data to improve your website and overall SEO.
Does GA4 track clicks automatically?
GA4 tracks some basic clicks through enhanced measurement, but not all click types. For comprehensive click tracking, you’ll need to set up custom events using MonsterInsights or Google Tag Manager.
How do I see which buttons are clicked most on my website?
To see which buttons get clicked most, you need to set up button click tracking in Google Analytics. The easiest way is to use MonsterInsights for WordPress sites or create button click triggers in Google Tag Manager.
Which MonsterInsights plan do I need to track link and button clicks?
It depends on the click type. Outbound links, file downloads, and affiliate links track automatically on the Plus plan and above. Form submissions and eCommerce clicks (Add to Cart, checkout) require the Pro plan and above, since those run through separate addons.
Can I track clicks on my competitor’s websites?
No, you can only track clicks on websites where you have implemented the Google Analytics tracking code. It’s not possible (or ethical) to track user behavior on websites you don’t own.
I hope this article helped you learn how to track link and button clicks in Google Analytics on your WordPress site. If you liked this article, check out the following beginner-friendly guides:
- 45+ Best WordPress Plugins (Many FREE)
- How to Set Up GA4 Scroll Depth Tracking (GA4 + WordPress)
- MonsterInsights vs Google Tag Manager – What’s the Difference?
- How to Track Phone Calls in Google Analytics: Complete Guide
- Google Analytics eCommerce + Revenue Tracking Tutorial [WordPress]
Follow us on Twitter, Facebook, and YouTube for more Google Analytics tips.