Google Search Console is a powerful tool that every website owner needs to use to improve their search presence. This essential platform provides critical insights into how your site performs in Google search results, helping you identify optimization opportunities and resolve issues that might be holding your rankings back.
I’ll walk you through exactly how to connect Google Search Console to both your Google Analytics account and WordPress website. Plus, I’ll explain why connecting these three platforms is essential and introduce you to some helpful WordPress plugins for Search Console integration.
Let’s get started!
Table of Contents
- Search Console + Google Analytics + WordPress: Video Tutorial
- What is Google Search Console?
- Why Connect Search Console, WordPress & Analytics?
- Tutorials:
- More Google Search Console WordPress Plugins
Search Console + Analytics + WordPress: Video Tutorial
What is Google Search Console?
Google Search Console (formerly known as “Google Webmaster Tools”) is a free dashboard of tools and reports available to every website owner.
This powerful platform helps you analyze and manage your site’s appearance in Google’s search results, empowering you to make informed decisions that improve your search ranking positions and enhance how your site appears on search results pages.
With Search Console, you can also:
- Submit new content for search engine indexing
- Add a sitemap
- Find and fix common malware and spam issues
- See which search queries (keywords) caused your site to appear in search results
- Find out which queries drive the most traffic to your site
- See what other sites are linking to your site
- See if your website passes Core Web Vitals (site speed) tests
- Check to make sure your structured data (breadcrumbs, reviews, recipes, or other schema) is configured correctly
In other words, Google Search Console is an incredibly helpful tool that gives you a ton of information about your website and how your visitors are finding it in Google search.
Why Connect Search Console, WordPress & Analytics?
There are big benefits to connecting these three platforms. When Search Console and Google Analytics are linked, you gain access to valuable data inside Google Analytics about the keywords your site ranks for, the traffic those keywords generate, and which landing pages receive that organic traffic.
Without this connection, you’d only be able to view this crucial data in Google Search Console itself.
Then, by using a plugin to connect Search Console to WordPress, all this valuable data appears directly in your WordPress dashboard, where you likely spend most of your time managing your site.
Search Console Setup + Connection Tutorials
Set Up & Verify Your Website with Search Console
Before you can see your site’s Search Console data, you need to prove to Google that you’re the owner of your website.
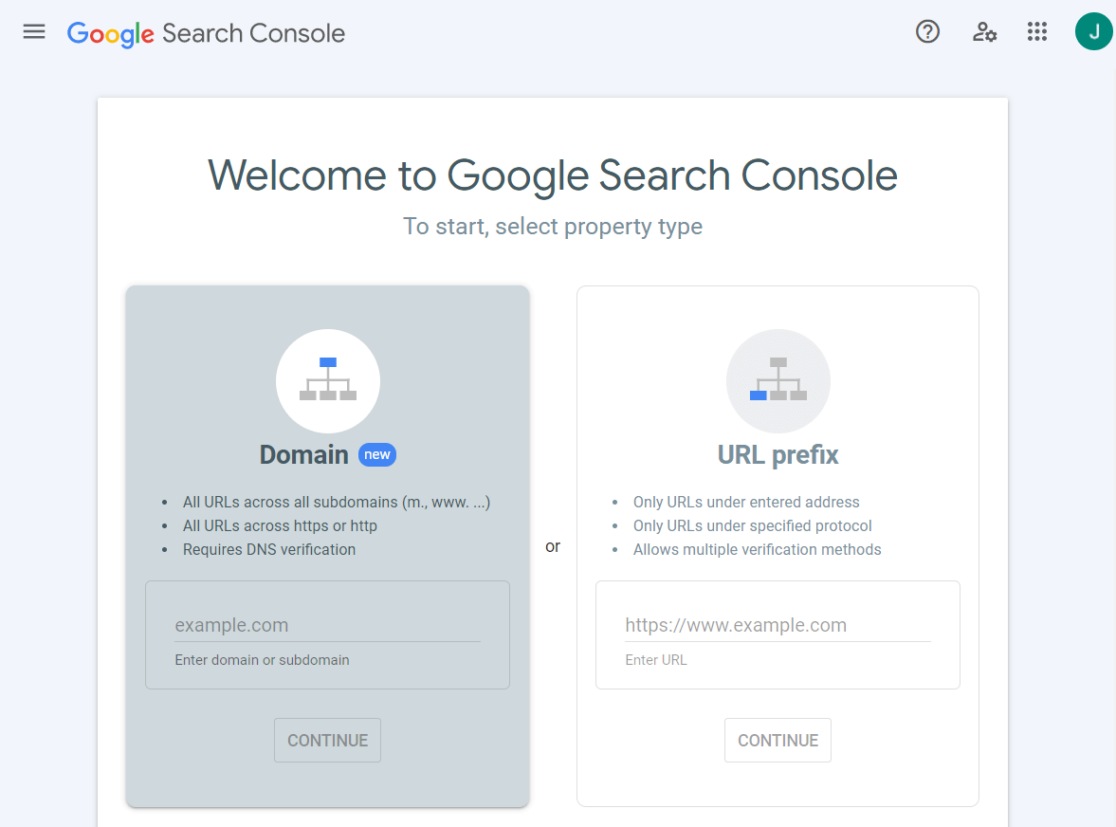
To start, go to Google Search Console and sign into your Google Analytics account. If you haven’t created a property yet, you’ll go straight to the Welcome screen:
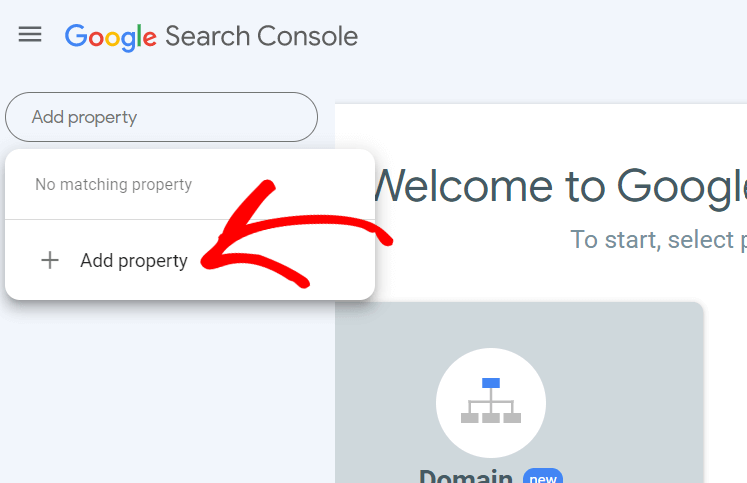
If you have another property set up already and you need to add a new one, choose the dropdown at the top of the left-hand navigation and click Add a Property.
To verify your site, we highly recommend the Domain method. For this tutorial, we’ll use the Domain property verification.
Why the domain method? It covers all possible configurations of your domain, including:
- https://www.yourdomainhere.com
- http://yourdomainhere.com
- www.yourdomainhere.com
- yourdomainhere.com
Verifying with the URL prefix method might seem easier now, but it’ll only cover one of those configurations we listed above. That can cause headaches down the road.
(If you do have to use the URL Prefix method, jump to our URL Prefix note.)
To verify a Domain property in Google Search Console, you have to verify that you are, in fact, the owner of the domain and not just the URL.
That means you need to verify it with your DNS (Domain Name Service) provider. That would be whomever you bought your domain name and/or hosting services from, such as GoDaddy, Siteground, or Bluehost.
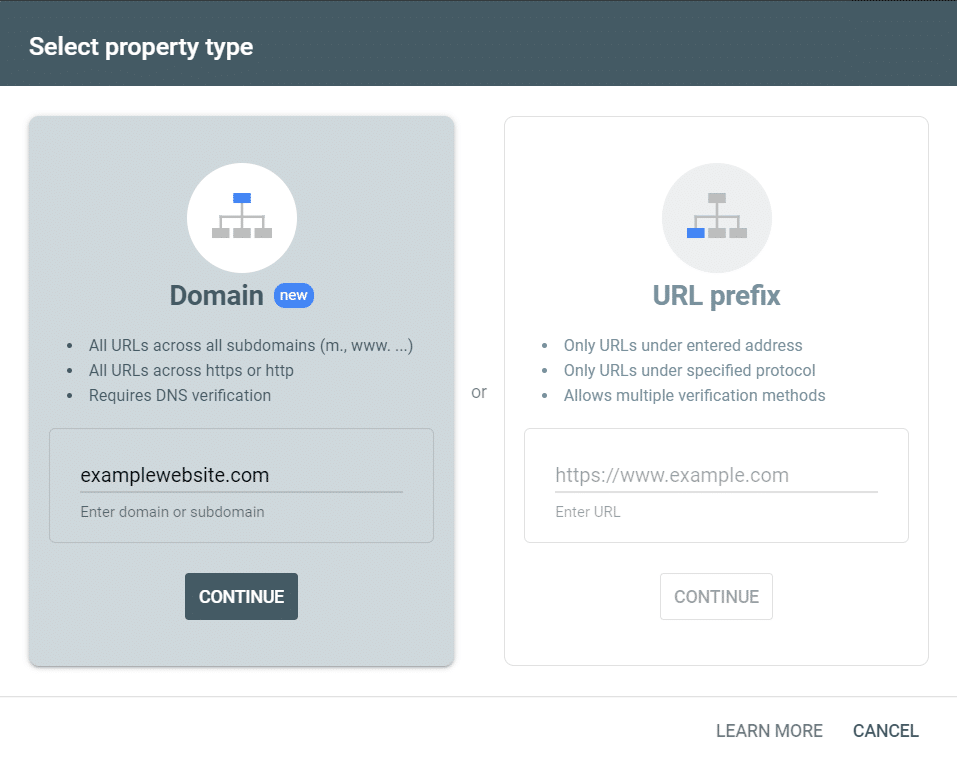
To do that, input your domain name and click Continue:
Then, Google will try to give you specific directions if you have one of the hosts in their dropdown. Or, you can just pick Any DNS provider for the universal instructions:
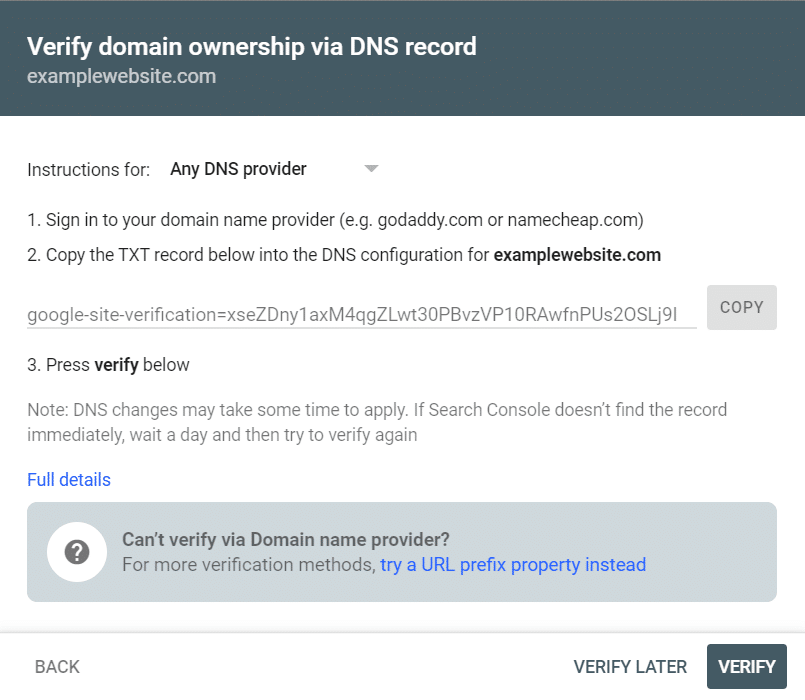
Now, you just need to copy the TXT record (that string of code) and paste it into your DNS. The location of where you can add a TXT record differs between different DNS providers but will generally look like this example in Siteground:
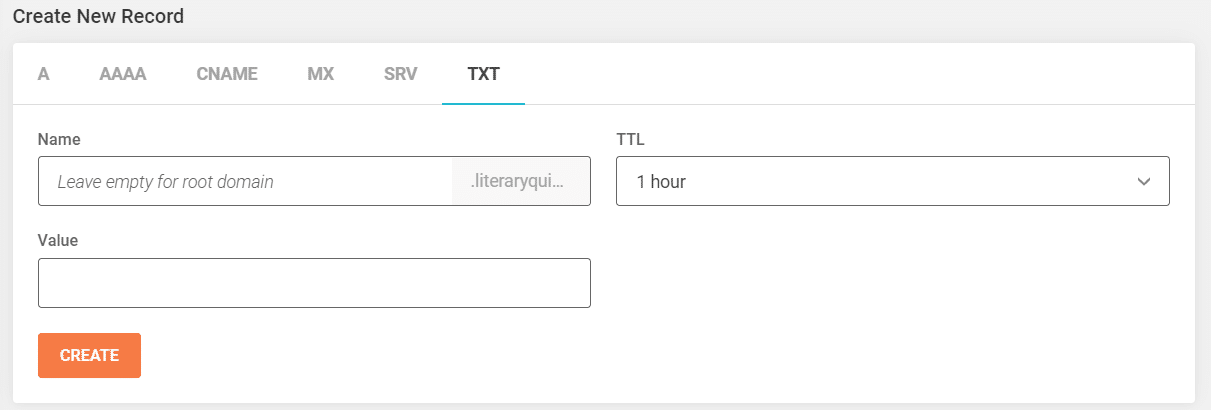
All you would do here is paste the code from Search Console into the Value field and click Create.
When you go back to Search Console and click Verify, you should get a success message.
For more help with these steps, visit Search Console Help.
And that’s it! Your website is connected to Google Search Console. You can now begin viewing Search Console data.
Have to verify using the URL prefix method? We recommend using the free WPCode WordPress plugin to add the HTML tag to your <head> section.
Connect Google Search Console and Google Analytics
Click the Admin cog on the bottom left.
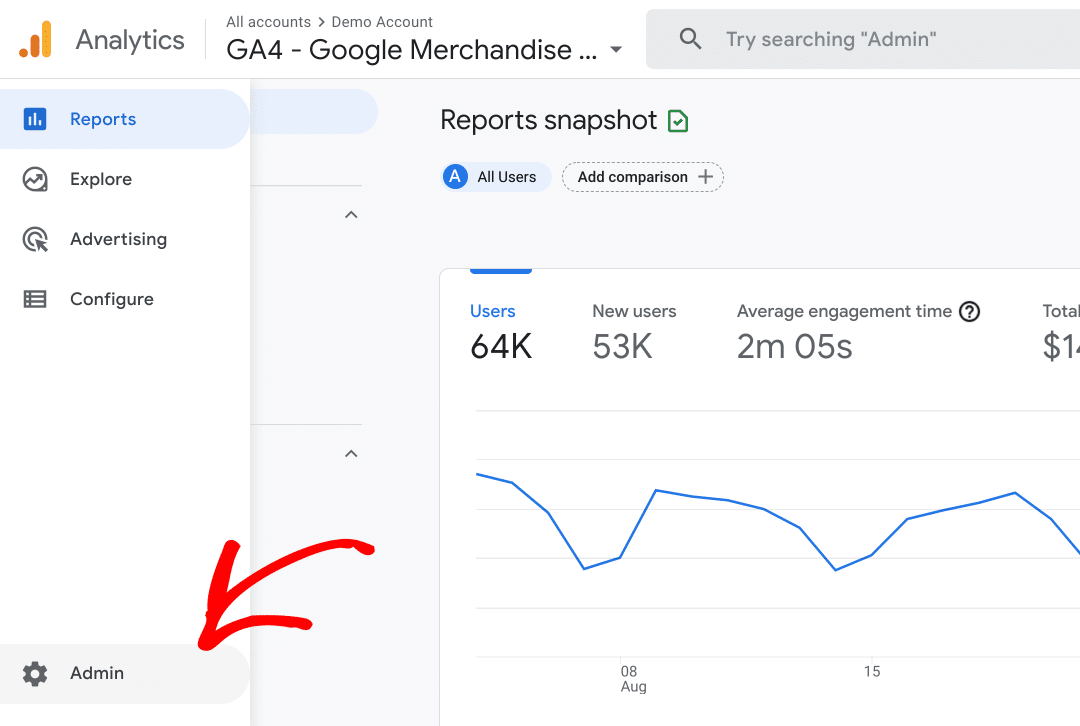
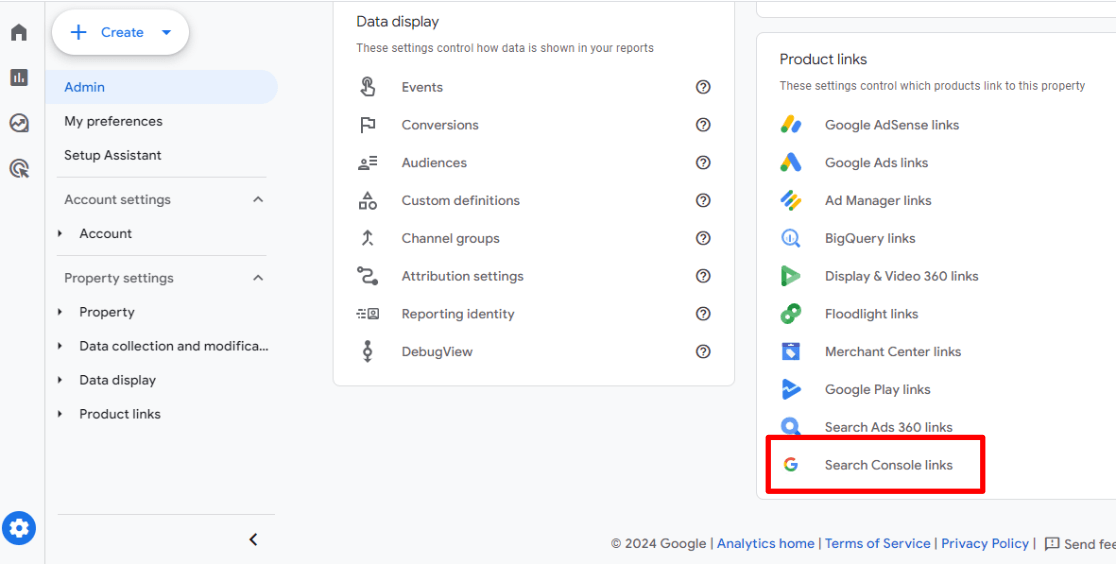
Now, you’ll find the Search Console Linking button at the bottom of the Property column:
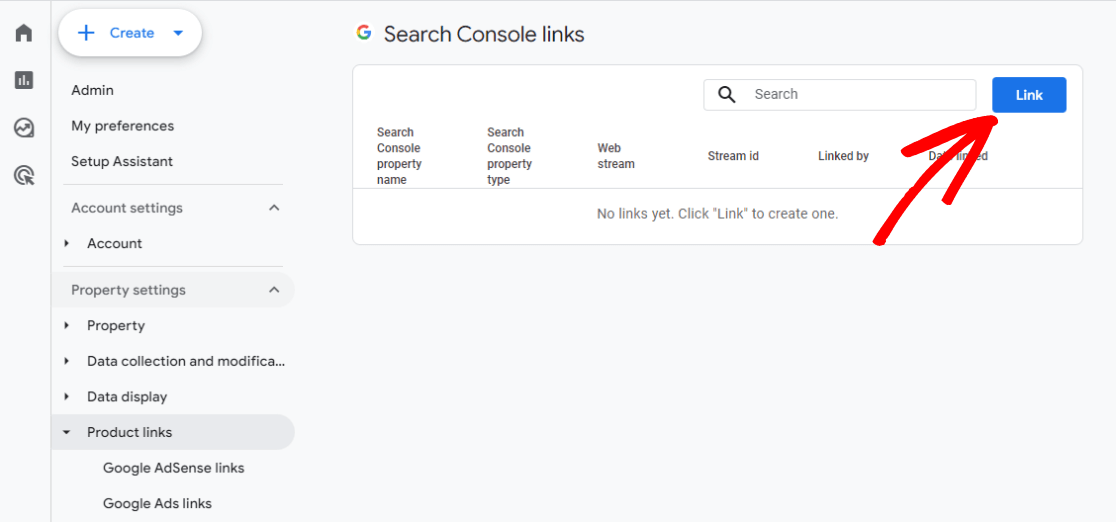
Now, click the blue Link button:
Now, click the blue Choose accounts link.
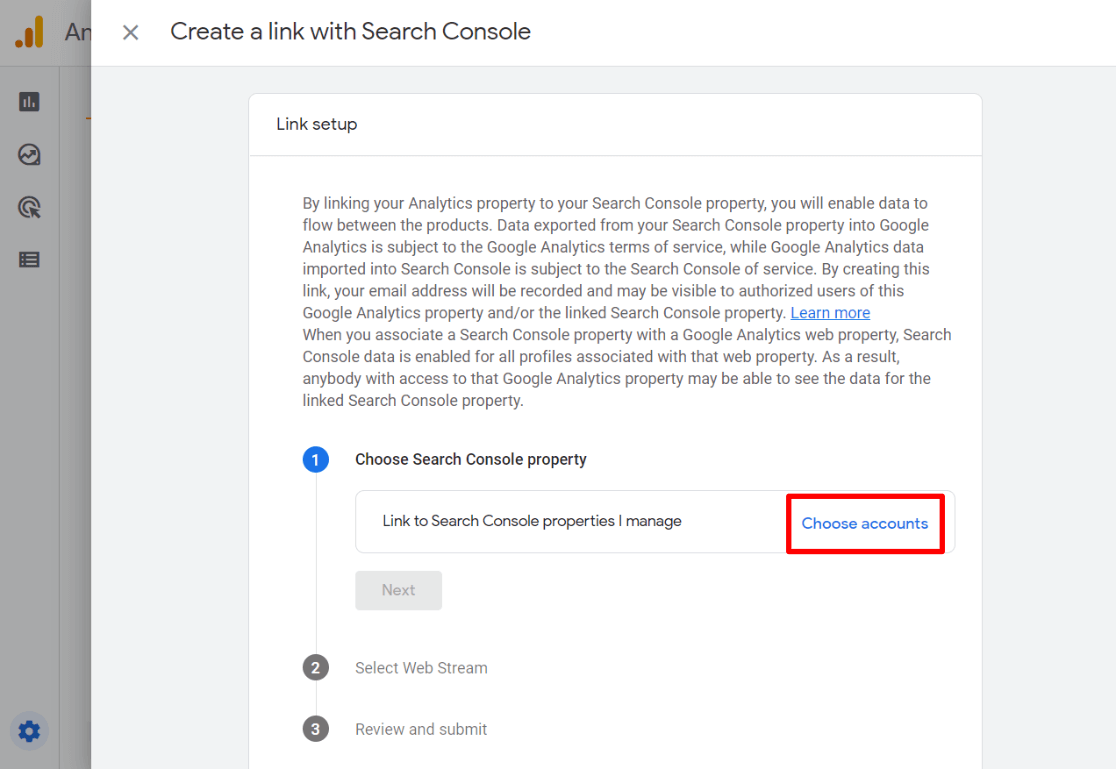
Now, click the checkbox next to the property you want to connect to and click the blue Confirm button.
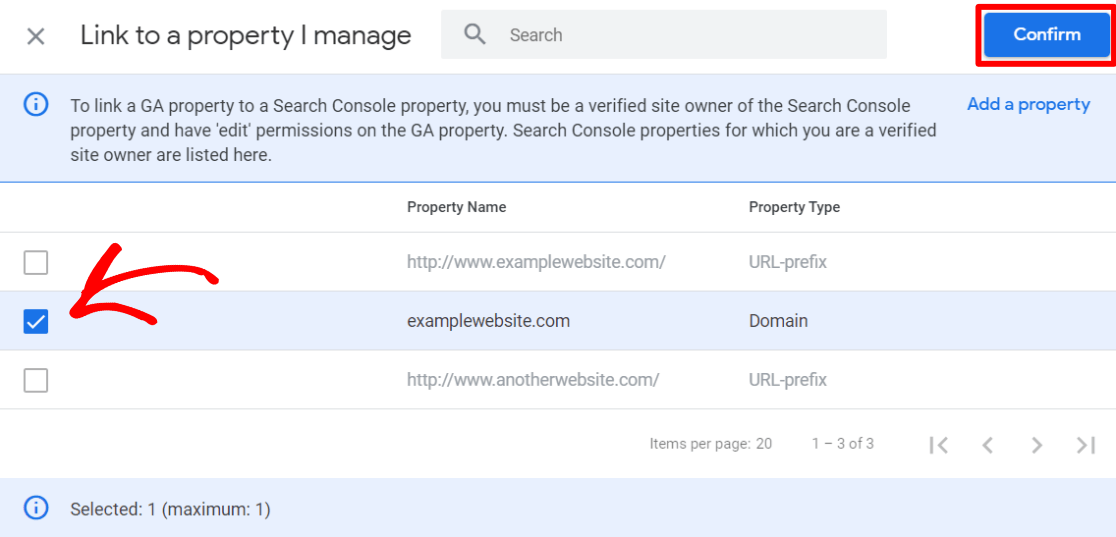
Click Next.
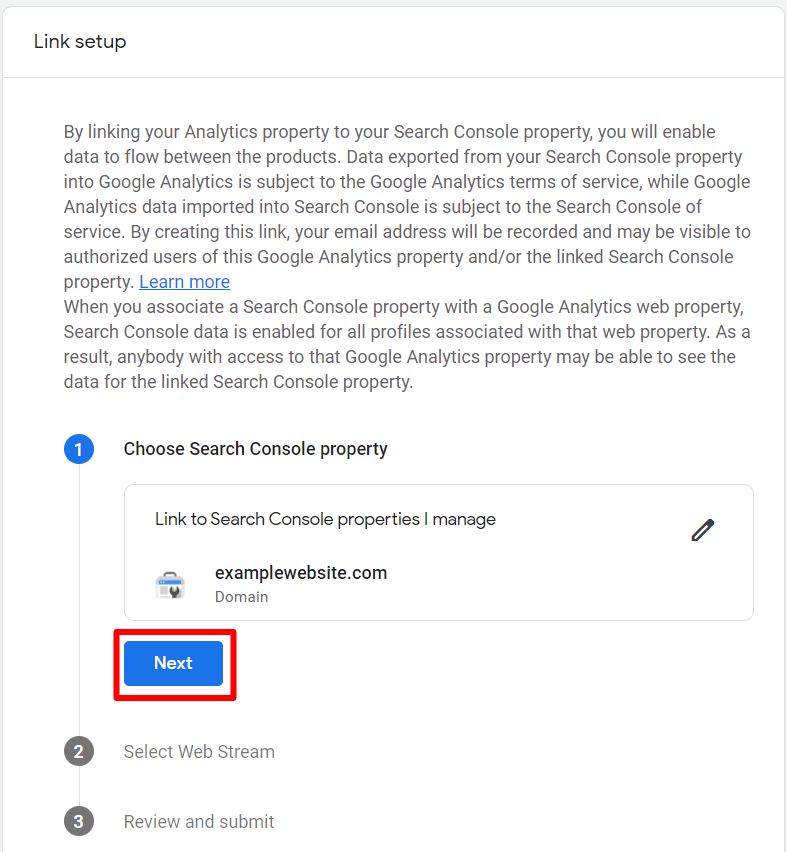
Click Select.
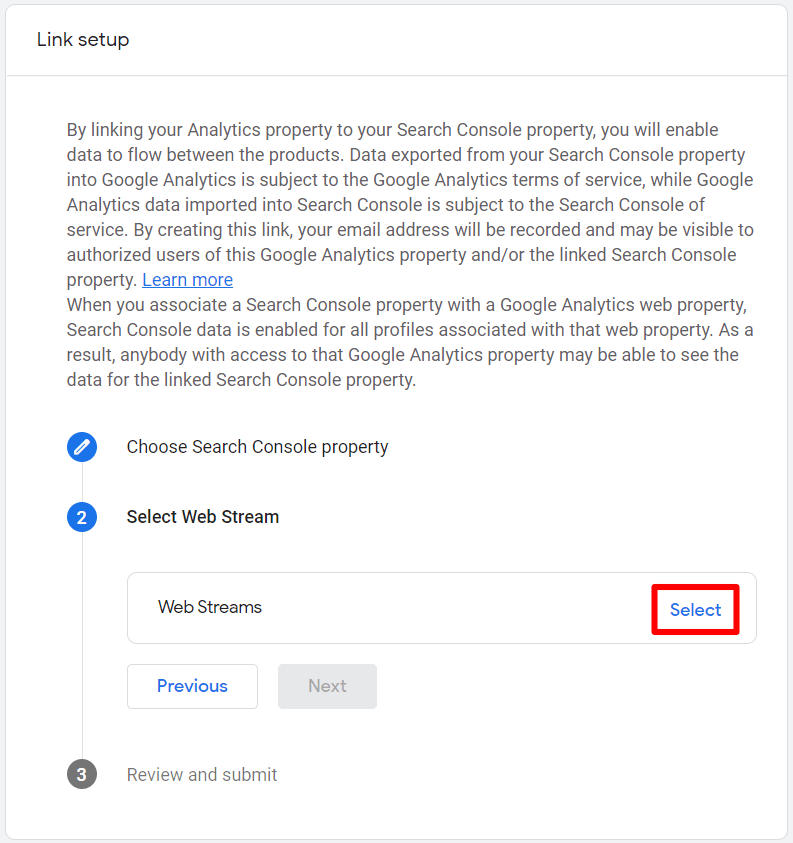
Choose the data stream you want to connect with by clicking Choose.

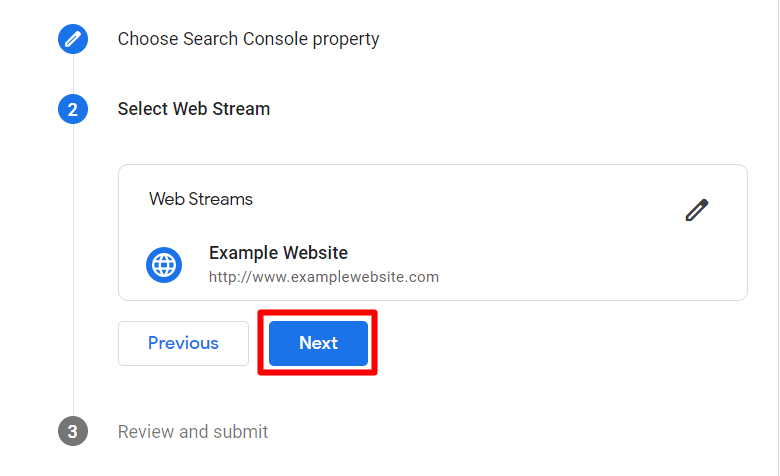
Now, click Next.
Check that everything is correct and click Submit.
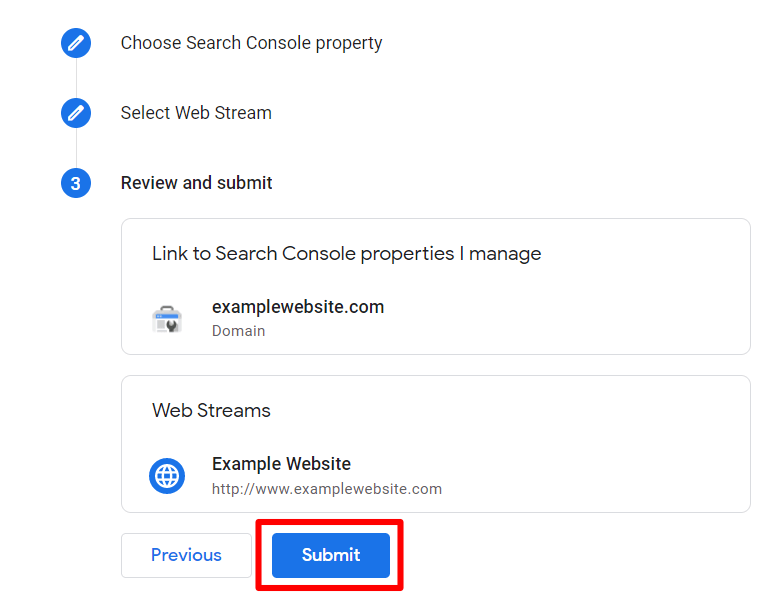
That’s it, your link is created!
View Google Search Console Reports in Google Analytics
Once Search Console and Google Analytics are connected, you’ll be able to access some of your Search Console data inside Google Analytics.
To find it, head to Acquisition » Acquisition overview, then scroll down until you find the two Organic Google Search cards:
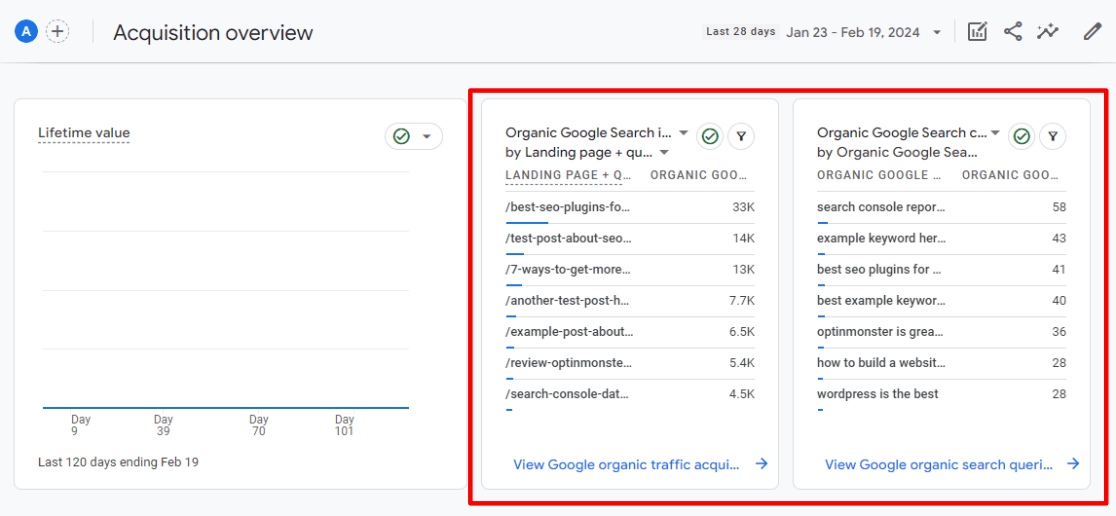
There are two reports here: organic landing pages and organic search queries. The full reports are available by clicking the blue links at the bottom.
Want to add these two helpful reports to your main Google Analytics report navigation?
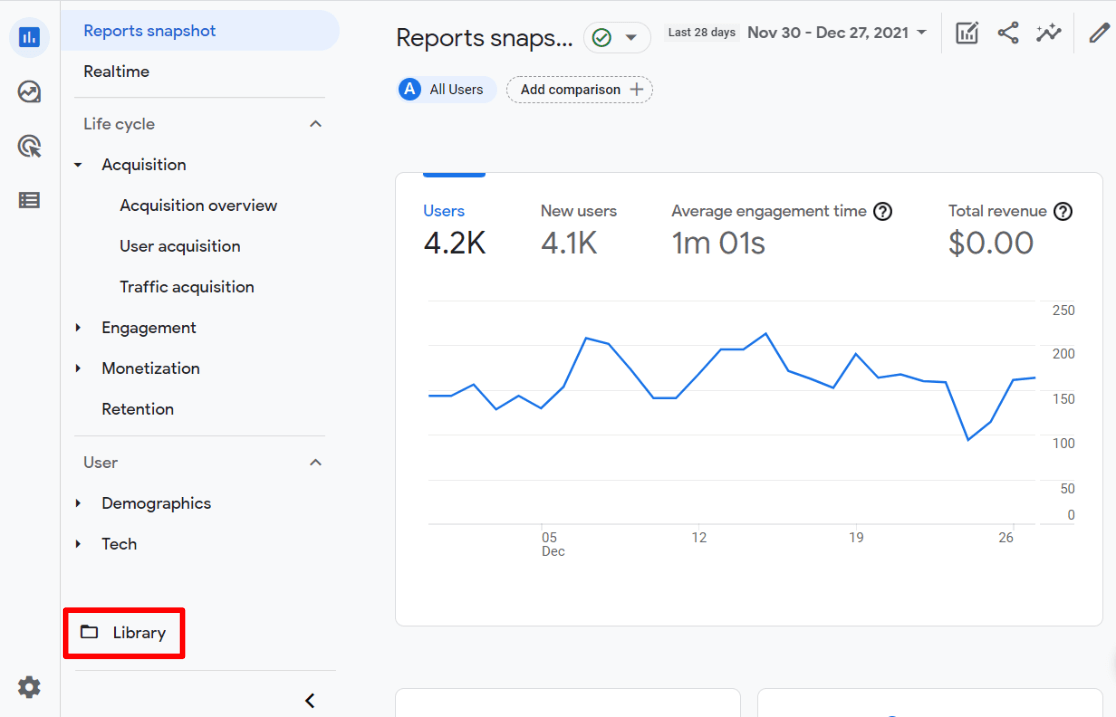
To do that, head to Library:
Now, click the Edit collection link on the Life cycle card:

Then, scroll down in the list to find the Google organic search traffic and Queries reports. Click and drag both of the reports into your report navigation wherever you’d like them to live:
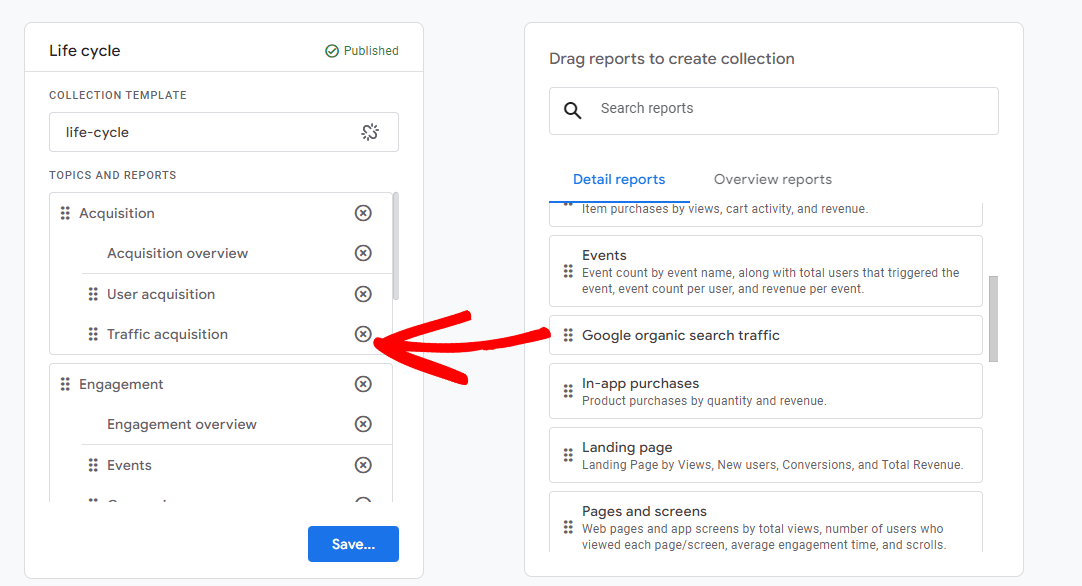
Once you have them both dragged over, go ahead and click the blue Save button, then Save changes to current collection:
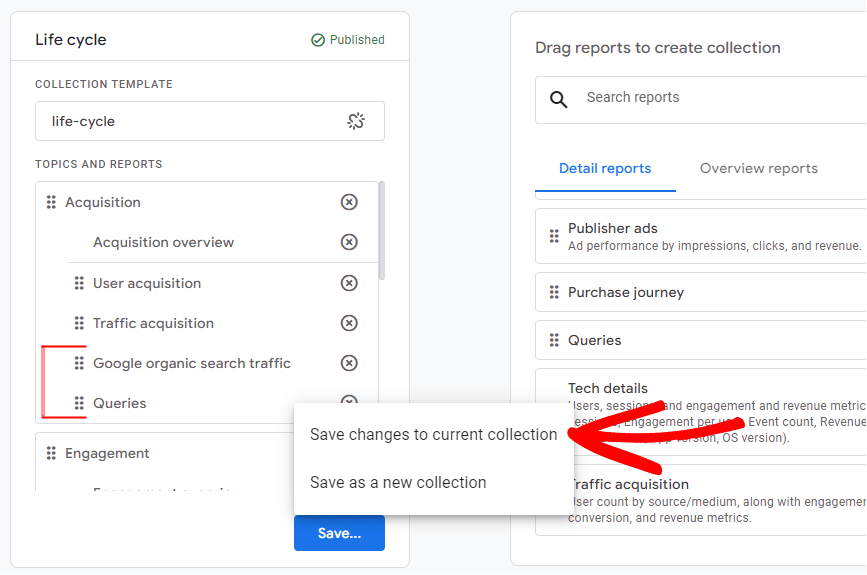
That’s it! You’ve added your Search Console reports to Google Analytics.
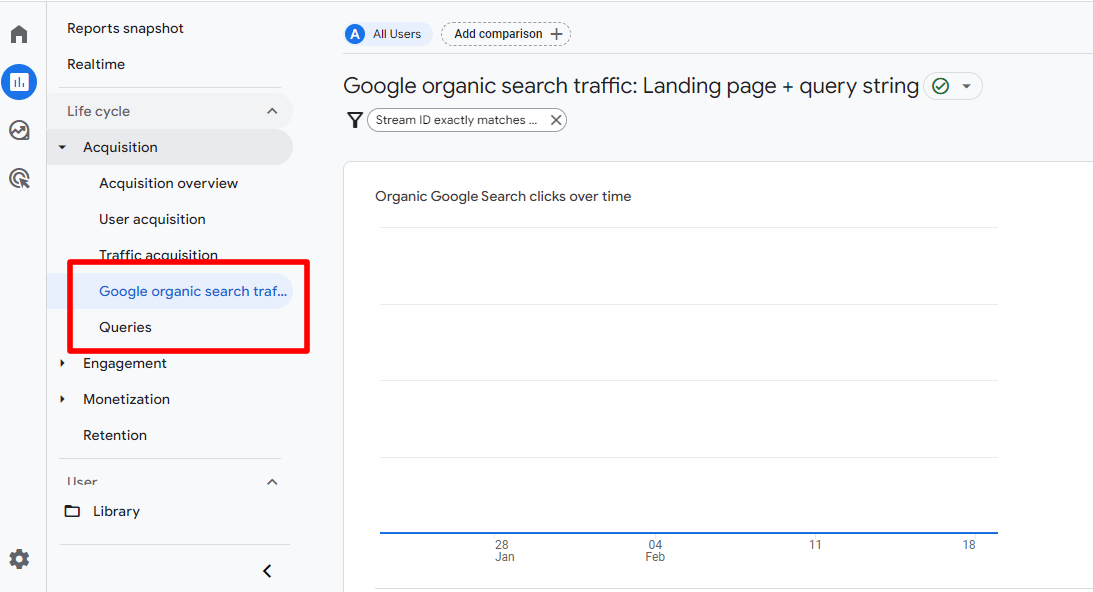
View Google Search Console Reports in WordPress
Lastly, you can use the MonsterInsights plugin at the Plus level or above to view your Search Console Queries Report right from your WordPress dashboard.
Don’t have MonsterInsights yet? You’re missing out!
MonsterInsights is the best Google Analytics plugin for WordPress. It allows you to easily connect your WordPress site with Google Analytics so you can view all the data that matters most right in your WordPress dashboard.
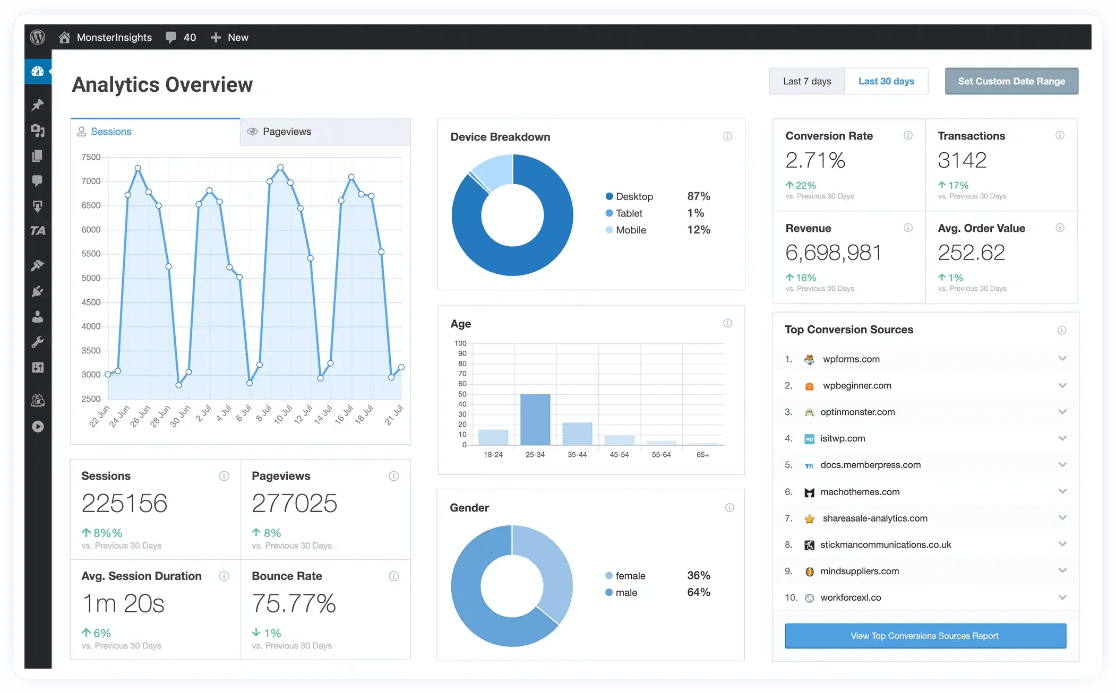
Plus, with the click of a button, you can set up sophisticated tracking features such as event tracking, eCommerce tracking, form tracking, custom dimension tracking, outbound link tracking, and much more.
Get started with MonsterInsights now!
If you’re already using the plugin, you can find your Search Terms report by going to Insights » Reports. From there, click on the Search Console tab.
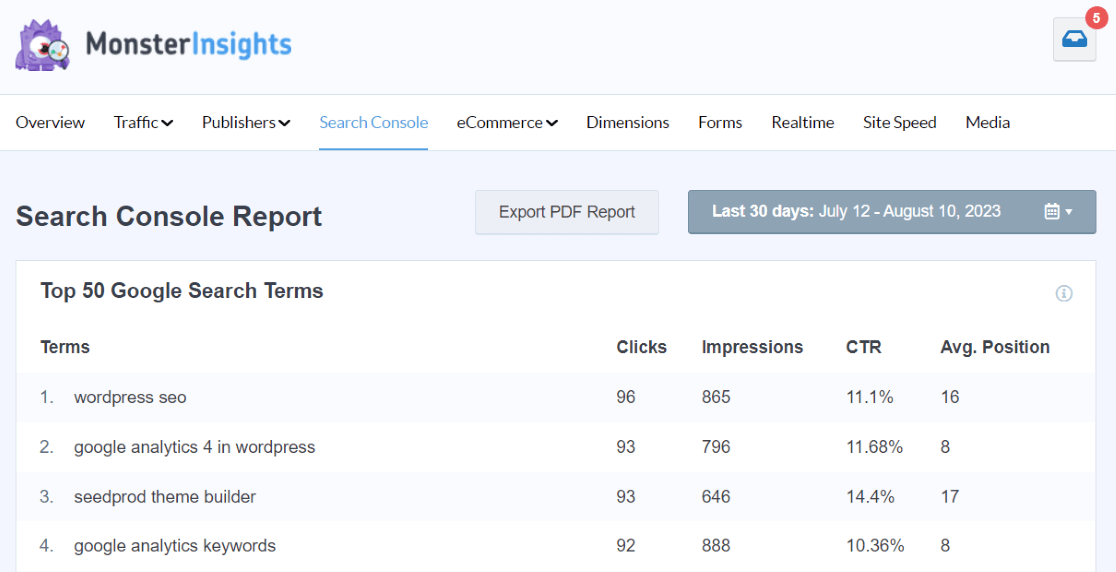
Here, you’ll see your website’s top search terms, organized by the number of clicks they’re getting from Google search. Next to each term, you’ll see the following:
- Clicks
- Impressions
- Click-Through Rate
- Average Position
This gives you a good idea of the keywords that are driving organic traffic to your website.
It also shows you the average position your keywords are ranking for in Google so you can keep an eye on your focus keywords and try to rank higher.
More Google Search Console WordPress Plugins
MonsterInsights is the best way to connect your website with Google Search Console, but there are a couple more WordPress plugins that connect to Search Console. Let’s take a look.
1. WPCode

We mentioned WPCode briefly above, but we’ll go over it a little more here. If you have to use the URL Prefix method to verify your Search Console, WPCode is the best way to make that happen.
WPCode is the best WordPress code snippets plugin. It makes inserting code snippets (like the Search Console verification snippet) super easy. Use it to insert verification snippets, conversion pixels, social media pixels, and any other snippets into your website’s code without actually touching your site’s files.
If you have to insert basic snippets, you can even use just the free version of WPCode.
2. AIOSEO
All in One SEO (AIOSEO) is the best WordPress SEO plugin, and it can help you verify your website with Google Search Console using the URL prefix method.
All you have to do is download AIOSEO at the Basic level or above, then you’ll be able to use their Webmaster Tools section to add your Search Console tag to your site:
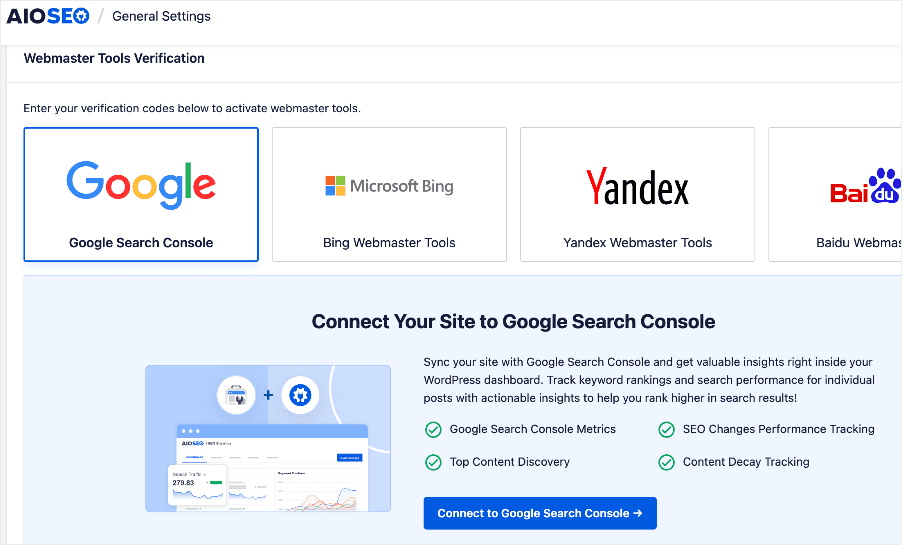
Besides the Webmaster Tools section, you’ll get more features like:
- Unlimited SEO audits for every page and post on your site
- WooCommerce SEO
- Powerful XML sitemaps
- Schema markup
- Keyword suggestions from Semrush
- ChatGPT for content suggestions
- And more!
And there you have it! That’s how you configure your WordPress website with Google Search Console and Google Analytics so you can make sure your site is not only showing up in Google search results but also looking and functioning great.
If you’re looking for great ways to improve your overall SEO to drive even more traffic to your site, check out our post on Google Analytics SEO hacks designed to bring more organic traffic to your site. Or, read How to Use Google Search Console for SEO.
Not using MonsterInsights yet? What are you waiting for?
Finally, don’t forget to follow us on YouTube for more helpful Google Analytics tips.
Google Search Console for Analytics and WordPress FAQ
How long does it take for Google Search Console to show data?
After verification, Google Search Console typically begins showing data within 24-48 hours. However, comprehensive data may take up to a week to populate fully. Be patient and check back regularly as your data accumulates.
Do I need both Google Analytics and Google Search Console?
Yes, you should use both tools as they serve different purposes. Google Analytics provides data about user behavior on your site, while Search Console focuses on how your site performs in Google search results. Together, they give you a complete picture of your website’s performance.
Can I verify multiple versions of my website in Google Search Console?
Yes, but the domain verification method is preferred because it covers all versions of your domain (http, https, www, non-www) in a single property. If you use URL prefix verification, you’d need to verify each version separately.
How do I fix the “URL is not on Google” error in Search Console?
This message means Google hasn’t indexed your page yet. To fix this, submit your URL for indexing through Search Console’s URL Inspection tool, ensure your robots.txt file isn’t blocking the page, and check that the page doesn’t have a “noindex” tag.
Is Google Search Console completely free?
Yes, Google Search Console is entirely free to use. Google provides this tool at no cost to help website owners improve their presence in Google search results.
How often should I check Google Search Console?
For active websites, I recommend checking Search Console at least once a week to monitor your performance, catch any issues early, and identify new optimization opportunities. During major website changes or SEO campaigns, you might want to check more frequently.

This instruction page is out of date. Google has changed the interface of these menus and it looks nothing like the images. Not only that some of them like the acquisitions tab don’t exist anymore.
Hi Jacob,
Thanks for your comment! The article actually includes instructions for both Universal Analytics and GA4. We’re guessing you’re looking at the UA instructions, but you’re using GA4. Here are some direct links to the GA4 parts of the article:
Connect Search Console to GA4
View GA4 Search Console Reports
Let us know if this still doesn’t help!
These were great instructions for me. Thanks!