Setting up Google Analytics custom event tracking in WordPress feels overwhelming when you’re staring at complex code snippets and confusing Google Tag Manager configurations. I’ve been there, spending hours trying to figure out why my button clicks weren’t showing up in reports, only to discover I’d missed one tiny parameter.
But here’s what I’ve learned after helping thousands of WordPress users track their most important interactions: there’s actually a much simpler way to set up custom event tracking that doesn’t require touching a single line of code.
In this guide, I’ll walk you through exactly how I set up Google Analytics custom event tracking on my WordPress sites using MonsterInsights – the method that’s saved me countless hours and eliminated all the guesswork.
Google Analytics Custom Events Video Walkthrough

What Are Google Analytics Custom Events?
Google Analytics is used by 55.49% of all websites globally, representing approximately 37.9 million websites, and for good reason. In Google Analytics 4 (GA4), every interaction on your website is tracked as an event. This includes page views, clicks, form submissions, and purchases.
However, GA4 doesn’t automatically track every important interaction on your website. You might want to track specific button clicks, custom form submissions, or unique user behaviors that matter to your business goals.
That’s where custom events come in. Custom events are user-defined interactions that you specifically set up to track actions that Google Analytics doesn’t monitor by default. For example, you might want to track:
- Clicks on your pricing page call-to-action buttons
- Downloads of specific resources, like whitepapers
- Video play interactions on product demos
- Newsletter signup completions
- Custom form submissions that drive conversions
With custom event tracking, you can finally see which elements on your website are actually driving results – and which ones need improvement.
Google Analytics Custom Event Tracking Shortcut
Before we get any further into creating custom events, did you know that just installing MonsterInsights on your WordPress site can help you automatically set up a whole list of events?
MonsterInsights is the best Google Analytics plugin for WordPress. It allows you to easily connect your WordPress site with Google Analytics so you can view all the data that matters most right in your WordPress dashboard.
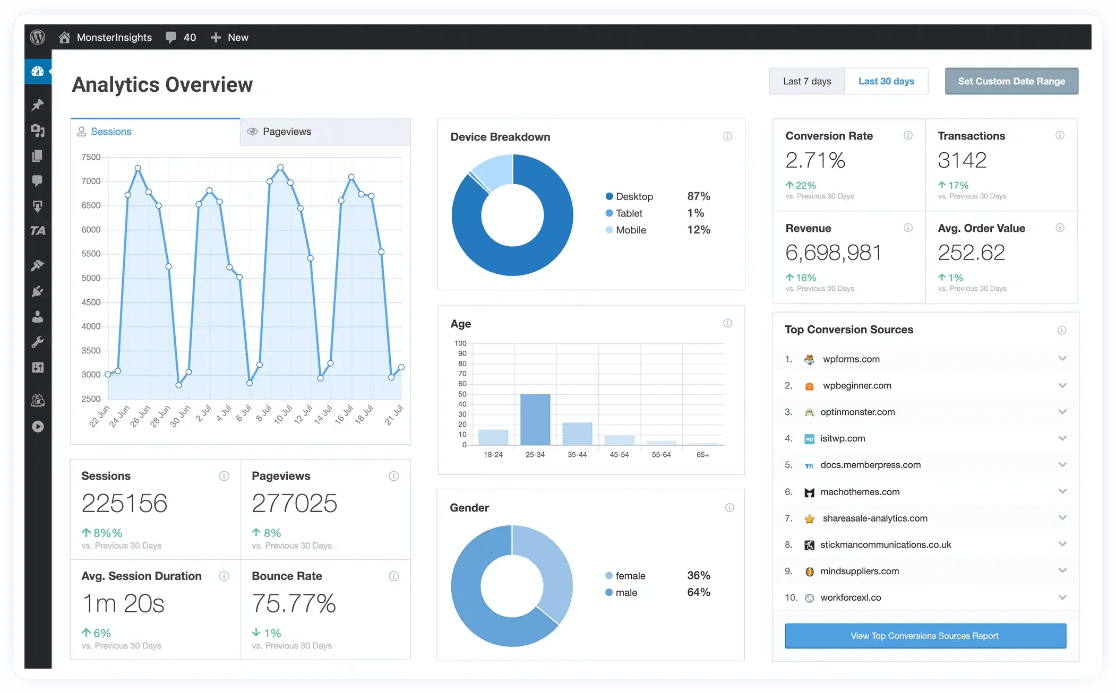
With just a couple clicks, you can set up event tracking for a whole list of clicks and actions, including:
- File downloads
- Outbound links
- Affiliate links
- Tel and mailto links
- eCommerce purchases
- Form submits
- Video play clicks
Plus, MonsterInsights includes a feature that makes setting up your own custom click events as easy as possible. Let’s check it out.
Anatomy of Google Analytics Custom Events
Google Analytics events have different bits of information, called “parameters” that you can use to track information about your important clicks. MonsterInsights uses the parameters that were required in Universal Analytics, and converts them to Google Analytics 4 for you.
Those parameters are:
- Event Category (Event name in GA4)
- Event Action (Link URL in GA4)
- Event Label (Link Text in GA4)
So, if you want to set up event tracking for a button click in Google Analytics 4, you just need to tell Analytics what the Category should be. That’s the name that you’ll be able to find later in Google Analytics reports when looking for your results, so name it something meaningful like “header_cta” or “sidebar_cta” for call-to-action buttons, for instance.
Tutorial: Setting Up Custom Event Tracking in WordPress
Since Google Analytics doesn’t track these events on its own, you’ll have to set up your event for each button or link on your site (besides the ones MonsterInsights takes care of for you) that you want to track.
MonsterInsights has a Custom Link Attribution feature that allows you to easily add custom event tracking to your links and buttons. You’ll just add a short snippet of HTML to your links (don’t worry, I’ll walk you through it!) to see how many clicks they’re getting.
To start, let’s take a look at this little bit of HTML code. Yes it’s code, but don’t let it scare you away! This is what you’ll need to add to your links in WordPress in order to track them with MonsterInsights:
<a href="https://www.example.com" data-vars-ga-category="custom_category">Example</a>
Let’s use a Buy Now button example. To set up event tracking on a Buy Now button in our website sidebar, we’d make these changes to the above code:
- Put the link for our button in where it currently says “https://www.example.com”. So, your link might be something like “https://www.yoursite.com/pricing”.
- Change “Custom Category” to “sidebar_buy_now”
Note: Keep the quotation marks in your code!
Now, our code looks like this:
<a href="https://www.yoursite.com/pricing" data-vars-ga-category="sidebar_buy_now">Buy Now</a>
Fairly simple, right? Where you still see the words “Buy Now,” that’s the anchor text for your link (as in the text that you’ll see hyperlinked on your site). In my example, I’m not using text, though. I’m using a button image.
Since the button is in the sidebar in our example, that means it’s in a widget. In order to use our event tracking code, we’ll have to put the image into a Custom HTML widget.
Here’s how to do that.
First, head to your media library and grab the URL of your button image.
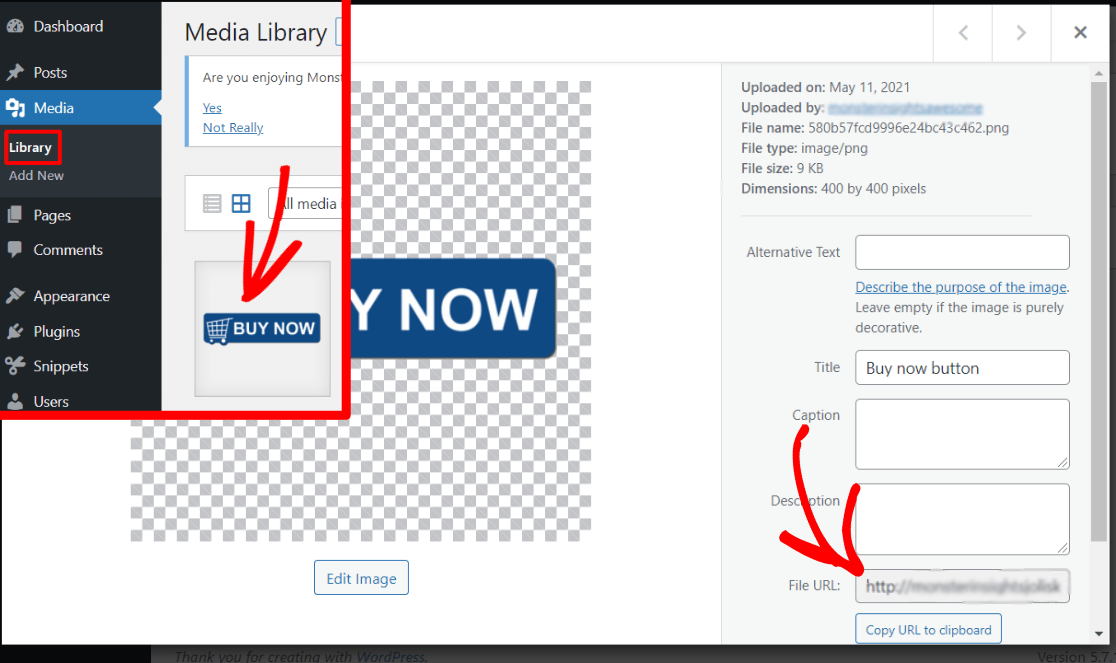
Let’s say your image link is https://www.yoursite.com/wp-content/uploads/2021/05/buy-now-button.png, and you want to link that image to https://www.yoursite.com/pricing with event tracking.
Here’s what your HTML code looks like now:
<a href="https://www.yoursite.com/pricing" data-vars-ga-category="sidebar_buy_now"><img src="https://www.yoursite.com/wp-content/uploads/2021/05/buy-now-button.png" alt="buy now button"></a>
You can copy paste the code above and just input your own links and category parameter. Paste it right into your Custom HTML widget, save it, and check to make sure it looks correct and leads to the right page on your site.
Here’s what ours looks like:
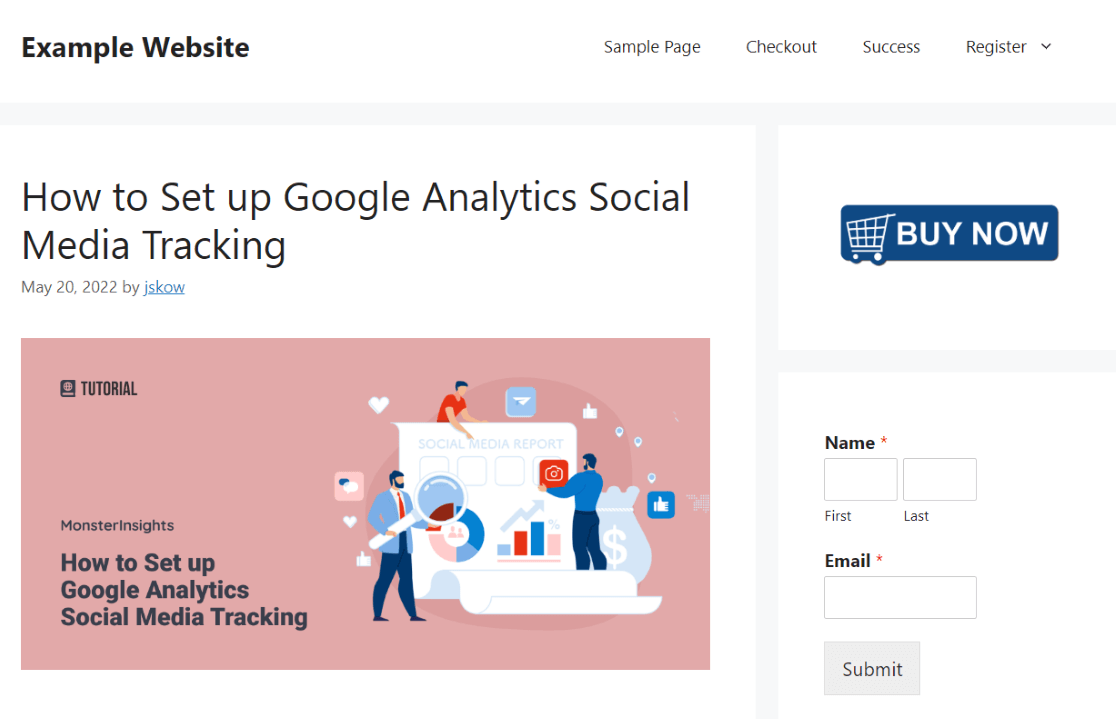
That’s it! Now, MonsterInsights will help Google Analytics track your Buy Now button clicks and provide you with detailed reports.
To recap, here are the steps we took to add event tracking code to a button image in our sidebar:
- We chose a category that’s meaningful for us: sidebar_buy_now
- We wrote out our code using that parameter and added our link (https://www.yoursite.com/pricing)
- We uploaded our image to the media gallery and copy pasted the URL into our code
- We copied our full code into a Custom HTML widget
- We viewed our site and clicked the link to make sure it works
Now, let’s take a look at how to find the click tracking results in Google Analytics 4.
Google Analytics 4 Custom Event Report
To see the results of our custom event click tracking, we’ll need to create a custom exploration report in GA4. So, head to the Exploration tab.
Haven’t made a custom GA4 report before? You might want to start with our basic GA4 custom exploration report tutorial.
To begin, you’ll need to import these four Dimensions to your report, then drag them into the Rows box:
- Event name
- Link Text
- Link URL
- Page location
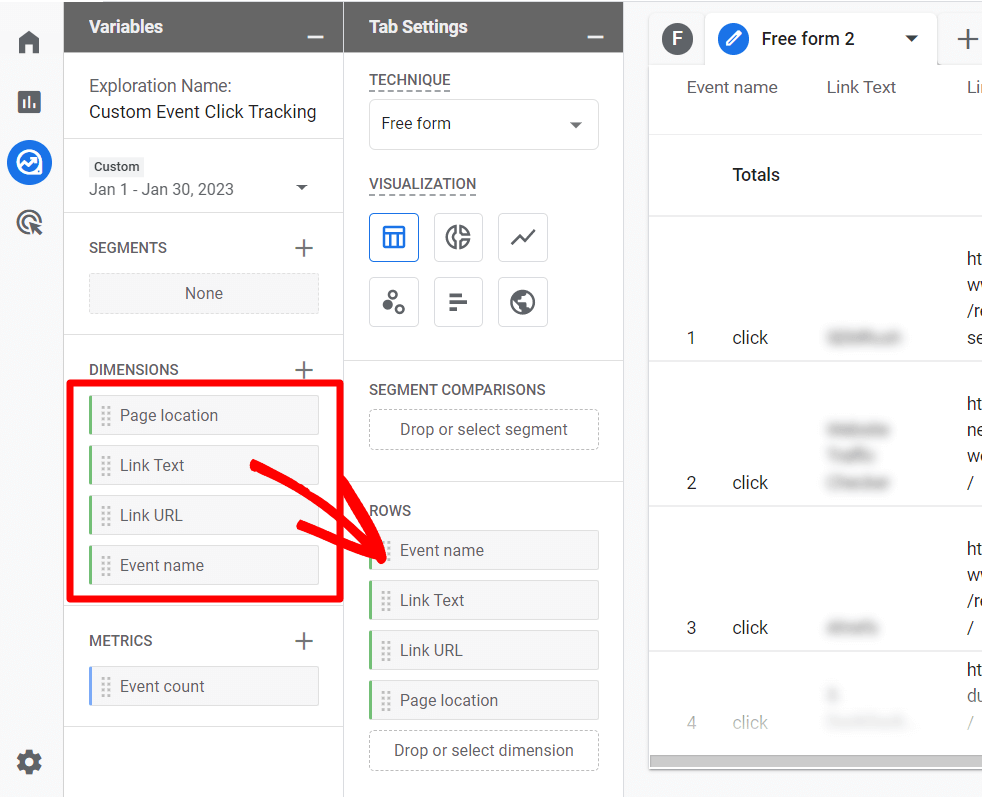
Next, import Event count as a Metric and drag it to the Values box:
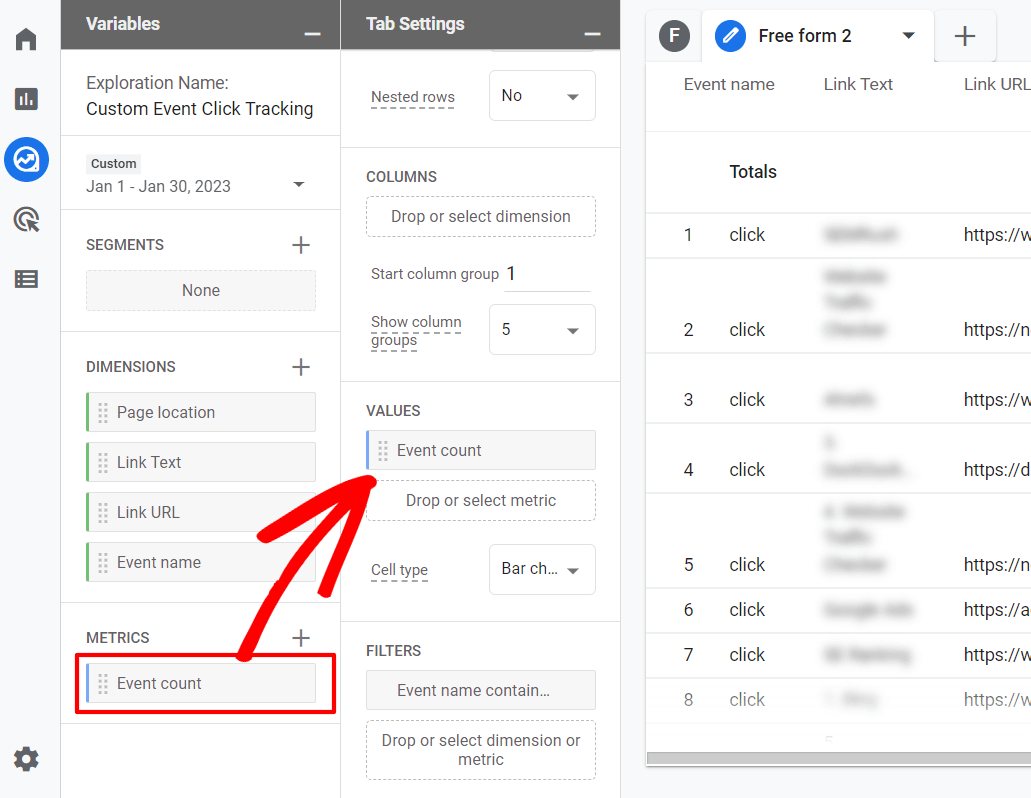
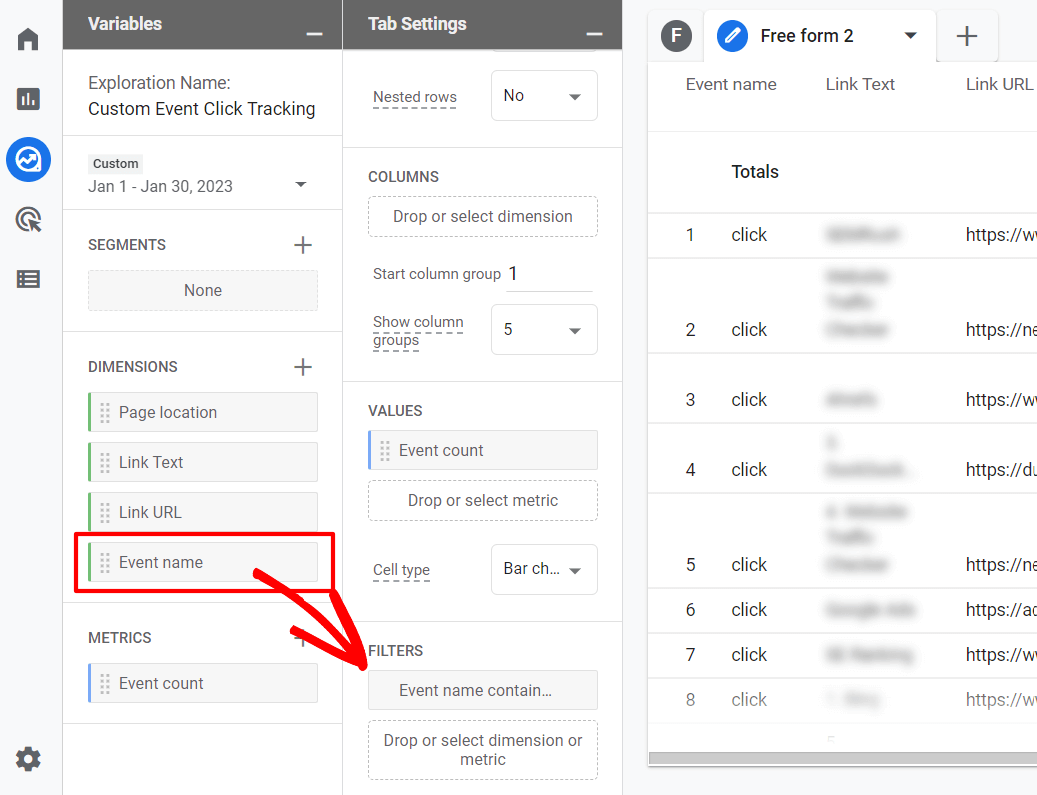
Finally, if you want the report to show only the custom event you’re looking for, drag Event Name from Dimensions over to the Filters box:
To set up the filter, you can select “contains” and then input all or part of your event name (Category) that you chose – so in our example, we could input “buy_now”. Then click Apply.
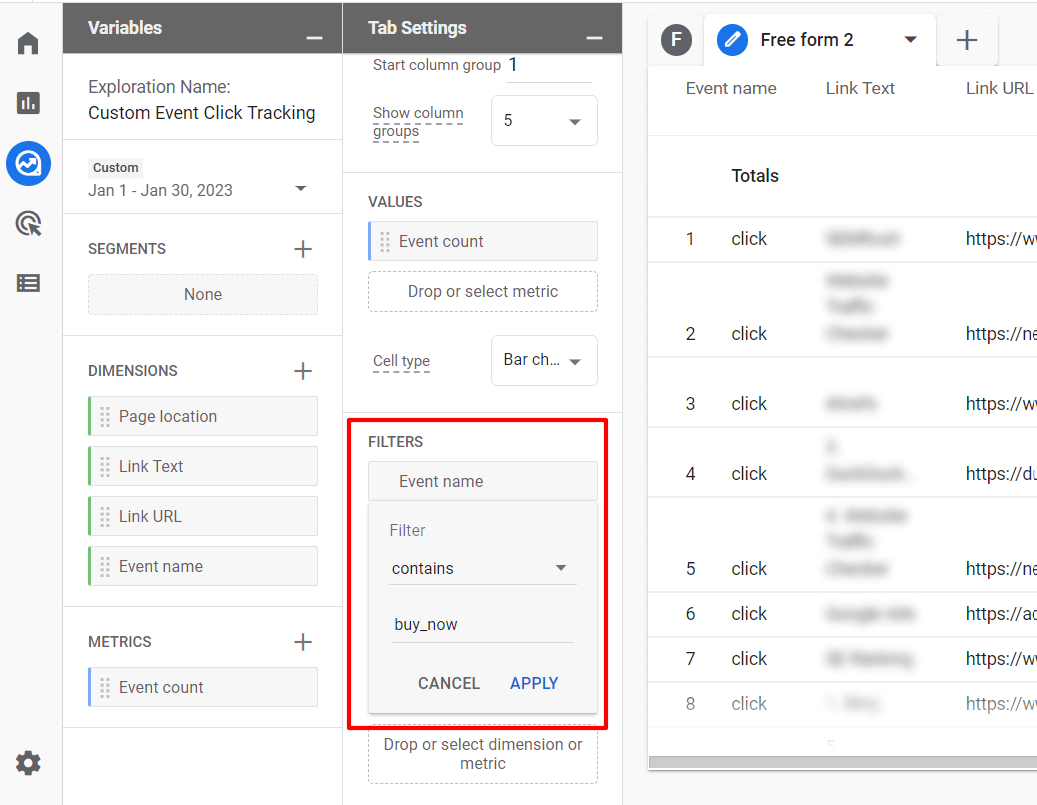
You’ll now have a report showing how many times your button was clicked, the URL the button leads to, and the URL of the page where your button was clicked.
Key Events vs. Regular Events
In 2024, Google officially replaced the term conversion event with key event in GA4 to clarify that any event can become a conversion — if you mark it as key.
Once you’re tracking custom events, you can mark the most important ones as “key events” in GA4 under Admin > Events.
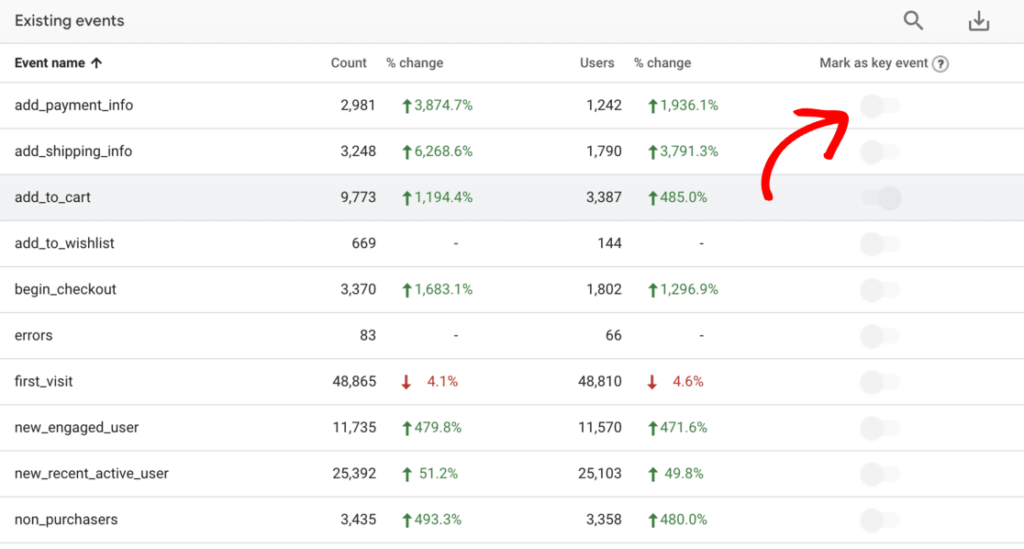
This treats them as conversions in your reports and makes them available for Google Ads optimization.
I hope this article helped you learn how to set up Google Analytics custom event tracking in WordPress.
You might also want to check out our guide on How to Track All Link Clicks in Google Analytics (Step by Step).
Also, don’t forget to follow us on Facebook and YouTube for more Google Analytics tutorials, reviews, and tips.
FAQs:
What are custom events in Google Analytics?
Custom events are user-defined interactions that you set up to track specific actions on your website that Google Analytics doesn’t automatically monitor. Examples include button clicks, form submissions, file downloads, or video plays.
How do I track custom events in Google Analytics 4?
You can track custom events using Google Tag Manager, direct gtag.js code, the GA4 interface, or WordPress plugins like MonsterInsights. The easiest method for WordPress users is MonsterInsights, which requires no coding.
What’s the difference between events and key events in GA4?
Events are any user interactions tracked by GA4, while key events are specific events you mark as important conversions for your business. Key events appear in conversion reports and can be used for Google Ads optimization.
How long does it take to see custom event data in Google Analytics?
Custom events typically appear in GA4’s Real-time reports within minutes of implementation. For historical reporting, it may take 24-48 hours for data to fully populate in standard reports.
Can I track button clicks without coding?
Yes, with MonsterInsights for WordPress, you can track button clicks by simply adding a data attribute to your HTML. No complex coding or Google Tag Manager setup required.
This article shows how to track clicks on an anchor tag, but you keep calling it a “button” even though it is not, which is very misleading. Do you have an option for tracking actual clicks?
Hey Chris! Thanks for your comment. In this case, it is actually a link, not an anchor. An anchor link would take you somewhere else on the current page. The link in the example (the linked image, the “button”) goes to another page. Adding the code from the example in the article will send Event data to Google Analytics, so those clicks will be tracked. You can find the event data in MonsterInsights, or in Google Analytics under Behavior » Events.
Does this work on “s or is it only available on `` links?
Hi Brian,
I think the comment box messed up your formatting a bit, but from what I understand you’re asking if it works just on “a” links? Yes. I couldn’t catch the rest of your question, I hope this answers it!
Can this be done in the free tool or are you required to upgrade to pro?
Hi Stephanie,
Custom/enhanced link attribution is available at the Plus license level.