Running your WooCommerce store without proper conversion tracking is like trying to do it all blindfolded. You need that data if you want to really grow! Making critical business decisions based on guesswork rather than data will cost you sales and revenue.
Setting up error-free WooCommerce conversion tracking is the key to gathering powerful insights about your store’s performance. When you have this tracking properly set up, you’ll gain access to valuable data about customer behavior, allowing you to make informed decisions that directly impact your bottom line.
In this guide, I’ll walk you through exactly how to set up WooCommerce conversion tracking in Google Analytics and WordPress. You don’t need to be a technical expert or analytics guru to implement these strategies! I’ll share a straightforward method that anyone can follow, regardless of your experience level.
Let’s dive in and transform your store’s analytics so you can start making smarter, data-driven business decisions today.
Start WooCommerce Conversion Tracking Today!
Table of Contents
What is WooCommerce conversion tracking?
WooCommerce conversion tracking is a system that monitors and records customer actions on your online store. It lets you track specific events like purchases, add-to-cart clicks, and checkout completions. When set up correctly, it allows Google Analytics 4 to collect and report on detailed data about your customers’ shopping behaviors.
With WooCommerce conversion tracking enabled on your eCommerce website, you can monitor:
- Add to Cart Clicks
- Remove from Cart Clicks
- Overall Conversion Rate
- Abandoned Checkouts
- Total Purchases
- Items Purchased
- Top Traffic Sources Resulting in Purchases
- Average Order Value
- Google Ads Conversions
- Meta (Facebook) Ads Conversions
- Coupon codes used
- And even more conversion events
Enabling conversion tracking in your WooCommerce store allows you to analyze your customers’ shopping behavior effectively, making changes and decisions that will grow your business.
Once you set up WooCommerce conversion tracking in WordPress, you’ll be able to find all the information you need inside your WordPress dashboard and Google Analytics account to optimize your store.
How to Set Up WooCommerce Conversion Tracking
To set up WooCommerce conversion tracking in WordPress and Google Analytics, use the MonsterInsights WordPress plugin. MonsterInsights is the best Google Analytics plugin for WordPress, and it can set up WooCommerce conversion tracking automatically in just a couple of clicks.
With MonsterInsights, you can add Google Analytics eCommerce tracking to WooCommerce without editing code or hiring any sort of developer or Analytics expert. It handles installing your Measurement ID and any other conversion tracking codes for you in just a couple of simple clicks.
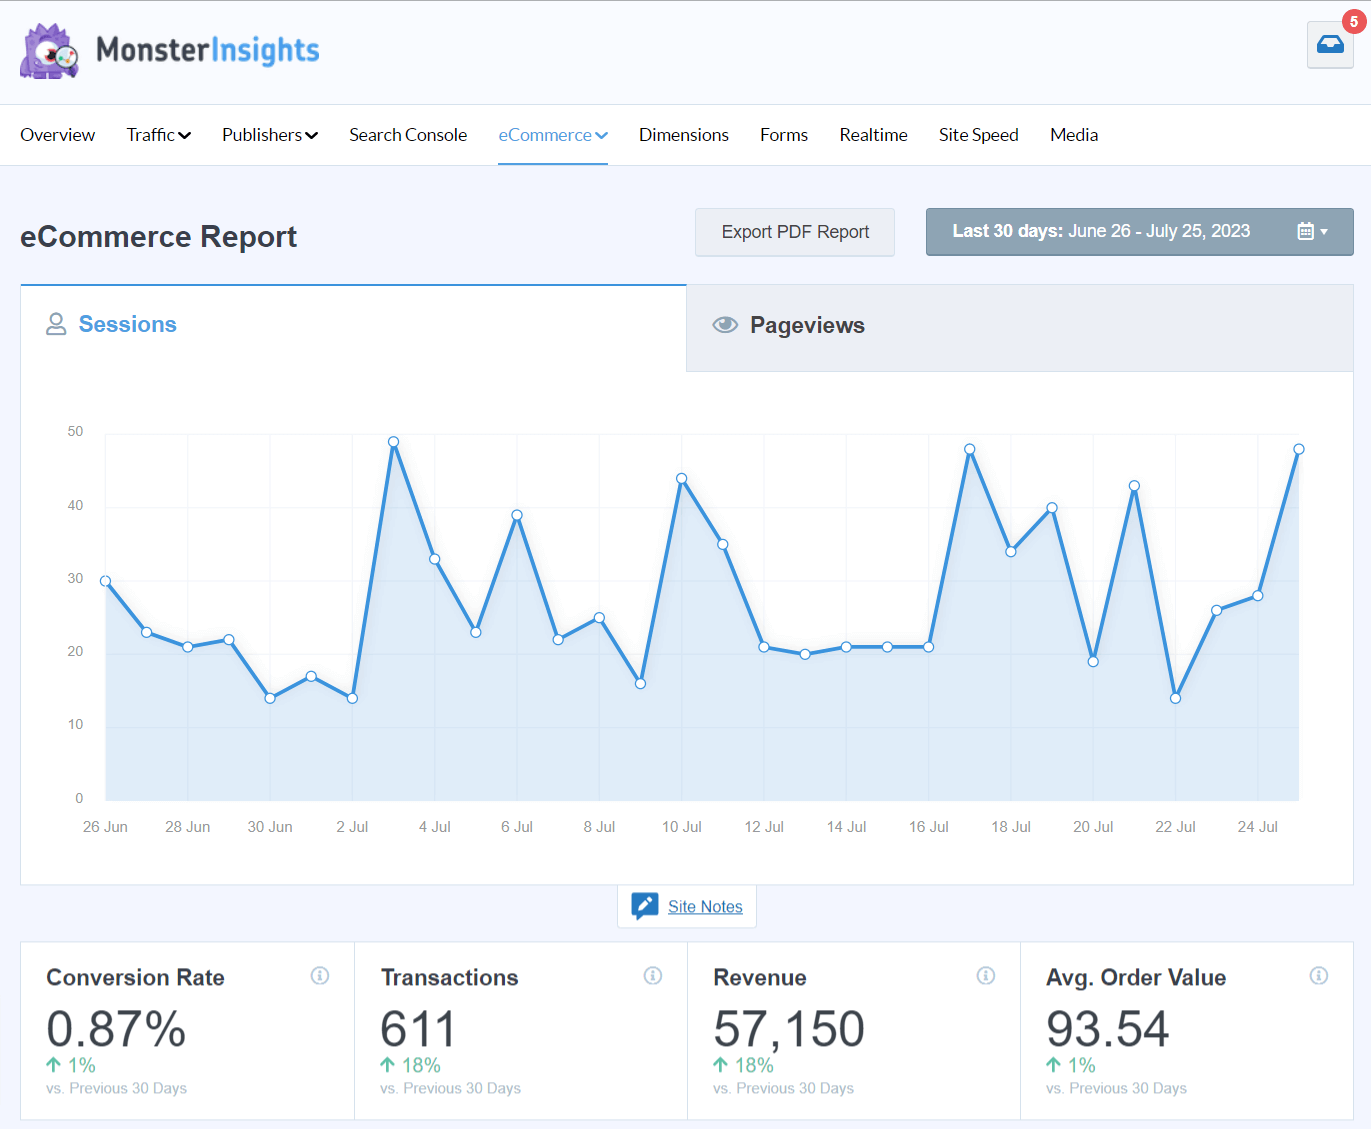
With our eCommerce addon, store owners can easily turn on eCommerce tracking in Google Analytics with just a couple of clicks. It’s so simple!
Plus, you’ll get extra-easy conversion event tracking for form submissions, video clicks, affiliate link clicks, and more.
You can even track customer behavior with our User Journey addon!
For this tutorial, we’ll use MonsterInsights, the best WooCommerce conversion tracking plugin. Let’s dive in!
Step 1: Install MonsterInsights
To get started, head to the Pricing page and get started with MonsterInsights at the Pro level.
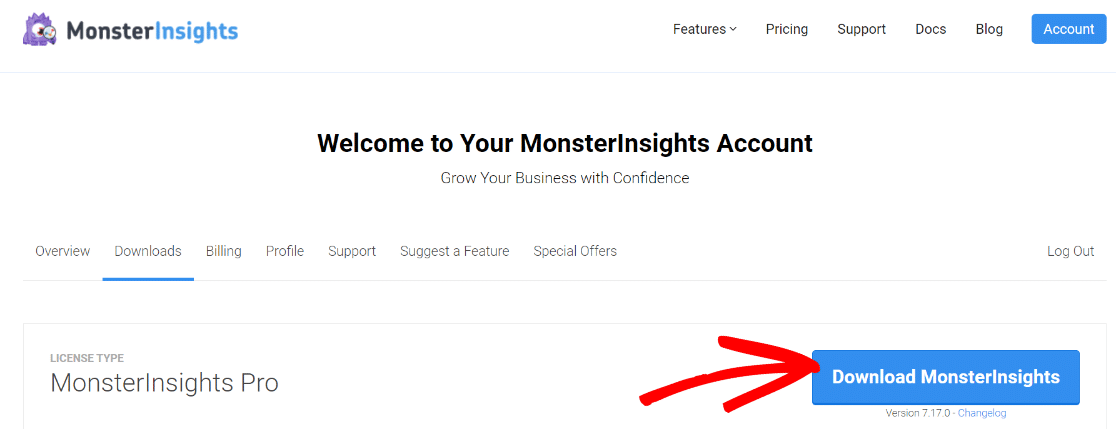
Once you’ve signed up, you can download the plugin’s ZIP file from your account area.
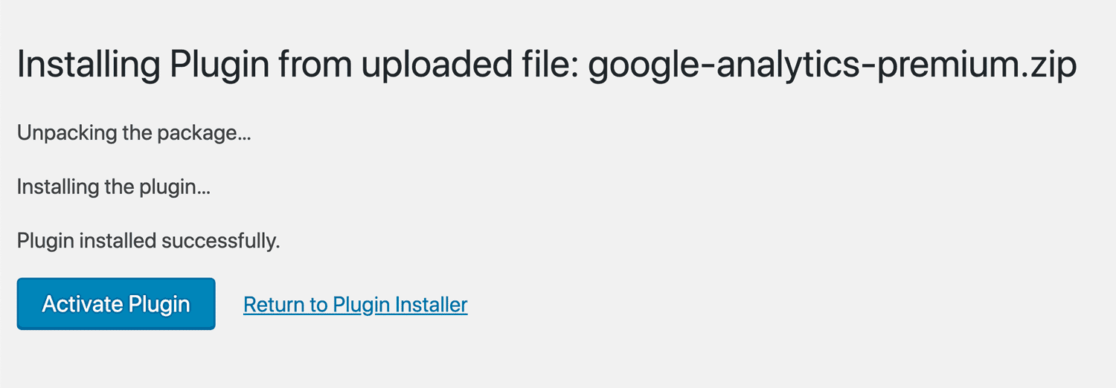
Next, click the Add New plugin button in your WordPress admin, install the MonsterInsights zip file, and activate the plugin.
Step 2: Connect Google Analytics with MonsterInsights
Now, connect Google Analytics with your website. Not only does this provide you with tons of different conversion tracking, but it also installs your Google Analytics code on your site automatically.
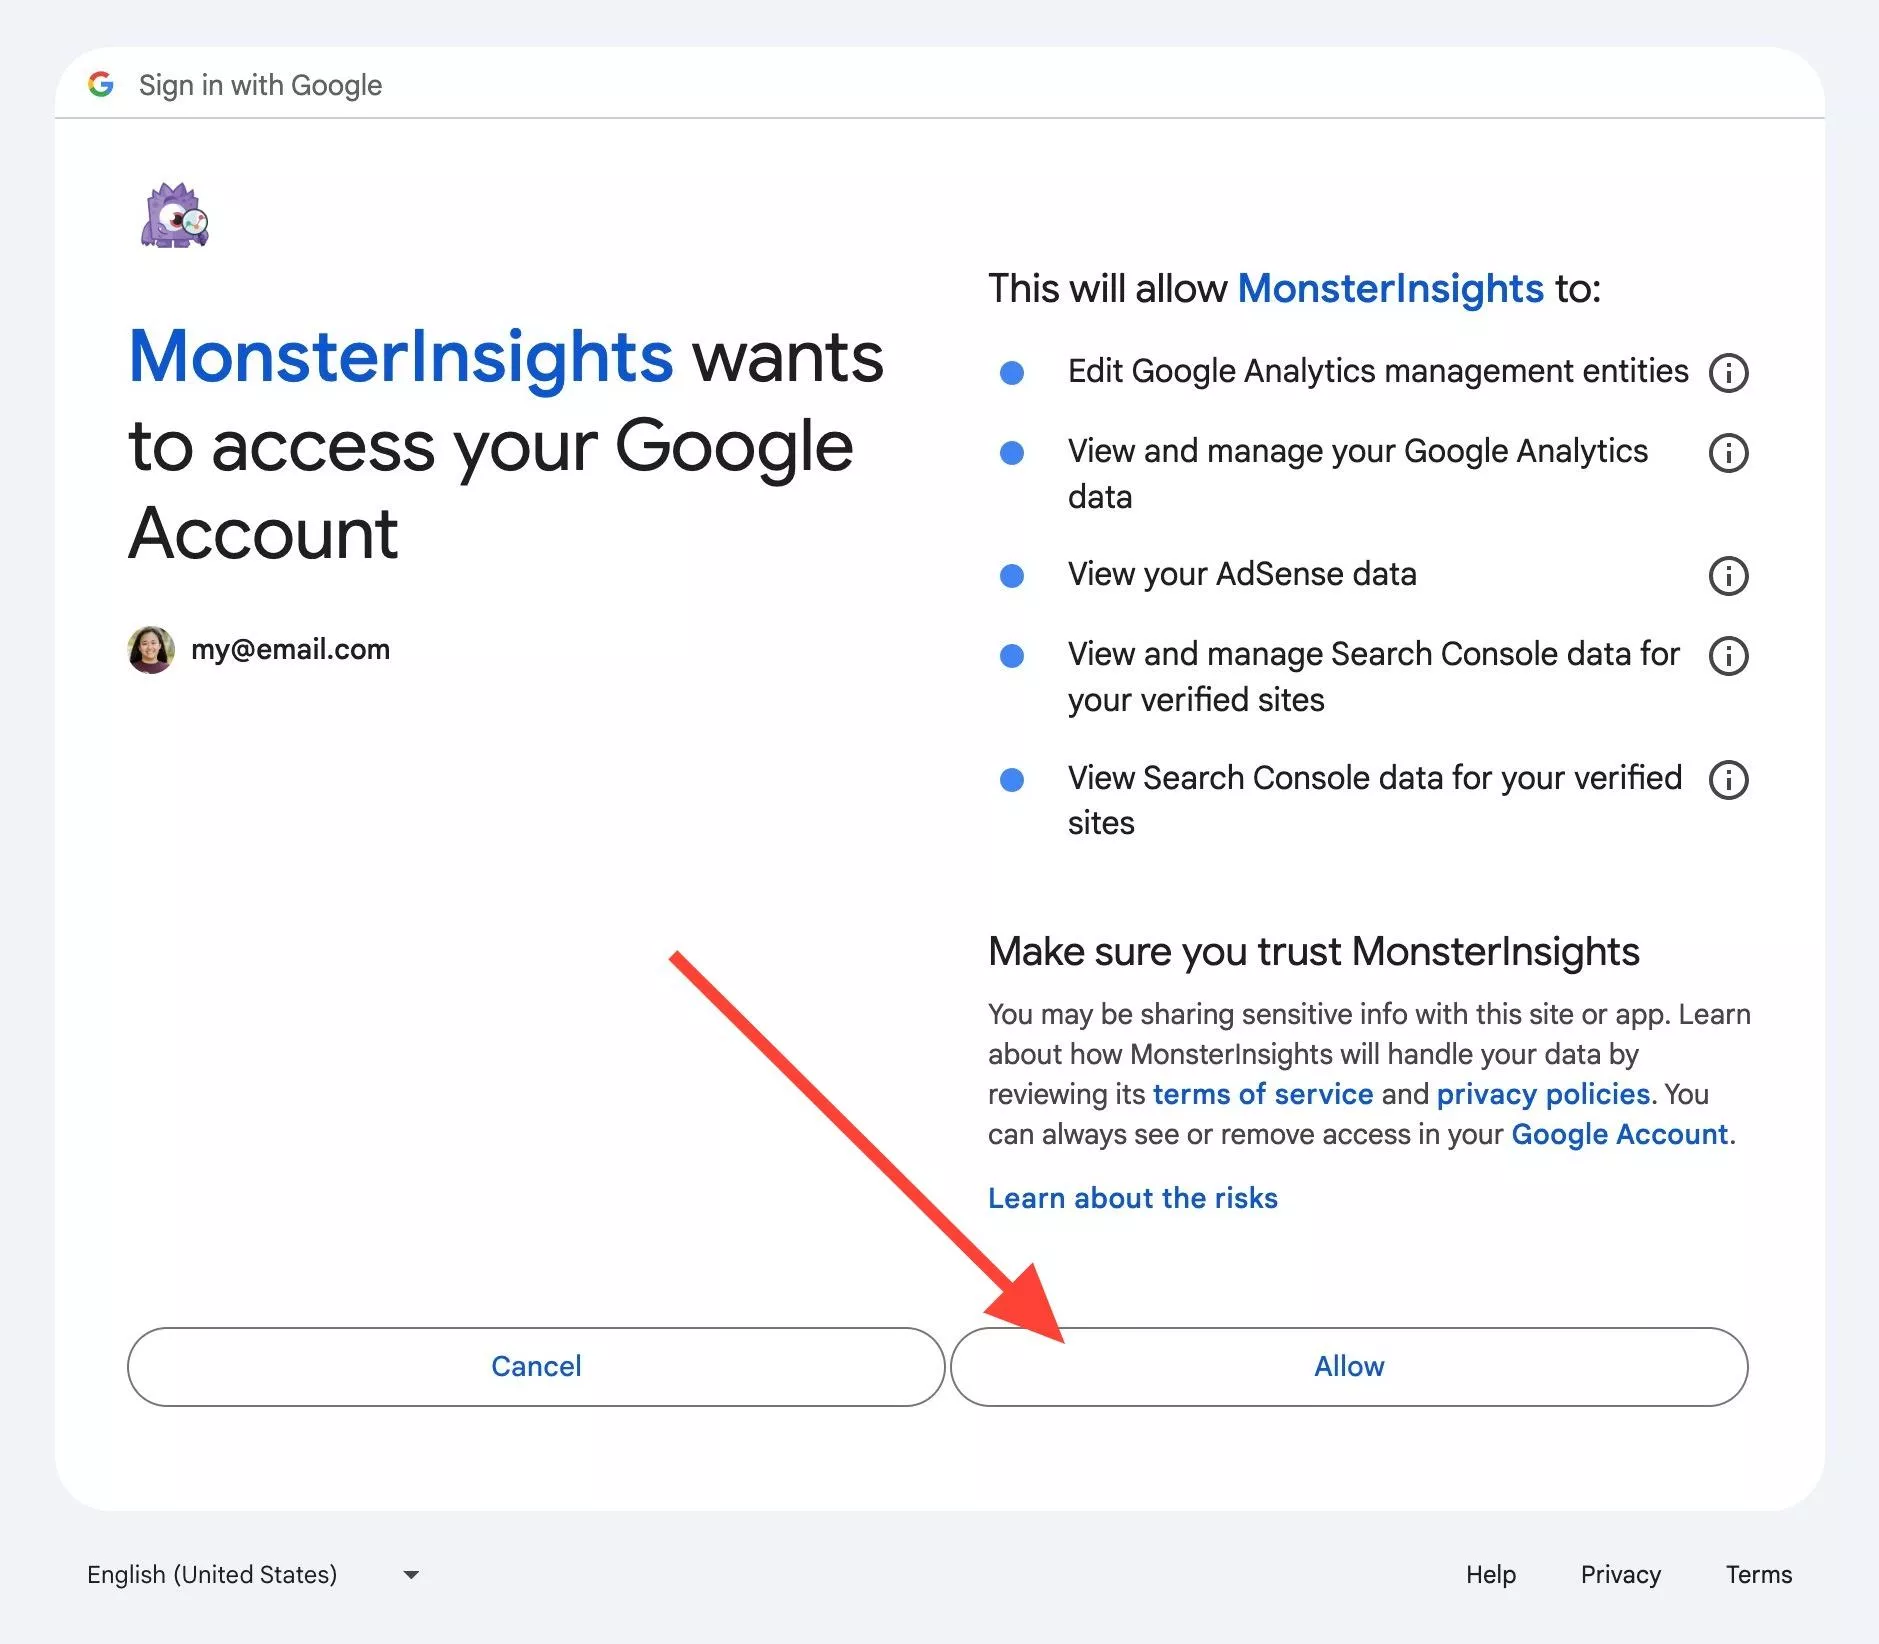
For a complete tutorial on installing and setting up the MonsterInsights plugin, refer to our guide on how to add Google Analytics to WordPress.
Step 3: Install MonsterInsights eCommerce Addon
Next, it’s time to install the MonsterInsights eCommerce addon.
To do that, go to Insights and then click Addons. Now scroll down to eCommerce and click the Install button.
That’s it! You’re now tracking purchase events and a whole lot more.
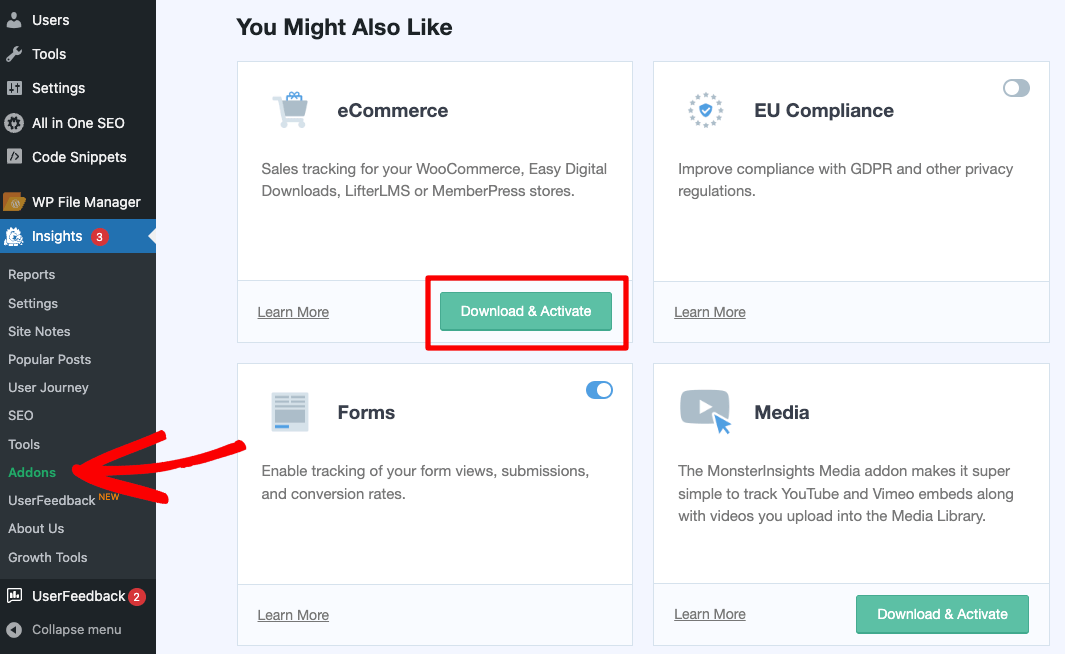
Step 4 (Optional): Add PPC Ads Conversion Tracking Information
If you’re running ad campaigns with Google Ads, Microsoft Ads, or Meta (Facebook), you’ll also want to install the PPC Ads Tracking addon. To do that, navigate to Insights » Settings » Conversions to turn on PPC ads tacking and fill in your conversion information:
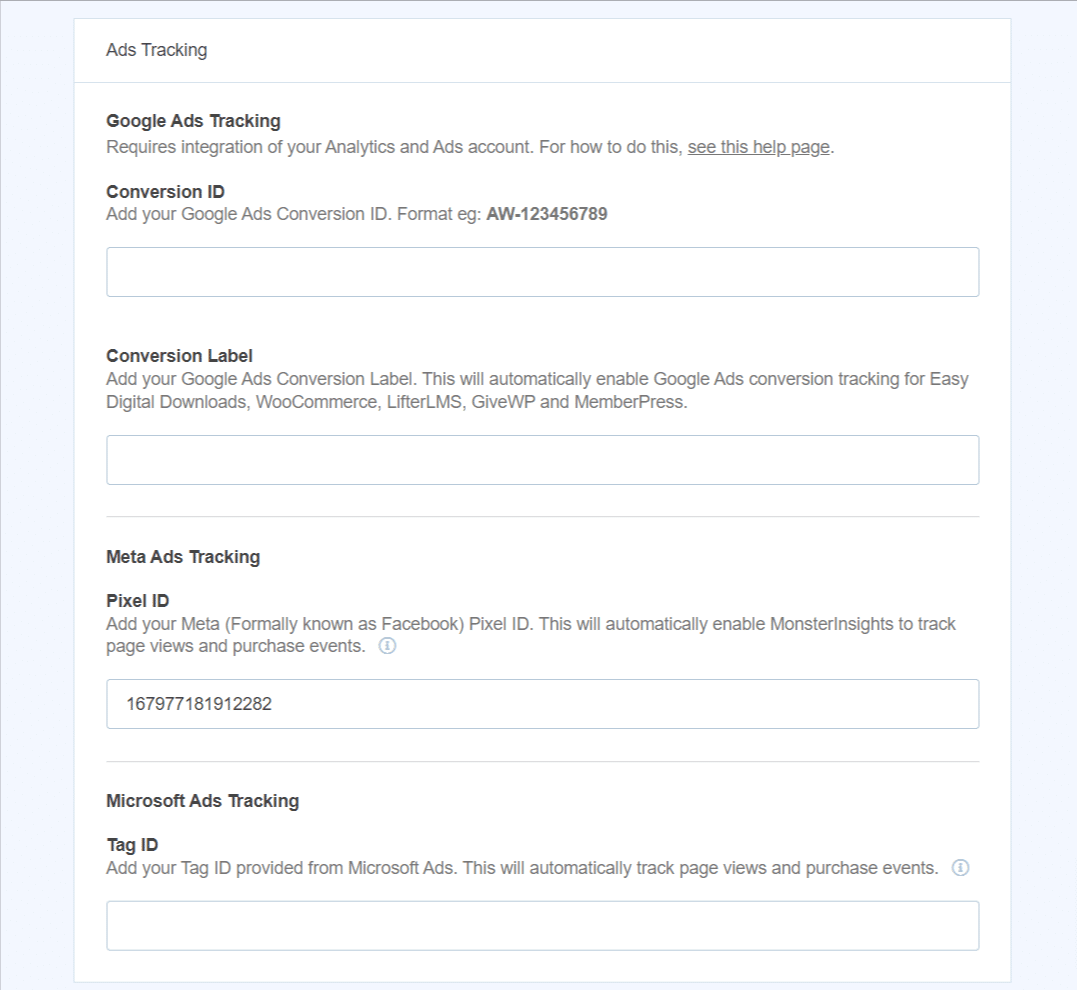
For full instructions on connecting PPC Ads to your eCommerce website, check out How to Set Up eCommerce Google Ads Conversion Tracking.
We also recommend using the User Journey addon with WooCommerce! For more information, read eCommerce Customer Journey Analytics: WordPress Guide.
That’s it! MonsterInsights is set up to track your WooCommerce conversions.
Now, let’s take a look at how to find your eCommerce reports.
Find WooCommerce Conversion Reports in WordPress
After you’ve completed the Google Analytics integration, you can view your eCommerce reports within your WordPress dashboard.
To get an overview of your WooCommerce conversion tracking data, just go to Insights » Reports » eCommerce in WordPress.
You’ll see an overview at the top:

Then, you’ll find a product performance report:
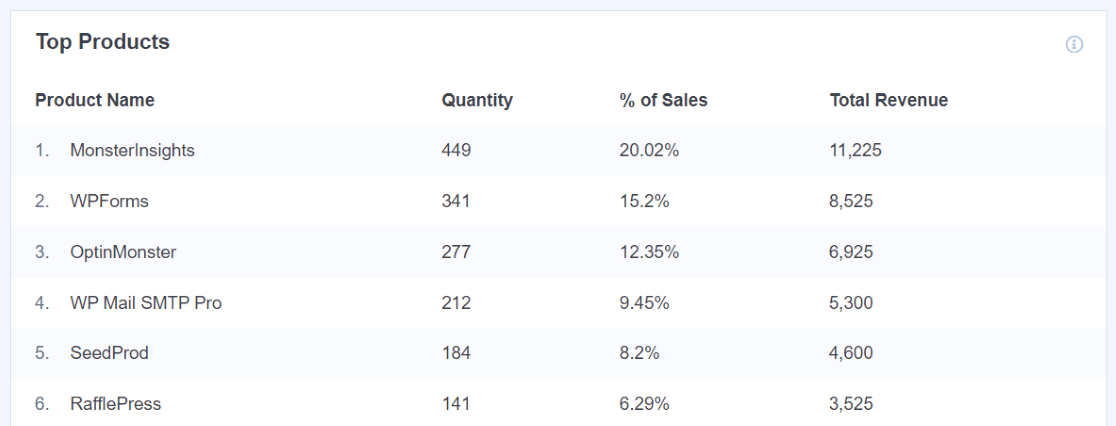
As you scroll down the page, you’ll see your store’s top conversion sources. These are traffic sources that send customers who completed successful purchases to your website.

Finally, you’ll be able to see the total add and removed from cart events, the percentage of new customers, and the percentage of abandoned checkouts.

If you want to see more detail, you can click the View Report button at the end of the products and conversion sources reports. Clicking on the button will take you to your Google Analytics 4 property, where you can explore your reports.
This provides a great overview of the health of your online shop, all right inside your WordPress dashboard.
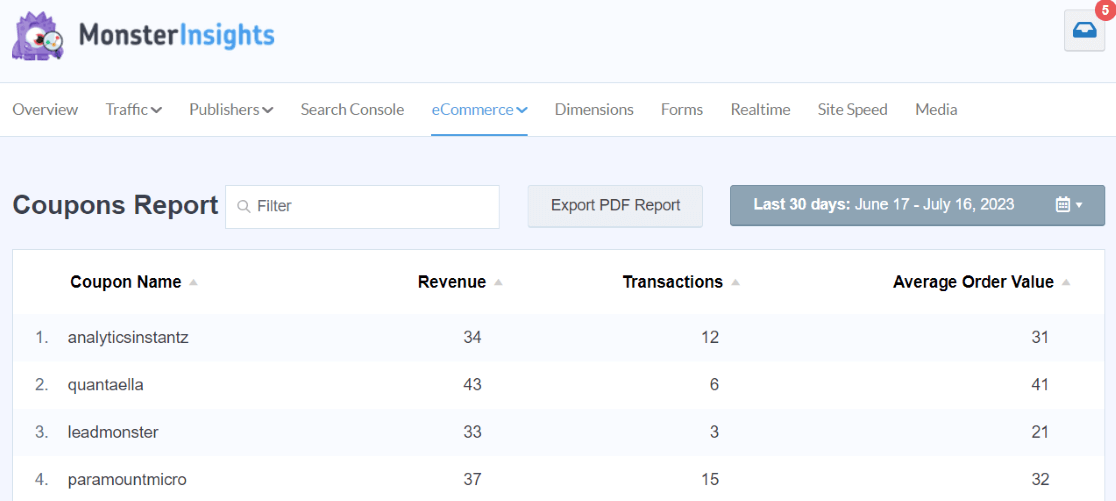
If you use coupon codes in your store, the MonsterInsights Coupons report is where you can find data about which coupons were used:
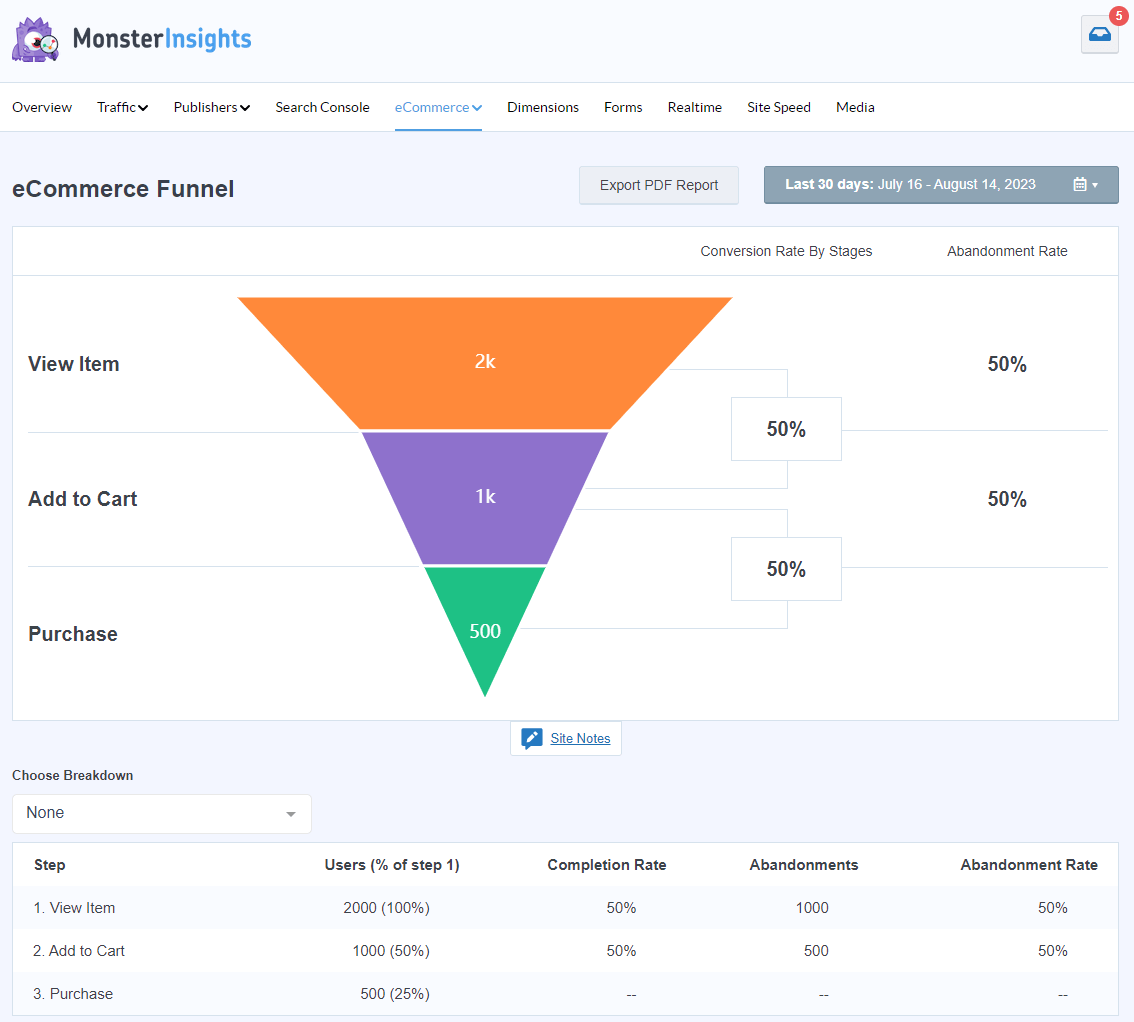
You’ll also definitely want to check out the funnel report to see where users are dropping out of your funnel:
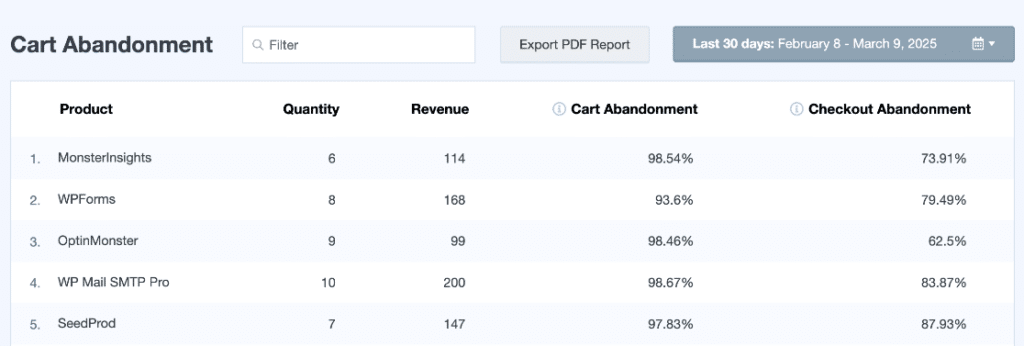
And finally, check the cart abandonment report to see which products are getting left in carts most often:
If you set up other conversion tracking, such as form submission tracking, custom dimensions, and more, you can view many of those reports in the other MonsterInsights report tabs.
Get a full tour of MonsterInsights in Your Ultimate Guide to MonsterInsights Dashboard Reports.
Find WooCommerce Conversions in Google Analytics 4
To view your eCommerce overview report in Google Analytics, navigate to Monetization » Overview. Here you can see your revenue trend by day, purchases by day, purchases by item name, purchases by item list, and more.
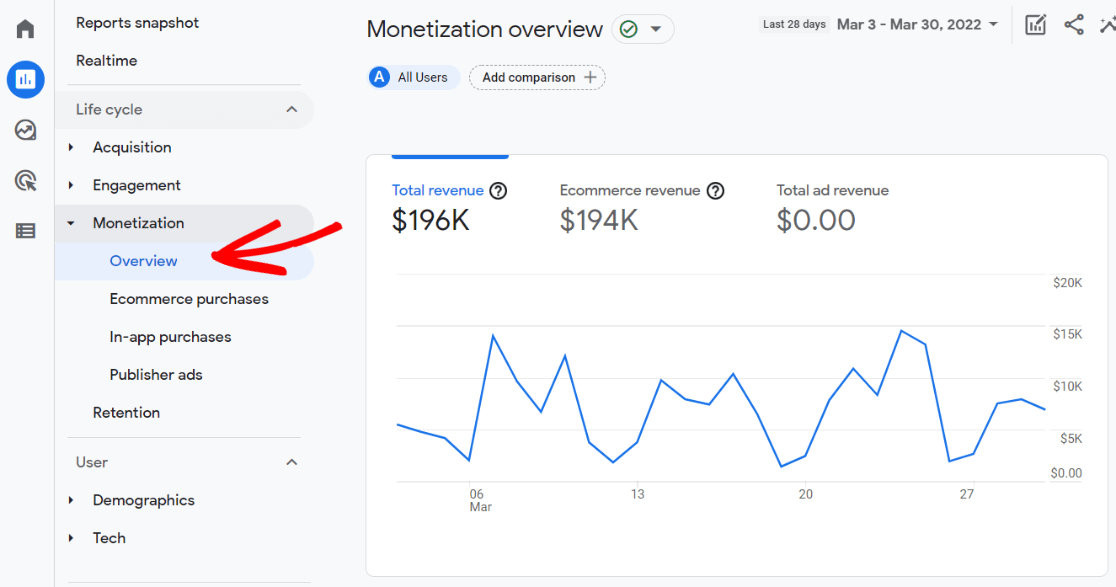
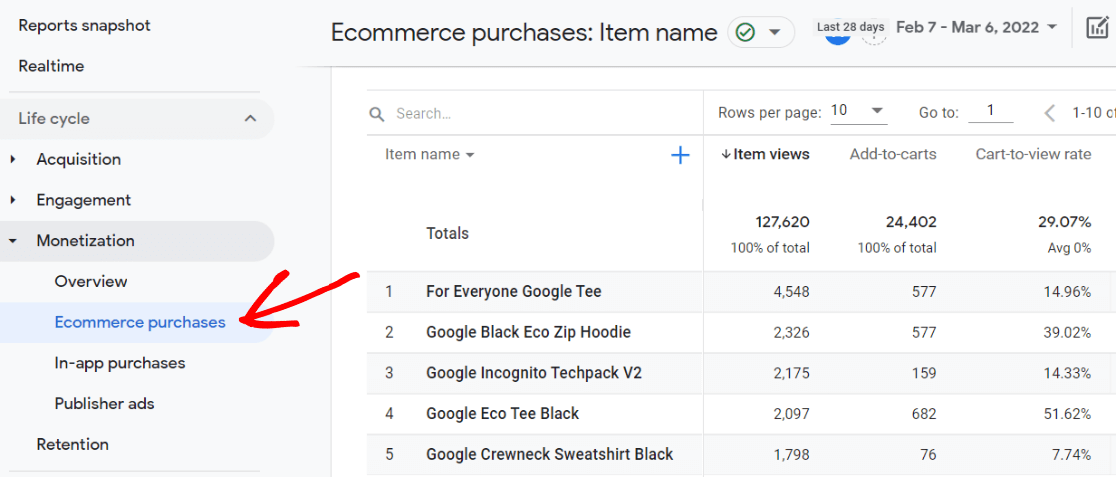
For a more in-depth look at items purchased, navigate to Monetization » Ecommerce purchases.

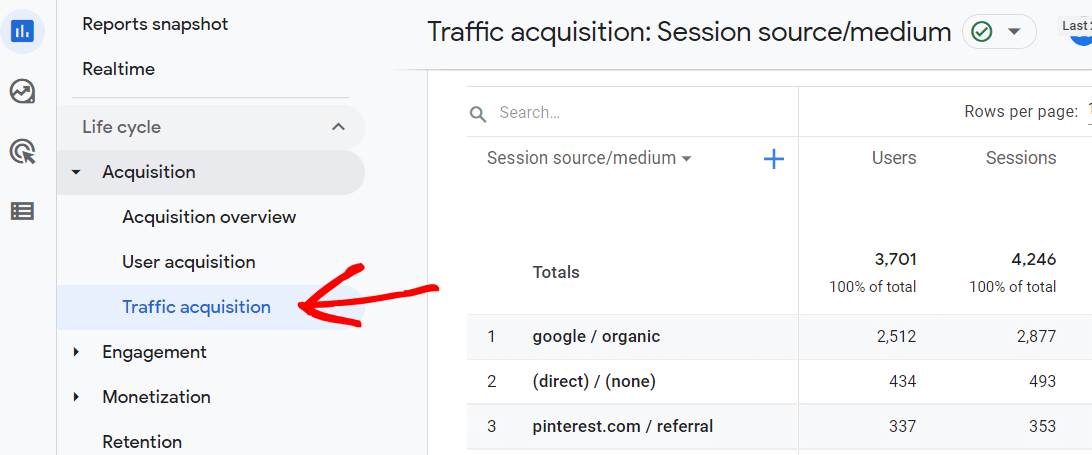
To view Google Analytics eCommerce sales (purchases) and revenue data organized by channel, navigate to Acquisition » Traffic acquisition:
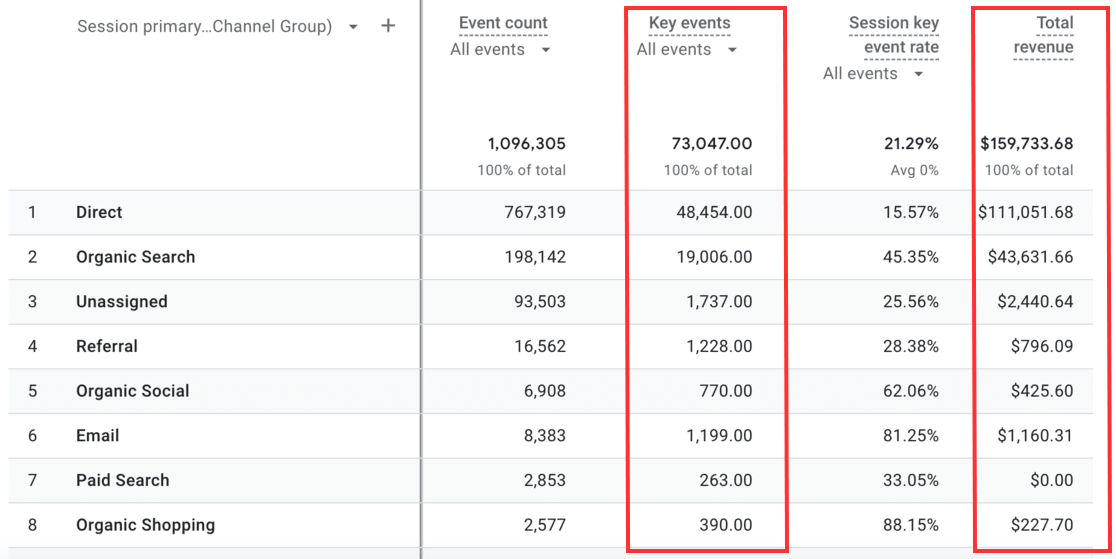
Then, scroll to the right in the table to find Key events (previously called conversions) and Total revenue.
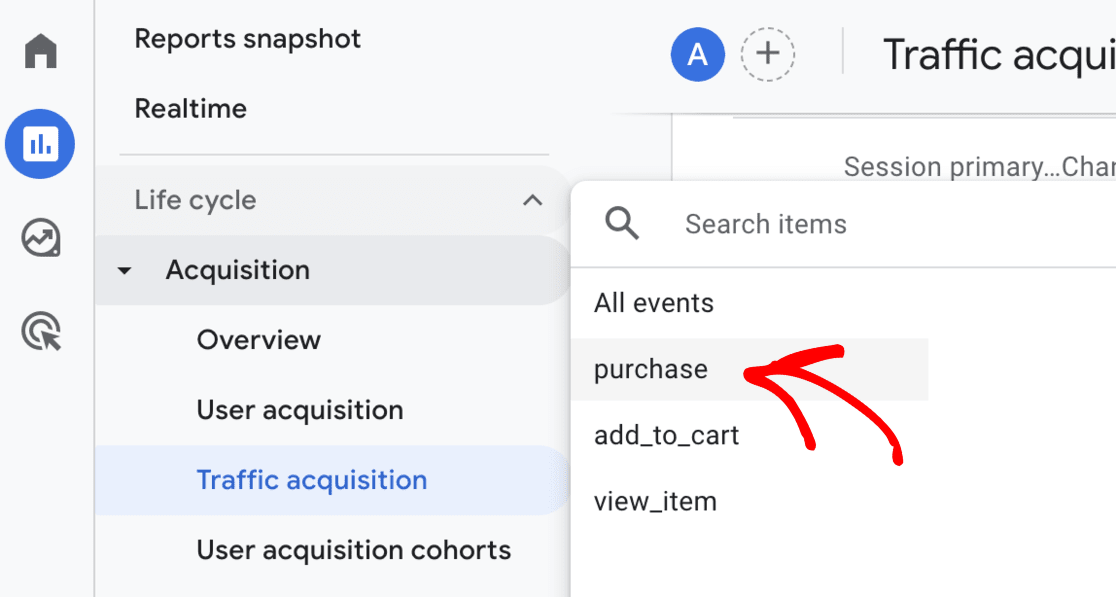
Click the All Events drop-down arrow under Key events and select purchase:
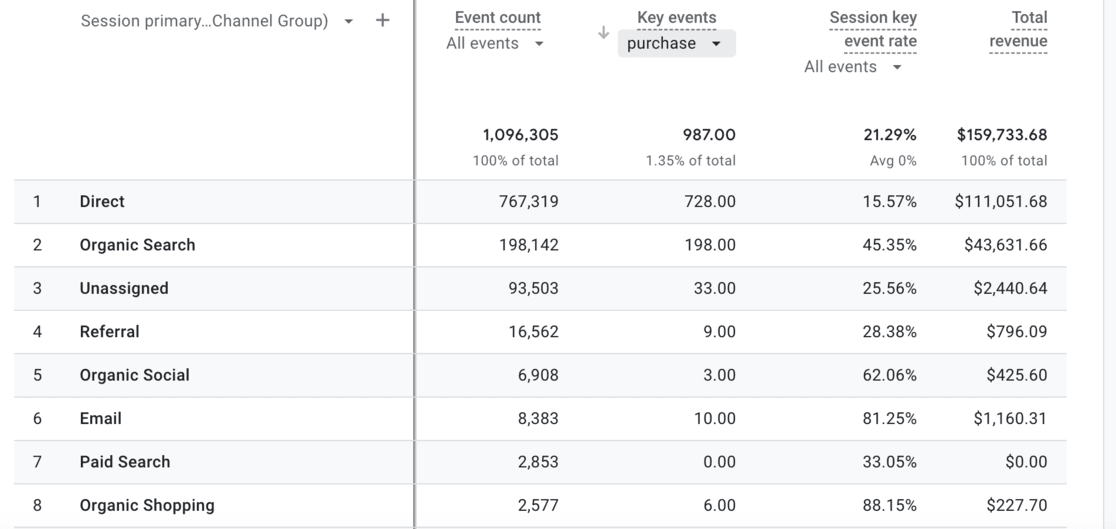
Now, the table shows total purchases and revenue by traffic channel.
That’s it!
You’ve successfully enabled WooCommerce conversion tracking by turning on eCommerce tracking in Google Analytics.
Start WooCommerce Conversion Tracking Today!
For more WooCommerce tips, check out:
29 Best WooCommerce Plugins
11 WooCommerce SEO Tips to Boost Your Traffic and Sales
How to Display Best-Selling Products in WooCommerce
12 Smart Tactics to Reduce Shopping Cart Abandonment
Not using the best Google Analytics plugin for WordPress yet? What are you waiting for?
Finally, don’t forget to follow us on Facebook and YouTube for more helpful reviews, tutorials, and Google Analytics tips.
WooCommerce Conversion Tracking FAQ
Do I need WooCommerce conversion tracking?
Yes, WooCommerce conversion tracking is essential for any WooCommerce store owner. Without it, you won’t be able to see how effective your store is at converting visitors into customers and identify areas for improvement.
What benefits does WooCommerce conversion tracking offer?
WooCommerce conversion tracking offers several benefits, including:
- Understanding customer behavior (what products they add to carts, what pages they visit, etc.)
- Identifying leaks in your sales funnel (where customers drop off)
- Measuring the effectiveness of your marketing campaigns
- Optimizing your store for better conversion rates
What data can I track with WooCommerce conversion tracking?
You can track a variety of data with WooCommerce conversion tracking, including:
- Add to cart events
- Remove from cart events
- Purchase completions
- Abandoned cart rates
- Total revenue
- Top conversion sources
- Average order value
- And more
Do I need to know how to code to set up WooCommerce conversion tracking?
No, you don’t necessarily need to know how to code to set up WooCommerce conversion tracking if you use a plugin like MonsterInsights that can simplify the process. If you don’t use a plugin, you will need to use code or Google Tag Manager to set up eCommerce event tracking.
How can I use WooCommerce conversion tracking data to improve my marketing campaigns and make more revenue?
Here are practical ways to use your conversion data:
- Identify your best marketing channels: Allocate more budget to channels that drive conversions
- Optimize product pages: Improve pages for products with high view rates but low conversion rates
- Reduce cart abandonment: Add exit-intent popups or email reminders where you see high abandonment
- Improve user experience: Fix points in your funnel where customers frequently drop off
- Target the right audiences: Create lookalike audiences based on your converting customers
- Refine your ad targeting: Focus on demographics and interests that generate the most sales
- Optimize pricing and promotions: Test different price points and promotions based on conversion data
Can I track conversions from Facebook and Google Ads?
Yes, with MonsterInsights Pro, you can track conversions from both Facebook (Meta) Ads and Google Ads. The plugin makes it easy to add your conversion tracking codes without touching any website code.
Why is my WooCommerce conversion tracking not working?
If your WooCommerce conversion tracking isn’t working properly, check these common issues:
- Google Analytics isn’t connected correctly
- The eCommerce tracking addon isn’t activated
- You’re looking at data before tracking was implemented
- Your website has caching that’s interfering with the tracking code
- You have privacy plugins blocking scripts
For most users, using MonsterInsights eliminates these technical issues by properly implementing tracking code.
How do I track abandoned carts in WooCommerce?
MonsterInsights automatically tracks abandoned cart rates as part of its eCommerce tracking features. You can view this data in your MonsterInsights reports under the eCommerce tab.
To reduce cart abandonment, consider implementing exit-intent popups, email recovery campaigns, or simplifying your checkout process based on the data you collect.
Is WooCommerce conversion tracking GDPR compliant?
Yes, when set up properly with MonsterInsights, WooCommerce conversion tracking can be GDPR compliant. MonsterInsights includes built-in compliance features like:
- Cookie consent integration
- IP anonymization
- User tracking opt-out
- Data retention controls
Always ensure you have a privacy policy that discloses your use of analytics and obtain proper consent from EU visitors.

Hi, I am using my woocommerce webshop for facebook ads. I want to see the conversion percentage of my webshop. So which percentage of my total website visitors placed an order. Is that possible with monsterinsight or does it only show the conversion percentage of the google analytics? Please let me know.
Kind regards,
Tommie
Hi Tommie – Are you wondering if you can see conversions from your Facebook ads? If so, then yes, a couple different MI reports could help! MonsterInsights connects with Google Analytics, so all of the numbers you see inside MonsterInsights are from Google Analytics. Four a tour of all of our reports, check out Your Ultimate Guide to MonsterInsights Reports