Do you want to track the activity of your logged in users in Google Analytics and WordPress? If you require people to register on your website, then you can set up WordPress user ID tracking in GA4 to track individual users by ID to see more about how those visitors interact with your site.
By enabling individual user ID tracking in Google Analytics, you can accurately track your logged in users across multiple devices.
In this article, we’ll take a look at how to set up WordPress user activity tracking in Google Analytics.
Can Google Analytics Track Users by User ID?
If you run a community-powered WordPress site that you want your users to register an account on, such as an eCommerce site, membership site, or forum site, Google Analytics can track your individual users.
So, Google Analytics can track them, but why should you use User ID tracking?
Better Conversion Tracking
Enabling UserID tracking on your site provides you with the awesome benefit of being able to track users across devices, and for longer periods of time.
For example, say someone arrives at your site by clicking on a social media campaign from their mobile device. They leave your site without converting. Then, they come back via desktop by typing in your URL to complete the conversion.
Google Analytics will see the above example as 2 separate visitors, the second of which completed a conversion via Direct traffic. If you have UserID tracking set up, though, you can see that someone clicked on your social media campaign, then came back via the Direct channel to complete the conversion.
Not only will you be able to track the engagement data of each unique user, but you can discover what devices they used, which channel they used to find your site, their revenue, and more, and track multiple sessions over an extended period of time.
Track Specific Users for Support or Marketing
Say a specific user contacts you needing support. You can find the user in Google Analytics to see what pages on your site he or she has visited, whether he’s on desktop or mobile, and more to help inform you about his needs or his problem.
You can also use these reports for marketing purposes. Say you have a page about upgrading to the next license level. With Google Analytics UserID tracking plus the MonsterInsights User ID custom dimension, you can look at that specific page in Google Analytics and see which of your users (by User ID) have viewed it. You could use that list to create an email list to target those who might be interested in upgrading.
How Does User ID Tracking Work?
When you enable UserID tracking, instead of a Client ID, Google Analytics will start using the WordPress user ID to identify registered users.
The Client ID represents the unique device from which a user engaged with your content. That means if a unique user browses through your website from two different devices, it will be counted as two different users, not a single user.
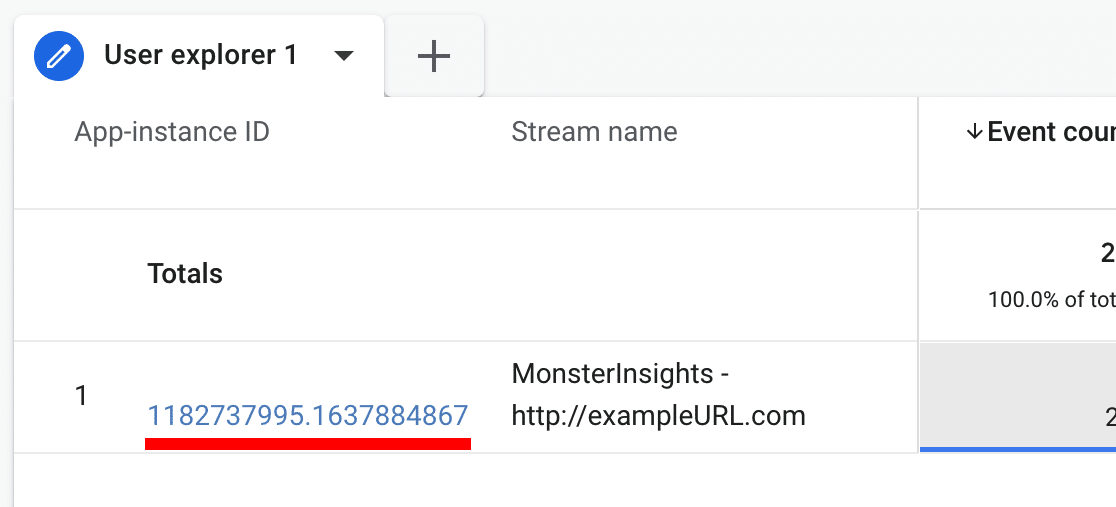
The WordPress user ID, however, identifies a user and follows them no matter what device they’re using:

So, by enabling WordPress user activity tracking, you can track logged-in users more accurately even if they visit your site from different devices.
Now, let’s dive into how to set up user ID tracking in WordPress.
How to Set Up WordPress User ID Tracking in GA4
The easiest way to track WordPress user ID is by using MonsterInsights. It’s the best Google Analytics plugin for WordPress.
Using the plugin, you can easily set up activity tracking and other advanced features. For instance, you can track affiliate links, file downloads, set up custom dimensions, track eCommerce performance, and more.
For tracking your logged in users, MonsterInsights replaces the anonymous Client ID in Google Analytics with the WordPress User ID with just a few clicks.
Step 1: Install MonsterInsights
The first thing you’ll need to do is to install and activate MonsterInsights at the Pro level on your site.
Once the plugin is active on your site, the next thing you’ll need to do is properly connect Google Analytics with MonsterInsights.
The setup wizard will guide you every step of the way. And you don’t have to edit a single line of code.
Step 2: Install the eCommerce Addon
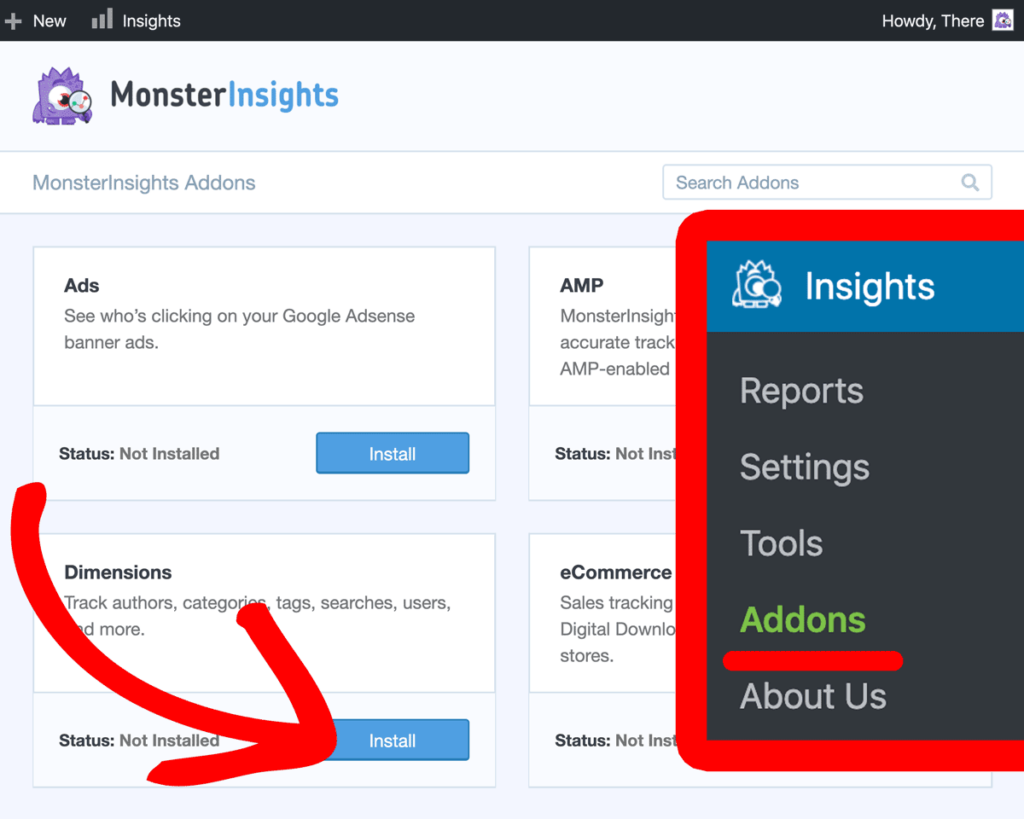
To set up eCommerce tracking for your WooCommerce store, you’ll need the eCommerce addon. To add it, head to Insights » Addons and click Install in the eCommerce addon box.
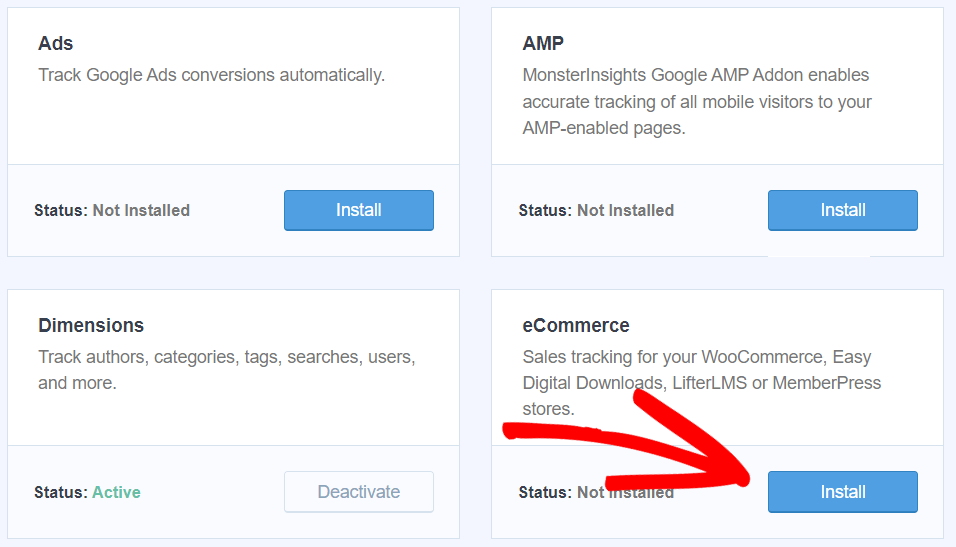
That’s all you have to do to set up eCommerce tracking!
Step 3: Enable User ID Tracking in MonsterInsights
After installing the plugin, you will have to activate User ID tracking.
To do that, go to Insights » Settings » eCommerce.
Now scroll down to User ID Tracking and click on the option that says Enable User ID tracking.
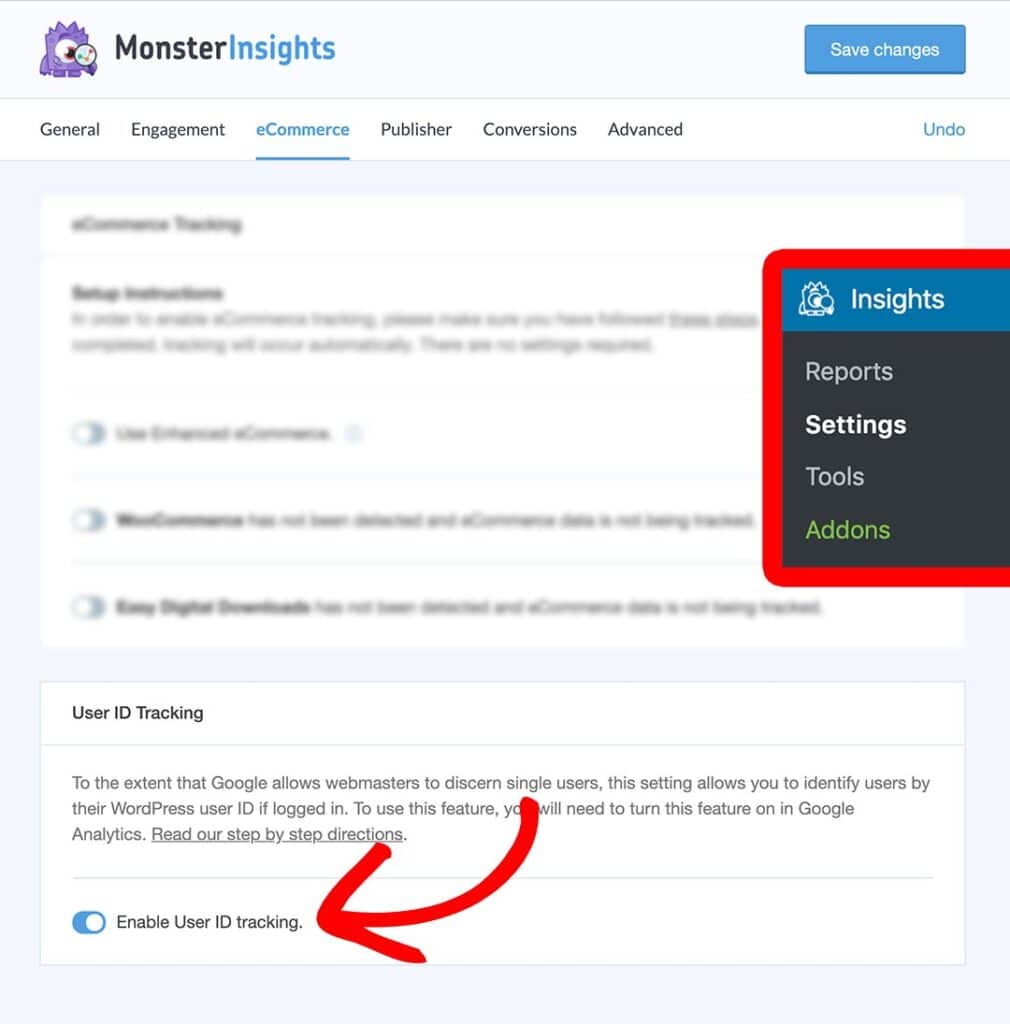
That’s it! You can now create a user ID report in GA4.
How to Find the User Activity Tracking Report in Google Analytics
In Google Analytics 4, we’ll find the user ID report by creating a pretty easy custom report.
Just head to the Explore tab, then scroll over until you see the User explorer template. Click it.

Now, you’ll see your user explorer report!
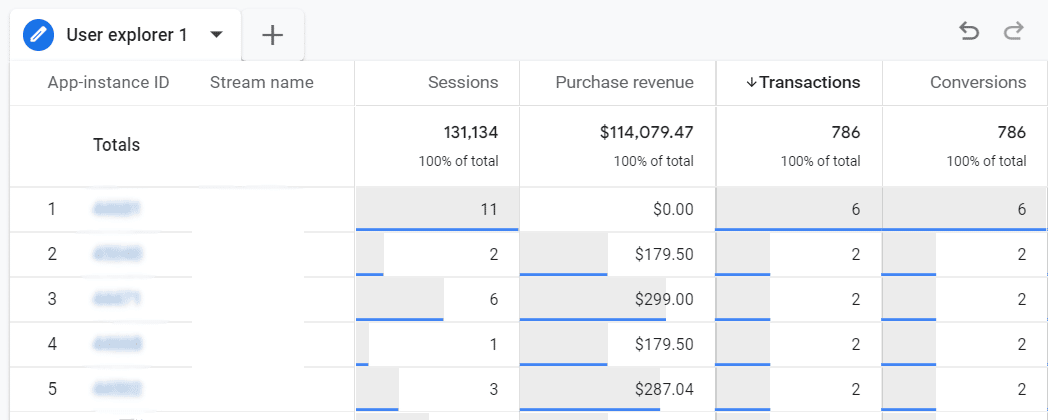
Click on a user in the App-instance ID column to see more information about that user:
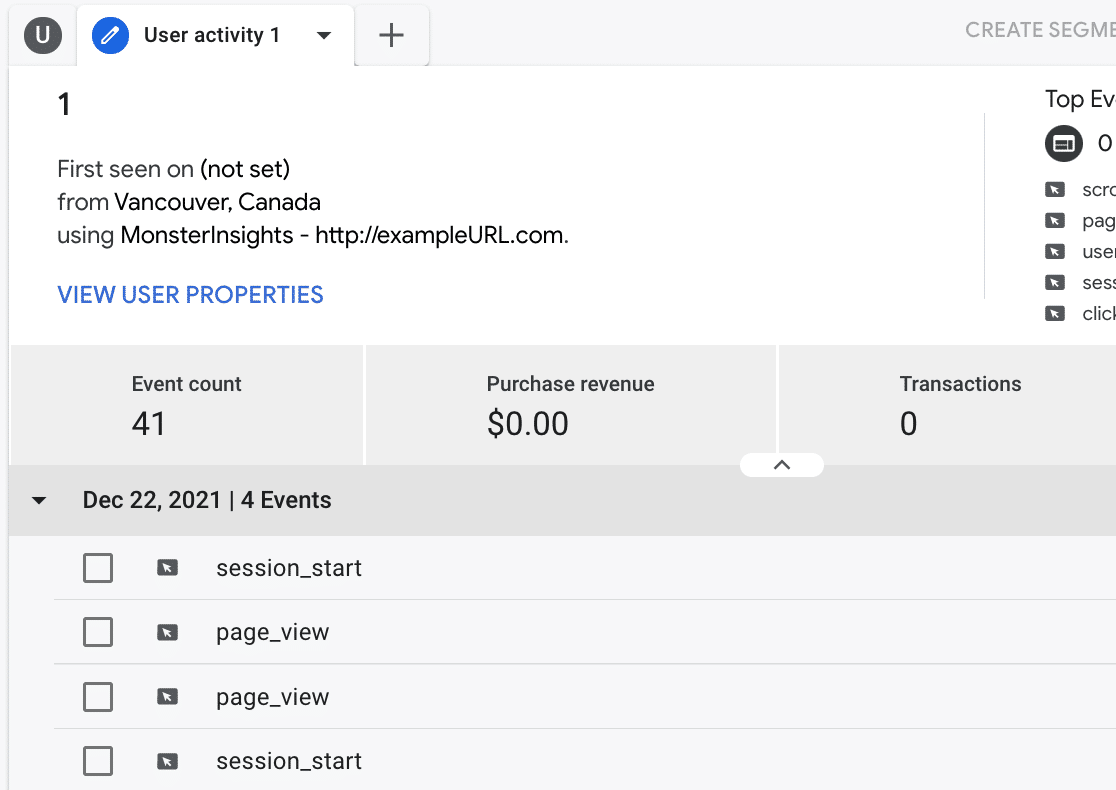
Here, you’ll see where your user is from geographically, their purchase revenue, events, and more. Click on each event to see more details about it.
How to See a Top Users Report in WordPress
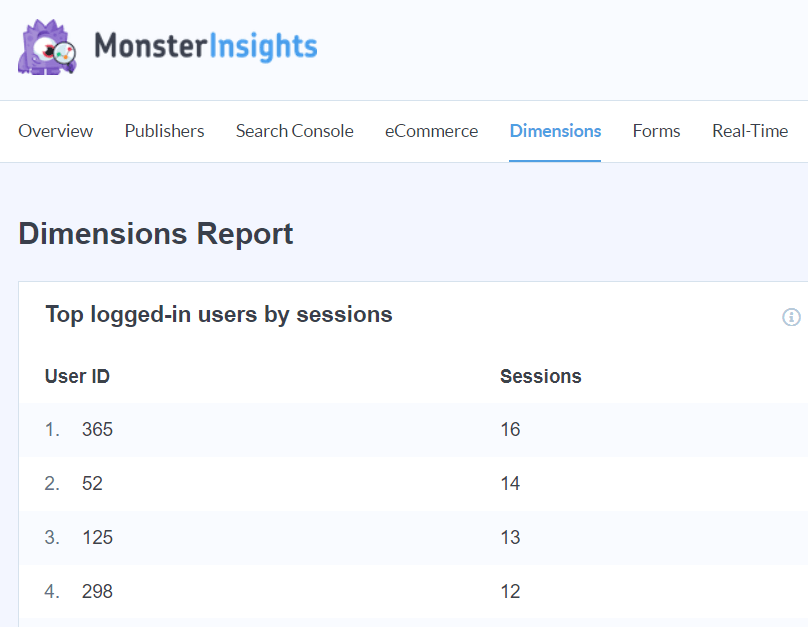
Want a Top Users by Sessions report right in your WordPress dashboard? You’ll need the MonsterInsights plugin at the Pro level or above, and the Custom Dimensions addon. Let’s go over how to get these set up.
First, you’ll need to install MonsterInsights on your site and connect it to Google Analytics.
For the full tutorial on those steps, read How to Add Google Analytics to WordPress (The RIGHT Way).
Next, you’ll want to install the Custom Dimensions addon.
To install the addon, visit the Insights » Addons page in your WordPress dashboard. Then, click Install under the MonsterInsights Dimensions addon.
Step 2: Add Custom Dimensions in MonsterInsights
Navigate to Insights » Settings from your dashboard and click on the Conversions tab.

Scroll down to the Custom Dimensions section, click the Add New Custom Dimension button, and choose the User ID dimension from the dropdown.
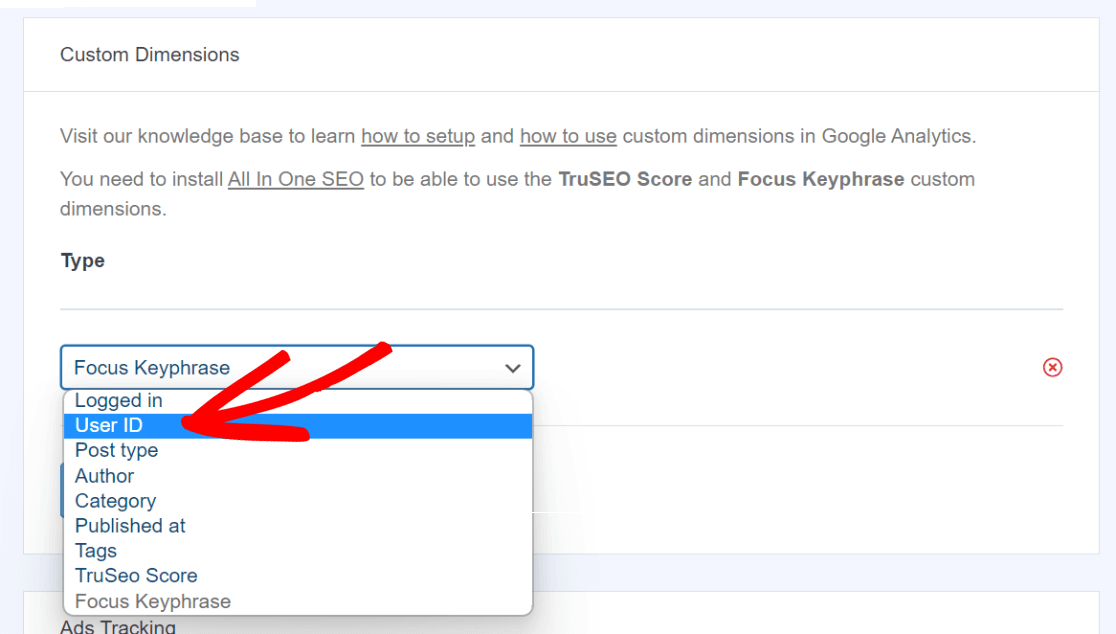
That’s it! You’ll now have access to your custom dimensions report in your WordPress dashboard.
You can view your custom dimensions reports in the MonsterInsights dashboard by going to Insights » Reports » Dimensions.
We hope this article helped you learn how to set up WordPress user activity tracking. If you enjoyed this article, you might also want to read the beginners’ guide to custom dimensions in Google Analytics.
Not using MonsterInsights yet? What are you waiting for?
And don’t forget to follow us on Twitter, Facebook and YouTube for more helpful Google Analytics tips.


Is it beneficial to set this up even if the website is not an eCommerce site?
Hi Jules,
Absolutely! If your website requires users to log in then tracking user activities can unveil exciting insights.
Is this able to track WordPress users segmented by user role?
Hey Nick – Great question. Unfortunately it does not at this time. We’ll add this as a feature request!
What about GDPR compliance? As I know, tracking User-IDs with Google Analytics is not GDPR compliant and thus should actually not be done?
Hi Michael,
If you are required to make your site compliant with GDPR, you are correct that you may need to disable the User-ID tracking feature or avoid setting it up altogether for your website,
We built an EU Compliance addon to help website owners automate settings needed for GDPR compliance such as disabling User-ID tracking, anonymizing IP addresses, and more.
Please keep in mind you’ll need to consult with a specialist internet law attorney to determine if you are in compliance with all applicable laws for your jurisdictions and your use cases.
How do I set this up in universal analytics? The above is now out of date.
Hey Scott! Thanks for your comment. You should be able to find directions for both UA and GA4 in the article – the first 2 steps are the same, then step 3 has instructions for both UA and GA4. If it’s still confusing, let me know!
If I have a member wall or page on my site is it possible to track user ID and connect that to a specific member with the Monsterinsights once they have logged in?
Hi Jono – Yes, as long as you have people logging in, MonsterInsights will change the random Client ID that Google Analytics assigns to the person’s user ID.