Do you want to learn how to track coupon codes in Google Analytics for your eCommerce store?
Coupon campaigns are an awesome marketing strategy for attracting new customers, engaging with your existing customers to increase repeat business, and turning on-the-fence shoppers into conversions.
However, you need to use Google Analytics coupon tracking to know if your promo codes are actually working. Then, you can uncover what works best and optimize your future campaigns.
In this article, we’ll show you step-by-step how to track coupon codes in Google Analytics and WordPress for your eCommerce store.
Coupon Tracking Video Tutorial
Why Use Google Analytics Coupon Tracking?
Whether you use discount codes for WooCommerce or another eCommerce platform, you’ll want to make sure your coupon usage is tracked in Google Analytics.
That way, you can do discount code analysis to uncover which campaigns work the best, optimize your future strategies, and better understand your customers’ shopping behavior. Here are some of the important insights you can gather with Google Analytics coupon tracking:
- Which coupon codes produce the most revenue
- How customers who use coupons arrive on your website (Google Ads, affiliates, social media, organic search, an email coupon link, etc.)
- The average order value for purchases with a coupon code.
- The products that customers purchase or view most frequently when they’re using a coupon
- And much more…
Learning how to track coupon codes in Google Analytics is the first step toward optimizing your promo code campaigns and seeing a major payoff.
Ready to dive in?
How to Track Coupon Codes in Google Analytics
Before you can track coupon codes in Google Analytics, you’ll want to set up eCommerce tracking. Don’t worry, we’ll walk you through how to do it easily.
Then, we’ll show you an easy way to track coupon usage in WordPress as well as where to find your coupon report in Google Analytics.
- Step 1: Install MonsterInsights
- Step 2: Set Up eCommerce Tracking
- Step 3: Track Coupon Codes & eCommerce Performance
- Step 4: View Your Coupon Report in Google Analytics
Already have MonsterInsights installed on your site? Jump ahead to find your eCommerce reports and track coupon codes in WordPress and Google Analytics.
Step 1: Install MonsterInsights
MonsterInsights is the best Google Analytics plugin for WordPress. You can connect your Google Analytics account to your site and automatically set up advanced eCommerce tracking code without hiring a developer, using a complicated tool like Google Tag Manager (GTM), or manually editing your site’s data layer.
The plugin seamlessly integrates with WooCommerce and other popular eCommerce platforms (Easy Digital Downloads, LifterLMS, MemberPress, Restrict Content Pro, GiveWP, and MemberMouse) to bring you the insights that matter.
You can track coupon codes, product performance, purchase events, shopping cart abandonment, and much more all inside your WordPress dashboard.
Plus, with MonsterInsights, you also get access to tons of other Google Analytics features and sophisticated tracking in only a few clicks, such as:
- One-click Google Ads and Microsoft (Bing) Ads conversion tracking
- Track product performance and automatically display your most popular products
- Custom dimensions and custom event tracking
- Social media and referral tracking
- Advanced form tracking and integration with popular form builders like WPForms, GravityForms, Ninja Forms, Formidable Forms, and more.
- Realtime reports
- Keyword tracking to optimize your SEO
- Video play tracking
- And much more…
The first step is to head to the MonsterInsights pricing page and purchase a license. You’ll need the Pro license or above to access eCommerce tracking.
After you’ve purchased a license, you’ll need to install the plugin and connect it to your Google Analytics account by following the set-up wizard.
If you don’t have a Google Analytics account yet or need more detailed help with this step, check out our tutorial: How to Add Google Analytics to WordPress the Right Way (2023).
Step 2: Set Up eCommerce Tracking
Next, you’ll need to install and activate the eCommerce addon to track your eCommerce data. From your WordPress admin, go to Insights » Addons.
Find the one titled eCommerce and press Install. When the button changes to say Activate, click it again.
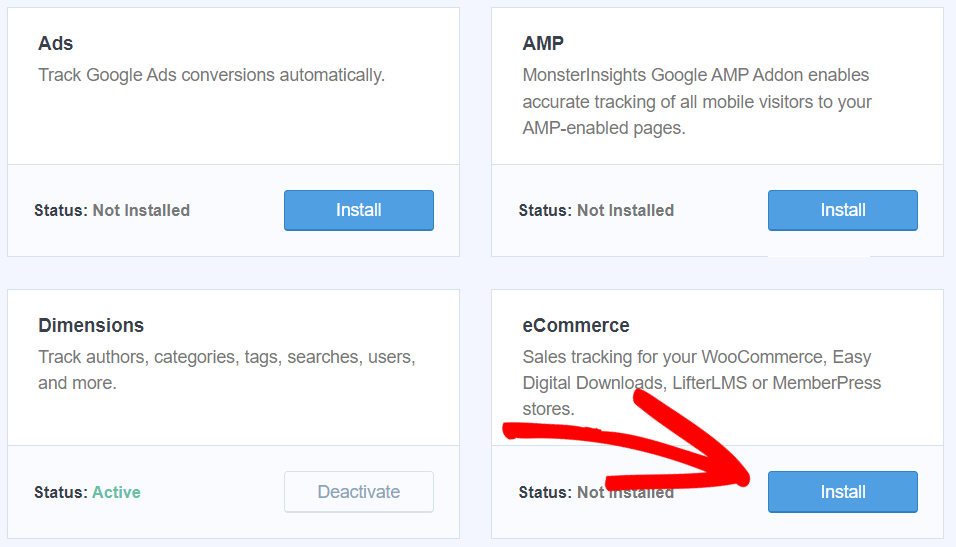
That’s it! You just set up Google Analytics eCommerce tracking. Pretty easy, right? Now, let’s see where you can find your eCommerce reports and track coupon codes.
Bonus: Although it’s not required for coupon tracking, you’ll probably want to go ahead and activate the User Journey addon to track the customer journey for eCommerce transactions. Easily see page views, product views, and every step in the checkout process for each transaction ID.
Step 3: Track Coupon Codes & eCommerce Performance
One of the best things about MonsterInsights is that you can see how your website is performing without ever leaving WordPress.
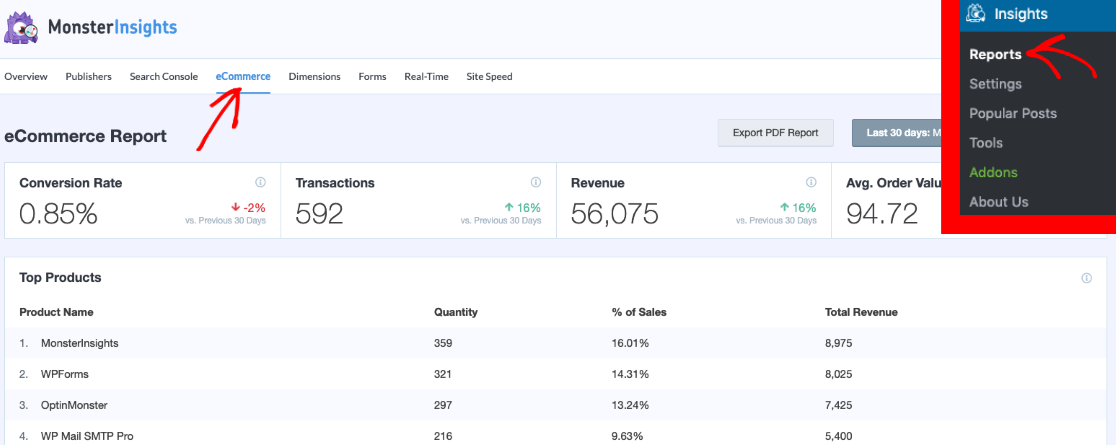
To see data for your eCommerce store, go to Insights » Reports and click the eCommerce tab at the top. To see your primary eCommerce metrics, click Overview from the drop-down.
Here, you can see your Conversion Rate, the total number of Transactions, total Revenue, and Average Order Value for the date range you select. You’ll also see your Top Products report.
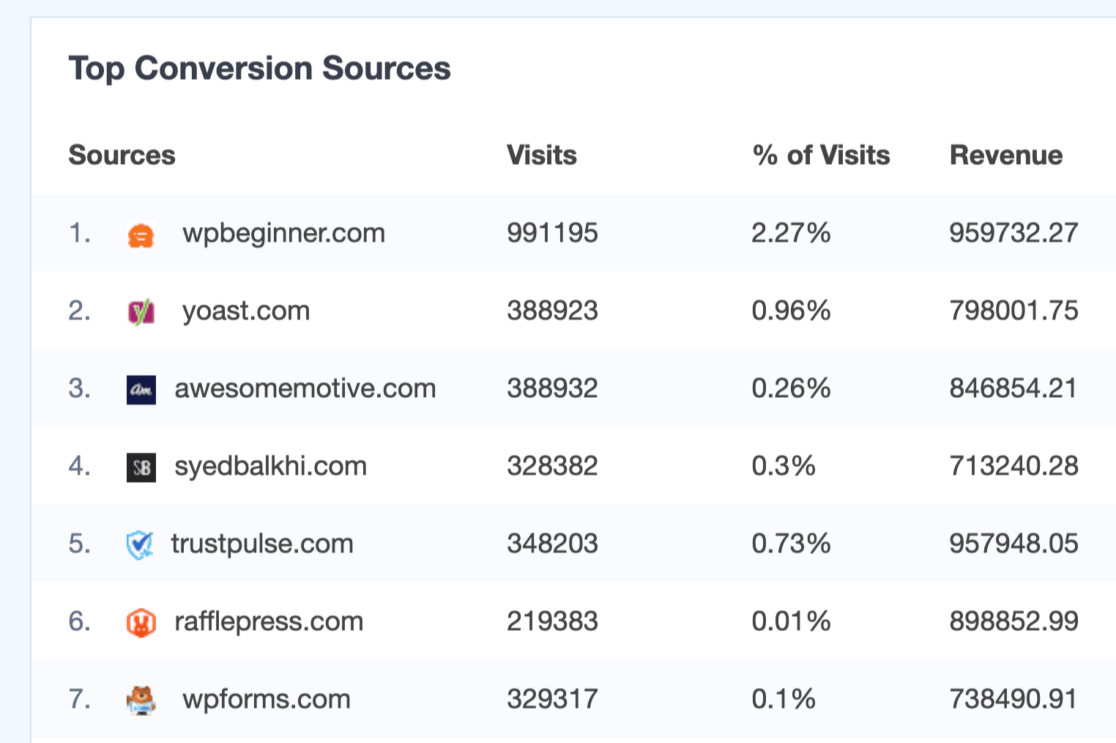
Scroll down to see your Top Conversion Sources at a glance.
At the bottom of this page, you’ll also find your Add to Cart / Remove from Cart events, New Customers, and Abandoned Checkouts.

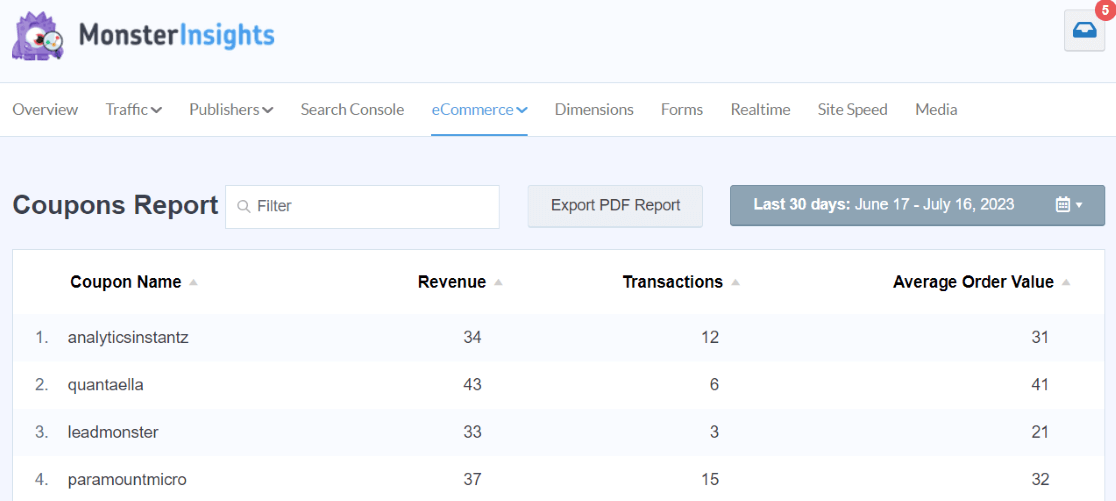
Now that you know where to find your eCommerce report, let’s see where to view your coupon report in WordPress. From the top menu, click eCommerce » Coupons.
You’ll see a list of all the coupons used on your site. Quickly see how many Transactions each coupon has been used in, the generated Revenue, and the Average Order Value when a coupon is used.
That’s it! You learned how to track coupon codes with Google Analytics, without even leaving WordPress.
If you want to find your coupon report in Analytics to uncover more data, we’ll show you how to do that next.
Step 4: View Your Coupon Report in Google Analytics
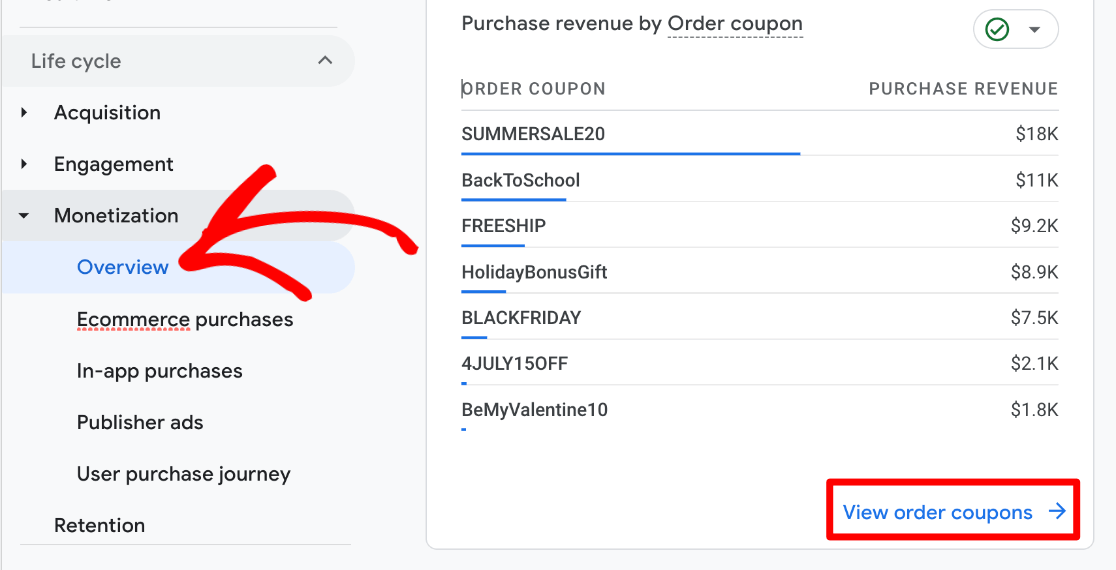
First, head to your Google Analytics account and sign in. Go to Reports » Monetization » Overview.
Scroll down until you see the card titled Purchase revenue by Order coupon. Go ahead and click the bottom arrow where it says View order coupons.
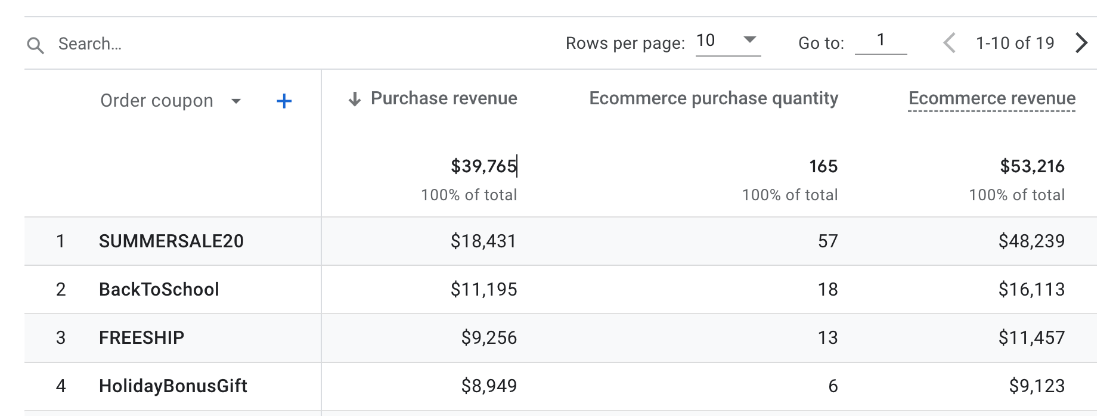
Here, you’ll see your coupon code tracking report. You can see each discount code that’s been used on your site along with their metrics, like the number of times a coupon code has been used (eCommerce purchase quantity).
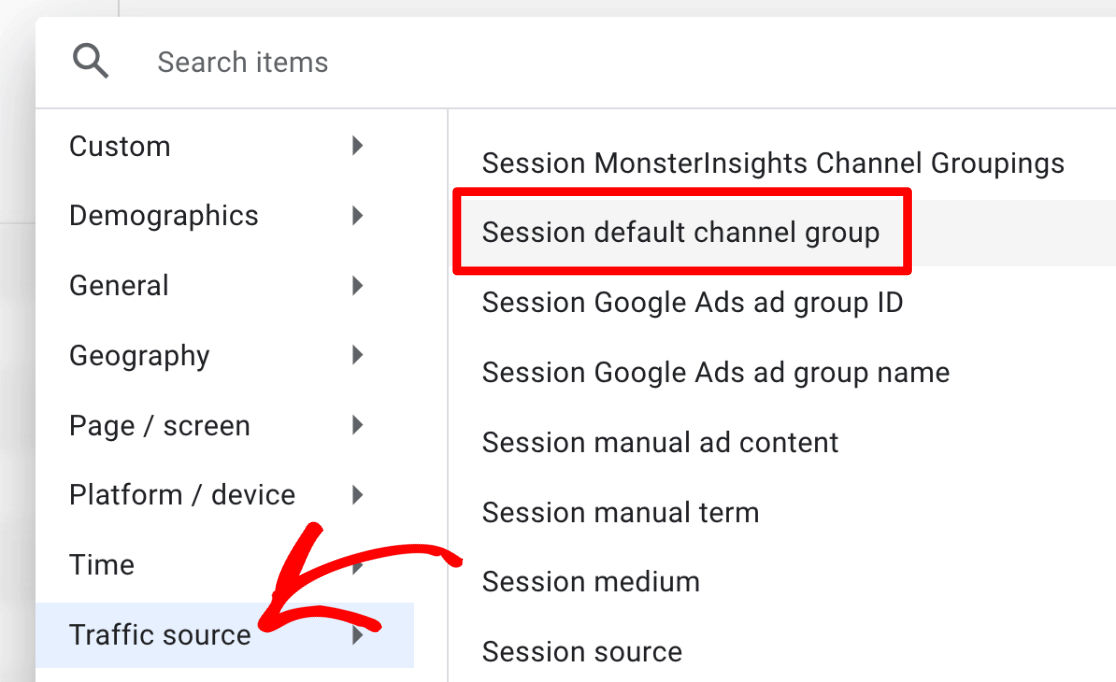
You can also add a secondary dimension to the table to get more insights.
For example, click the + sign next to Order coupon. Then, add Traffic Source » Session default channel group.
Now, you can see how much revenue for each coupon comes from organic search, referral, email, etc.
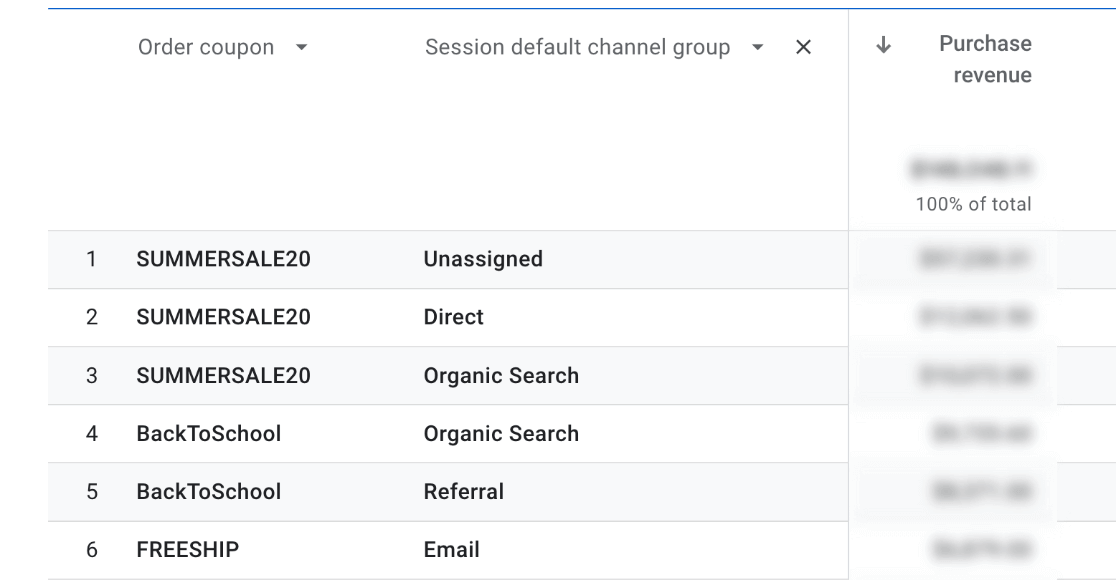
In our example, the SUMMERSALE20 discount code is producing the most revenue, and BackToSchool is also performing well for Organic Search and Referral, but neither one is top-performing for Email.
That could be a good indicator that we’re not promoting it well enough in our email marketing.
Start Tracking Your eCommerce Store & Coupon Codes Today!
Now that you’ve learned how to track coupon codes in Google Analytics, there’s a wealth of information you can discover about customer shopping behavior, your sales funnel, and more by using comparisons and custom explorations.
Uncover how users interact with your coupons, how promo codes affect events, like add-to-carts, and more. Check out How to Create Google Analytics 4 Custom Reports (Step by Step) to learn more about creating explorations.
Not using MonsterInsights yet? What are you waiting for?
Don’t forget to follow us on Twitter, Facebook, and Youtube for the best WordPress tutorials and Google Analytics updates.

