Google Analytics annotations are back in GA4!
This powerful feature helps you add context to your analytics data by marking important events directly on your reports. With annotations, you can easily track how website changes, marketing campaigns, and other activities impact your traffic and performance.
I’m thrilled to share that Google has finally reintroduced this beloved feature to GA4 in April 2025. In this guide, I’ll walk you through how to use annotations in GA4 and show you an even easier way to implement them if you’re using WordPress.
Table of Contents:
GA4 Annotations in WordPress: Video Overview
What are GA4 annotations?
GA4 annotations are notes you can add to specific dates in your analytics reports to document important events or changes. They provide crucial context to your data, helping you understand why certain metrics might have changed.
In the previous version of Google Analytics (Universal Analytics), annotations were a standard feature that allowed you to add short notes to specific dates and share them with team members who had access to the account.
This was an incredibly useful tool for businesses to see how activities were impacting their websites, such as new email campaigns, design changes, new content, promotions, new affiliate links, offline advertising, real-world events, or anything else they wanted to document.
When GA4 was first released, this feature was noticeably absent, making it harder for teams to document and track the impact of their activities. But now, Google has brought annotations back to GA4 with some improvements!
Why Annotations Matter in GA4
Annotations are incredibly valuable for several reasons:
- Document important changes: Record website updates, redesigns, or new features
- Track marketing initiatives: Mark the start and end dates of campaigns
- Note external factors: Document events like holidays, outages, or market changes
- Improve team collaboration: Share context about website changes with your team
- Make data-driven decisions: Better understand what impacts your traffic and conversions
Here are some specific examples of what you might want to annotate:
- Website redesign launches
- New product releases
- Email campaign send dates
- SEO updates
- Algorithm changes
- Paid media campaigns
- Technical issues or outages
- Major content publications
- Seasonal promotions
- Industry events
How to Add Annotations in Google Analytics 4
Google has now added back a native annotation functionality to GA4. Here’s how to add annotations directly in GA4:
Step 1: Open a Report in GA4
Navigate to any report in GA4 that displays a chart (such as the Acquisition Overview or Engagement Overview reports).
Find the new annotations icon up in the right corner:
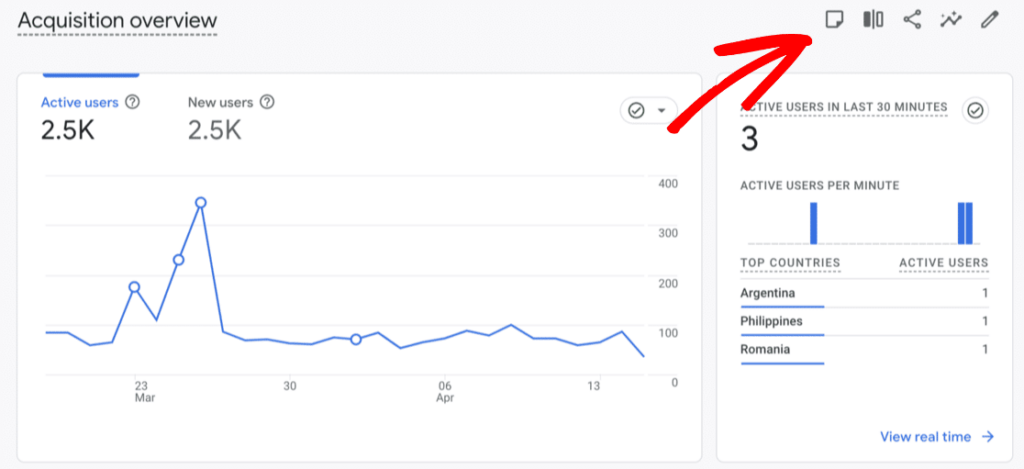
A panel will open to the right. Click Create annotation to get started:
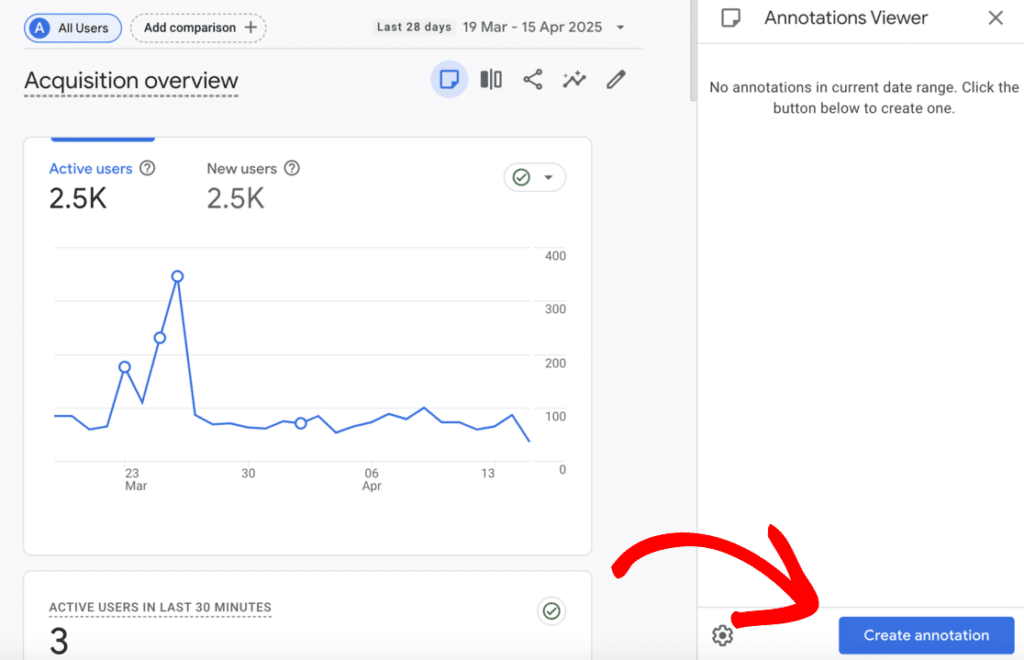
Step 2: Add Your Annotation
Now, fill in the following information:
- Title: Enter a clear, concise title (up to 60 characters)
- Description: Add more context if needed (up to 150 characters)
- Date: Choose a single date or date range
- Color: Select a color to categorize your annotation
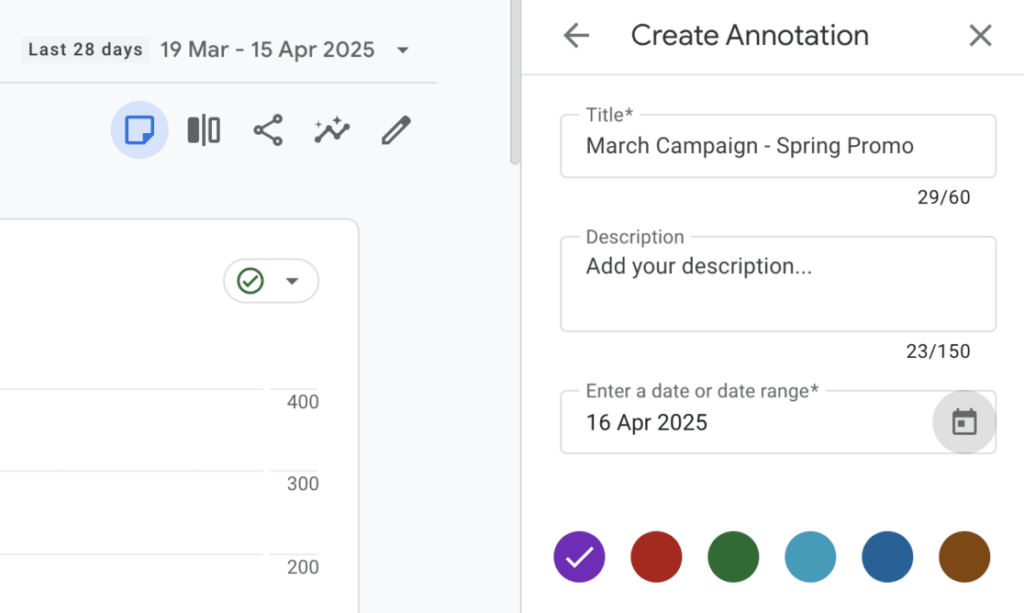
Click Create annotation when you are done. You can always go back in and edit or delete any annotations later.
And that’s it!
Your annotation is now added and visible in your Google Analytics reports. Just hover over the icon to see the details you included:
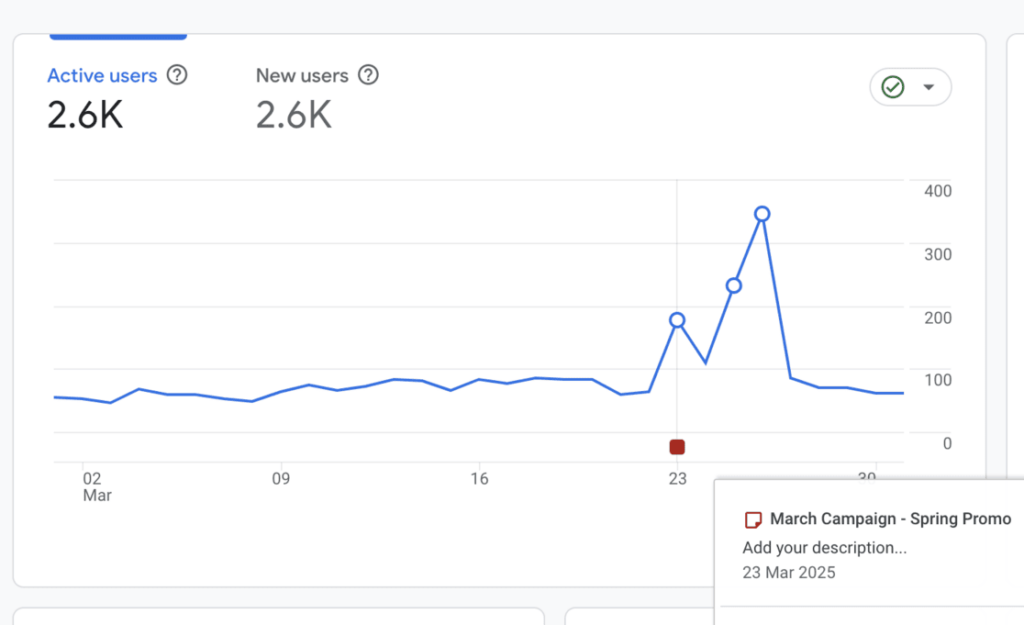
However, if you have a WordPress website, I have another even more powerful and completely free alternative…
How to Add Google Analytics Annotations in WordPress
While GA4’s native annotations are helpful, WordPress users can take advantage of an even more powerful solution: MonsterInsights Site Notes.
Adding GA4 annotations is totally free, doesn’t require a GA annotations extension for your browser, and doesn’t require editing code or using Google Tag Manager. You’ll be able to use and see GA4 annotations right inside WordPress!
Step 1: Install MonsterInsights

MonsterInsights is the best Google Analytics plugin for WordPress. You can connect your Google Analytics account to your site and set up advanced tracking without editing any code or hiring a developer. You’ll get the insights that matter, right inside your WordPress dashboard.
Adding GA4 annotations to your digital analytics data is a breeze with MonsterInsights’ built-in annotations feature, Site Notes. Site Notes gives you enhanced Google Analytics annotations in GA4 and lets you visibly see how activity impacts your website.
With Site Notes’ unlimited GA4 annotations and no limit on users, it’s easy to keep your whole team on the same page.
Plus, with MonsterInsights, you also get access to tons of other Google Analytics features and sophisticated tracking in only a few clicks, such as custom dimension tracking, event tracking, form tracking, eCommerce tracking, outbound link tracking, and more.
Site Notes is included with every MonsterInsights download, meaning you can easily use Google Analytics annotations in GA4 even if you’re using the free version.
That said, MonsterInsights Pro definitely unlocks more Google Analytics features and some pretty cool Site Notes features to make your GA4 annotations even more powerful. Here are the Site Notes features you’ll find if you upgrade:
- Attach files and images to your Google Analytics annotations
- Create unlimited custom categories to organize and manage your notes
- Color code your categories for fast sorting and tracking
- Export any or all of your GA4 annotations
Before we show you how to add your GA4 annotations, you’ll need to download and install MonsterInsights. Head to the pricing page to get started!
For a full walkthrough of how to set up MonsterInsights, check out our guide on How to Add Google Analytics to WordPress the Right Way, or see our Lite instructions to try it out for free first.
Step 2: Three Ways to Add a New Google Analytics Annotation
Once you have the MonsterInsights plugin installed and set up on your website, we’ll show you 3 ways to create new annotations and how to see them in Google Analytics.
No matter where in WordPress you create annotations with Site Notes, they will always be visible on your traffic graph in MonsterInsights Reports and in the Site Notes section.
Here are the 3 convenient ways to add Google Analytics annotations in GA4 using MonsterInsights’ Site Notes.
1. Add Google Analytics Annotations in Site Notes
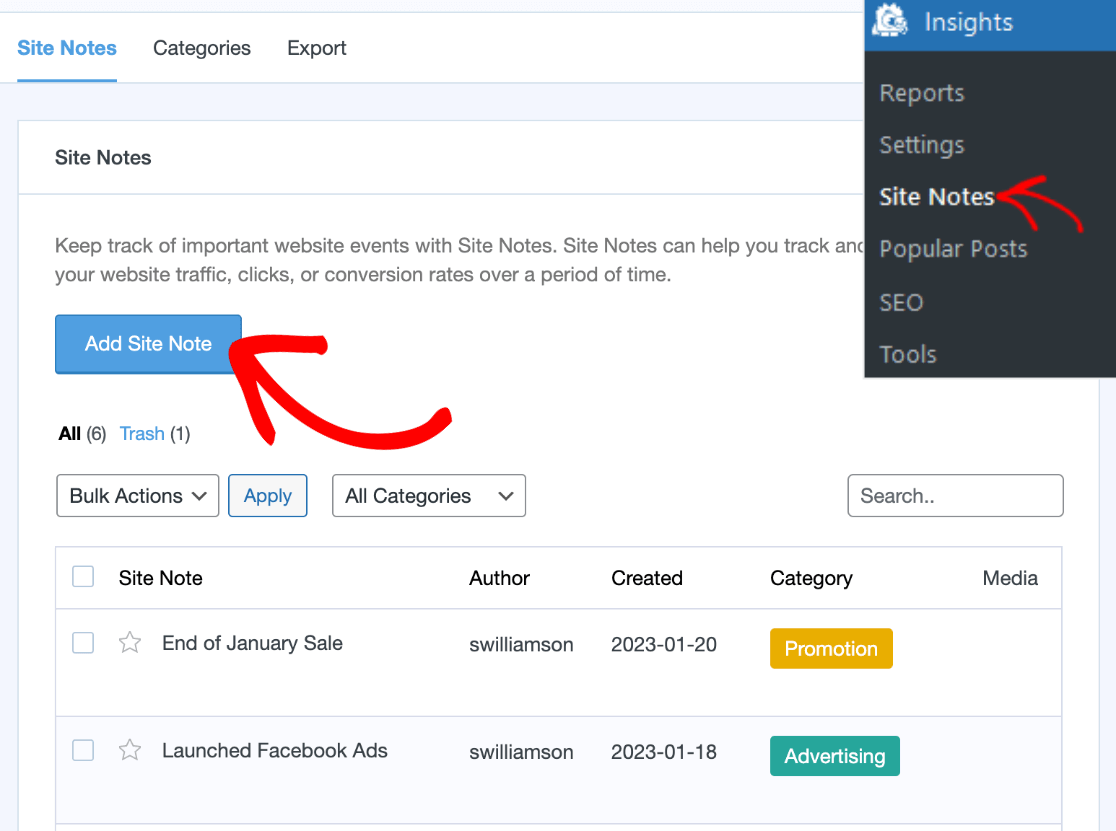
The first way to add a new site note and manage your annotation settings is in the Site Notes section. From your WordPress admin, click Insights » Site Notes. Here you’ll see all the annotations you’ve created.
Press the Add Site Note button to create a new one:
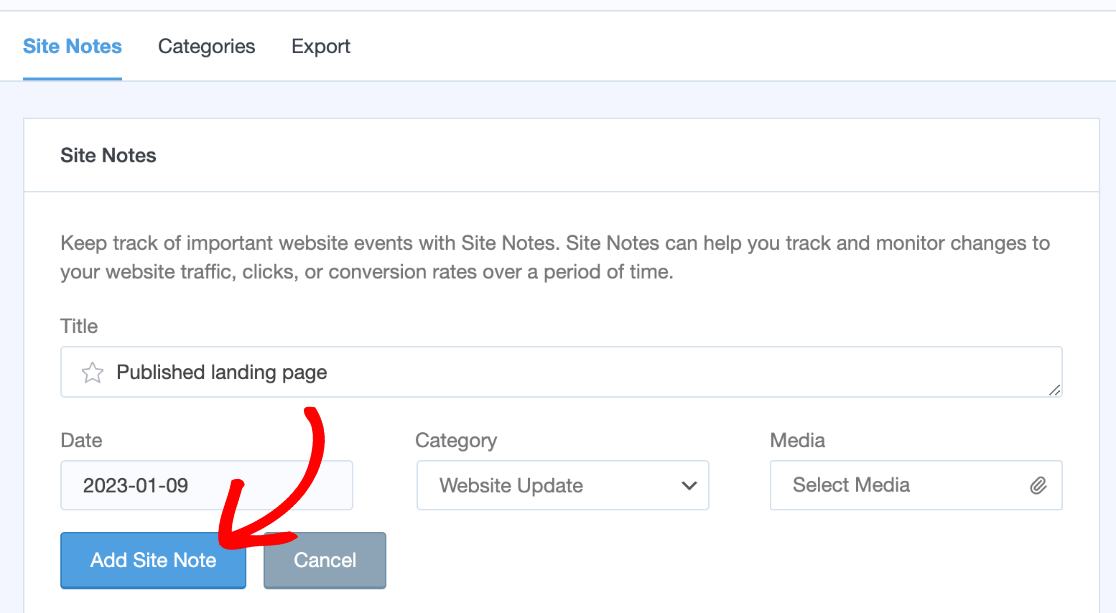
Fill in the Title of your Site Note, select a Date, which can be any time in the past or future, and choose a category. If you’re using MonsterInsights Pro, you can also add Media to your note.
Note: If you want the Site Note to be starred as “Important,” just click the star under Title to highlight it.
When you’re finished, make sure to click Add Site Note at the bottom to save your annotation:
If you’re using the Pro license or above, you’ll have the option to click the Categories tab or Export tab at the top.
Categories are super helpful for organizing your Google Analytics annotations with custom categories and colors. To create or edit a category, just click the Categories tab and press the Add New Category button.
Fill in the Category Name and Select Color. Then, click Add New Category again to save it.
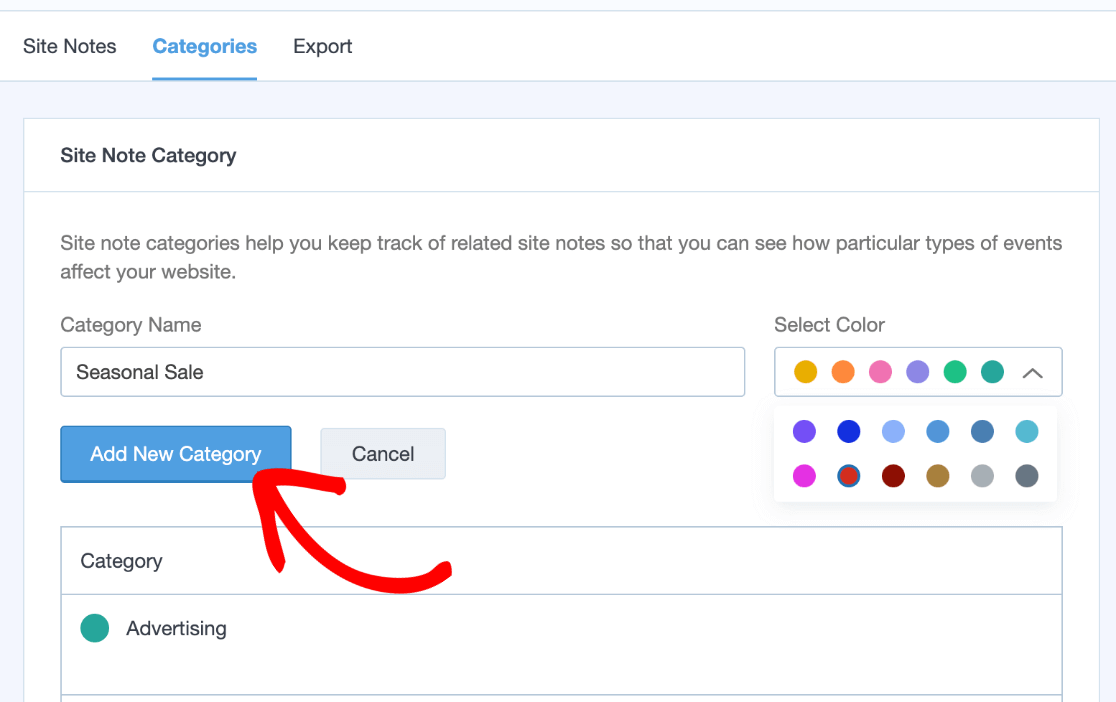
You’ll immediately see your new annotation category in the drop-down list when you make or edit a site note.
If you’re using Pro, you can also click the Export tab at the top, and a CSV of your site notes will immediately download. This is a really helpful tool if you want to add your Google Analytics annotations to Looker Studio (Data Studio) or another platform that accepts CSV data.
Now, we’ll show you another Site Notes option where you can add GA4 annotations from your Google Analytics traffic report.
2. Add GA4 Annotations on Your Dashboard Page
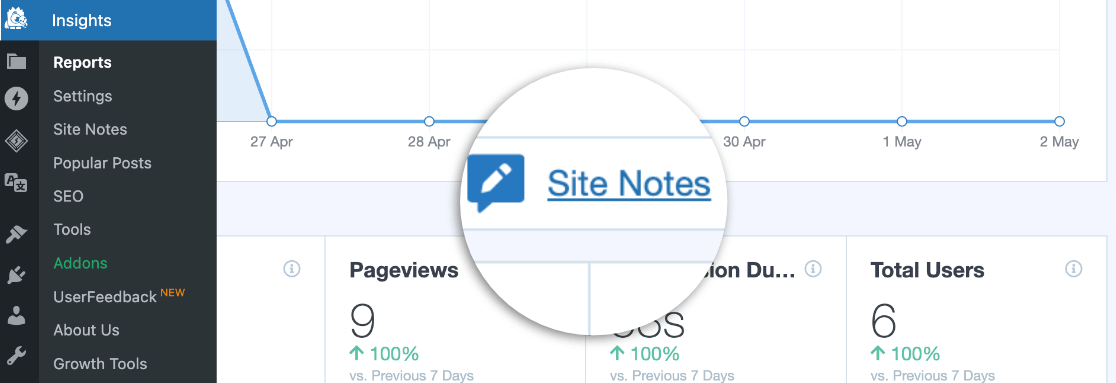
Another way to add Site Notes is from your MonsterInsights’ dashboard page. Click on Insights from your WP admin. Here, you’ll see your traffic graph displayed, along with other Google Analytics reports for your site.
Just below your traffic graph, click Site Notes:
Now the section will expand. If you had entered any annotations for the Google Analytics date range shown in the graph, they would show here. To add one, click the blue button +Add New Site Note on the right-hand side:
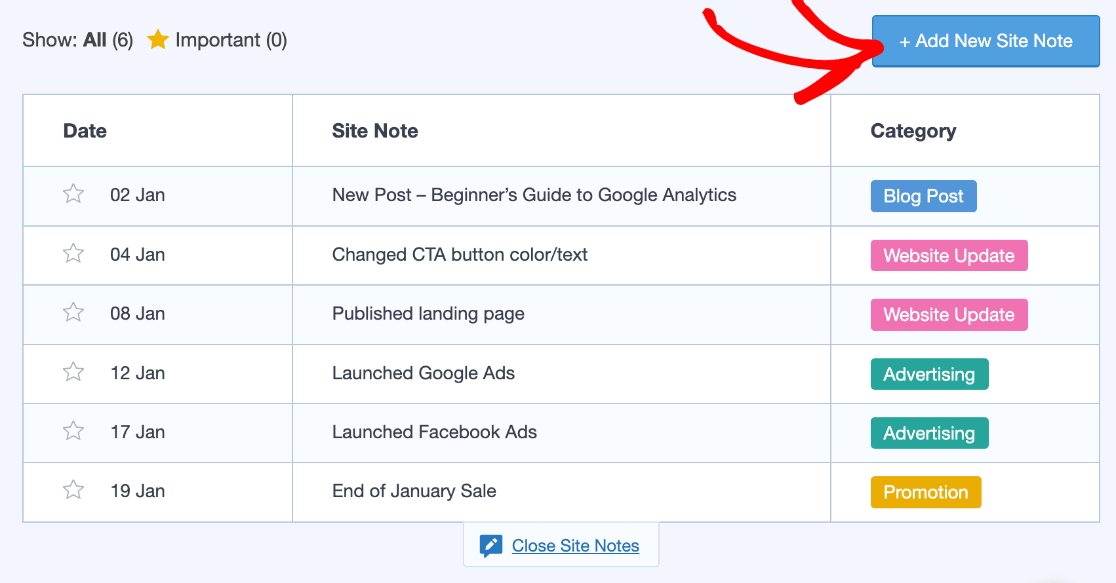
Next, you’ll fill out the details of your GA4 annotation and choose a category. You can also click the star on the left-hand side to add the annotation to Important.
For Pro users, you can click Select Media to add an attachment to the note from here. When you’re finished, click the Add Site Note button at the top to save your Google Analytics annotation.

Your new Site Note will immediately show up on the traffic graph above as well as in the Site Notes section that we visited in the last step.
If you want to see the details of a Google Analytics annotation on your traffic report, just click the Note icon:
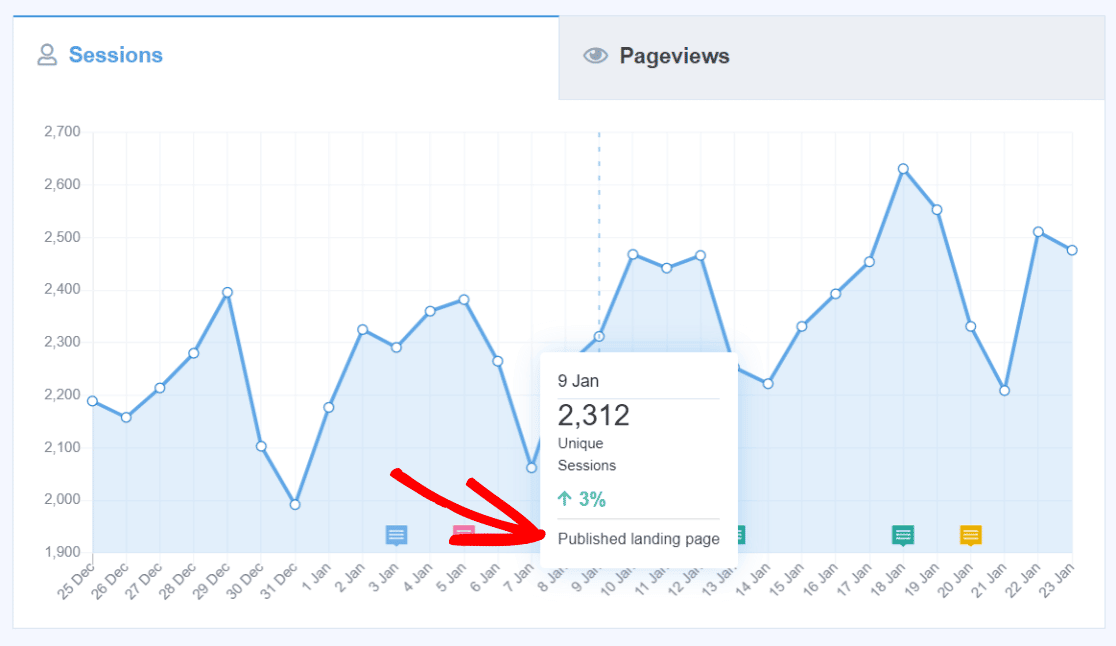
All your notes are shown right here on your graph, which easily lets you see how website changes or activities are impacting traffic.
Next, let’s take a look at the third way of adding Google Analytics annotations with Site Notes.
3. Add Annotations from the WordPress Editor
One of the best things about Site Notes is that it can add a new annotation when you publish a new post, page, or product. So, you don’t have to remember to manually add one in order to see how your content affects traffic later.
You can edit the details of your annotation right inside the post editor. From your WordPress editor, look at the side menu under Post on the right. You’ll automatically see the Site Note section already there.
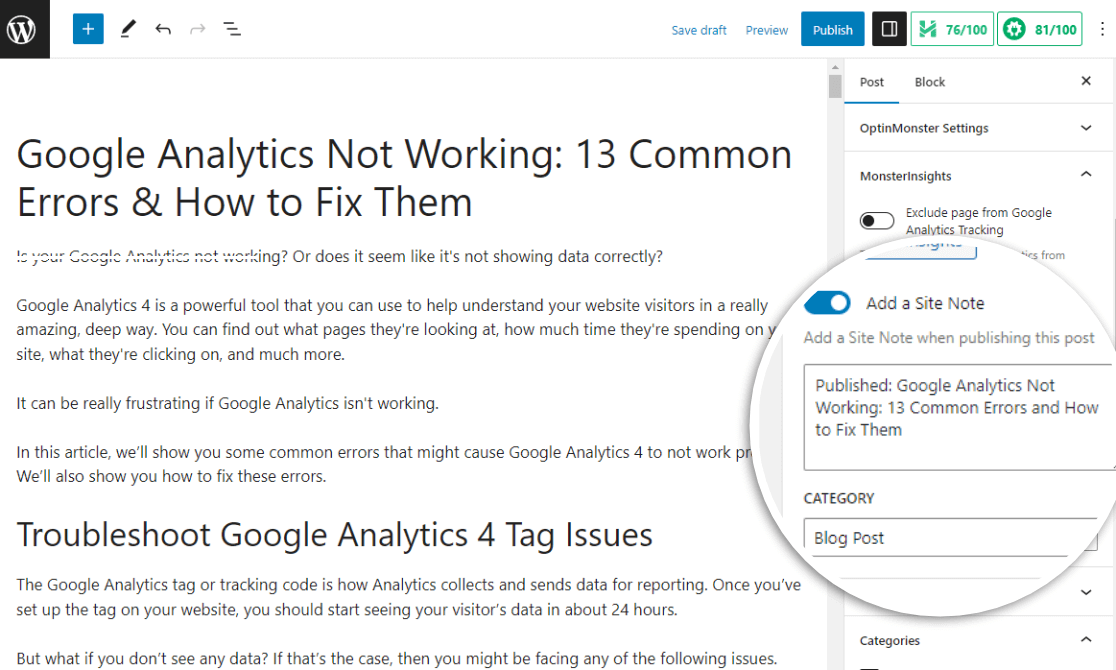
Find the option for Add a Site Note and toggle it on. It automatically includes the new post’s title as the annotation. If you don’t want to create a Site Note for the new content, just leave it toggled off. You can also edit the name of your annotation and change which category it’s assigned to.
If you want to change the date for annotations that are created in the WP editor, you can always do that in the Site Notes section of MonsterInsights.
How to Use Google Analytics Annotations in GA4 to Optimize Your Website and Marketing Strategy
You did it! You learned how to use Google Analytics annotations in GA4.
Now, use annotations to see what changes were made on your website and how they affect things like how many people bought things or visited your website.
Plus, with shared annotations, it’s easy to keep your whole team updated and on the same page. If you’re using MonsterInsights, the number of notes or users in Site Notes is unlimited.
The visibility of the annotations and whether a team member can use Site Notes is determined by their overall access to MonsterInsights. You can find permissions and user roles in Insights » Settings » Advanced.
You won’t need to search through old emails or project calendars to find out what happened on your website, track publishing events, and keep tabs on your marketing campaigns.
Easily track your digital marketing, website activity, and anything else right inside WordPress:
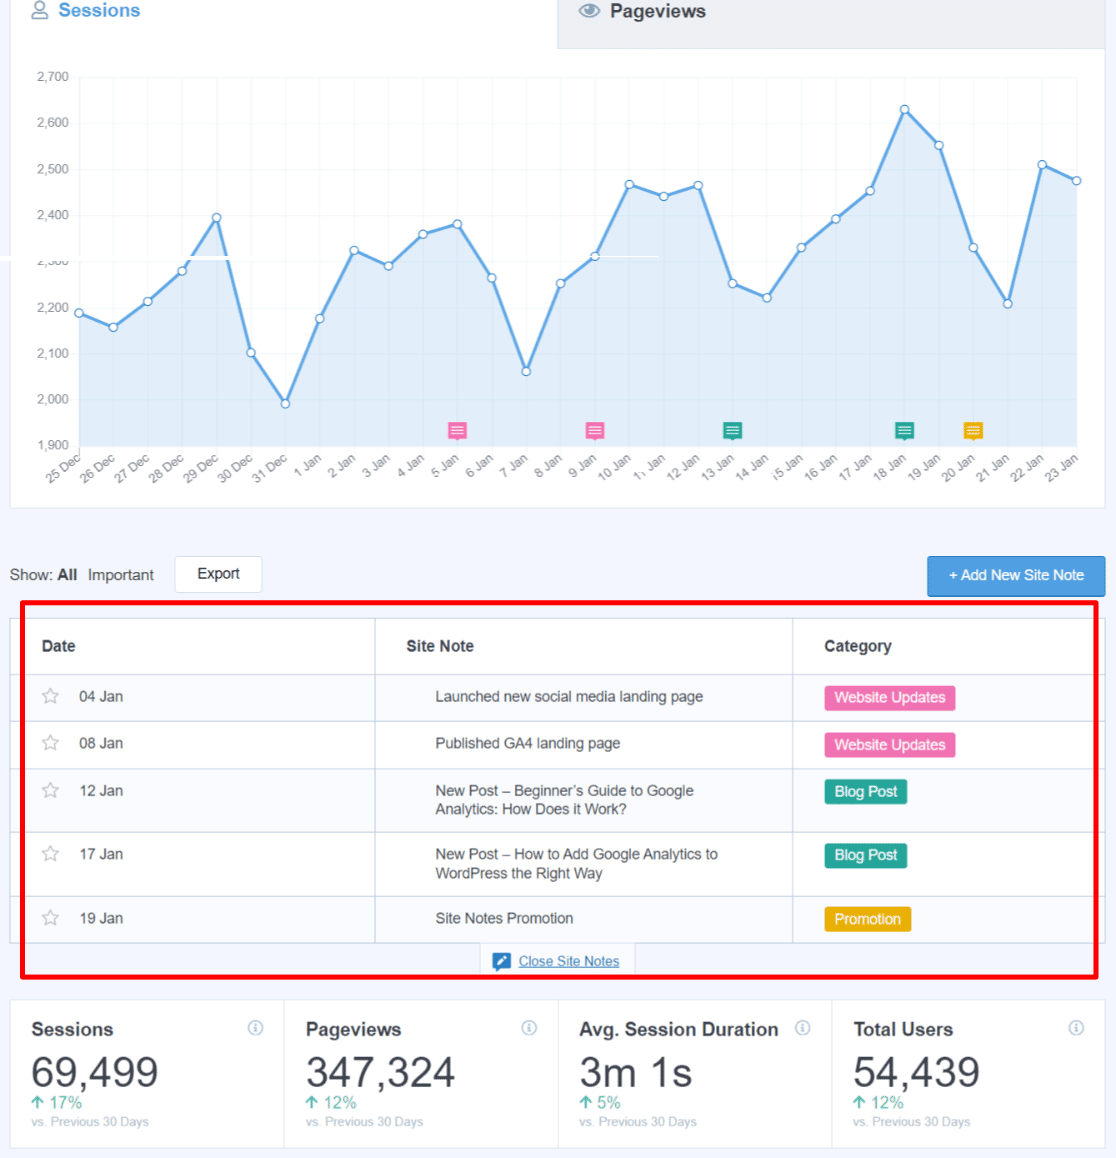
Look back and see if a previous promotion performed well enough to do it again, see how your website performance dipped right after you changed your landing page design, see how your traffic improved after launching a Google Ads campaign, or add a future annotation for a team deadline. The possibilities are endless!
Using Google Analytics annotations with Site Notes’ new blog post publishing feature is also an awesome tool for optimizing your content and SEO.
For example, if you’re using MonsterInsights Pro, you could have separate categories for your different types of posts (Tutorials, Reviews, Announcements, etc.). When you publish a new post, just assign it to the right category.
Then, use Google Analytics on your MonsterInsights traffic report to easily see which post types are generating more traffic, and use that information to optimize your content!
Well, that’s it for this tutorial! I hope you enjoyed learning how to add GA4 annotations both inside Google Analytics and WordPress.
If you liked this article, be sure to check out:
How to Reveal Your Conversion Paths in Google Analytics
How to Set up Google Analytics Click Tracking (Step by Step)
GA4 Enhanced Measurement Guide (+ Alternatives)
GA4 Funnel Exploration Reports: Beginner’s Guide
Not using MonsterInsights yet? What are you waiting for?
Don’t forget to follow us on Facebook and YouTube for the best WordPress tutorials and Google Analytics updates.
FAQ
Are annotations available in GA4?
Yes, annotations are now available in GA4! Users with Editor or Admin access to your GA4 property can create, edit, and delete annotations.
How many annotations can I create in GA4?
Google doesn’t specify a limit for the number of annotations you can create in GA4. However, it’s best to use annotations strategically to avoid cluttering your reports.
Can I see annotations across multiple reports in GA4?
Yes, once you create an annotation in GA4, it will appear on charts across all reports for the specified date range.
Can I use Google Annotations in WordPress?
Yes! MonsterInsights’ Site Notes feature allows you to use Google Annotations right inside your WordPress dashboard. Site Notes is available to all MonsterInsights users with no limits and includes advanced capabilities.

It’s great that you built this feature as an easy way to create notes. I don’t understand why GA4 got rid of the annotation feature. Any future plans to integrate MonsterInsights notes so that they can be viewed within GA4?
That would be really cool! Unfortunately we can’t build things into GA4 – only Google can do that 🙂 Notes will only be available inside MonsterInsights.
This is very cool! However I’m wondering if it’s possible to add annotation programmatically via API calls?
This way we could automate it by adding it to our deployment’s pipeline.
Thank you!
Hey Alessandro! That’s not a current feature of our annotations tool, but I’ve added it in as a feature request! We’ll let you know if it’s added.