


Google Tag Manager gives you a central command center for every tracking code on your WordPress site — no developer needed, no theme file editing required.
If you’ve been putting it off because it sounded complicated, the setup is more straightforward than most guides make it look.
In this guide, I’ll show you how to install GTM in WordPress step by step. I’ll also walk you through a faster alternative that handles the same tracking — form submissions, eCommerce, ad pixels — without any tag configuration. Pick the approach that fits your site.
In This Article:
What is Google Tag Manager?
Google Tag Manager (GTM) is a free tool by Google that allows you to manage and deploy marketing tags (snippets of code or tracking pixels) on your website or mobile app without modifying the underlying code. Think of it as a container that houses all your tracking codes in one centralized location.
Here’s what makes GTM so valuable:
- Centralized Management: Instead of adding various tracking codes directly to your site, you can manage all your tags in one dashboard
- No Coding Required: Once GTM is installed, you can add or update tracking codes without touching your website’s code
- Version Control: GTM lets you test and preview tags before publishing them live
- User Permissions: You can control who can view, edit, or publish tags
- Triggers and Variables: You can set up conditions for when tags should fire based on specific user actions
Without Google Tag Manager, implementing tracking solutions like Google Analytics, Facebook Pixel, or Google Ads conversion tracking would require you to manually add separate JavaScript snippets to your website. This can quickly become messy and difficult to manage, especially if you have multiple marketing tags to implement.
Besides adding tracking pixels, GTM also helps you track custom events on your website that most analytics platforms don’t track automatically, such as:
- eCommerce transactions and interactions
- Form submissions
- File downloads
- Outbound link clicks
- Video plays
- Scroll depth
- Custom button clicks
The setup for these advanced tracking features often requires creating complex tag configurations, triggers, and variables. That’s a reasonable learning curve if GTM is your long-term tool — but it’s worth knowing there’s a faster path for most WordPress sites.
An Easier Way to Set Up Advanced WordPress Tracking
Google Tag Manager is a powerful tool, and we’ll cover how to set it up in the next section. That said, for most WordPress site owners, many of the tracking tasks that send people to GTM can be handled more directly.
With MonsterInsights, you can set up advanced tracking and get features like eCommerce tracking, link and button click tracking, form conversion tracking, scroll tracking, and much more out of the box. You can even track Google Ads conversions on an eCommerce website without touching any code. Just turn on these features with a few clicks in MonsterInsights rather than go through a complicated Tag Manager setup.
We’ll cover both paths below. Click the links to jump ahead to any section:
- Set Up Advanced Tracking Using MonsterInsights (in a Couple Clicks)
- Install Google Tag Manager in WordPress
Set Up Advanced Tracking in WordPress the Easy Way
MonsterInsights is the best alternative to Google Tag Manager. It’s easier to use, and you don’t have to spend hours learning how to configure it.

Instead of manually setting up tags and triggers for every interaction you want to track, you can click a button to turn it on. MonsterInsights also removes the risk of making a mistake that breaks your tracking code.
It also allows you to set up Google Analytics on a WordPress site without editing code. Here are some of the reasons to consider it instead of Tag Manager.
1. Track Link and Button Clicks Out of The Box
Google Analytics doesn’t track most link clicks or button clicks by default. You’d have to manually set up tracking for each link and button using Google Tag Manager or by adding code to your website.
With MonsterInsights, you can track a wide range of link clicks without any extra work. There’s no need to set up additional tracking tags or edit code. Here are some of the things you can track:
- Set up affiliate link tracking to grow your revenue
- See which outbound links get the most clicks
- Track video plays and access a Media report with plays, average watch time, average percent watched, and completion rate
- Find out when people click on a mailto or telephone link
- Track file downloads on your website
- Add call-to-action (CTA) button tracking to boost conversions
- See which products people buy the most by tracking add-to-cart buttons
I find this especially useful for affiliate sites and content-heavy blogs where manually tagging every link in GTM would take hours.
2. Set Up Form Conversion Tracking
If you have one or more forms on your website — a Contact Us form, an order form, a lead capture — you’ll want to see how they’re performing. Although GA4 tries to track your forms with its enhanced measurement feature, it has some serious flaws that make it unreliable.
Without MonsterInsights, you’d have to create tags for each contact form using Google Tag Manager so that Google Analytics can accurately track performance.
MonsterInsights makes this much simpler. All you have to do is install its Forms addon, and the plugin will automatically track all types of WordPress forms.
You can view the performance of your forms inside the WordPress dashboard. Just go to Insights » Reports » Forms to find out the number of impressions, conversions, and conversion rates of all your forms.

You can also identify the source of your form conversions and see which channels capture the most leads.
3. Track eCommerce Performance in Just a Few Clicks
Another advantage of using MonsterInsights is that you can enable eCommerce tracking in just a few clicks to see how your online store is performing.
Using the eCommerce addon, it’s straightforward to track revenue, conversion rate, popular products, conversion sources, coupons, and much more in Google Analytics. MonsterInsights integrates directly with WooCommerce, Easy Digital Downloads, GiveWP, MemberPress, and more.

It also helps you understand your customers’ behavior. You can see which pages they visit, how many products they add to and remove from the cart, and how many abandoned their carts.
Plus, you can use the User Journey addon to see what paths your users take through your site to get to a purchase:

For more on eCommerce tracking and reporting, check out Google Analytics eCommerce Tracking Tutorial [WordPress].
4. Install Ad Conversion Tracking Codes & Pixels
If Google Ads, Bing Ads, or Meta (Facebook) Ads are part of your marketing mix, MonsterInsights has you covered for conversion tracking. Just copy and paste your conversion ID and label, tag ID, or pixel ID into your MonsterInsights settings.

For a deeper look at ad tracking, these guides are worth bookmarking:
- How to Set Up eCommerce Google Ads Conversion Tracking
- Tutorial: Bing Conversion Tracking in WordPress [Microsoft Ads]
- How to Track Meta (Facebook) Ads in Google Analytics Easily
5. Chat With Your Google Analytics Data
Have a question about your analytics and don’t want to dig through reports to answer it? With Conversations AI by MonsterInsights, all you have to do is ask. It’s like having a personal analytics assistant right in your WordPress dashboard.
Ask about your landing pages, sales, engagement, and much more to get answers quickly. It can even generate a custom graph based on your data.

Skip the GTM Setup — Track Everything From WordPress
MonsterInsights connects Google Analytics to your WordPress site in minutes — with eCommerce tracking, click tracking, form tracking, and ad pixels built right in. No tag configurations required.
Get MonsterInsights and Start Tracking TodaySet Up WordPress Google Tag Manager in 3 Steps
To add Google Tag Manager to WordPress without using MonsterInsights, follow these steps to get started.
Step 1: Create Your Google Tag Manager Account
Visit the Google Tag Manager home page and click the Sign-Up button.

Sign in with your Google account. Once done, you’ll see the Create Account page. Click the Create Account button to get started.

On the next screen, enter your account name and choose a country in the Account Setup box. Your company name works well as the account name.
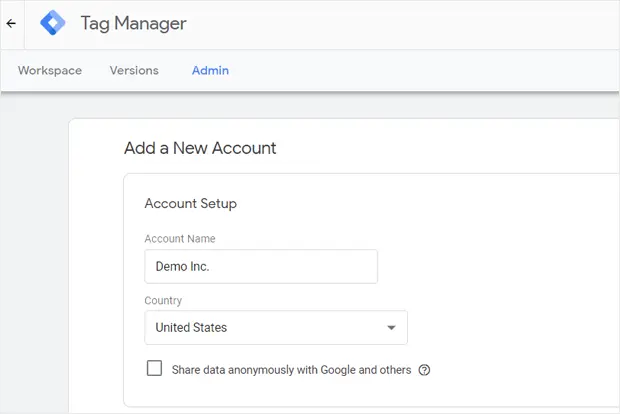
Next, set up your container. A container is the collection of tags, triggers, and all configurations installed on a website.
Enter your website name as your container name. Choose Web under the Target platform container option, then click the Create button.

Accept the Google Tag Manager Terms of Service Agreement to proceed. Check the box next to I accept the Data Processing Terms as required by GDPR at the bottom, then click the Yes button in the top right corner.
If you want to learn more about GDPR compliance, check out our guide on GDPR and Google Analytics.

After accepting the terms of service, a popup window will appear with the GTM code snippets you’ll need to install on your website.
Your JavaScript tag that needs to be installed in your header will look like this:
<!– Google Tag Manager –> <script>(function(w,d,s,l,i){w[l]=w[l]||[];w[l].push({‘gtm.start’: new Date().getTime(),event:’gtm.js’});var f=d.getElementsByTagName(s)[0], j=d.createElement(s),dl=l!=’dataLayer’?’&l=’+l:”;j.async=true;j.src= ‘https://www.googletagmanager.com/gtm.js?id=’+i+dl;f.parentNode.insertBefore(j,f); })(window,document,’script’,’dataLayer’,’GTM-XXXXXX’);</script> <!– End Google Tag Manager –>
The tag that needs to go in the body section immediately after your opening body tag will look like this:
<!– Google Tag Manager (noscript) –> <noscript><iframe src=”https://www.googletagmanager.com/ns.html?id=GTM-XXXXXX” height=”0″ width=”0″ style=”display:none;visibility:hidden”></iframe></noscript> <!– End Google Tag Manager (noscript) –>

Step 2: Add Google Tag Manager Code to WordPress
Log into your WordPress admin and install the free WPCode plugin. Upon activation, go to Code Snippets » Header & Footer.
WPCode is the recommended WordPress plugin for adding code snippets and GTM container code to your site without editing any theme files. I’ve used it on dozens of client sites and it’s consistently the most reliable approach.

You’ll see a box for adding code to your header without touching your header.php file. Go back to your Google Tag Manager account and copy the code in the first box. Paste it into the Header box.
Then copy the second code snippet from your Tag Manager account and insert it into the Body box.

Save your changes, and GTM is live on your WordPress site.
Step 3: Add and Publish Tags in Your Tag Manager
With Google Tag Manager installed, you’re ready to add code snippets (tags) from different tracking tools to your site.
GTM supports over 50 tag types, including Google marketing products and third-party services. You can also add custom HTML or JavaScript tags using its interface.
To create a tag, click the New Tag tile and follow the steps to configure your first tag.

For example, check out our full guide on adding Google Analytics to WordPress with Google Tag Manager. From there you can add additional tags following the same process and connect your site to various marketing and tracking tools.
Pro Tip: Always preview and debug your tags in GTM before clicking Publish. The Preview mode shows you exactly which tags fired on each page, so you can catch configuration errors before they affect your data.
Worth Knowing
GTM requires you to manually configure every tag and trigger — which gives you flexibility, but also means every tracking feature needs setup time. For WordPress sites, many of the same outcomes (eCommerce data, form conversions, click events) can be achieved faster without building individual tag configurations.
Video Tutorial: How to Install Google Tag Manager in WordPress
FAQs About Google Tag Manager in WordPress
Does Google Tag Manager work with WordPress?
Yes, Google Tag Manager works with WordPress. You can install GTM by adding the container code manually to your theme files, or by using a plugin like WPCode to handle the header and body code insertion. Once installed, GTM lets you manage all your tracking tags from a single dashboard. That said, for WordPress sites using MonsterInsights, GTM is often unnecessary — the plugin handles most common tracking needs directly.
What is the best GTM plugin for WordPress?
The best option depends on what you need. For advanced GTM features, GTM4WP is a solid choice. For simple container code placement, WPCode works well. If you want to bypass GTM entirely and get eCommerce, form, and click tracking built in, MonsterInsights is worth a look. You can also compare options in our roundup of the best Google Analytics plugins for WordPress.
Where do I put the Google Tag Manager code in WordPress?
GTM provides two code snippets: one goes in the <head> section of your site, and one goes immediately after the opening <body> tag. The easiest way to add both without touching theme files is to use the free WPCode plugin — go to Code Snippets » Header & Footer and paste the header code in the Header box and the body code in the Body box.
Why not use Google Tag Manager?
GTM is a code injection tool, which can introduce security vulnerabilities if misconfigured — anyone with publish access to your GTM container can add arbitrary scripts to your site. It also has a steep learning curve and can be overkill for WordPress sites that only need standard tracking. If you want eCommerce data, form conversions, and click events without building individual tags, a plugin like MonsterInsights gets you there in a fraction of the time.
Does the Google Site Kit plugin install Google Tag Manager?
Yes, Google Site Kit can help you connect Google Tag Manager to your WordPress site. However, it doesn’t provide any further tag configuration help or conversion reports inside your WordPress dashboard. For a deeper comparison of your options, see our guide on MonsterInsights vs. Google Site Kit.
Can I use Google Tag Manager without coding knowledge?
Installing GTM itself doesn’t require coding — a plugin like WPCode handles the code insertion for you. But building useful tags, triggers, and variables inside GTM does require some technical understanding. Basic setups (like firing a GA4 tag on all pages) are manageable for beginners. More advanced tracking — like custom event triggers or data layer variables — typically requires some JavaScript knowledge or a willingness to follow detailed setup guides.
That’s it! I hope this guide helped you install Google Tag Manager in WordPress. Whether you go the GTM route or use MonsterInsights for faster setup, you now have everything you need to start tracking your site properly.
If you found this helpful, check out these related guides:
- How to Add Google Search Console to WordPress and Analytics
- How to Add Google Analytics (GA4) to Google Tag Manager
- How to Set Up Google Analytics Click Tracking (Step by Step)
- How to Add a Meta (Facebook) Pixel to Google Tag Manager
- How to Set Up Google Analytics in 2026: Step-by-Step
Follow us on X, Facebook, and YouTube for more Google Analytics tips.