Connecting WooCommerce with Google Analytics is the single most important step you can take to understand your store’s performance and make data-driven decisions that boost your revenue.
By adding Google Analytics to your WooCommerce store, you can track its performance and get the insights you need to grow your business. Adding that essential eCommerce tracking to WooCommerce will give you insights about which products sell the most, how much revenue you’re making, where your customers are coming from, what paths they’re taking to convert, and lots more.
In this guide, I’ll show you the easiest way to set up Google Analytics for WooCommerce so you can start making smarter decisions for your online store right away.
Table of Contents
WooCommerce Google Analytics Walkthrough Video
Why You Need Google Analytics for WooCommerce
If you want to grow your WooCommerce store and make smart business decisions, you absolutely need eCommerce analytics.
Running your store without data is like navigating in the dark. You might invest in promoting products that aren’t resonating with your audience or miss opportunities to leverage your best-performing items.
Here’s what you can discover by connecting WooCommerce with Google Analytics:
- Top Performing Products – Identify which items generate the most revenue so you can optimize your inventory and promotional strategies
- Reduce Abandoned Carts – By tracking abandoned carts, you can pinpoint where customers drop off in your purchase funnel and boost conversions
- Measure Campaign Performance – You can track each marketing campaign in Google Analytics to see which ones are performing the best to save money on running only the campaigns that perform well
- Identify Top Referral Traffic Sources – Find out which websites send the most converting traffic to your website so you can create a personalized experience for those users or perhaps team up with the referral website in some marketing campaigns
- Measure SEO Performance—Track which pages users find via organic search to understand your SEO performance. Then, use the data to optimize your WooCommerce site for better SEO.
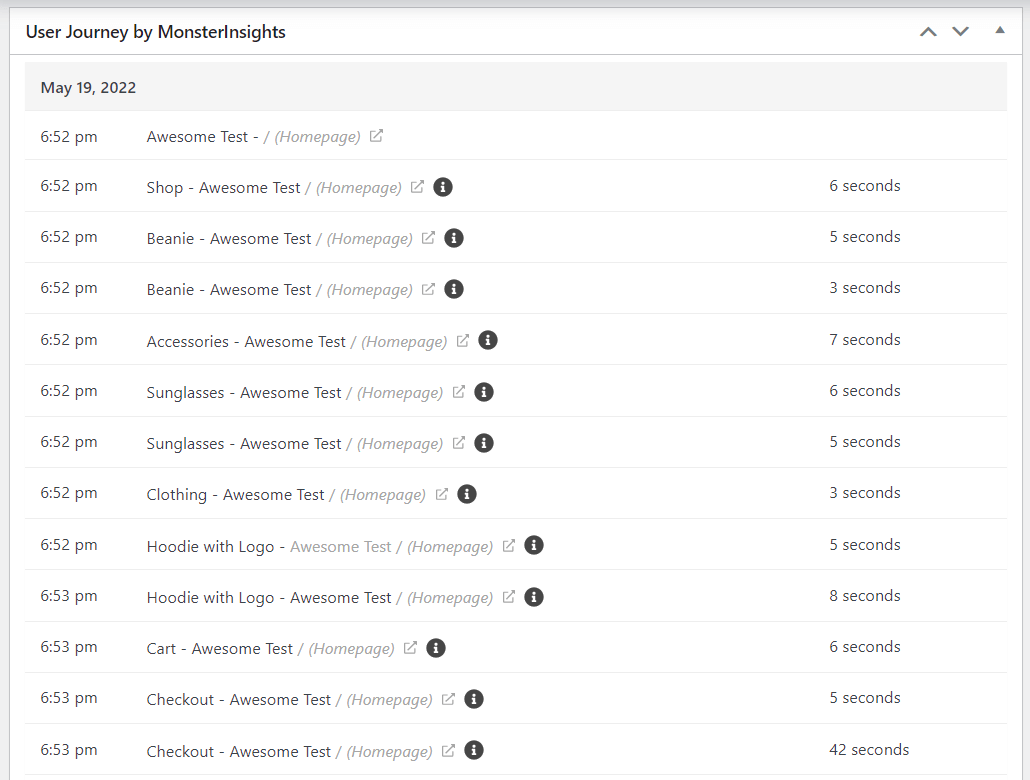
- User Journey Tracking – Want to know what paths your users are taking through your site to make it to a conversion? Use customer journey tracking to see the paths they’re taking through your website before they complete a purchase.
- Even More Event Tracking – By using MonsterInsights to set up WooCommerce analytics, you get even more event tracking functionality beyond eCommerce metrics. Track form submit button clicks, file downloads, video plays, and much more.
How to Add Google Analytics to WooCommerce
There are several methods to connect Google Analytics with WooCommerce, but the most straightforward approach by far is using MonsterInsights, the best WooCommerce Google Analytics plugin available.
MonsterInsights eliminates all the technical complexity of setting up eCommerce tracking. You won’t need to edit code, manually install tracking scripts, learn Google Tag Manager, or hire a developer.
Plus, you’ll be able to see the eCommerce data that matters right in your WordPress dashboard.
Here’s how to set up Google Analytics for WooCommerce in three simple steps:
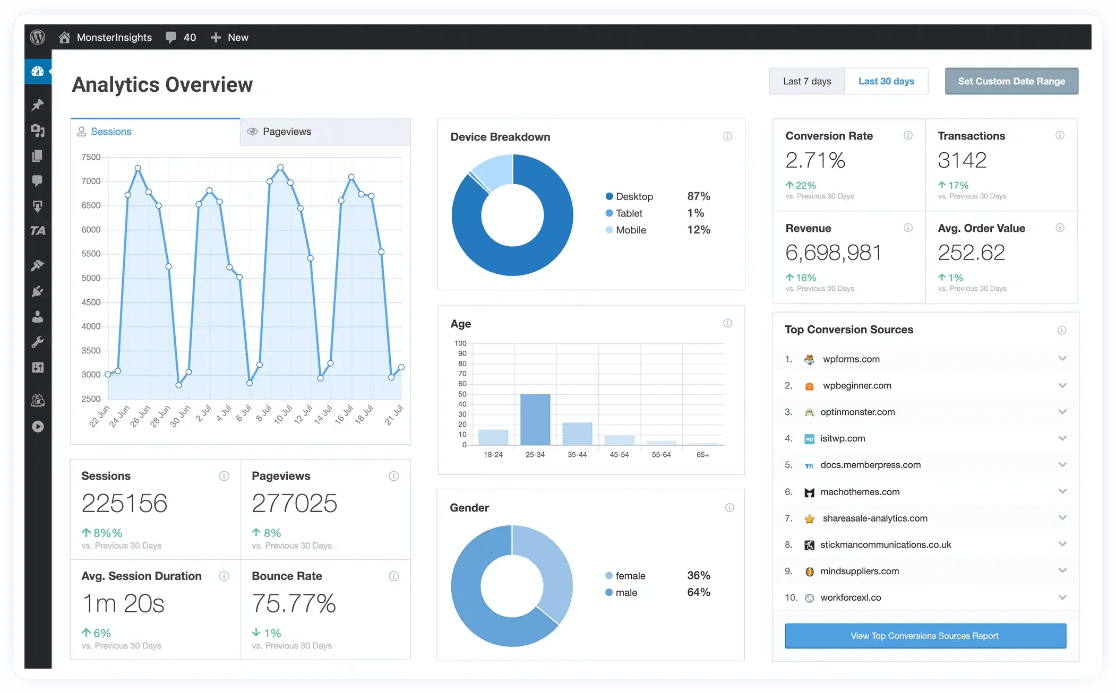
Plus, with the click of a button, you can set up sophisticated tracking features such as event tracking, eCommerce tracking, form tracking, custom dimension tracking, outbound link tracking, and more.
Just connect MonsterInsights to Google Analytics, and we’ll install your tracking code snippet for you automatically.
Wondering more about what makes MonsterInsights the best Google Analytics plugin for WooCommerce? Check out the 6 Best WooCommerce Analytics and Reporting Plugins.
To get started, just follow these steps.
Step 1: Install and Activate MonsterInsights
MonsterInsights is the best WooCommerce Google Analytics plugin. It offers loads of features and detailed reports inside your WordPress dashboard, so you can get the metrics that matter for your business.
The plugin makes it very simple to connect Google Analytics to your WordPress website without any coding or manually installing your Google tag and tracking ID.
Besides that, you can easily set up advanced tracking, like eCommerce tracking, which is not available by default in Analytics. MonsterInsights is hands down the easiest way to set up your WooCommerce Google Analytics integration.

To set up tracking for your WooCommerce store, grab MonsterInsights at the Pro level or above.
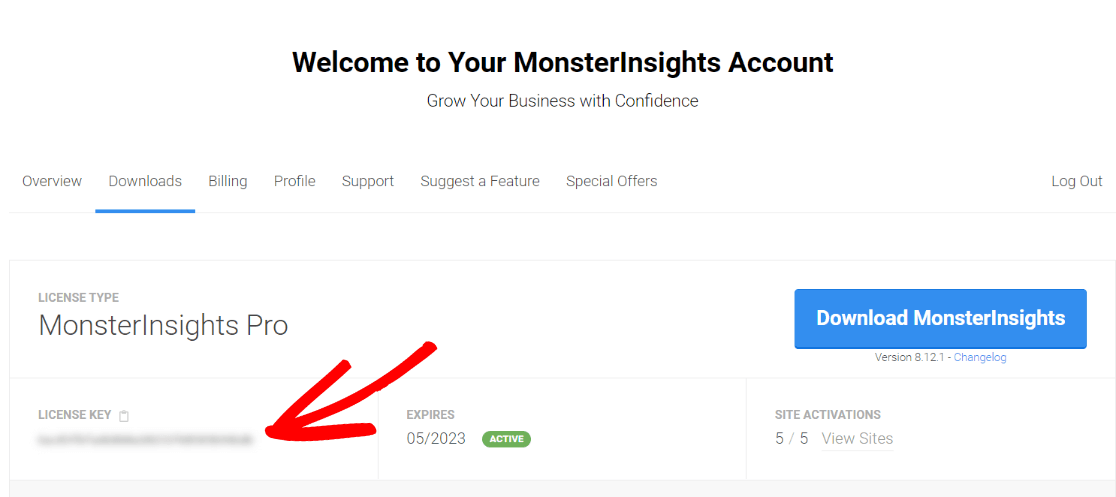
Once you’re set up with the Pro version of MonsterInsights, log in and go to your account area.
Then, navigate to the Downloads tab and click Download MonsterInsights.
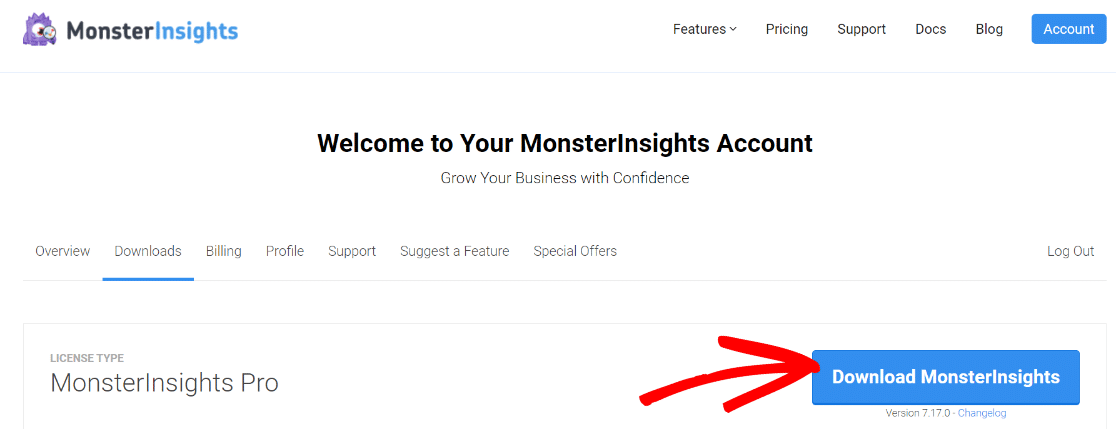
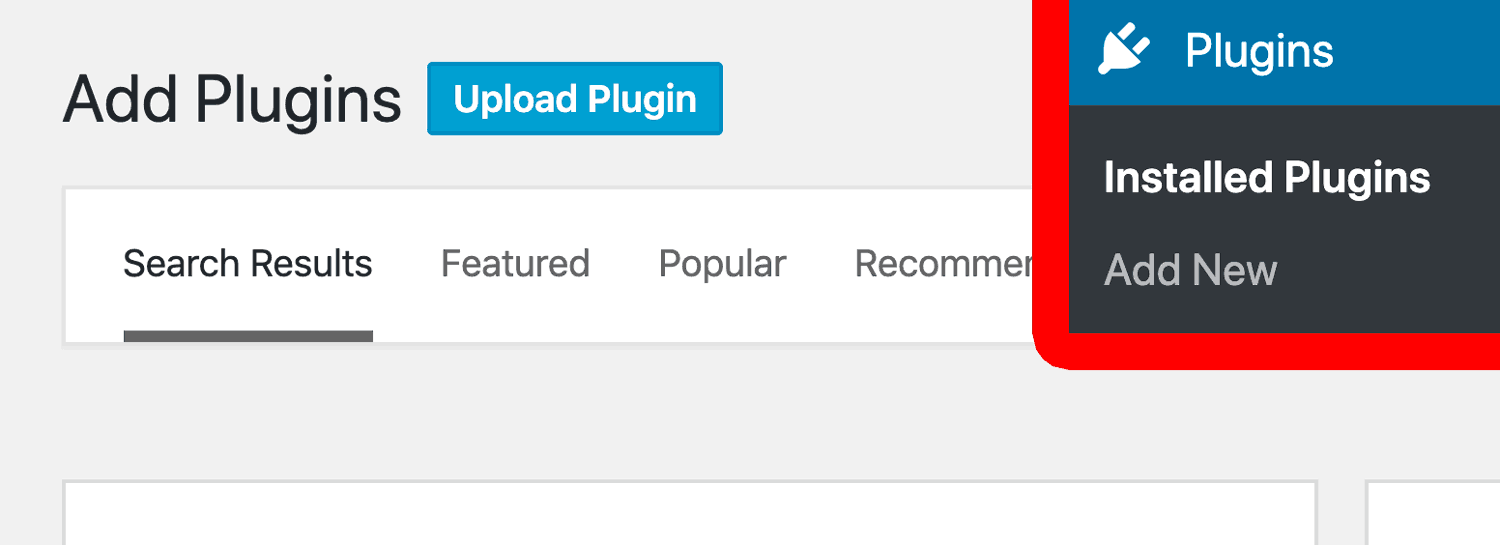
Now, go to your WordPress site’s admin and upload the plugin. You can do that by going to Plugins » Add New » Upload Plugin.
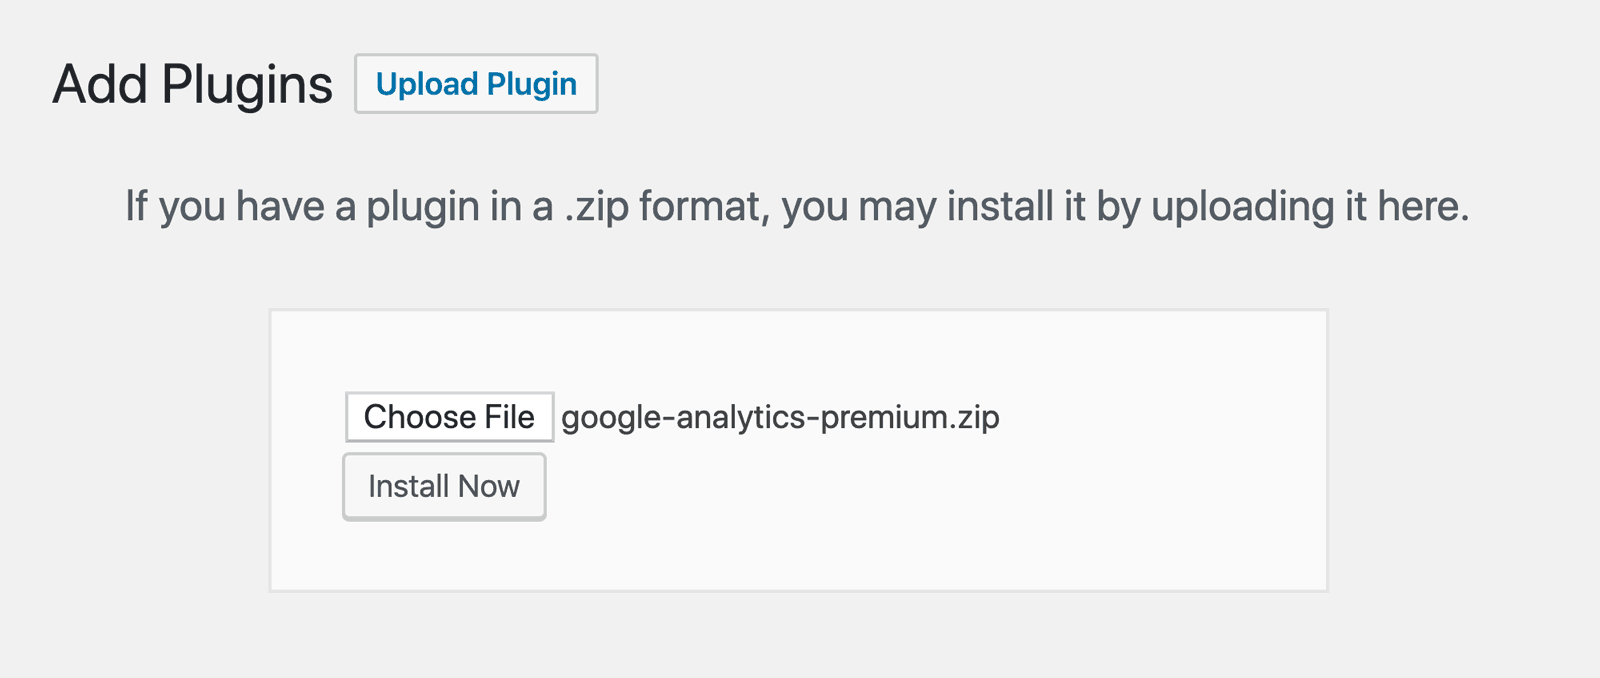
Next, click on Choose File and select the MonsterInsights ZIP file. Click Install Now.
Once the plugin installs, click Activate Plugin.
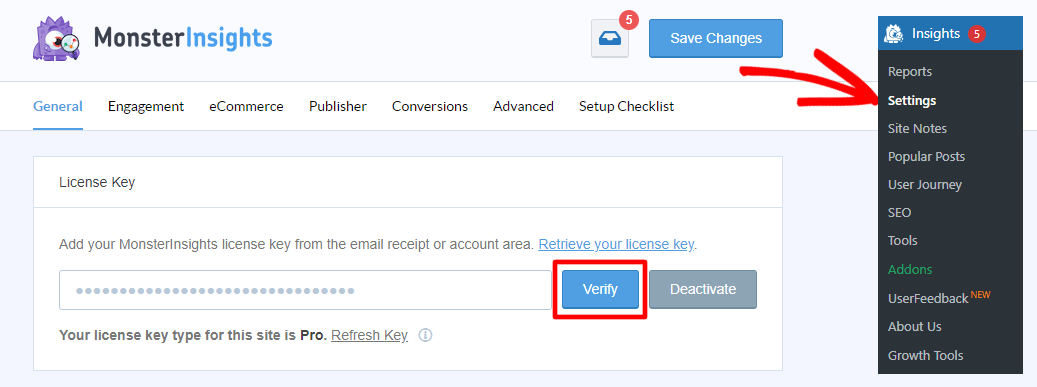
To configure MonsterInsights and connect to your Google Analytics account, you’ll need to verify your license key in the plugin. You can find the key in your account area in the Downloads tab. Simply copy the license key.
If you’ve gone through the MonsterInsights setup wizard without adding your license key, you can always find it in plugin settings under Settings » General.
For a complete tutorial on setting up MonsterInsights, check out How to Add Google Analytics to WordPress the Right Way.
Step 2: Install the MonsterInsights eCommerce Addon
Now that MonsterInsights is ready to use on your website, the next thing to do is install and activate the eCommerce addon.
The addon automatically integrates with WooCommerce to track all of your sales and overall website performance.
You can install the addon by going to Insights » Addons. In the eCommerce box, click Download & Activate.
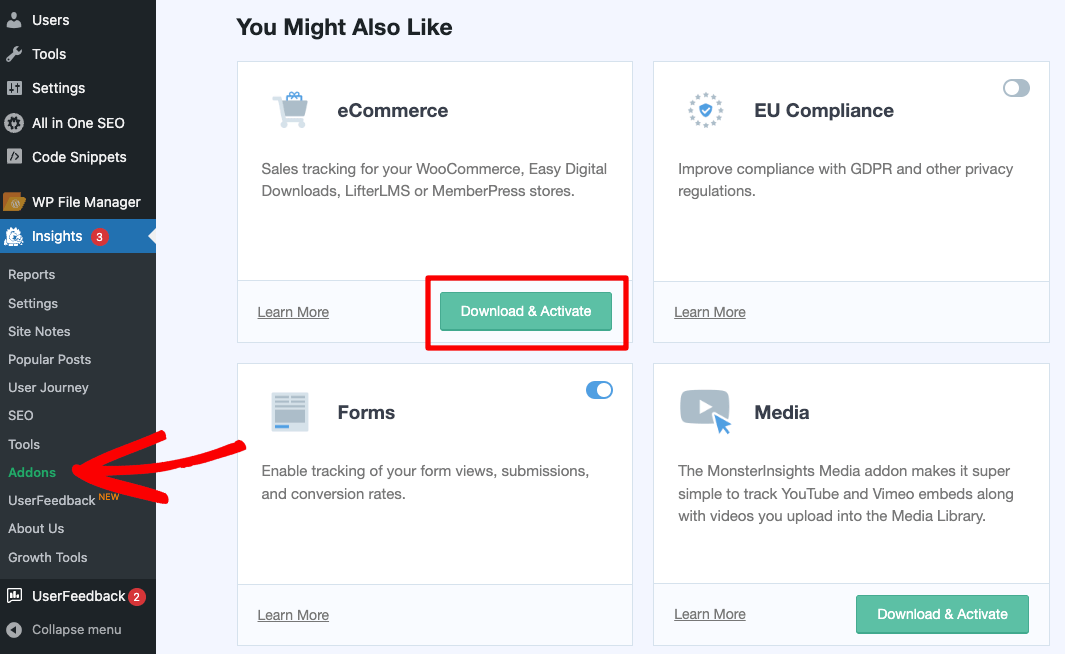
That’s it! You’ve set up WooCommerce analytics in a few simple clicks.
You’ll see that MonsterInsights automatically detects and connects with WooCommerce in the eCommerce settings tab:

Keep reading to find out how to take advantage of the User Journey reports, plus how to find your WooCommerce analytics reports in WordPress.
Step 3: Install the User Journey Addon (Optional)
If you’re using the eCommerce addon, we highly recommend installing the user journey addon also.
With the addon, you can easily see trends in shopping and user behavior, see at a glance how many sales you’ve made recently, which campaigns are driving the most sales, and more.
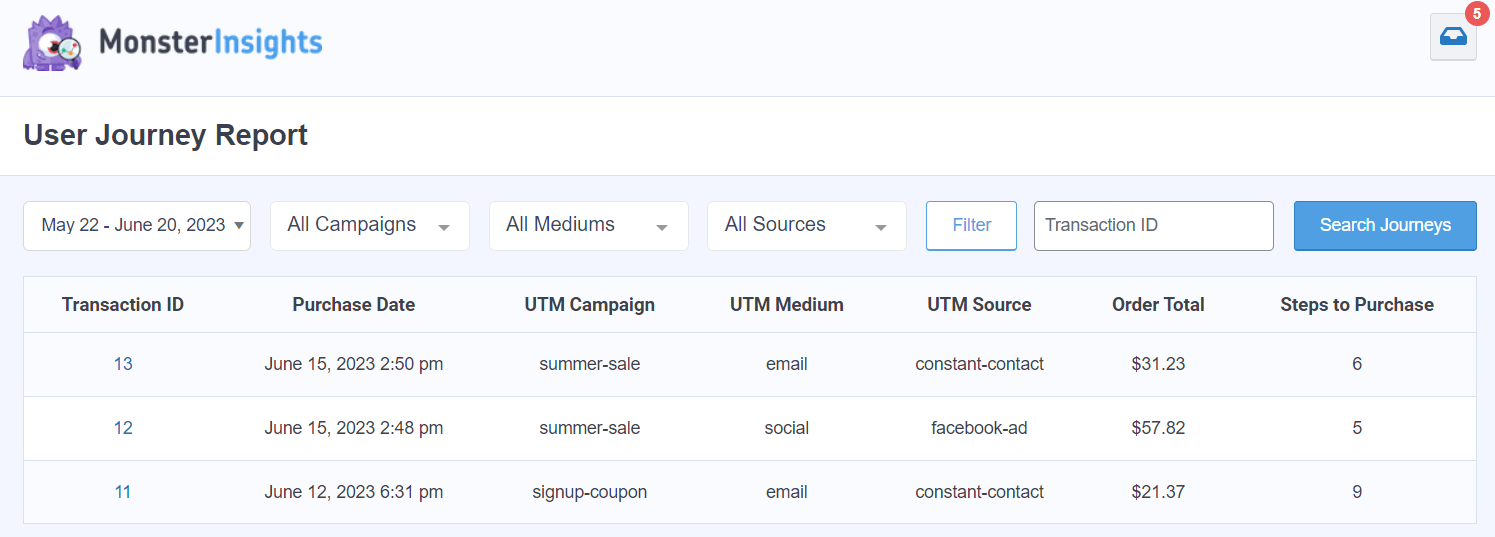
Plus, you can click into single user journeys to see the exact steps the user took:
Find the addon by going to Insights » Addons in your WordPress dashboard and clicking Install.
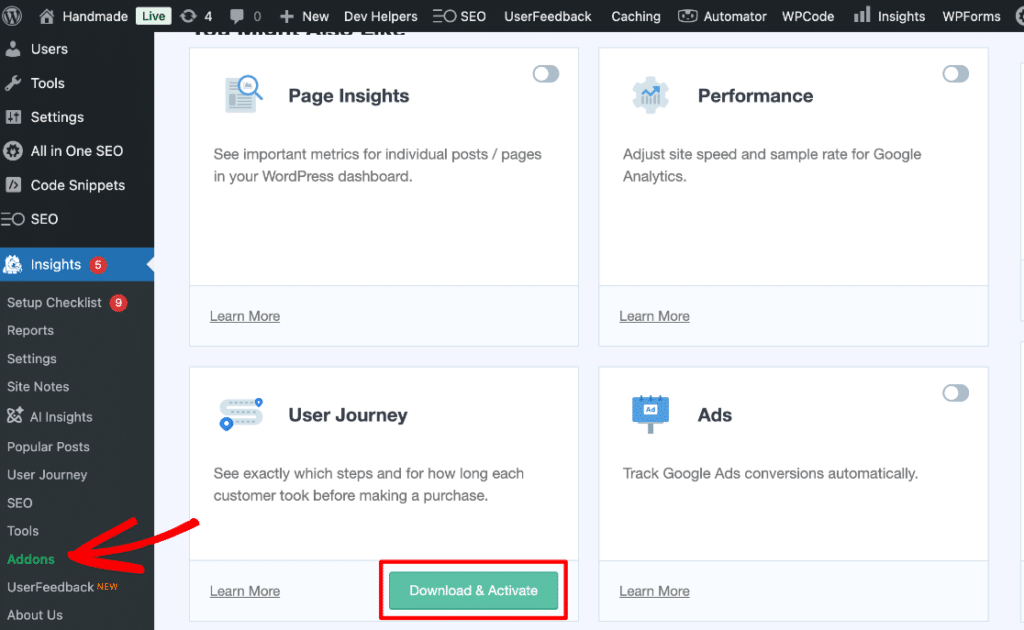
That’s it! You’ve enabled user journey reporting.
Make sure to check out the rest of the MonsterInsights addons while you’re there like our forms tracking addon, GDPR (EU compliance) addon, Ads addon, and more. MonsterInsights has many tracking options!
View WooCommerce Google Analytics Reports in WordPress
The best thing about using MonsterInsights is that you can view how your WooCommerce store is doing without leaving your WordPress dashboard.
MonsterInsights is the best WooCommerce analytics plugin because it brings some of the most important reports from Google Analytics and displays them on your website, so you don’t have to go anywhere. This is especially helpful if you’re a beginner and don’t know how to view different GA4 reports or find the data that matters.
To view stats about your online store, go to Insights » Reports » eCommerce » Overview.
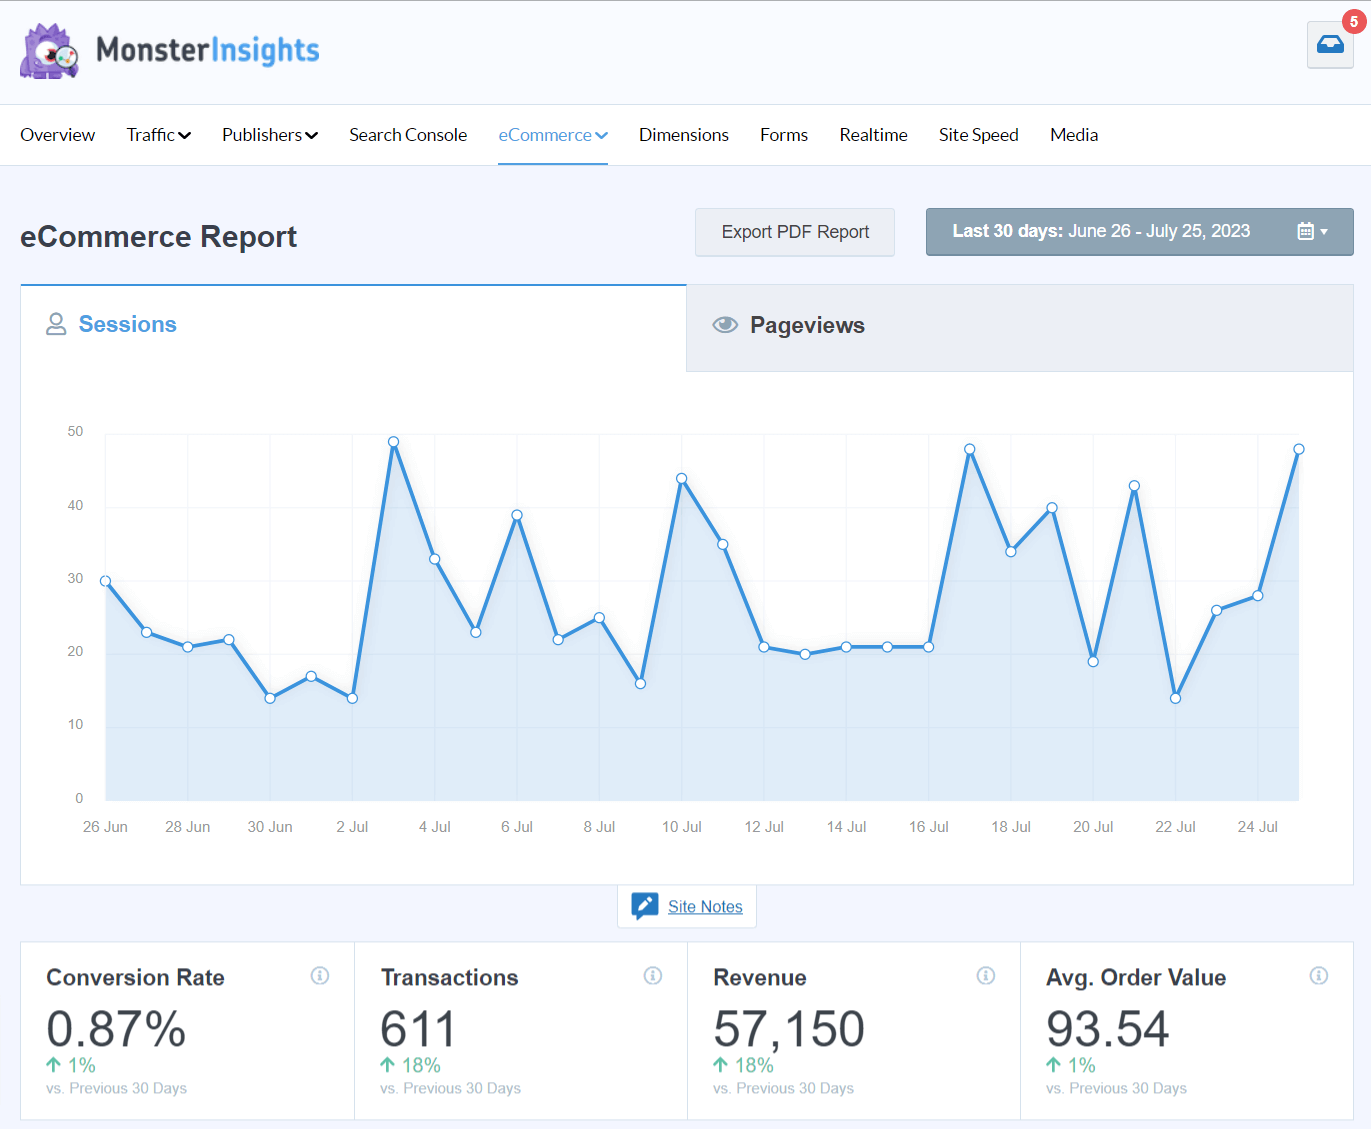
Your new Analytics dashboard shows you your site’s conversion rate, transactions, revenue, and average order value for the date range selected.
It can also show a comparison between the last time period (for instance vs. Previous 30 Days), so you know if your store’s performance improved.
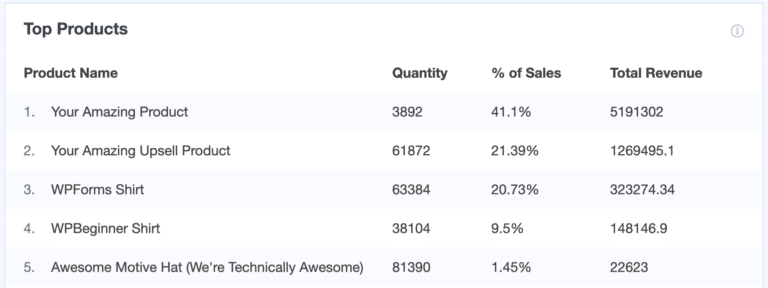
If you scroll down, the next report you’ll see is of Top Products. These are the best-selling items on your WooCommerce store. For each product, you can view its quantity sold, percentage of sales, and total revenue.
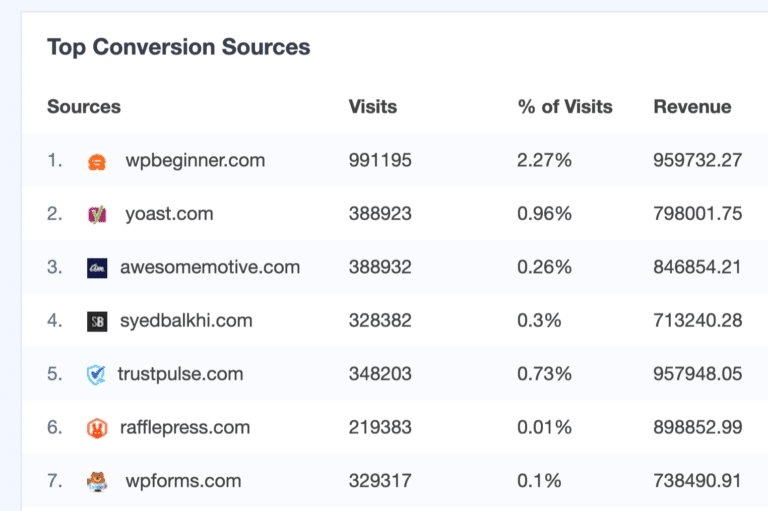
MonsterInsights also shows your Top Conversion Sources. These are websites that some of your buyers were referred from. You can see how many people came to your site from each source, their overall percentage of visits, and the revenue they generated.
The last reports you’ll see are of Total Add to Carts, Total Removed from Cart, New Customers, and Abandoned Checkouts. These eCommerce events help you understand your customers’ shopping and checkout behavior.

Next, check out the Funnel report under eCommerce » Funnel:
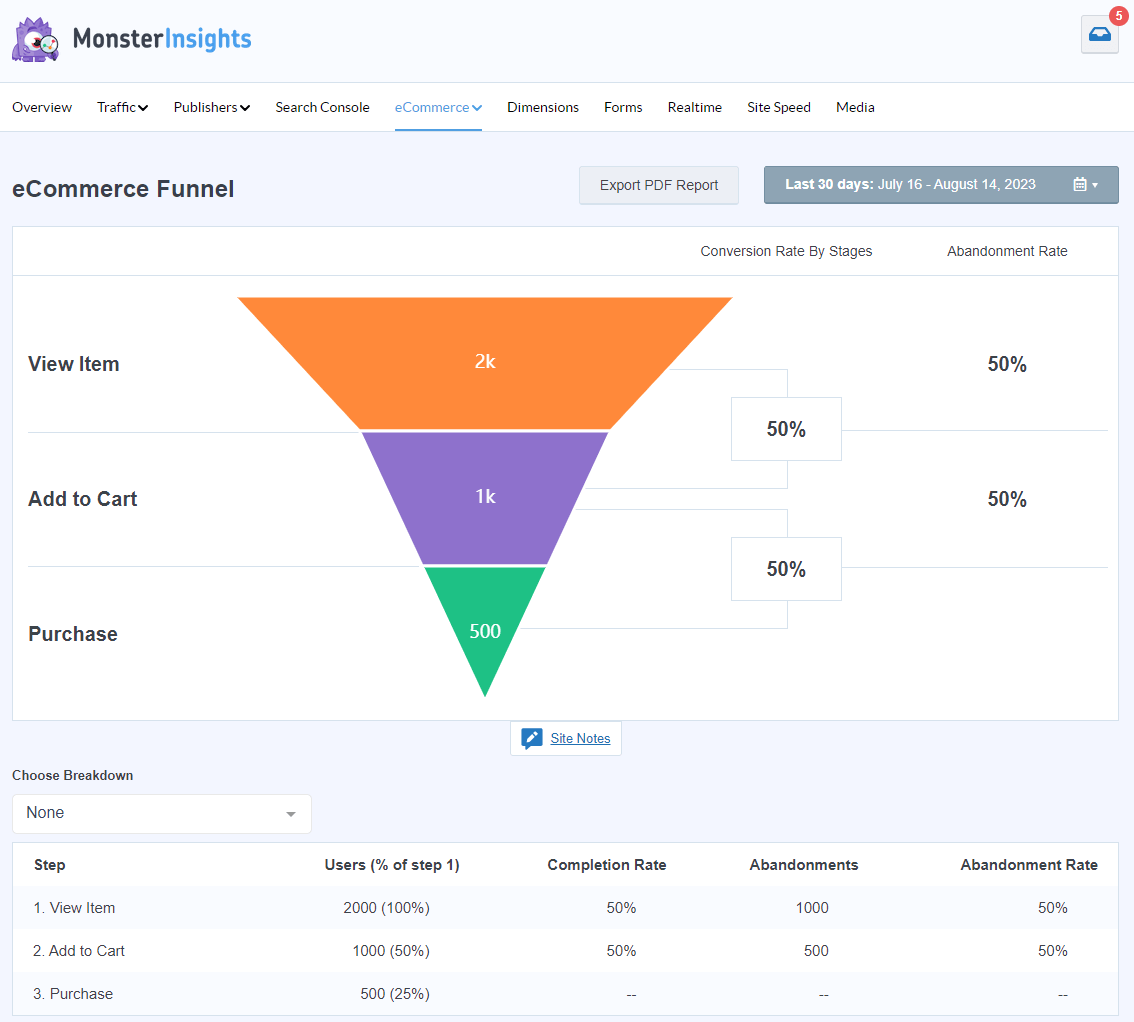
In this report, you can see the abandonment rate of your purchase funnel. How many users moved from viewing items to adding them to their carts to purchasing those items? If you’re seeing a ton of abandoned carts, that’s worth looking into.
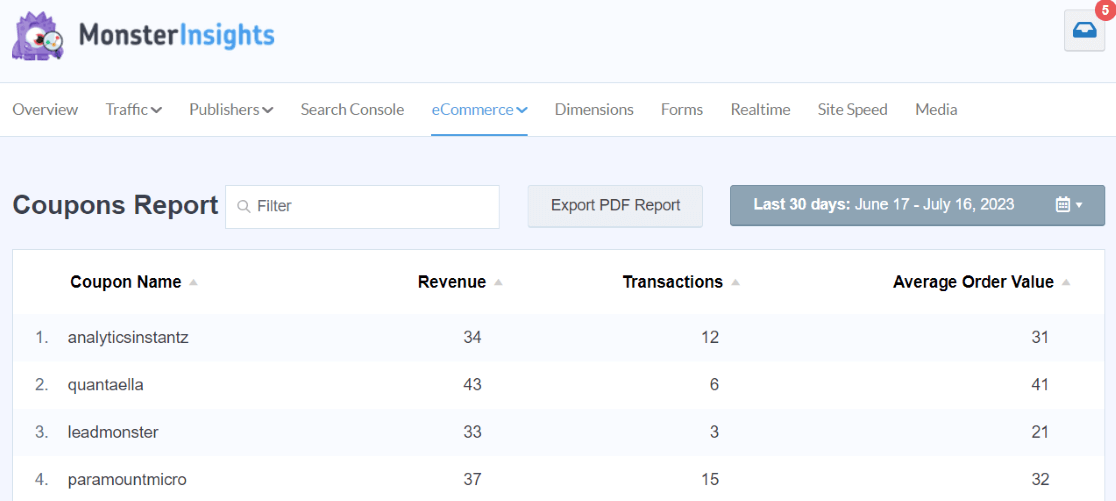
Do you use coupon codes in your WooCommerce store? If so, check out the eCommerce » Coupons report to see which coupon codes were used the most often:
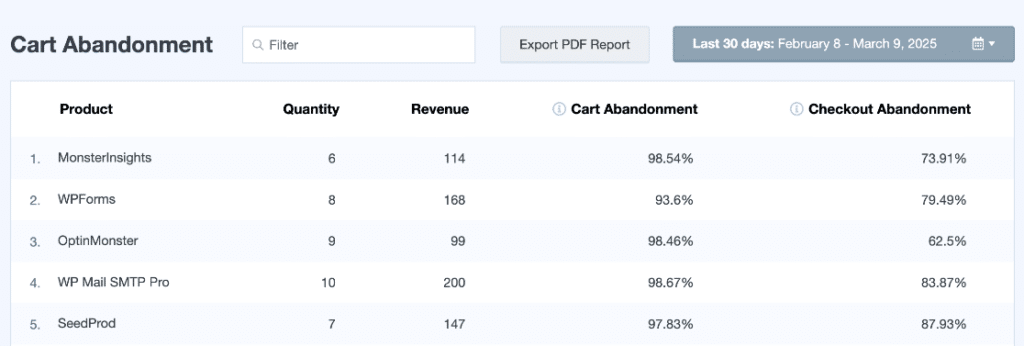
Finally, you’ll get a Cart Abandonment report. This report has two tables: abandonment by product and abandonment by date. Use it to:
- See exactly which products are being abandoned (no more guessing!)
- Track abandoned quantities to spot inventory planning opportunities
- Monitor potential lost revenue for each product
- Identify peak abandonment times
- Monitor daily revenue impact
- Spot daily trends to optimize your marketing
Of course, you’ll also get all of the other reports in MonsterInsights that aren’t in the eCommerce tab, such as:
- Pageviews and landing page details
- Form tracking report
- Campaigns report
- Media report
- Source/medium
- Landing page details
- And much more
For a full tour of MonsterInsights dashboard reports, check out Your Ultimate Guide to MonsterInsights Dashboard Reports.
How to See eCommerce Reports in Google Analytics 4
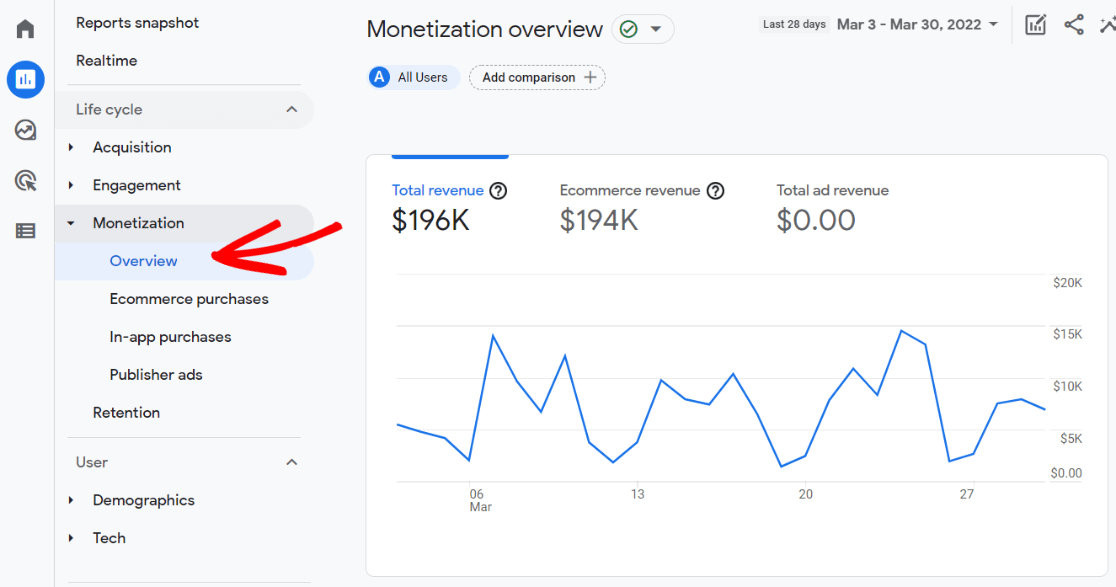
To view your eCommerce overview report in Google Analytics, navigate to Monetization » Overview. Here you can see your revenue trend by day, purchases by day, purchases by item name, purchases by item list, and more.
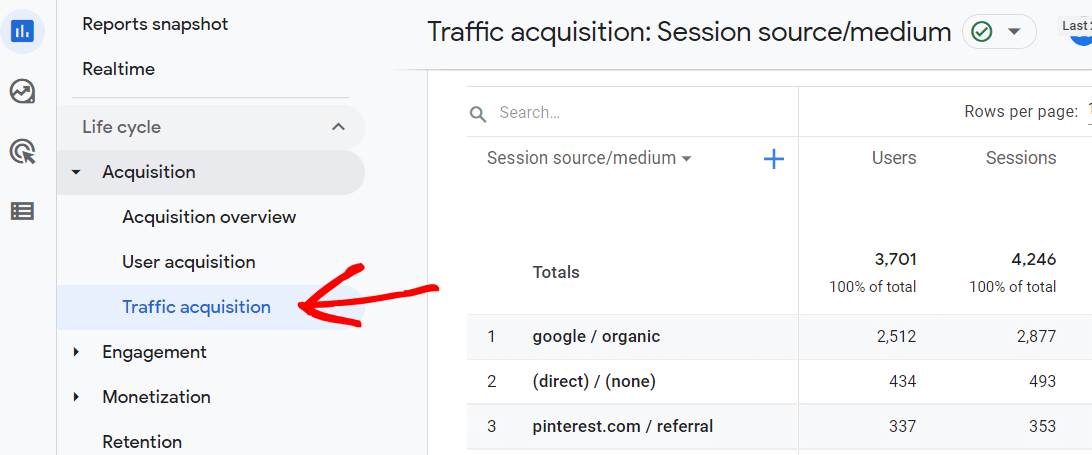
To view Google Analytics eCommerce sales (purchases) and revenue data organized by channel, navigate to Acquisition » Traffic acquisition:
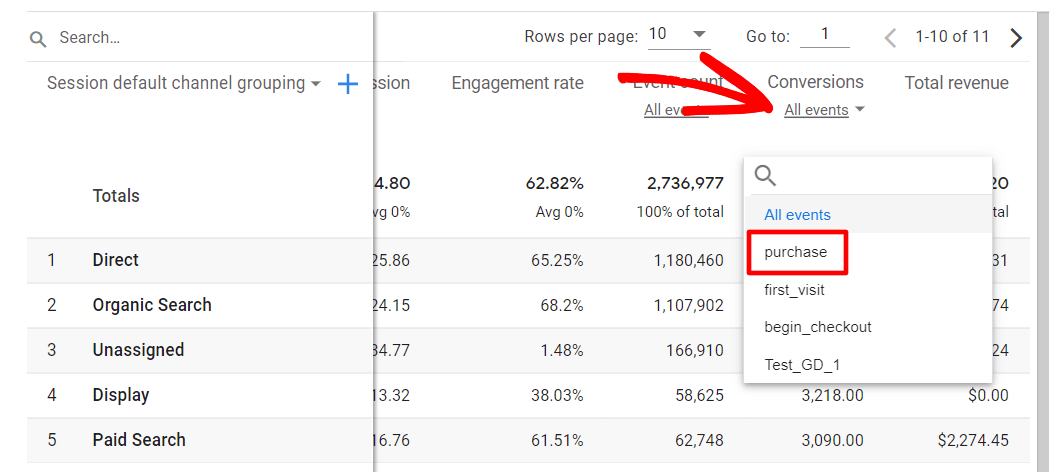
Then, scroll to the right in the table to find Conversions and Total Revenue. Click the All Events drop-down arrow under Conversions and select Purchase:
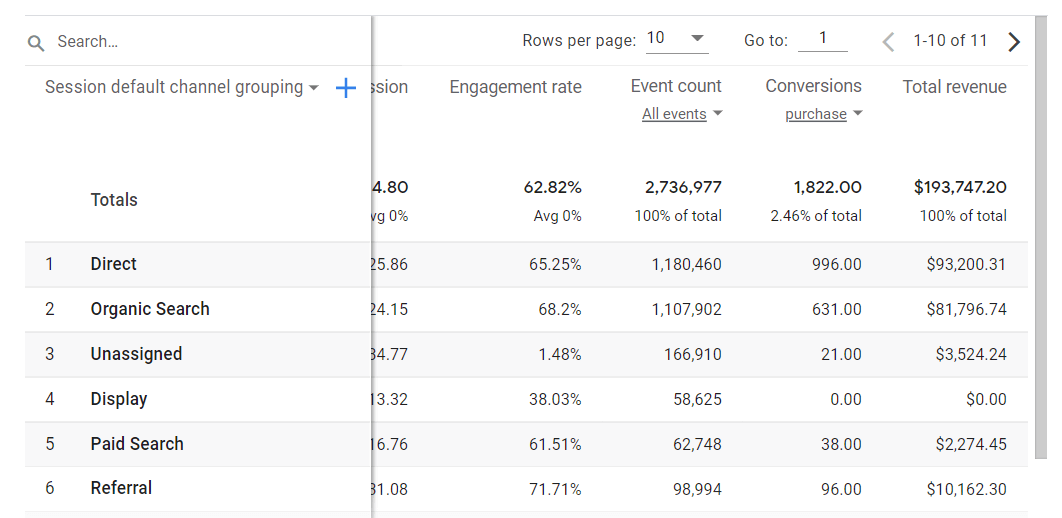
Now, the table shows total purchases and revenue by traffic channel.
You can now easily track the performance of your WooCommerce store in Google Analytics. Using the data, you’ll know which products to promote more, how to create personalized marketing campaigns, and better understand your customers.
I hope that you liked this guide on how to set up Google Analytics tracking for WooCommerce the easy way.
You might also want to check out:
WooCommerce Conversion Tracking: Complete Guide
29 Best WooCommerce Plugins to Upgrade Your Store
11 WooCommerce SEO Tips to Increase Search Rankings Today
How to Set up a Google Analytics PayPal Referral Exclusion
How to Create an IP Address Filter in Google Analytics
Not using MonsterInsights yet? What are you waiting for?
Finally, don’t forget to follow us on YouTube for more helpful Google Analytics tips and tutorials.
Frequently Asked Questions
Does Google Analytics work with WooCommerce?
Yes, Google Analytics works with WooCommerce. However, you’ll have to go through some extra setup to track your eCommerce metrics like products, sales, and revenue. That setup involves coding or learning how to use Google Tag Manager, which is why many WooCommerce users choose an analytics plugin that can set it all up instead.
What is the best Google Analytics plugin for WooCommerce?
MonsterInsights is the best Google Analytics (GA4) plugin for WooCommerce. It provides the most features for eCommerce stores and allows you to set up eCommerce tracking in Google Analytics with just a couple of easy clicks.
What about the WooCommece Google Analytics Pro plugins?
Woo has two plugins they’ve created for integrating Google Analytics and WooCommerce: WooCommerce Google Analytics Pro and WooCommerce Google Analytics (free). Both plugins are an option for WooCommerce users wanting to set up Google Analytics reporting for their store. MonsterInsights has many more features than those plugins (like customer journey reporting, form submission tracking, Google Ads and Meta Pixel integration, and more), so we recommend it over both of them. MonsterInsights also has more and better customer reviews.
For more about the differences in WooCommerce analytics plugins, check out the 6 Best WooCommerce Analytics and Reporting Plugins.
Does WooCommerce have analytics?
Yes, WooCommerce comes with built-in analytics. However, although you can use the analytics to track how your products are doing in terms of sales, they don’t tell you anything about your users. What channels did they use to find your products? What pages did they land on? Where are your shoppers from? You’ll need to set up Google Analytics to find out all of that information.
