How do you track sales of your most popular eCommerce products? Do you track top selling products in Google Analytics to get the information you need to make smart marketing decisions?
When you figure out which products are the most profitable and popular, you’ll be able to make better-informed decisions that maximize sales and increase your revenue.
In this article, we’ll show you how to find your most popular eCommerce products in Google Analytics (step-by-step).
How to Track Top Selling Products in Google Analytics
Google Analytics is the most powerful web analytics tool available. If you’re running an online shop, you can view your most popular products and other conversion stats by setting up Google Analytics eCommerce tracking.
Setting up Google Analytics eCommerce tracking requires you to code to your site to get it to work properly.
Now, the process of manually adding the code can be confusing. You have to add several different commands to add transactions and items, send data, clear data, and more.
Most likely, if you don’t have web development experience, you’ll want to hire a developer. Or, you can use a tool like MonsterInsights.
MonsterInsights is the most beginner-friendly Google Analytics plugin for WordPress. It empowers anyone, at any skill level, to use advanced Google Analytics features with ease.
You just need to enable eCommerce tracking and MonsterInsights handles the rest. To get started, make sure that you’ve installed Google Analytics on your site with MonsterInsights Pro.
If you need detailed instructions, here’s our step-by-step guide on how to set up Google Analytics in WordPress.
Once you have a MonsterInsights account and you’ve connected Google Analytics with your website, just follow these steps.
Step 1: Install and Set Up MonsterInsights eCommerce Addon
To track product sales on your online store with just a few clicks, first you need to get the MonsterInsights eCommerce addon.
Go to Insights » Addons from your WordPress dashboard menu and navigate to the MonsterInsights eCommerce addon.
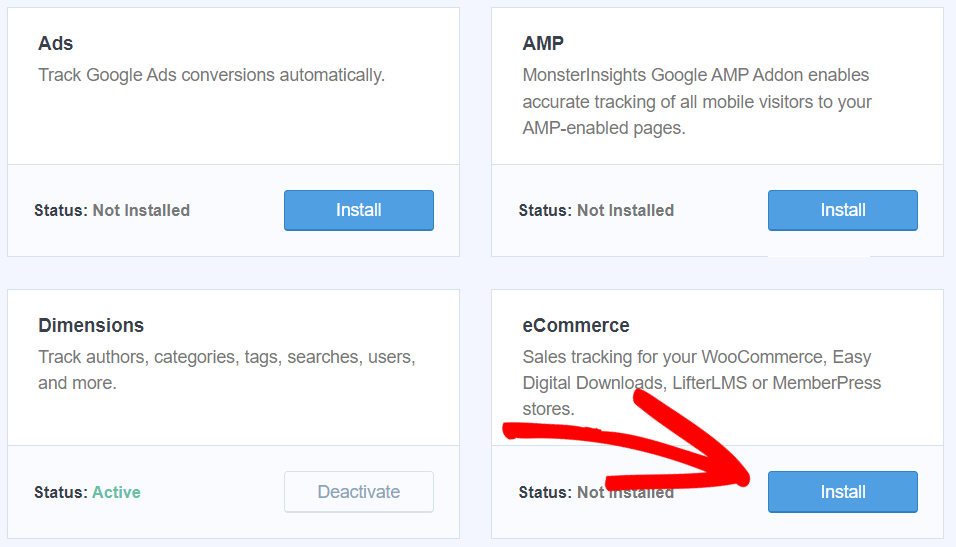
Then, click the Install button. The addon will automatically activate and you should see the status change to Active.
MonsterInsights automatically detects the eCommerce plugin you’re using on your WordPress store (it currently supports WooCommerce, Easy Digital Downloads, MemberPress, LifterLMS, GiveWP, and Restrict Content Pro).
That’s it! You’re done setting up eCommerce tracking in your WordPress online store.
MonsterInsights not only saves you money on paying a developer, but it also prevents the risk of your site breaking due to custom coding errors. In short, it empowers every WordPress user regardless of their coding skills or technical ability.
Step 2: View Top eCommerce Products in Your WordPress Dashboard
Now that you’ve set up eCommerce tracking, you can view your eCommerce reports in Google Analytics.
But, you no longer need to open Google Analytics to see eCommerce data. MonsterInsights offers all of your important sales data right in your WordPress dashboard, including conversion tracking.
To view your most popular products, total sales, conversion rates, and other eCommerce reports, visit Insights » Reports from your WordPress dashboard. Then, click the eCommerce tab at the top.
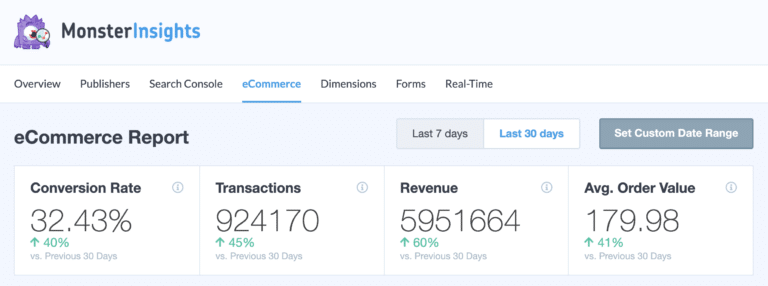
As you can see in the screenshot above, you’ll see your shop’s conversion rate, total transactions, revenue, and average order value.
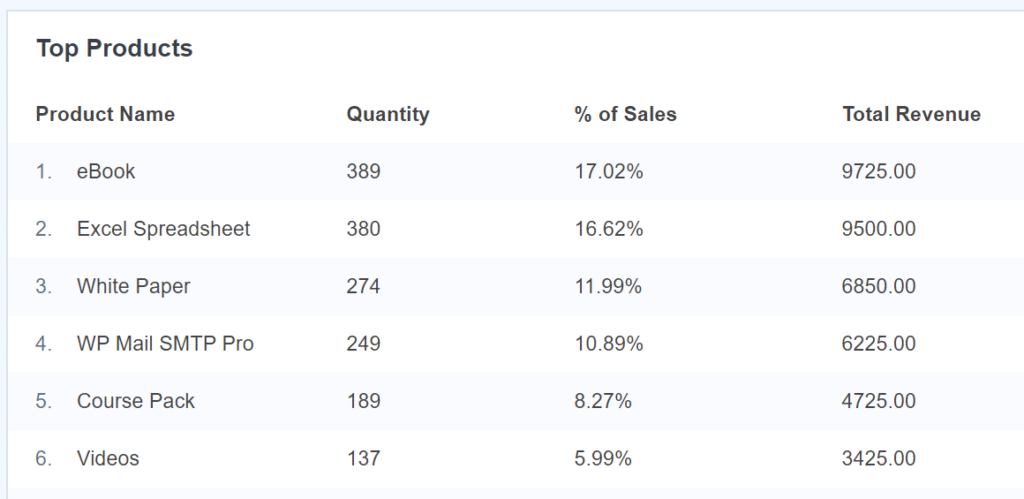
And if you scroll down, you’ll see a list of your top selling products, in order of numbers sold. For each product, you can see the quantity ordered, its percentage of overall sales, and total revenue earned by that product.
MonsterInsights also offers more reports that track the performance of your eCommerce store.
If you scroll down, you’ll see more useful eCommerce metrics like Total Add to Carts, Total Removed from Cart, New Customers, and Abandoned Checkouts.

Now, you can analyze your online store’s performance and build marketing strategies that actually work to grow your business.
How to View Your Most Popular Products in Google Analytics
Viewing eCommerce reports in MonsterInsights’ dashboard is easier and more convenient, but sometimes you may want to view them in Google Analytics.
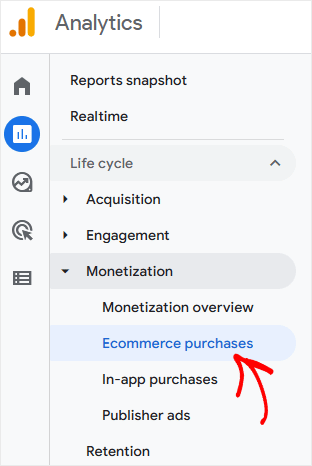
Go ahead and log in and select your property, then simply navigate to Reports » Monetization » Ecommerce purchases.
Then, you’ll see an eCommerce report page with several charts and a table. The table shows you a complete list of products sold, with item names in the left column.
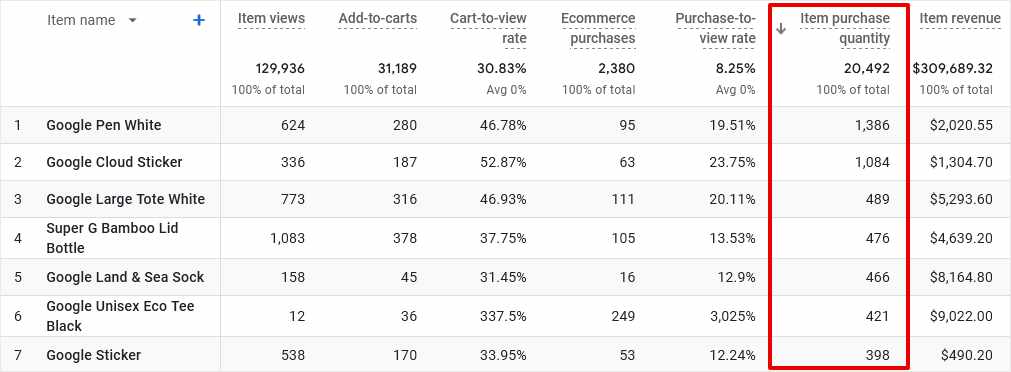
The other columns show you various metrics for each product. To see your top selling items, click the arrow next to the Item purchase quantity table heading. That will sort the table in order of most purchased products.
As you can see in our example, the top selling products sold on this site are the Google Pen White and the Google Cloud Sticker.
You can also sort the table to see which items bring in the most revenue. Simply click the sort arrow next to the Item revenue heading. Then you’ll see the top revenue-generating products at the top of the list.
Obviously, there’s a lot more data here to work with, but this should give you a start with GA4’s eCommerce reports.
Display Top-Selling Products for More Sales
Want to increase your sales of your top-selling products?
When you have MonsterInsights installed, you’ll also get access to our popular products widget. With this handy tool, you can display your top-selling products on other pages on your site, increasing sales of those items!
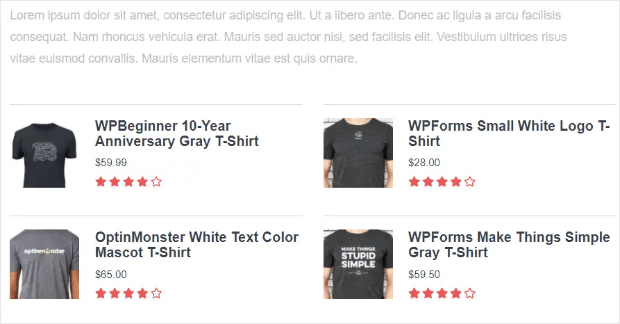
For more on how to use our popular products widget, check out How to Display Best Selling Products in WooCommerce.
That’s it!
We hope you enjoyed our guide on how to find your most popular eCommerce products, and that it helps you make more money online.
If you liked this, take a look at our post on how to set up WooCommerce conversion tracking in Google Analytics.
Still not using MonsterInsights? What are you waiting for?
And don’t forget to follow us on Twitter, Facebook and YouTube for more helpful Google Analytics tips.

