If you’re running Meta (Facebook) ads to promote your products, services, or content, installing the Facebook Pixel is crucial for tracking conversions and understanding how your ads are doing. But how do you install it on your site? How do you add your Facebook Pixel to Google Tag Manager?
There are multiple different ways to add the Facebook Pixel to your website, including adding it in Google Tag Manager, using a plugin, and pasting the code into your website manually.
In this guide, we’ll go over step-by-step instructions on how to add a Meta (Facebook) Pixel using Google Tag Manager. We’ll also take a look at an alternative for WordPress users that eliminates the need for using Google Tag Manager at all!
Why You Need to Add a Facebook Pixel
How to Add a Facebook Pixel the Easy Way (WordPress)
How to Add Facebook Pixel to Google Tag Manager
Why You Need to Add a Facebook Pixel
Installing your Facebook Pixel gives you valuable data on how visitors interact with your website after clicking on your ads. That makes it a crucial tool for any business running Facebook ad campaigns!
Here are a few of the benefits of installing your Facebook Pixel:
- Track Conversions Accurately: Without the Facebook Pixel, you’re essentially flying blind with your Facebook ads. The pixel allows you to precisely track how many conversions (purchases, leads, signups, etc.) result from visitors clicking on your ads. This conversion data is necessary for measuring how your ads are doing and making changes to improve them.
- Build Retargeting Audiences: The pixel tracks everyone who visits your website, making it possible for you to build custom audience lists for retargeting purposes. You can create audiences of past website visitors, people who abandoned a cart, or those who completed specific actions like joining your email list. Showing ads to these audiences tends to drive more conversions than your other ads!
- Get Laser-Focused Ad Targeting: Facebook Pixel data also unlocks advanced ad targeting capabilities. You can find “lookalike” audiences of new prospects who share traits with your website visitors or customers. This allows you to put your ads in front of an ideal audience who is likely to convert.
- Optimize Ads for Conversions: The Facebook Pixel allows you to run conversion optimization studies and test different ads, audiences, and placements to figure out what works best for achieving your goals in the most cost-effective way.
Simply put, if you want to get the most out of your Facebook advertising budget and truly profit from your paid social ads, installing the Facebook Pixel is an absolute must.
How to Add a Facebook Pixel the Easy Way (WordPress)
While Google Tag Manager allows you to add the Facebook Pixel code to your website to track conversions from your Facebook ads, the setup process can be complex and time-consuming, especially for beginners. Luckily, there’s a much easier way to install your Facebook Pixel without having to use Google Tag Manager at all.
MonsterInsights is the best Google Analytics plugin for WordPress, and it includes a setting to install your Facebook Pixel to track your Meta ads:

With MonsterInsights Pro, you can quickly enable Facebook Pixel tracking with just a few clicks – no coding required. It’ll track page views for all sites and purchase events for WooCommerce, Easy Digital Downloads, LifterLMS, MemberPress, and GiveWP sites.
MonsterInsights connects your WordPress site to Google Analytics while also letting you easily enable other tracking features like:
Google Ads Conversion Tracking
For Google Ads and Microsoft Ads, simply enter your conversion IDs into MonsterInsights to properly track ad conversions without any complicated code installation.
Form Conversion Tracking
MonsterInsights also makes it super easy to enable form submission tracking on your WordPress forms, no matter which forms plugin you’re using.
eCommerce Tracking
If you have an online store, you can install the eCommerce addon with a couple of clicks to track revenue, products, conversion sources, and more—no code needed. It works with WooCommerce, Easy Digital Downloads, MemberPress, and more.
On top of that, MonsterInsights unlocks powerful reporting in your WordPress dashboard, such as:
- Form conversions report
- eCommerce reports for revenue, products, etc.
- Affiliate link tracking
- File download tracking
- Marketing campaign tracking
- Site Notes (annotations)
- And much more
So if you want to skip the hassle of setting up the Facebook Pixel manually through Google Tag Manager, get started with MonsterInsights at the Pro level. Then, all you’ll need to do is install the PPC Ad Tracking addon and paste in your Pixel ID.
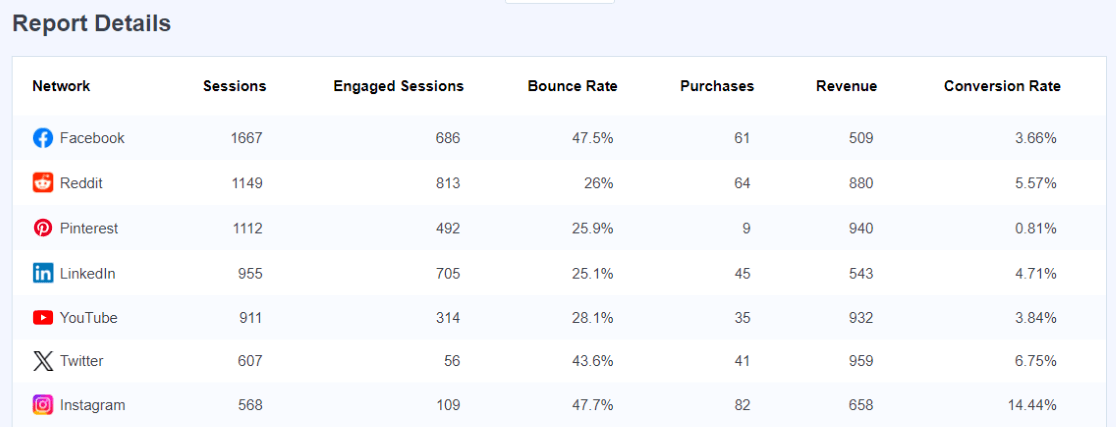
Then, you’ll get a report with your social media traffic right inside WordPress:
For a full tutorial on adding your Facebook Pixel to WordPress, check out How to Add a Facebook Pixel to WordPress (Easiest Way).
How to Add Facebook Pixel to Google Tag Manager
For those who still want to go the Google Tag Manager route for installing the Facebook Pixel, follow these steps:
Step 1: Sign Up for Google Tag Manager
Sign up for Google Tag Manager and create an account/container for your website if you haven’t already.
If you don’t have Google Tag Manager installed on your website yet, head to How to Install Google Tag Manager in WordPress. If you don’t have a WordPress site, follow Google’s installation instructions.
Step 2: Create a Facebook Pixel Tag
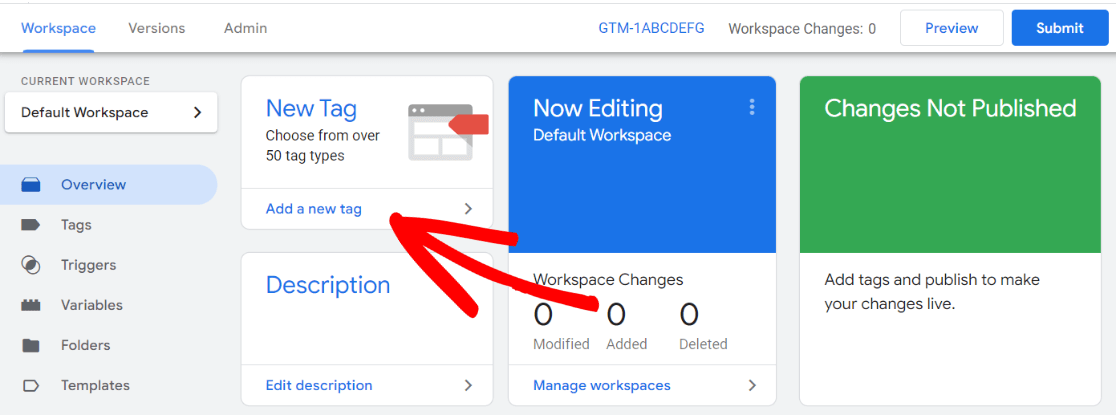
In the Google Tag Manager dashboard, go to Add a new tag:
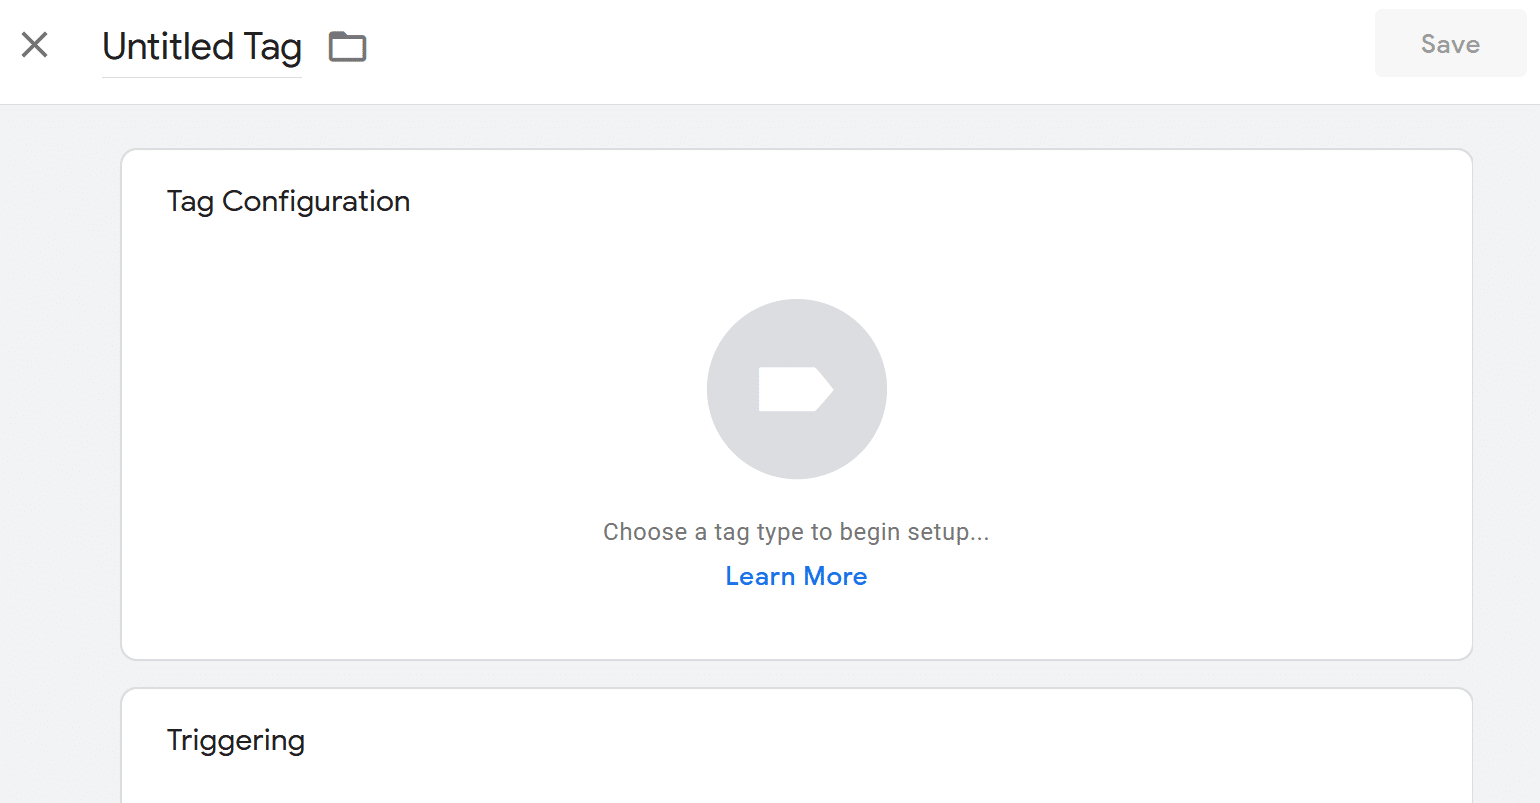
Then, click into the Tag Configuration box:
Next, choose Custom HTML from the list of tag types:
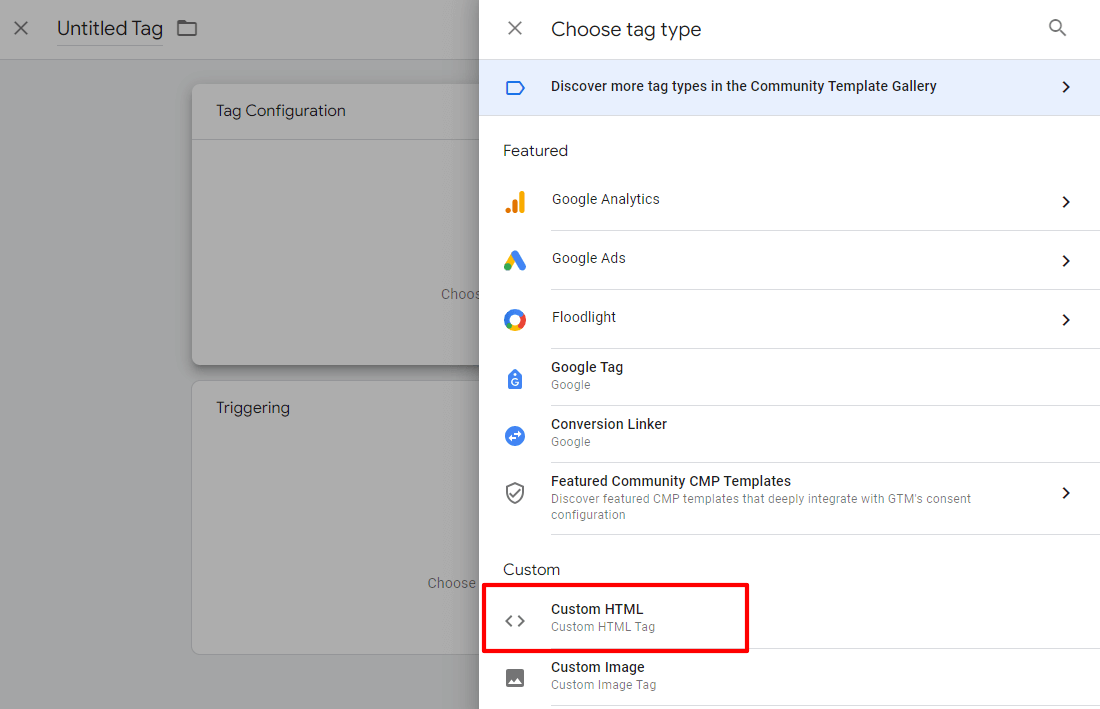
Now, copy and paste your Meta Pixel code into the tag box and give your tag a name, such as Meta Pixel:
![]()
Need help finding your pixel code? It’s located in your Facebook Events Manager. Find it by choosing the Install code manually button:
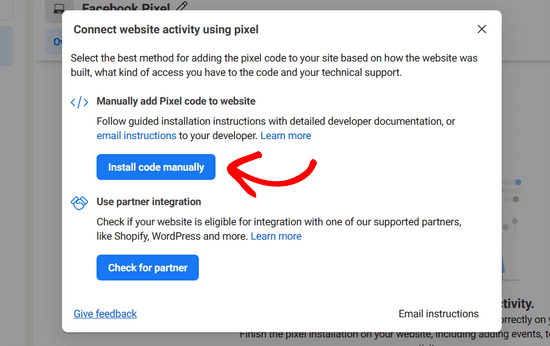
For more help on creating or locating your Pixel, check out our instructions.
Step 3: Set an All Pages Trigger
The next step is to set up your trigger, which is below your tag in Google Tag Manager:
![]()
Since you want your visitors to be tracked on all of your pages, choose All Pages here:
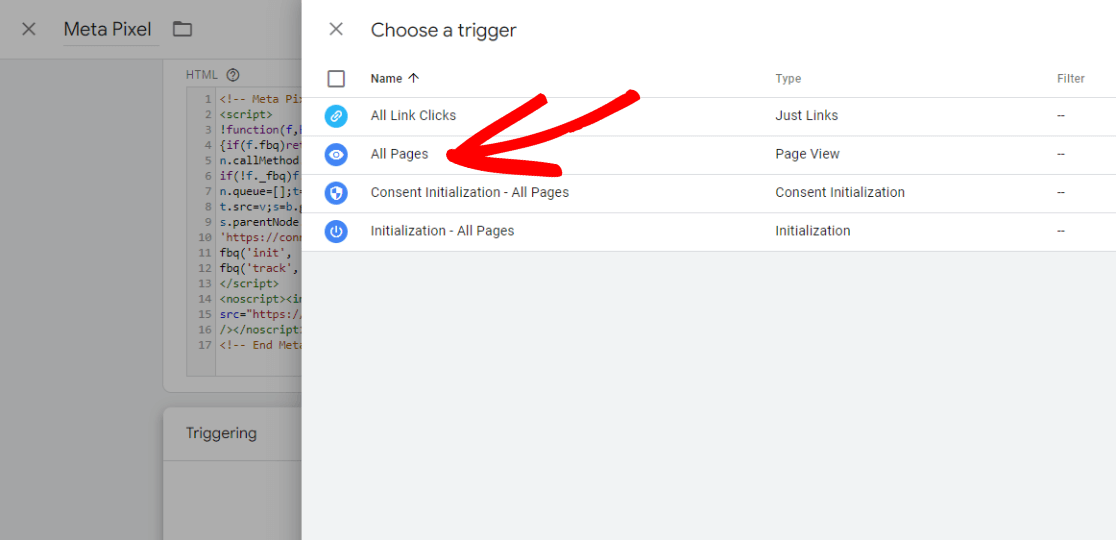
Now, go ahead and click the blue Save button:
![]()
Step 4: Publish Your Container
The final step is to publish the changes to your Google Tag Manager container. To do that, click the blue Submit button on your dashboard screen:
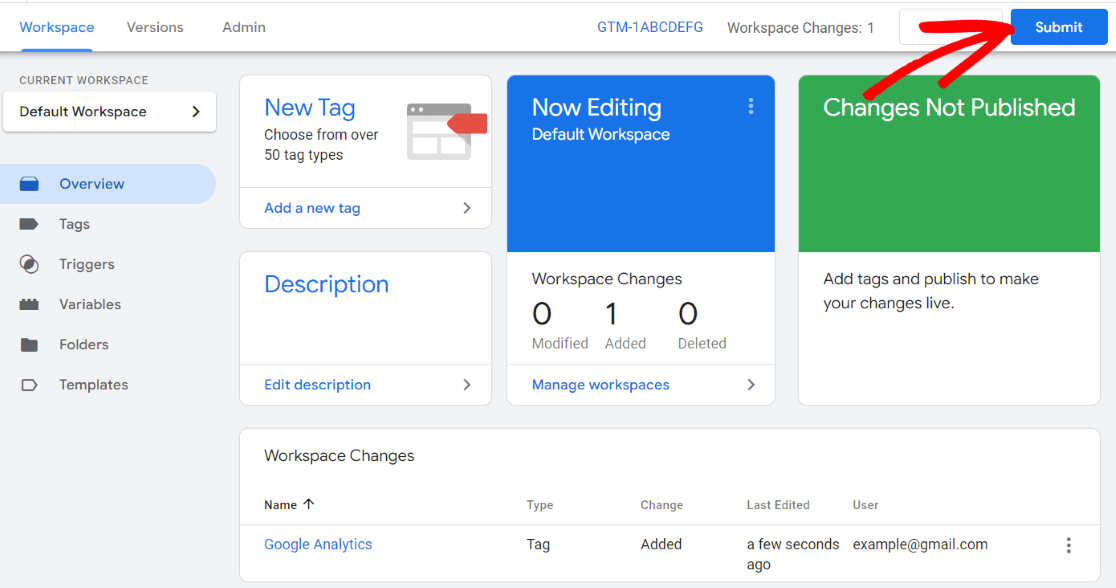
That’s it! You’ve installed your Meta (Facebook) Pixel tracking code in Google Tag Manager.
While Google Tag Manager does offer flexibility by letting you install the Facebook Pixel and any other marketing tags, the setup requires extensive time and learning compared to using a plugin like MonsterInsights.
Get started with MonsterInsights now.
Meta Pixel + Google Tag Manager FAQ
Can you put a Facebook pixel in Google Tag Manager?
Yes, you can install your Facebook pixel code using Google Tag Manager. The process involves creating a new Facebook Pixel tag in GTM and entering your pixel ID. Google Tag Manager then installs the pixel across your entire website.
How do I connect my Facebook pixel to Google Analytics?
There is no direct integration between Facebook’s pixel and Google Analytics. However, you can view Facebook traffic data in your Google Analytics reports.
Is Google Tag Manager the same as Facebook pixel?
No, Google Tag Manager and the Facebook pixel are different things. GTM is a tag management system that allows you to install and manage various tracking codes/pixels on your site. The Facebook pixel is a specific code for tracking Facebook ad conversions.
What is the difference between a tag and a pixel on Facebook?
In the context of Facebook ads, a tag and pixel refer to the same thing – it’s the conversion tracking code you place on your website. The terms are often used interchangeably, though “pixel” is more commonly used for Facebook’s tracking code specifically.
Where do I put the meta pixel code?
For a WordPress site, the recommended way is to use the MonsterInsights plugin to install your Facebook pixel with a couple of clicks. Otherwise, you’d need to add the pixel base code to your site’s header.php file.
How do I find my Facebook Pixel ID?
You can find your Facebook Pixel ID in the Facebook Events Manager. Go to Data Sources, select your pixel, and the ID will be shown there. It’s a unique string of numbers you’ll need to enter when setting up the pixel.
Do I need to use Google Tag Manager for the Facebook pixel?
No, using Google Tag Manager is not required to install the Facebook pixel. You can alternatively add the pixel code directly to your website files or use a plugin like MonsterInsights if you have a WordPress site. GTM is simply one option for installing the code.
What kinds of conversions can the Facebook pixel track?
The Facebook pixel can track a wide range of conversion events like purchases, registrations, leads, checkouts, and more. You can define custom conversion events based on URLs as well. This data helps optimize your Facebook ad performance.
That’s it!
We hope you found our tutorial on installing a Facebook pixel with Google Tag Manager helpful. If you liked this post, you might also want to check out:
8 Best Social Media Metrics to Track Now (+ Growth Tips)
How to Set up Google Analytics Social Media Tracking
How to Set up Google Analytics Click Tracking (Step by Step)
Not using MonsterInsights yet? What are you waiting for?
And don’t forget to follow us on X, Facebook and YouTube for more helpful Google Analytics tips.

