Ever wondered how many times a visitor clicked a button on your website? You can use Google Analytics to track button clicks and find out.
Wouldn’t it be great to know which buttons are garnering the most attention and potentially leading to conversions? In today’s digital world, tracking these clicks is not only helpful, it’s crucial.
Understanding your users’ behavior, like which buttons they click, can provide valuable insight into what works and doesn’t work on your site.
The good news is you don’t need to be a tech wizard to do this. I’ll show you the simple way to track button clicks in Google Analytics 4 without using any complicated tools like Google Tag Manager.
Can I track button clicks in Google Analytics?
Yes, you can track button clicks in Google Analytics! Setting up button click tracking gives you key insights into your users’ behavior, showing you exactly what grabs their attention and leads them to take action.
Tracking the clicks on your website’s buttons can help:
- Improve the User Experience: By understanding which buttons are getting the most clicks, you can adjust your content to serve your users better.
- Boost Conversions: Analyzing button clicks can reveal potential bottlenecks in your conversion funnel and help you optimize your call-to-action buttons to boost conversions.
- Enhance Marketing Strategy: By knowing which buttons are most effective, you can apply these insights to improve your overall marketing strategy.
Does GA4 automatically track clicks?
Google Analytics 4 can automatically track certain clicks through a feature called Enhanced Measurement, but it has limitations. You’ll need additional Google Analytics configuration to track clicks on call-to-action buttons, add-to-cart buttons, click-to-call buttons, and more.
The manual process can be a bit technical. You’ll need to set up custom GA4 event tracking and click event parameters, which involves editing your website’s code or using a complicated tool like Google Tag Manager (GTM) to configure data layer tags and triggers. This can be a daunting task if you’re not a developer or Google Analytics professional.
But don’t worry! For WordPress users, there’s a much easier and quicker way to track button clicks without tag manager or any coding when you use MonsterInsights.
MonsterInsights is the best Google Analytics plugin for WordPress. You can add Google Analytics tracking to your site without editing any code or hiring a developer. You’ll get the insights that matter right inside your WordPress dashboard.
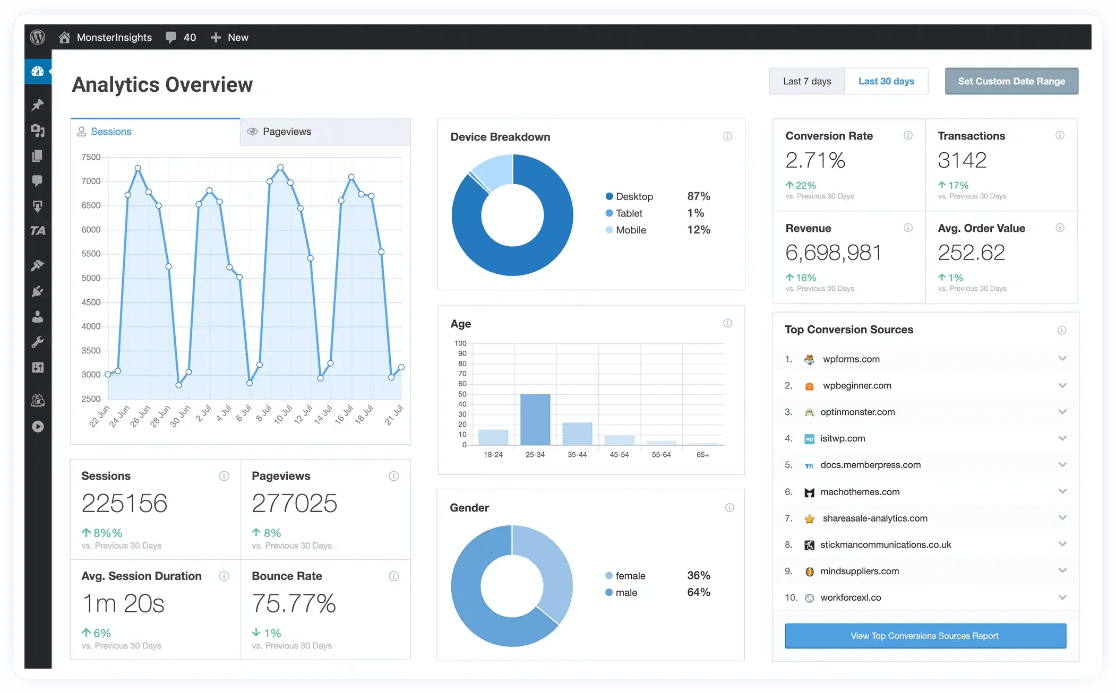
Besides advanced tracking for button clicks, MonsterInsights gives you access to tons of other Google Analytics features and sophisticated tracking with only a few clicks, such as:
- One-click conversion tracking for Google Ads, Microsoft Ads, and Facebook Ads
- Custom dimensions for tracking authors, categories, tags, and more.
- Affiliate link tracking
- Social media and referral tracking
- Outbound link tracking
- EU/GDPR Compliance
- Video play tracking
- And much more…
Just follow our guide to easily start tracking button clicks on your WordPress website.
How to Track Button Clicks in Google Analytics
- Video Tutorial
- Set Up Button Click Tracking
- Track Click-to-Download Buttons
- Track Form Submit Buttons
- Track eCommerce Button Clicks
- Track Click-to-Call and Contact Buttons
- Track Call-To-Action Buttons and Other Custom Links
Button Click Tracking Video Tutorial
Set Up Button Click Tracking
Before you can start tracking button clicks on your WordPress site, you’ll need to set up Google Analytics tracking. Head to the MonsterInsights pricing page and grab the license level that works best for you. Note that you’ll need a Pro license to track form submissions and eCommerce buttons.
Next, you’ll need to install and activate the plugin. Download the ZIP file that’s found under the Downloads tab of your account area.
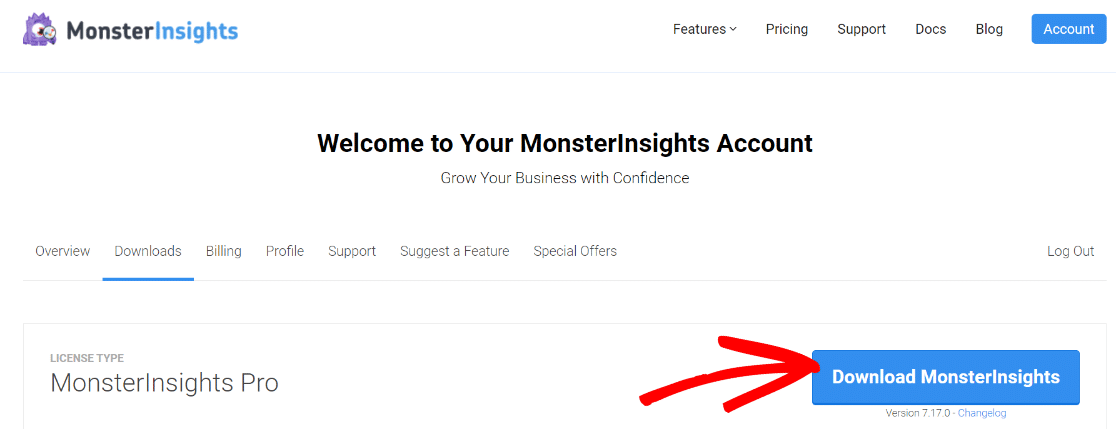
Now, log into your WordPress website and go to Plugins » Add New. Click Upload Plugin at the top and upload the ZIP file. After it finishes installing, click Activate.
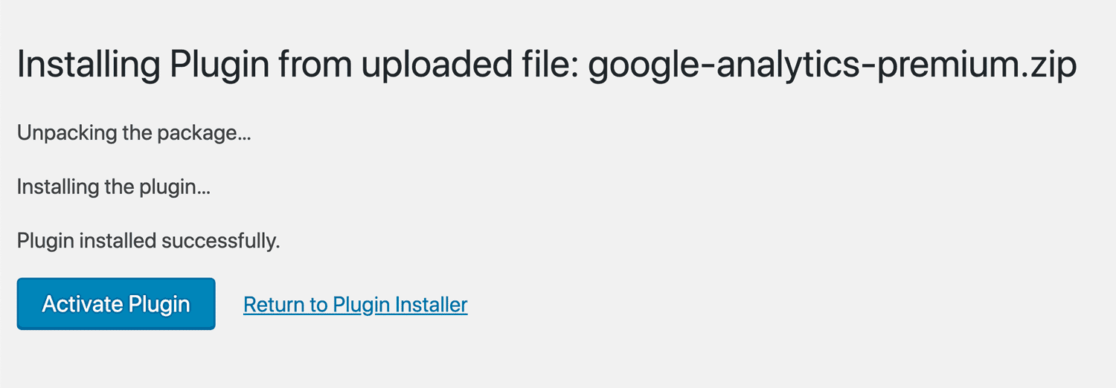
After you’ve installed and activated the plugin, the next step is to connect it to Google Analytics.
Luckily, it’s really easy with the MonsterInsights setup wizard. Just follow the prompts to grant access and connect Google Analytics to your site in a few clicks.
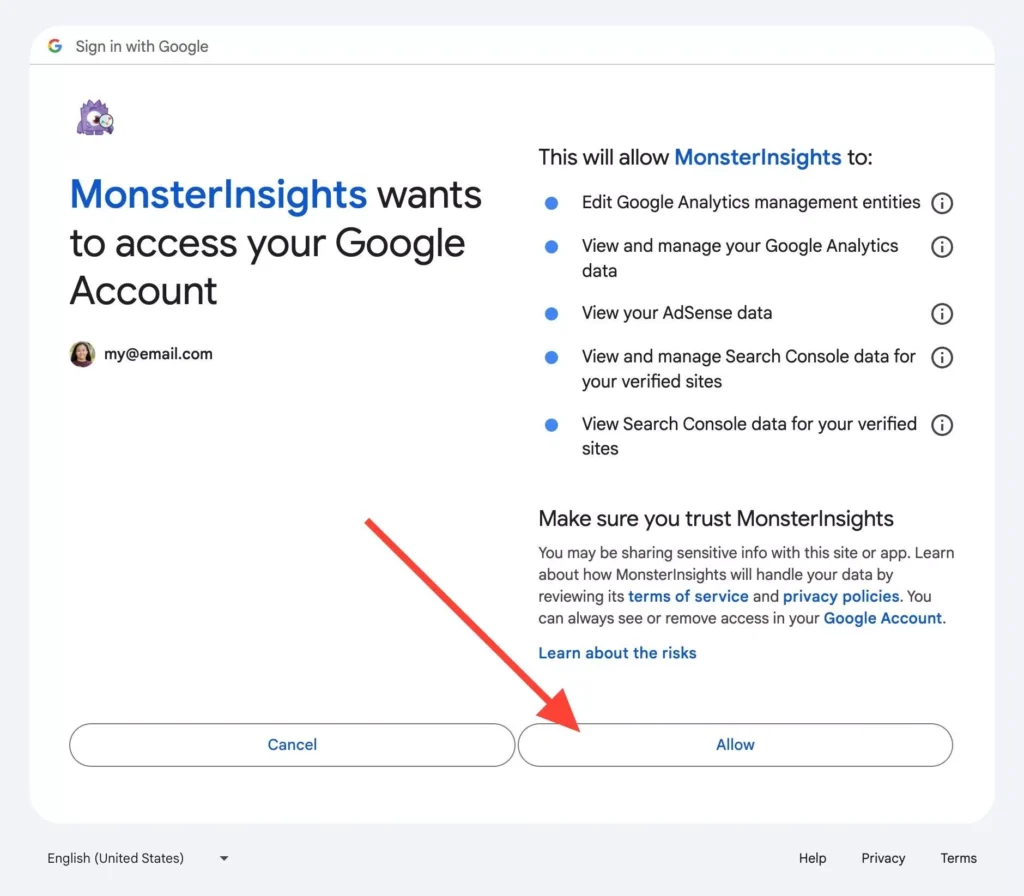
And that’s all there is to it! You’ve now installed MonsterInsights and connected it to Google Analytics.
Need more help? Check out our step-by-step tutorial on How to Add Google Analytics to WordPress. Now, let’s see how to track specific buttons with Google Analytics.
Track Click-to-Download Buttons
Are you offering digital content for users to download on your website? Monitoring clicks on your download buttons gives you insight into what content visitors like the most.
With MonsterInsights, tracking downloads for a wide array of commonly used file types is an automatic process. These file types include:
- Documents
- Spreadsheets
- Presentations
- PDFs
- Zip files
Want to add more file types to be tracked? Simply navigate to MonsterInsights » Settings and tap the Engagement tab at the top. Expand the section for File Downloads, and you’ll be able to add as many additional file types as you’d like.
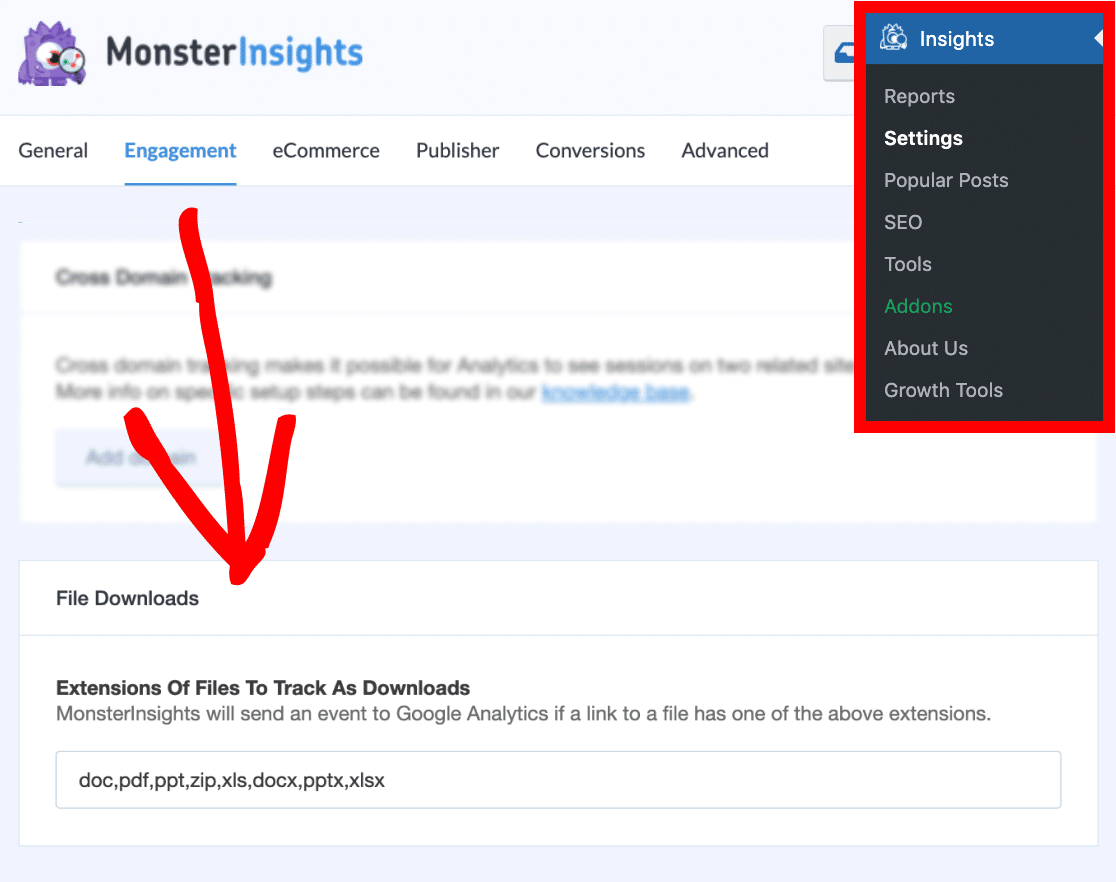
Want to check which download buttons are getting the most action? Just go to MonsterInsights » Reports and click Publishers » Overview at the top.
Scroll down to find your Top Download Links report.
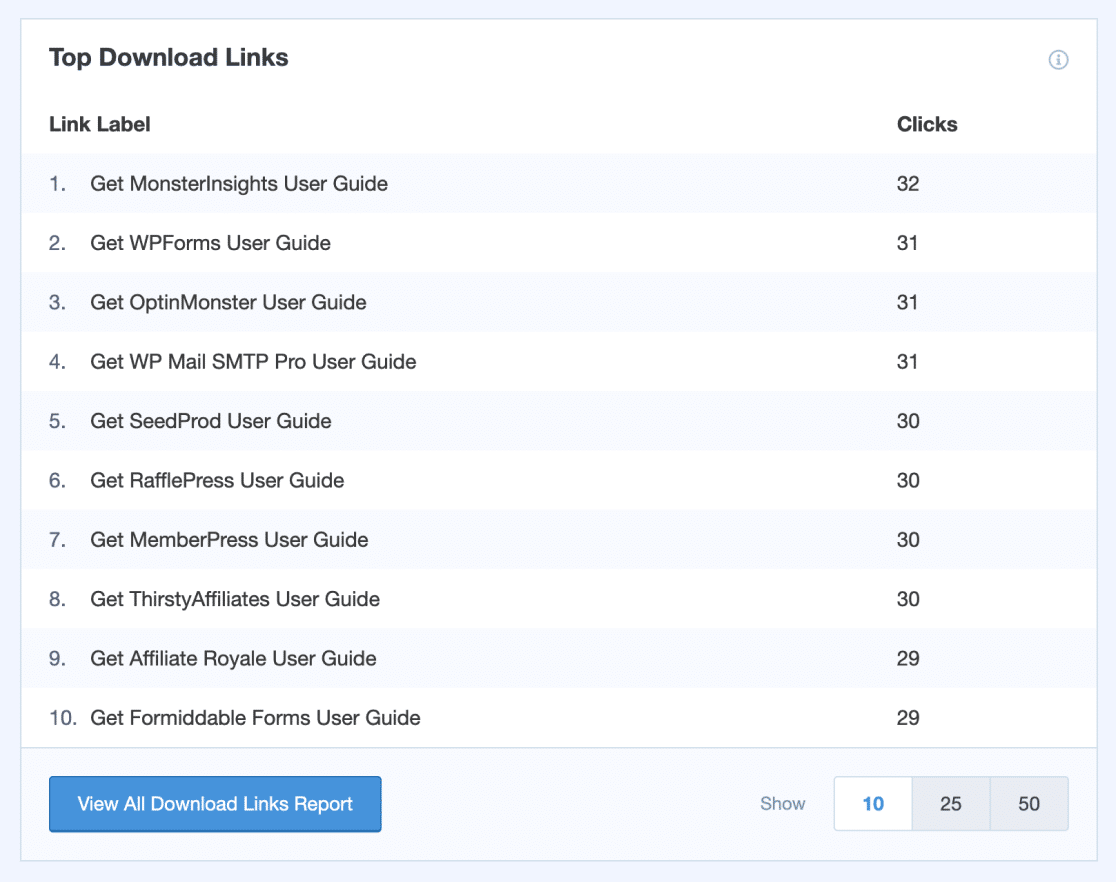
Here, you’ll find a list of all your download buttons and the number of times each button was clicked. This is a great way to monitor your most popular downloads and see which buttons are grabbing visitors’ attention.
See Download Button Clicks in Google Analytics
To see a report of your file downloads in GA4, click the link at the bottom of your MonsterInsights report, View All Download Links Report. This will take you straight to the correct event report in your Google Analytics account.
Alternatively, you can find it by going to Reports » Engagement » Events. Look for the event named file_download in the table, and click it.
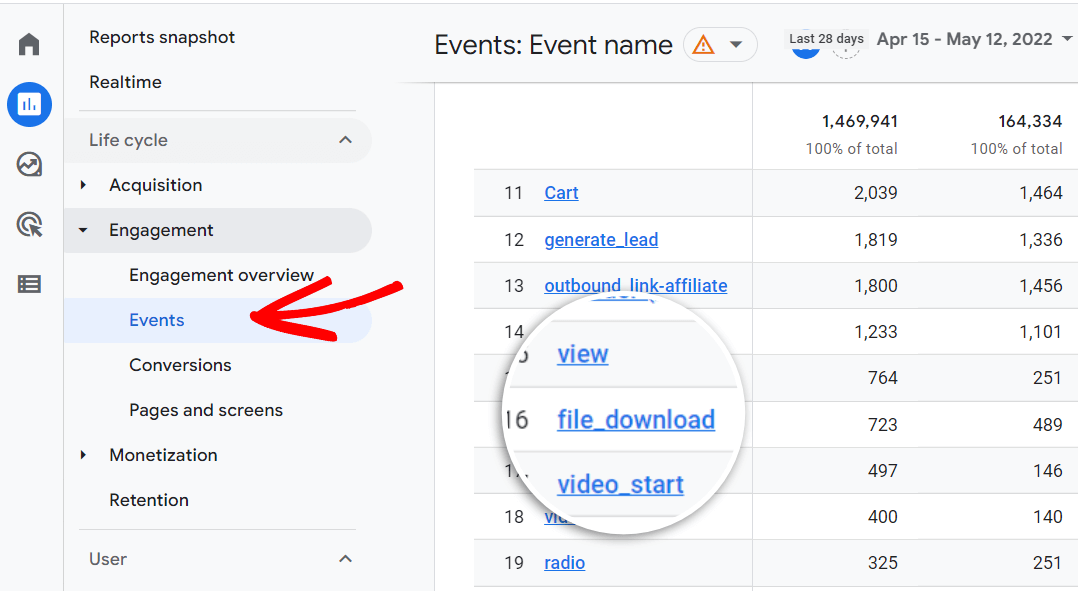
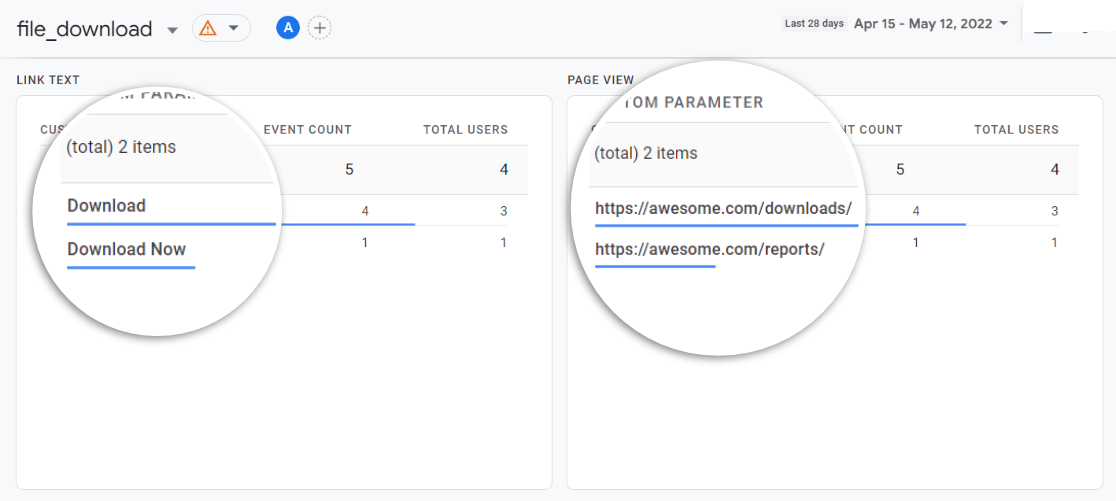
Look for the Link Text card to see a list of your download buttons along with the number of clicks (event count) and total users. Use the Page View card to see which pages users were on when they clicked a download button.
You can also create a custom report in GA4 to get more insights into your file download buttons.
Track Form Submit Buttons
Did you know that MonsterInsights Pro has an awesome feature for form tracking?
It automates form submission tracking to streamline the process of tracking clicks on your form submit buttons. Simply put, it’s a pretty handy tool. So, how does it work?
First, you’ll need to install and activate the Forms add-on. To do so, navigate to MonsterInsights » Addons from your WordPress admin menu and press Install on the Forms add-on.
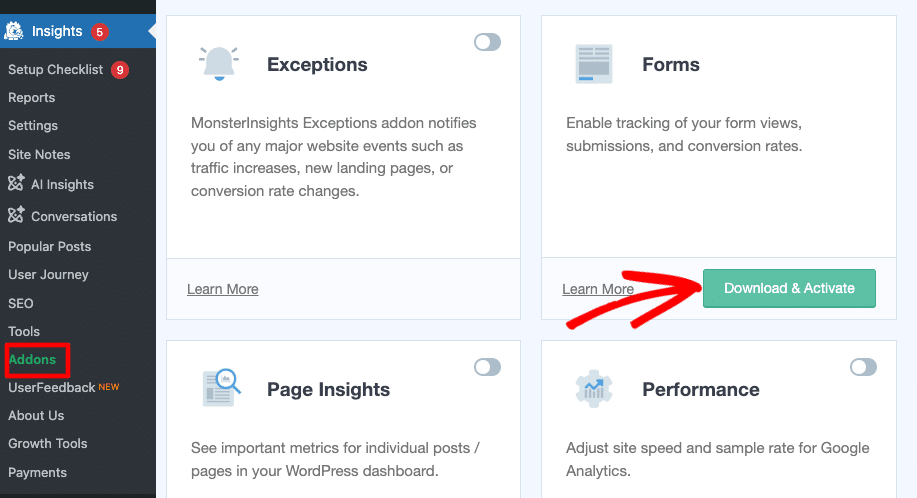
The addon will automatically activate and detect any forms on your site to start tracking. It integrates with all form builders for WordPress. Pretty straightforward, right?
To see a conversion tracking report for your forms, head to Reports » Forms.
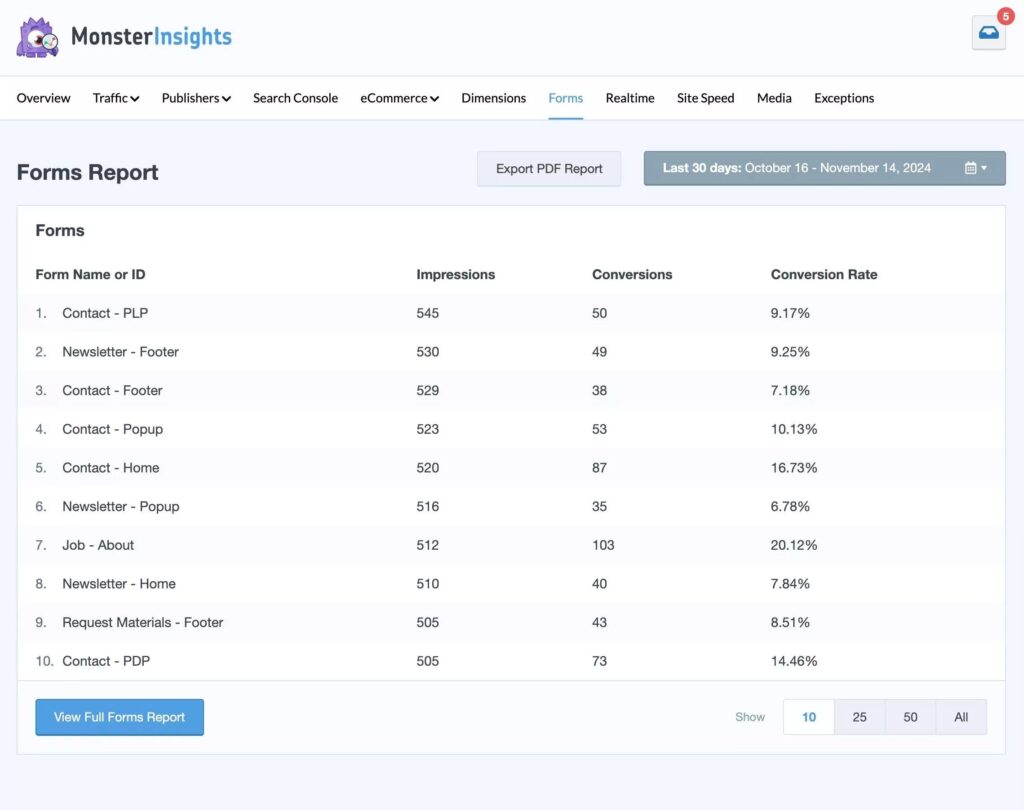
Here, you can see the number of impressions and conversions (total clicks on the form submit button) each form received, as well as the conversion rate, to quickly see which of your forms is performing best.
View Form Submit Clicks in Google Analytics
MonsterInsights handles all the tricky aspects of Google Analytics 4 behind the scenes, so you can track your website’s form buttons without any extra configuration.
You can click the link in MonsterInsights, View Full Forms Report, to quickly access the report in Google Analytics. Or, navigate to Reports » Engagement » Events.
In the table, look for a newly created custom event called generate_lead, which represents your form submissions. When you find it, click it.
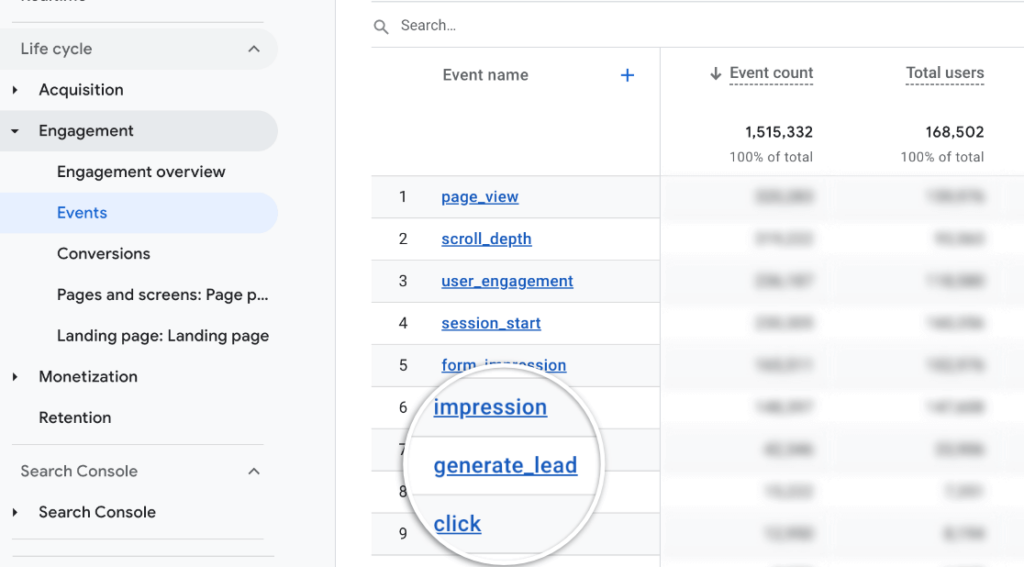
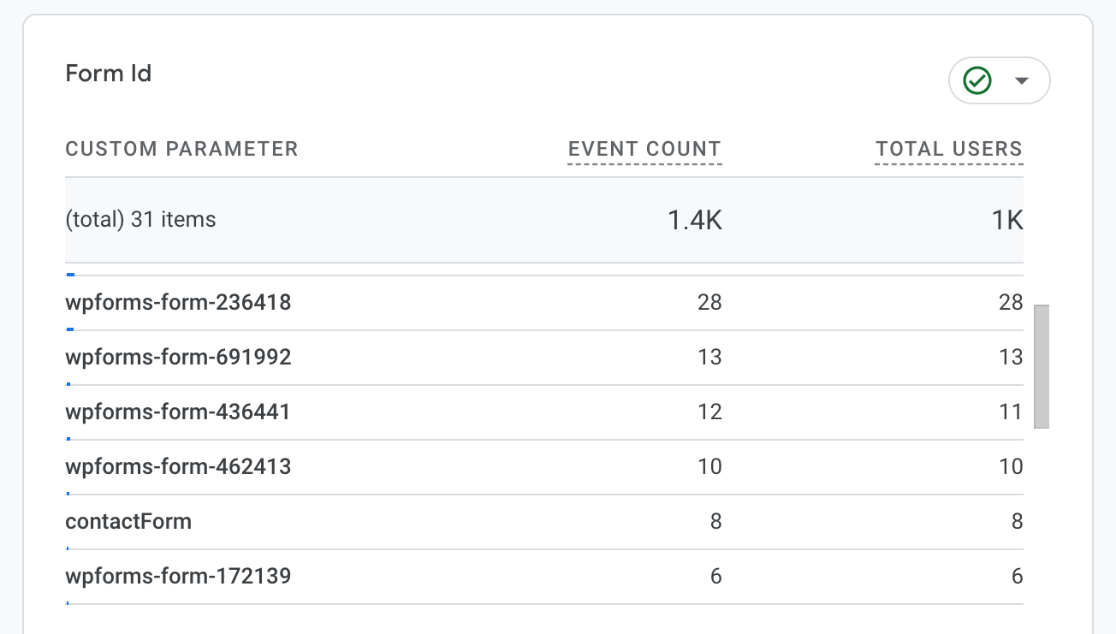
Then, scroll down to the Form ID card to see each of your forms, along with the submission count (event count) and total users.
Since your button-click event for form submissions is already set up, you can also use it in a custom report to get more data about how visitors interact with your form.
Track eCommerce Button Clicks
MonsterInsights is a fantastic way to track overall eCommerce performance and monitor clicks on buttons related to online shopping.
You can set up Google Analytics tracking for your online store in under a minute, and it works with popular WordPress eCommerce plugins like WooCommerce, Easy Digital Downloads, MemberPress, and more.
MonsterInsights comes packed with an array of eCommerce tracking features, and you’ll get your reports right within your WordPress dashboard. To set it up, just navigate to MonsterInsights » Addons and press Install under eCommerce to activate it on your site.
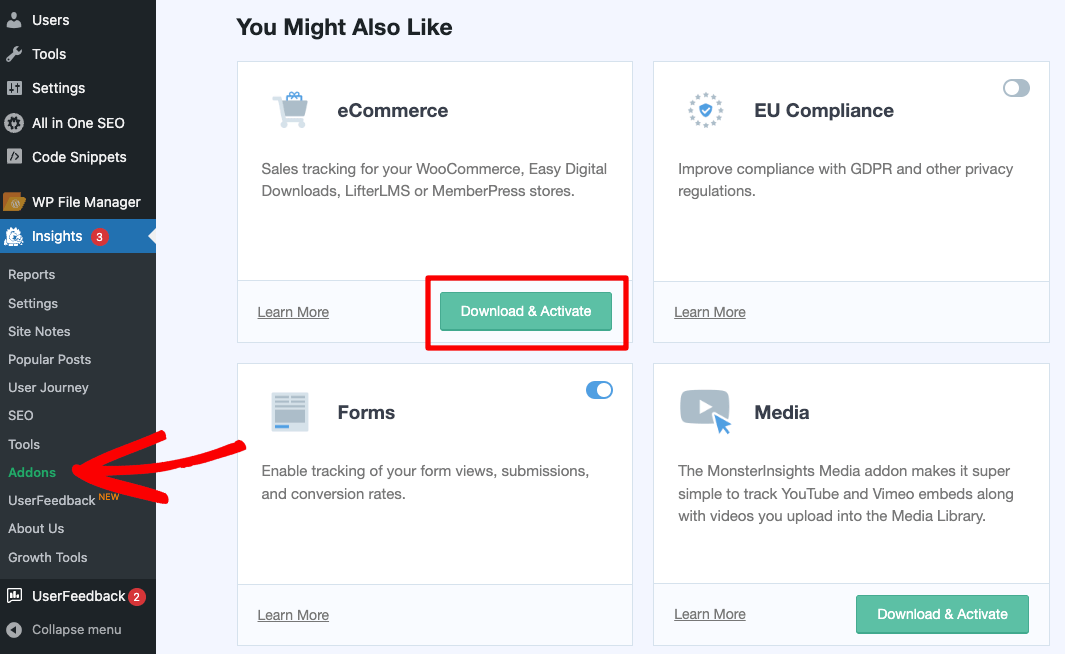
Once done, MonsterInsights will automatically recognize your online store’s software and set up Google Analytics eCommerce tracking.
To easily see how your online store is performing, head to Reports » eCommerce » Overview. This comprehensive report will show you a ton of important metrics.
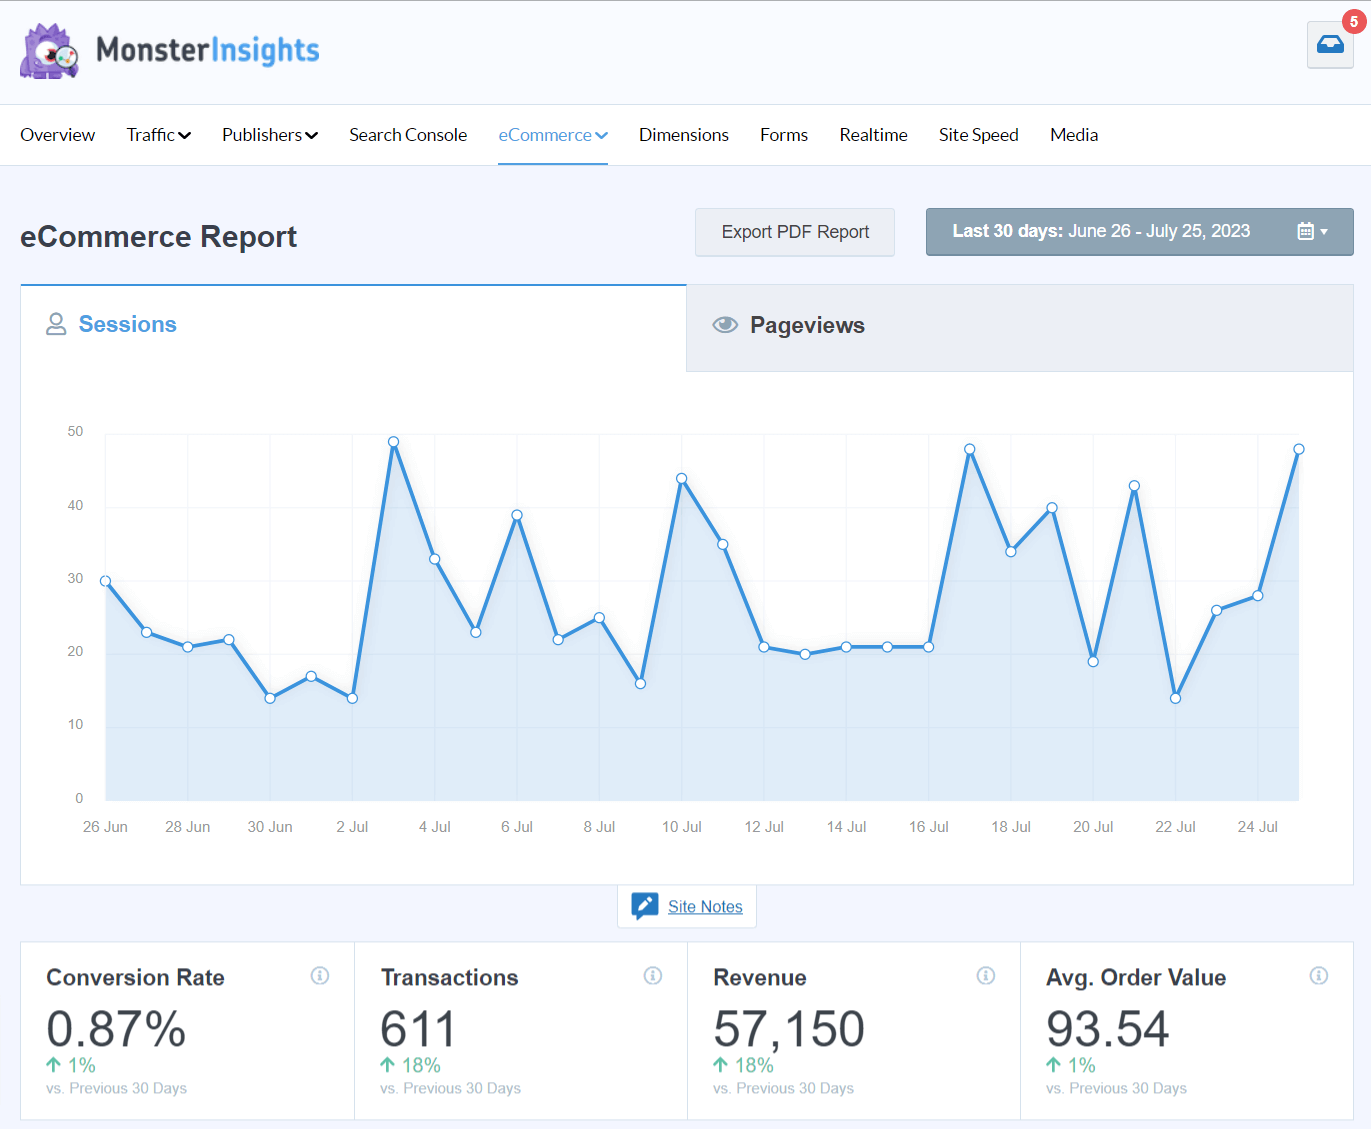
Simply scroll down to the bottom of the report to see the number of times customers used the Add-to-Cart or Remove-from-Cart buttons on your site.

Quickly keep tabs on how often customers are using your eCommerce-related buttons, your abandoned checkout rate, and other key metrics you’ll find in this report.
View Add-to-Cart Events by Product in Google Analytics
Want to track add-to-carts for individual products? Since MonsterInsights already configured your GA4 click events, it’s simple!
Press View Full Top Products Report under the Top Products section of your eCommerce overview report in WordPress to go directly to the Monetization » Ecommerce purchases report within Google Analytics.
In the table, look at the Add-to-carts column to see the number of times each product was added to a cart.
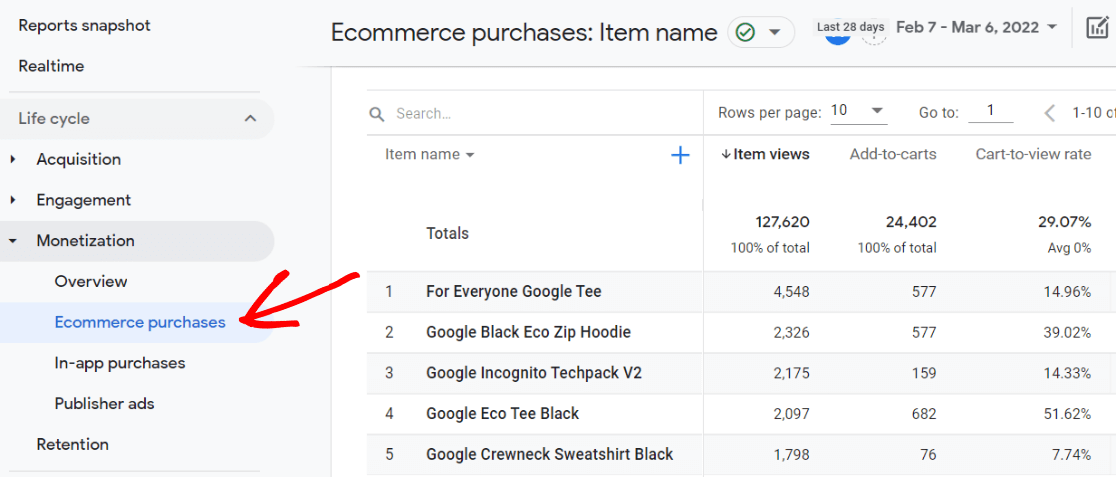
With all your eCommerce events already set up in Google Analytics, you can build custom reports and funnel explorations and gain a deeper insight into how users shop on your site.
Track Click-to-Call and Contact Buttons
Do you have contact buttons on your website for users to email or call your business using a mailto or tel link? If so, you can track how often these buttons are clicked.
MonsterInsights automatically records these button clicks as events in Google Analytics. To see how often visitors use these buttons, head to Reports » Engagement » Events in Google Analytics 4.
In the table, search for an event titled mailto. Look at the Event count to see how many times visitors clicked an email contact button on your site.
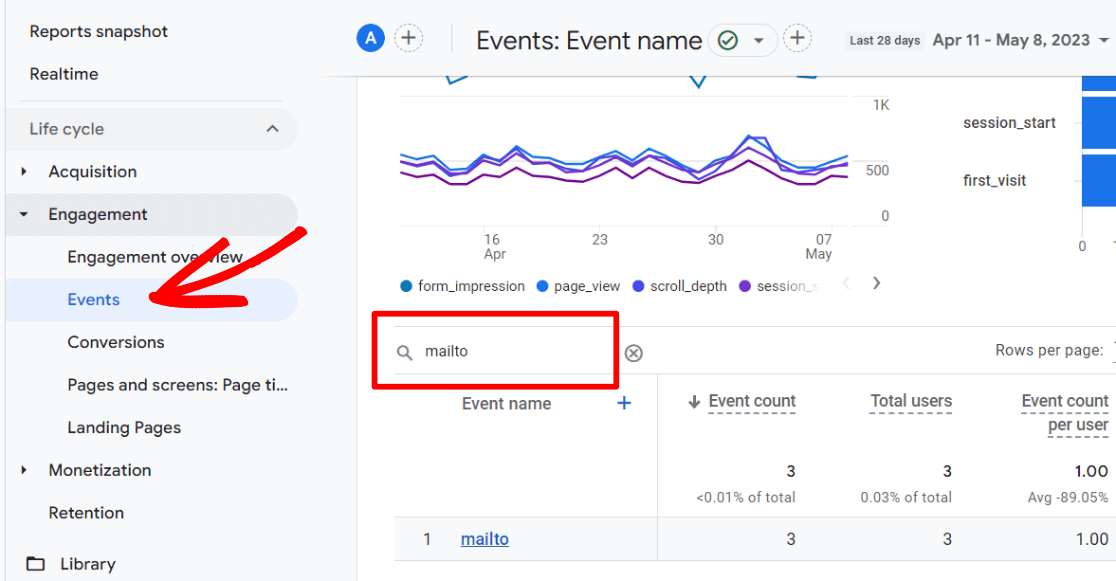
If you want to see how many times a call button was clicked, search for the event named tel instead.
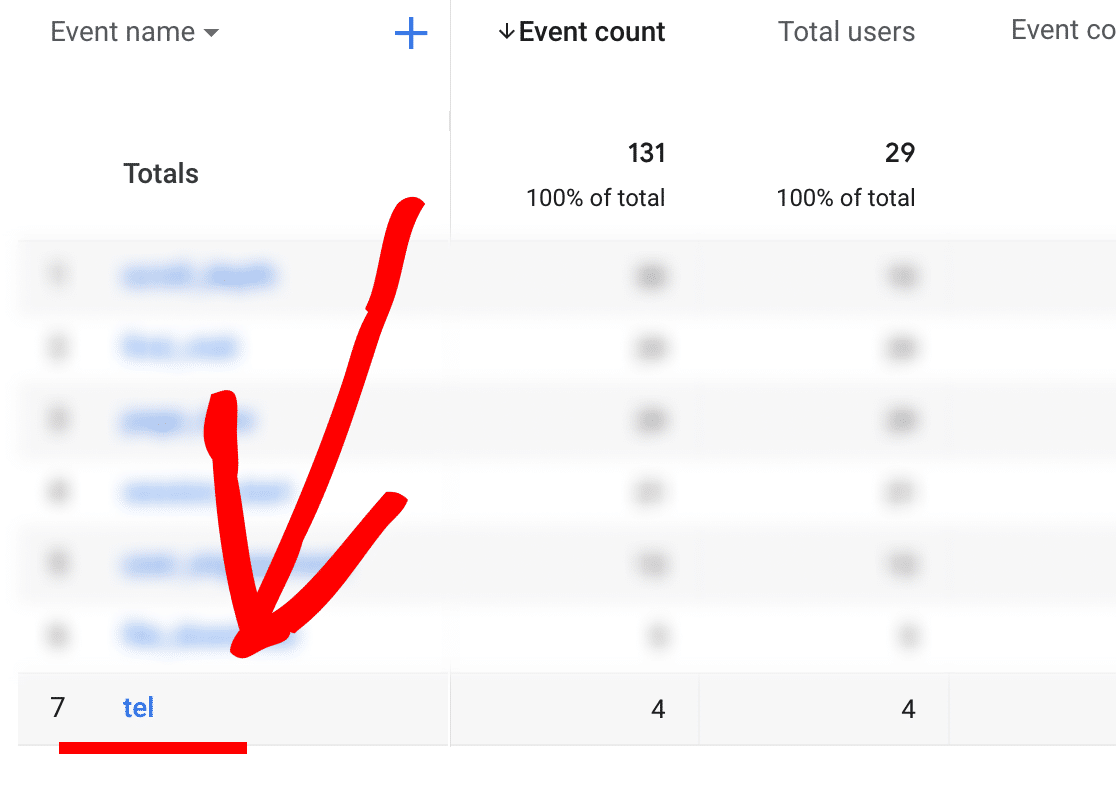
If you run a local business where customers contact you to set an appointment or request a service, it’s especially important to track these button-click events to know how your website is contributing to in-person business.
Track Call-To-Action Buttons and Other Custom Links
When you use MonsterInsights, Google Analytics tracking is automatically enabled for the buttons we’ve already gone over, but the plugin also allows you to track clicks on custom links.
A unique feature called Custom Link Attribution lets you seamlessly track your call-to-action buttons and other significant links to gain deeper insights into your site’s conversion rates and visitor engagement.
All it takes is adding a dash of HTML to the link you’re trying to track. You can easily assign the following Analytics event parameters:
- Event Category: This is the name you assign to the type of link visitors interact with. It’s also how the event will appear in Google Analytics. For example, it could be titled “cta” or “donate-button”.
- Event Action: This is essentially the type of interaction made, such as clicking a link. If you leave it blank, Google Analytics will automatically record the URL of your page here.
- Event Label: This gives you the option of specifying what the button is. If left blank, Google Analytics will automatically record the link text, but you may want to summarize it or specify something else like a red CTA vs. a blue CTA.
The only mandatory field is the Event Category. So, feel free to leave the other fields blank to make it simple. So, your link for a custom call-to-action button with only the category assigned would look something like this:
<a href="https://www.yoursite.com" data-vars-ga-category="cta">Example</a>
You’d just replace https://www.yoursite.com with the correct URL and change custom_category to the category label of your choice (keep the quotations).
If you wanted to also specify the event action and event label on your button event, it would look something like this:
<a href=”https://www.yoursite.com” data-vars-ga-category=”cta” data-vars-ga-action=”cta_click” data-vars-ga-label=”red_cta”>Buy Now</a>
Just add the extra snippets to your button link and MonsterInsights will automatically send the event date to Google Analytics 4, so you can use it in your reports. Head to How to Set Up Google Analytics Custom Event Tracking for a full tutorial.
[button]Get started with button click tracking today![/button]
And that’s all!
I hope you found this article on how to use Google Analytics to track button clicks helpful. You may also want to check out:
10+ Best No Code Tools for WordPress to Install Now
Google Analytics (GA4) Events: A Quick-Start Guide for Beginners
GA4 Enhanced Measurement Guide (+ Alternatives)
Not using MonsterInsights yet? What are you waiting for?
Don’t forget to follow us on YouTube for the best WordPress tutorials and Google Analytics updates.

Re: Track Call-To-Action Buttons and Other Custom Links
This is great, but most WP Themes, like Divi, have GUI interfaces and don’t provide a way to add HTML attributes to buttons. It would be possible to add the attributes to inline links, but not so easy to do it with buttons.
Are there any other options available to track CTA buttons?
Thanks for your insights,
Jules
Hey Jules – Are you looking specifically for a solution with Divi? If so, this should help: https://github.com/Spcktr/divi-button-event-tagger
Just wanted to let you know that I reported the Fatal Error on the divi-button-event-tagger and the dev, Tim, fixed it and released an updated version. I installed it and it works great. Thank you for the reference!
Excellent, thank you!