Want to learn how to set up Bing conversion tracking on your WordPress site?
By tracking your Microsoft Advertising (Bing Ad) conversions, you can see what’s working and what’s not for your advertising strategy, which is key to improving your ad campaigns, making more sales, and growing your business faster!
In this article, we’ll walk you step-by-step through the process. Before we get started, let’s take a closer look at what a UET tag is.
Bing Conversion Tracking Video Tutorial
What is a Microsoft (Bing) UET Tag?
A Bing UET (sometimes called a Bing pixel or Microsoft tag) is a universal event tracking code. Meaning, it’s a little snippet of code that you install on your website to make Microsoft Ads (Bing Ads) conversion tracking possible.
Usually, monitoring and tracking your ads with Microsoft (Bing) analytics in WordPress would require manually installing the UET (Universal Event Tracking) tag code on all your website pages, which probably sounds a bit overwhelming.
Thankfully for WordPress users, there’s actually a really simple way to set up your Bing UET tag and start tracking conversions easily. Best of all, you won’t have to use any code to set it up!
What Does a Bing UET tag do?
A Microsoft (Bing) UET tag or tracking code allows the actions that your website visitors take after clicking on your ad to be recorded, which allows you to track conversion events.
It also lets you track page views and categorize your audiences. This helps you better understand your audiences and create a remarketing plan that focuses on the right audience for Bing retargeting (ads targeting an audience that viewed specific pages on your site).
Thinking it sounds a lot like Google Analytics? Yep, you’re right. A Microsoft Advertising (Bing) UET tag is very similar to how a Google tag works for tracking Google Ads (AdWords) conversions.
How to Track Microsoft Ads (Bing) Conversions
First, we’ll show you how to create a new Microsoft Ads conversion goal and UET tag. Then, we’ll show you the easiest way to add it to your WordPress site.
You’ll have conversion tracking for your Bing Ads set up in no time! Here are the steps we’ll go through:
- Step 1: Install MonsterInsights
- Step 2: Set Up a New Microsoft Ads (Bing) Conversion Goal
- Step 3: Customize Your Conversion Goal and Trigger
- Step 4: Set Up Microsoft Ads UET Tag
- Step 5: Install the PPC Tracking Addon
- Step 6: Copy Your Microsoft Ads Tag ID Number
- Step 7: Paste Your Tag ID in WordPress
Step 1: Install MonsterInsights
![]()
MonsterInsights is the best Google Analytics plugin for WordPress, and with its ad tracking addon, you can install your Microsoft Ads (Bing) UET tag to track conversions from your ads in just a couple of clicks.
The PPC Ad Tracking addon lets you easily track your Bing Ad page views and purchases in WordPress. Plus, it integrates with WooCommerce, Easy Digital Downloads, LifterLMS, MemberPress, and GiveWP for conversion tracking.
You’ll also get access to tons of other Google Analytics features, such as:
- One-click eCommerce tracking
- Form conversion tracking
- Author tracking
- Google and Meta (Facebook) conversion tracking
- Outbound link tracking
- Video play tracking
- And much more
We’ll be using the PPC Ads Tracking addon in later steps to install your Bing UET tag. To access the addon, you’ll need MonsterInsights Pro. Get started now!
For a full walkthrough of how to set up MonsterInsights, check out our guide on How to Add Google Analytics to WordPress the Right Way.
Ready to set up your Bing conversion tracking in Microsoft advertising? Let’s dive in.
Step 2: Set Up a New Microsoft Ads (Bing) Conversion Goal
To get started, head to Microsoft Advertising and log in to your account.
Click Tools at the top, find Conversion tracking » Conversion goals, and click it:
Note: If your top menu has fewer options and says Smart Pages with only a few items under tools, click Upgrade to Expert in your left sidebar (Screenshot) to access the tools we’ll be using.

Under Conversion goals, click the blue button that says +Create:

Now you’ll see 3 types of conversions to choose from. You’ll be setting up Microsoft Ads conversion tracking on WordPress, so select Website and press Next.

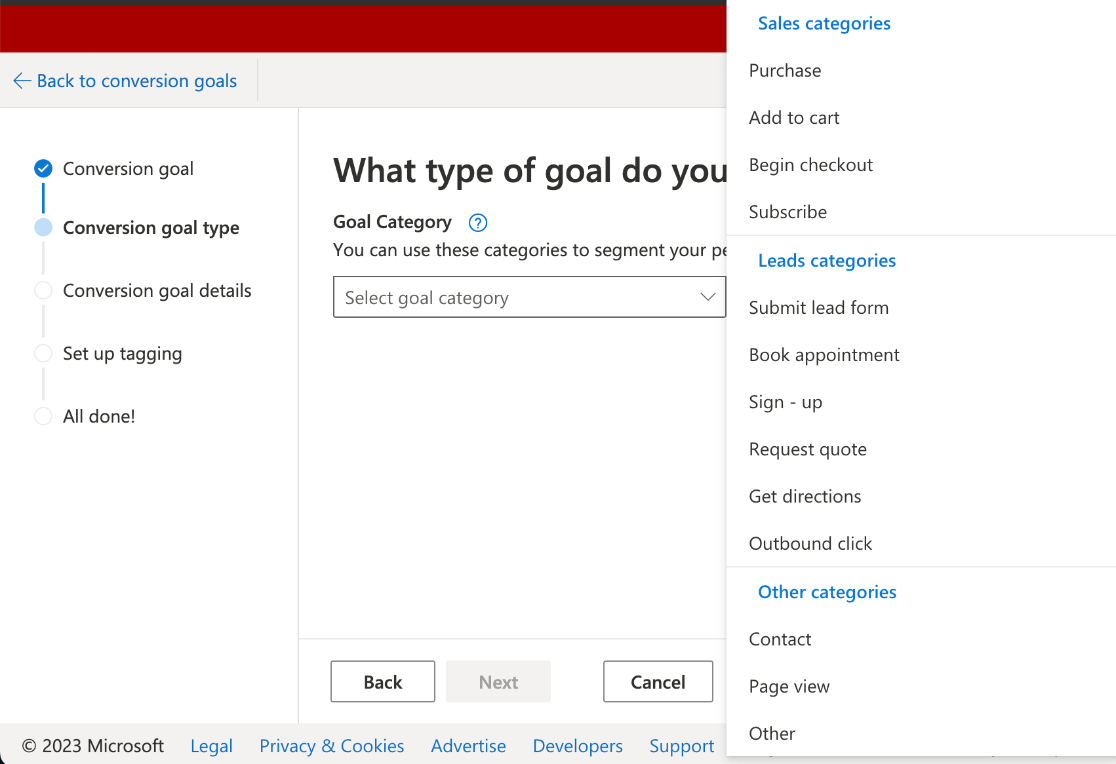
Now you’ll need to use the drop-down list to pick a Goal Category for your conversion. The three main ones are Sales, Leads, and Others. Under each category, you’ll see more specific conversion events to choose from.
For our tutorial, we’re going to track Sales » Begin Checkout. That means every time a customer takes the first step in the checkout process after clicking the ad, a conversion is counted.

After you’ve selected your conversion type, you’ll have another question populate below with a choice for Goal Type (the specific interaction that triggers a conversion).
If you want to be able to track your Microsoft Ad (Bing) conversions in your WordPress dashboard and use our easy, no-code method, you need to select Destination URL. Or, if your conversion category is Purchases, you can also select Product to track your WooCommerce conversions.
Note: You’ll see the additional option, Event, along with a couple more Goal Types under Other. If you’d like to use one of those options as your conversion trigger, we suggest checking out WPCode for help with installing custom code snippets and tracking tags.

Since we’re tracking the beginning of the checkout process as our event (not a purchase), we’re going to set up our eCommerce conversion tracking by Destination URL. When you’re ready, go ahead and press the Next button at the bottom.
Step 3: Customize Your Conversion Goal and Trigger
Next, you’ll need to fill out the fields under Create a destination goal. First, Name your conversion goal. Keep in mind, once you name your goal, you can’t use that name in the future. It’s best to be specific to keep everything organized down the line.
Now, choose your Destination URL type from the four options in the drop-down menu (we’ll explain them more below). Then, enter the target destination for your conversion in the field next to it.
The last field here is Revenue. This is where you’ll decide how to track conversion value in Bing Ads and set the value of each conversion.
If you’re tracking product purchases, you’ll probably want to set it to the 2nd option and use variable revenue, meaning the value of conversion actions may vary (by purchase price, for example).
For our page-view event, we set our value to be the same ($10.00) for each conversion. Go ahead and enter the value you want to assign, or the default value if you’re using a UET variable.

Here’s some further explanation on the different types of destination URLs from above. Keep in mind, none of the destination types will count http(s) or www for matching the input with the conversion URL.
- Equals means that the input will have to exactly match the destination URL you enter to count as a Bing ad conversion.
- Begins with means the input will have to be identical to your string from the start of the input up until the last character you enter for the destination.
- Contains means the conversion string just has to be present anywhere in the input URL to count as a Microsoft Ads conversion event.
- Regular expression is a more advanced option where you can use special characters to enable wildcard and flexible matching. We wouldn’t recommend it unless you’re already very familiar with how to create regular expressions that match your URLs.
We used Contains and entered “checkout” as our page-view destination. That way, Microsoft (Bing) tracking will record a conversion anytime “checkout” is in the URL, regardless of any other strings attached from pages the customer visited before beginning checkout.
Right under Revenue, you’ll see more conversion customizations in Advanced Settings, and there’s one section we definitely recommend looking at: Count.
![]()
The Count setting lets you decide if your advertising tracking will record a conversion every time the event is triggered or only when it’s unique.
For example, if you’re tracking the start of the checkout process like us, you’ll want to only record the first time a customer has “checkout” in their URL. But if you’re tracking purchases, you’ll want to record every sale.
Note: Microsoft Ads (Bing) already uses default auto-tagging to assign a unique ID to each visitor’s ad click, so if you use a unique count, it’s already set up to work.
Feel free to edit any of the other Advanced settings, such as Scope, Conversion Window, or Conversion Attribution Model.
When you’ve finished, press the Next button.
Step 4: Set Up Microsoft Ads UET Tag
It’s time to set up your Microsoft Advertising (Bing) UET tag. Assuming this is your first time setting up a conversion tag, select the first option, No, and press Save and next at the bottom.

At this point, the setup tool will show you a few options for how to add the Microsoft UET tags and code to your site, like using a developer, Google Tag Manager, or a UET tag helper plugin.
We won’t actually need the code when installing with MonsterInsights, but we’ll still walk through it.
Choose Install the tag yourself, and click Next.

Now you’ll see instructions and a piece of code that you’re supposed to install on every page of your website. Luckily, we don’t even need this base code for MonsterInsights, so you can scroll right to the bottom and click Next.

Go ahead and click Done at the bottom of the next page. That’s it! You’ve created a Microsoft Ads (Bing) UET tag and you’ll see your new conversion event listed on the next page under Conversion Goals.
Next, let’s add it to your WordPress site.
Easily Add Microsoft (Bing) UET Tag to WordPress
Using MonsterInsights to add a UET tag to WordPress is the absolute best way. Plus, it’s ridiculously simple and quick. You’ll get your Bing conversion tracking reports right in your WordPress dashboard:

If you haven’t already, download MonsterInsights Pro to access the PPC Ads Tracking addon that we’ll use to add your UET tag easily.
If you need help getting started with MonsterInsights, head to our guide: How to Add Google Analytics to WordPress the Right Way.
Once you have the plugin set up, keep reading to finish setting up your Microsoft Ads (Bing) conversion tracking and UET tag.
Step 5: Install the PPC Ad Tracking Addon
First up, you’ll need to install MonsterInsights’ PPC Ad Tracking addon. From your WP admin, head to Insights » Addons. From there, scroll down to find the one called PPC Tracking.
Click Install, and the addon will activate automatically after it finishes the installation.
![]()
Step 6: Copy Your Microsoft Ads Tag ID Number
As promised, you won’t need any code to set up Bing conversion tracking. Just head back to your Microsoft Ads account in a new tab. Click Tools » UET Tag.
![]()
You’ll see the DefaultTag you created while making your conversion goal, and your Tag ID is right there in the 3rd column. Go ahead and copy it.
Note: If you want to rename your UET tag, like naming it “Microsoft Ads,” just click the Tag name and you’ll be able to easily edit it.

With your tag copied, head back to your WordPress site.
Step 7: Paste Your Tag ID in WordPress
To finish the last step for Bing Ads conversion tracking, go to Insights » Settings » Conversions in WordPress.

Scroll down to where it says Microsoft Ads Tracking and paste your Bing UET under Tag ID.
![]()
You’re done! No need to mess with any code or take any further steps, you’ve successfully set up Microsoft Ads (Bing Ads) conversion tracking!
Easily track purchases and conversions in WordPress to optimize your Microsoft Ad campaigns, and use page-view tracking to create a top-notch retargeting strategy.
If you liked this article, check out: How to Improve CTR in 5 Minutes or Less: 27 Simple Ways.
Not using MonsterInsights yet? What are you waiting for?
And don’t forget to follow us on Twitter, Facebook, and YouTube for more helpful reviews, tutorials, and Google Analytics tips.