
Are you looking for ways to speed up your WordPress site?
Speeding up your site will improve the overall user experience and boost your search engine optimization (SEO), which might result in more traffic.
In this article, we’ll show you easy hacks to speed up WordPress site performance.
Why Speed Up Your WordPress Site?
If your website can load within seconds, it can greatly impact your conversions and overall user experience.
That’s because studies show that a 1-second delay in page load time can reduce conversions by almost 7%. And 53% of website visitors will leave your website if it takes more than 3 seconds to load.
This means that having a slow website can frustrate your visitors, and you’ll have a small window to convince them to stay on your website and buy your products or services.
Besides that, speeding up your website is also important for your search engine rankings.
Starting in May 2021, Google began incorporating website speed into its Core Web Vitals—a set of metrics that evaluates a website’s user experience. This means that website speed now plays a crucial role in how Google ranks websites. Simply put, to achieve a good ranking in Google, your website needs to be quick
So, how do you know whether your WordPress website speed is fast or slow?
Video Tutorial
How to Check Your WordPress Website Speed
The easiest way of checking your WordPress website speed is through MonsterInsights. It shows an up-to-the-minute site speed report inside your WordPress dashboard, so you don’t have to leave the website to check its performance.
MonsterInsights is the best Google Analytics WordPress plugin, and it also helps set up analytics without editing code. You can also use the plugin to easily add advanced tracking features like eCommerce tracking, file download tracking, form conversions, and more in just a few clicks.

To start, download and install MonsterInsights on your WordPress website. Next, connect Google Analytics to WordPress using the setup wizard. For more details, refer to our tutorial on how to add Google Analytics to your WordPress site.
Once the plugin is active, go to Insights » Reports » Site Speed. You’ll see an overall score of your website load time for desktop and mobile in the report.

Besides that, the report also shows other metrics to speed up your WordPress website, along with a goal and how to improve each metric to make your website load quicker.
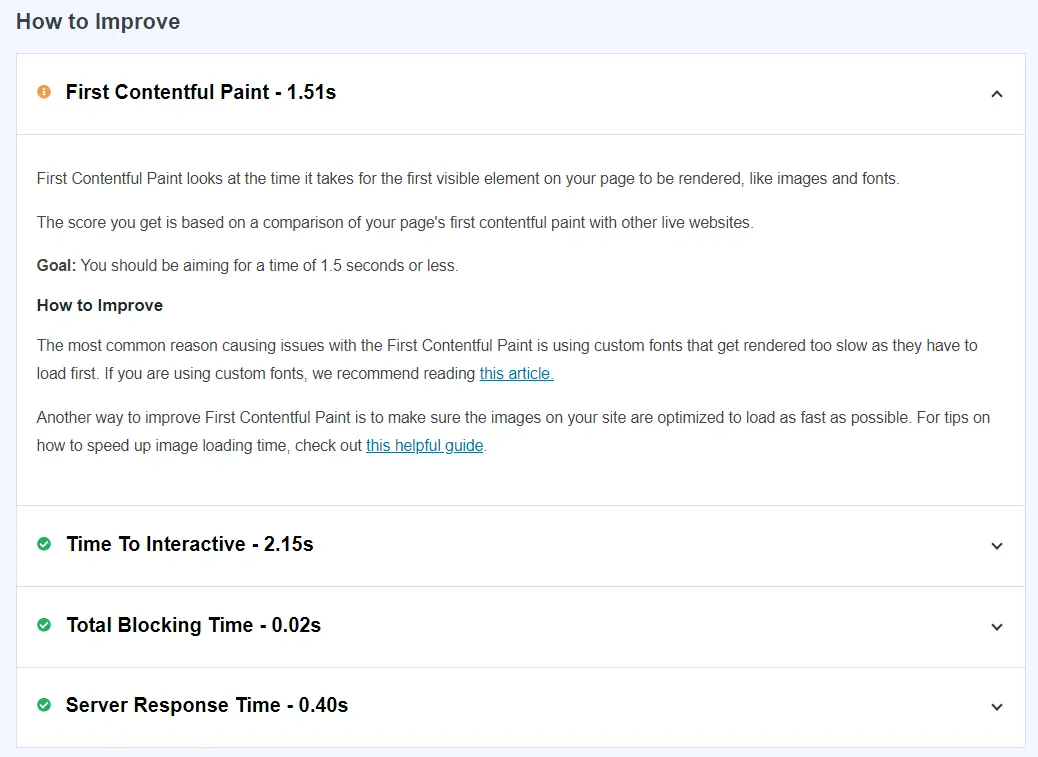
Here’s a breakdown of each metric in the report:
- Server Response Time – The time for the server to respond to a data request and load the website.
- First Contentful Paint – This metric measures the loading time of the visual elements on your website, like images, fonts, and themes.
- Time to Interactive – The time difference between when the website first starts to load and when it’s no longer loading for the user.
- Total Blocking Time – You can use this to measure the time it takes until people can interact with your website.
Now that you know how to check your WordPress website speed, let’s look at some of the hacks to improve the loading time.
How to Speed Up Your WordPress Site
Your WordPress website speed depends on a lot of factors. It could include your website hosting, the plugins you’re using, images, the way your site is set up, external scripts, and more.
But with these hacks, you’ll be able to improve the performance and speed up your WordPress website.
1. Select the Right Type of WordPress Hosting
Website hosting is one of the key components for the success of your WordPress website. It’s where all your website files and content are stored. And using the right type of hosting can speed up or slow down your website.
Top shared WordPress hosting services like Bluehost or SiteGround ensure that you get the best performance and that website speeds are quick.
However, the downside of using shared hosting is that you’re using the same server resources as other websites. This means that if other websites attract a lot of traffic, they’ll need these resources more than you. As a result, it might impact your WordPress website speed.
A workaround to this issue is to switch to managed WordPress hosting. You can get server resources according to your needs, and they won’t be shared with other websites.
Managed hosting also offers benefits like automatic updates, backups, advanced security features, and more.
2. Use a Caching Plugin to Improve Response Time
The next hack we have for you is to use a caching plugin for your WordPress website. It reduces the load time of your website and improves the server response time.
So, how does it work?
Each time a visitor opens your website in a browser, WordPress gets that data from the database and has to run several steps to generate the web page. This can slow down your website when a lot of people visit your site at the same time.
But a caching plugin solves this issue. Caching temporarily stores frequently requested information and quickens your website speed.
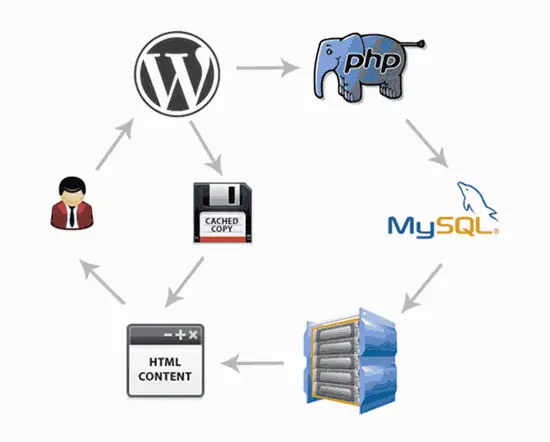
The caching plugin will copy the web page after the first load and show the cached version to the user when they open your website. This allows WordPress to skip a lot of steps, and it doesn’t have to generate each page from scratch.
Now, if you’re looking for a premium option, then we recommend using WP Rocket as it’s user-friendly, allows you to cache your website with a single click instantly, and offers other features to speed up a WordPress website.
On the other hand, you can also give the free WP Super Cache plugin a try. For more options, check out our list of the best WordPress caching plugins.
Different WordPress hosting services also offer caching solutions. And if you’re using a managed hosting service, then there’s no need to download a plugin separately, as the caching feature is built-in and active by default.
3. Optimize Images Using a Compression Tool
Having large images can also have a huge impact on your WordPress website speed. There’s no doubt that images are important for providing a pleasant user experience, but they could slow down your site if they’re not optimized properly.
When you take a picture from your phone or use a stock image and upload it directly to your website, the image file will have a large size. This means that it will take longer for it to load when a visitor views the web page.
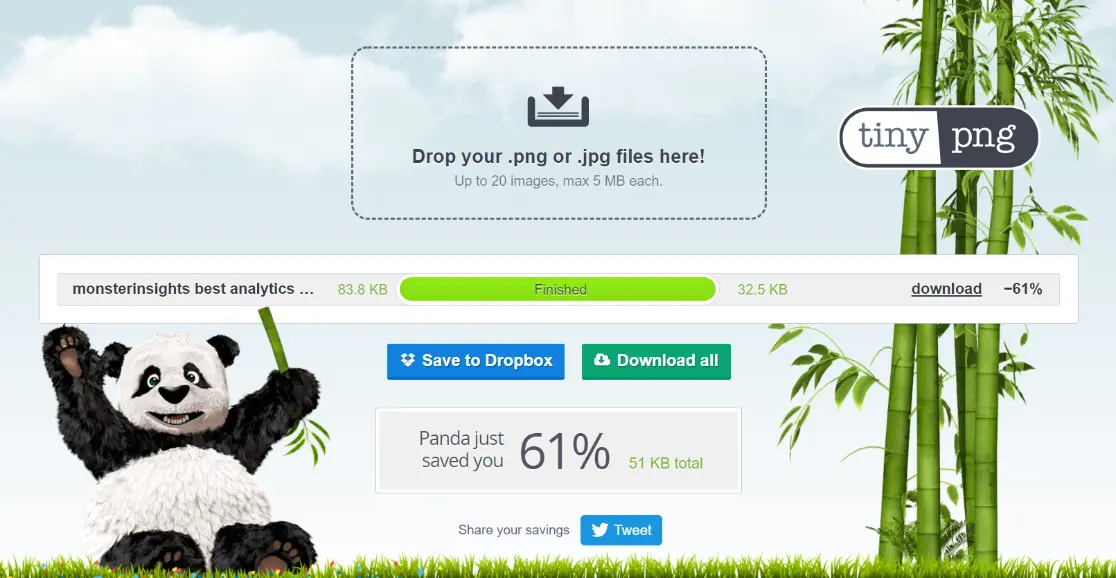
To optimize your images, you can use different image compression tools. For example, TinyPNG is a free tool that compresses PNG and JPEG images.
Just upload the images, and the tool will reduce their size. If you feel that the size is still large, then reupload the compressed picture in the tool.
Another way to optimize WordPress images is by using photo editing software.
You can change an image’s dimensions, remove layers to make the image lightweight, and export the image in different file formats (like PNG or JPEG) to lower the image size further.
4. Speed Up Your Website Load Time with a CDN
Using a CDN (content delivery network), you can speed up a WordPress website and make sure it loads in an instant for visitors, no matter where they’re located.
The location of your web hosting server and the location of your visitor can impact your website speed.
For example, let’s say that a visitor located in New Zealand visits your website, but your website is hosted on a server that’s in the United States. The visitor will experience a slow loading time compared to someone who’s based in the United States.
But a CDN service for WordPress solves this issue. It’s a network of servers located in different locations that cache your website’s static content, such as images, fonts, and stylesheets.
When a user requests to view your website, a CDN delivers the cached content from the nearest server and loads your website without delay.

For more details, you can refer to our guide on how to improve WordPress website loading speed using a CDN.
5. Make Sure Your WordPress Site is Updated
Your website speed can also be improved by making sure that you’re using the latest version of WordPress. It’s just as important as keeping your plugins and themes updated.
Keeping WordPress updated adds new features, fixes bugs, and secures against security issues that could expose your site and lead to poor loading time.
To check for the latest version, log in to your WordPress site and go to Dashboard » Updates. You can check for new updates and install them on your website.

For more details, refer to this guide on how to safely update WordPress.
6. Use a Theme that Ensures Fast Load Time
When it comes to speeding up your WordPress site, it’s important to select a theme that’s optimized to deliver a fast performance. Many WordPress themes are visually stunning, but they are poorly coded and can have a major impact on your load times.
To pick the right theme for your website, we recommend selecting one that’s simple and clean.
It would be best to avoid any themes that have many animations, complex layouts, flashy designs, and other features that aren’t useful. Usually, such themes can slow down your website.
A good place to start is looking at premium WordPress theme shops like Astra Theme, Themify, and CSSIgniter. These are trusted theme shops that offer themes that are optimized for speed.
You can check out our article on the most popular and best WordPress themes for more details.
7. Avoid Using a Lot of Custom Fonts
As with themes, fonts can also play a big role in skyrocketing your WordPress website speed. Having fonts that render quickly can improve your website experience, as users won’t have to wait for the visual elements to load.
But using too many custom fonts can slow down your website. That’s why we recommend picking a single font for your website and using it throughout your design. This will reduce the time it takes to load each custom font and provide a fast user experience.
You can find premium and free custom fonts on websites like Google Fonts. Make sure to go through this guide on how to add custom fonts in WordPress.
8. Deactivate Plugins You Are Not Using
Having a lot of plugins that you’re not using can add unwanted junk files to your server.
Freeing up space can help the server use its resources more efficiently and improve website speed. It also helps to reduce the size of backups and won’t put a lot of load on the server.
You can deactivate plugins by going to your WordPress admin area and then clicking on Plugins. Next, scroll down to any plugin that’s no longer needed and click the Deactivate button.

9. Use Fast WordPress Plugins
Besides removing inactive plugins, it would help if you also use WordPress plugins that are fast and won’t slow down your website. Many plugins aren’t coded that well and will load bloat when you use them.
To find out whether a plugin is slowing your website, perform a speed check of your WordPress website before installing a plugin.
After that, download and activate the plugin and perform the speed check again. If you notice a dip in the scores, then it means that the plugin compromises your website’s performance.
We’ve put together a list of the best WordPress plugins in the market. You can use any one of them for your business needs without worrying about slow website speed.
10. Fix Render-Blocking JavaScript and CSS
Render blocking JavaScript and CSS are files that stop your website from displaying web pages and other elements that users can interact with before loading these files.
Since every WordPress plugin and theme adds these files to the front end of your website, they can slow down your website speed and prevent a page from loading properly.
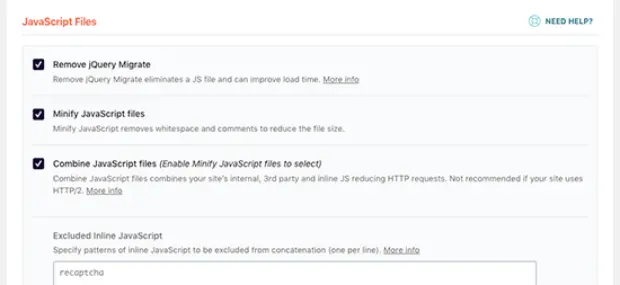
A quick way to fix render-blocking is by using the WP Rocket WordPress plugin. It offers features to optimize your site for JavaScript and CSS. However, do remember that these options aren’t enabled by default, as they may affect your website’s appearance.
You can enable the options by going to Settings » WP Rocket and then clicking the File Optimization tab. Now scroll down to the CSS Files and JavaScript Files section and enable all the options to get maximum performance.
You can go through this complete guide on how to fix render-blocking JavaScript and CSS in WordPress.
11. Optimize Your WordPress Database
The next strategy we have for improving website loading speed is optimizing your WordPress database.
Over the years, your database would have a lot of data that’s no longer needed. You can remove these unwanted data from the database and improve your site’s performance.
The easiest way of cleaning the database is by using the WP-Sweep WordPress plugin. It’s a free plugin, and you can clean up unused tags, trashed posts, revisions, auto drafts, and more.

Check out this guide on how to clean up your WordPress database.
12. Don’t Upload Video and Audio Directly to WordPress
A good practice that you should follow to speed up the WordPress website is never to upload video and audio files directly.
That’s because hosting audio and video files on your server takes a lot of bandwidth and causes the website speed to drop. It also increases the size of website backups, which can further reduce website performance.
A simple fix for this issue is to embed all media files in your blog posts and landing pages. Popular streaming platforms like YouTube, Vimeo, and DailyMotion offer embed codes for all their videos.
All you have to do is copy the code and enter it on your website. WordPress has a built-in embed feature that will add the media file to your content without having to host it on your server. Using an embed block, enter the URL of any video or audio file.

After entering the link to your media file, click the Embed button, and WordPress will display the video or audio on your website.

Want to track how many website visitors are watching your videos? Check out How to Track Video Plays in Google Analytics.
13. Split Lengthy Articles into Multiple Pages
Another popular practice to speed up your WordPress website is breaking down large blog posts and comment sections into multiple pages.

Having super detailed and long articles is great for satisfying the needs of the visitors and boosting your chances of ranking higher in search engines.
But, if it contains many images, videos, and other media files, it will take a long time to load. This can affect your website’s overall load speed and hamper performance.
Splitting lengthy content into multiple pages improves load time and offers a better user experience as people can easily digest your content.
To split your content, edit any post or page, and then add a Page Break block.

If you’re using the classic editor, then add the <!––nextpage––> tag in the Text view where you’d like to break the article. You can also use the Alt + Shift + P keys from your keyboard to add page breaks.
14. Divide the Comments Section into Several Pages
On the other hand, having lots of comments is great for showing social proof and finding out the needs of your visitors. But loading so many comments on a single page can slow your website speed.
You can work your way around this problem by splitting comments into multiple pages as well.
To do that, go to Settings » Discussion and then scroll down to the Other comment settings section. After that, check the box that says Break comments into pages.

15. Use Excerpts on Homepage and Archives
Besides breaking up your blog posts and comments into multiple pages, another way to speed up your WordPress website is by showing excerpts on the homepage and archive pages.

By default, WordPress displays full articles on your homepage and archives. Since it’s loading the entire blog post at once, your website will take a lot of time to load.
Another problem with displaying full blog posts on the homepage is that people won’t feel the need to visit your actual article. As a result, your pageviews and time spent on the page will be reduced.
To improve the speed and performance of your website, you can show excerpts instead of full articles on the homepage and archives.
You can do that by going to Settings » Reading and then changing the option of For each post in a feed, include to Summary.

16. Run Backup Plugin During Low Traffic Time
On your WordPress website, there are many tasks that run, and among them are backups. Backups use a lot of server resources and can really hurt your website’s performance.
Since it can slow down your website, you can run backups during low traffic times. This way, your visitors won’t feel a dip in performance, and your important data will remain secure.
For instance, instead of running backups every day during peak traffic hours, you can schedule them to run on specific days and at a certain time to ensure fast website speed.
17. Use Lazy Load to Improve Website Speed
Lazy load is great for websites with many images, videos, photo galleries, comments, and other media files in their content.
What it does is that instead of loading all the images and videos at once, it will only download those files that are visible on the visitor’s screen.
So, as a user scrolls down the page, it loads images and other media files that are visible in the browser’s viewing area.
To set up lazy loading in WordPress, you can Lazy Load by WP Rocket. It’s a free plugin, and in just a few clicks, you can improve the page load times.
And that’s it!
We hope this article helped you learn some of the best hacks to speed up your WordPress website performance. You may also want to check out our guide on How to Set Up WordPress Visitor Tracking – Beginner’s Guide.
Not using MonsterInsights yet? What are you waiting for?
And don’t forget to follow us on X, Facebook and YouTube for more helpful Google Analytics tips.