Do you ever feel like your website’s analytics are hard to understand? How do you take that data and make decisions about what to do next? That’s where Google Analytics segments come in handy. They let you divide your data into smaller, more manageable groups based on demographics, behavior, and traffic sources.
Think of it like this – your website gets visitors from all over, right? Some might be new users, while others are returning. Some visit from organic search, while others come from social media. Google Analytics segments allow you to look at each of these groups individually to really understand how they interact with your site.
When you can understand your traffic on such a deep level, you can make changes that result in significant traffic or sales boosts for your business.
In this article, we’ll review the basics of Google Analytics segments and provide an easy-to-follow tutorial on creating them. By the end, you’ll be able to slice and dice your data to determine what changes will have the biggest impact on your bottom line.
The Basics of Google Analytics Segments
Segments let you create groups of your analytics data based on shared traits. For example, you might look at only new visitors or only the sessions that resulted in a sale. The possibilities are endless – sort by location, device, traffic source, you name it.
Why are segments so valuable for marketers? They allow you to customize and refine your strategies. If you find that returning visitors convert at a much higher rate than new ones, you know to double down on your efforts on that loyal audience. So, you look at what kinds of content your returning users are the most drawn to and create more of it.
It’s all about using your data to make smarter decisions!
Whether you want to study users from a specific location, see which products are hottest, or compare new vs returning visitors — segments have you covered. They give you a microscope to really inspect your audiences and how they act on your site. And that means more money for your business!
The 3 Types of Google Analytics Segments
There are three different types of Google Analytics segments: User segments, session segments, and event segments.
User Segments
User segments look at the characteristics and behavior of users across all of their sessions within your date range. These allow you to group users based on things like:
- Demographics (age, gender, interests)
- Geographic location
- New vs returning visitors
- Technology used (browser, device, operating system)
- User behavior across sessions (pages viewed, conversion events completed, etc.)
User segments provide an overview of how different buckets of users interact with your website or app over a period of time.
Session Segments
Session segments, on the other hand, focus on breaking down individual session data. A single user can have multiple sessions captured, so these segments look at the specifics of each visit, such as:
- Traffic source (organic, paid, referral, etc.)
- Pages viewed within that session
- Engagement levels (bounces, time on site)
- Conversion activity within that session
- Device or browser used for that visit
Session segments are useful for breaking down traffic channels used, engagement metrics, and how your content is doing.
Event Segments
Event segments in Google Analytics 4 allow you to drill down even further to the level of user interactions or “events.” These could include:
- Specific button clicks or site engagements
- Video views or media interactions
- eCommerce activities (product views, adds to cart, purchases)
- Custom events you define for your business
Event segments provide analysis of every tiny user action, helping optimize your conversion funnels and the overall user experience.
So how do you create segments? Let’s take a look.
How to Create GA4 Segments
Creating segments in GA4 is done inside custom Explore reports. If you’ve never created an Explore report, don’t worry! We’ll walk you through it.
Head over to the Explore tab, then click on Free form to get started:

This will automatically create a report with data in it for you to practice segmenting. The default free form report shows active users by city and device type:
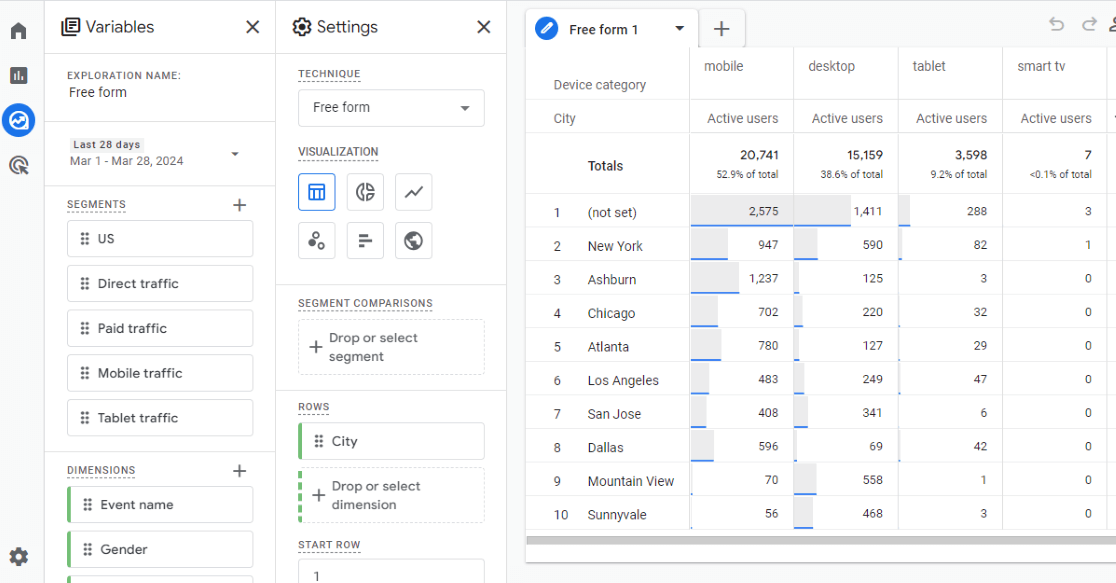
Now, let’s jump into the steps to create your first segment.
Step 1: Create a New Segment
If you’ve created a free form report, you’ll notice there are some ready-made segments there. However, we’ll go ahead and create our own by clicking the plus sign next to Segments:
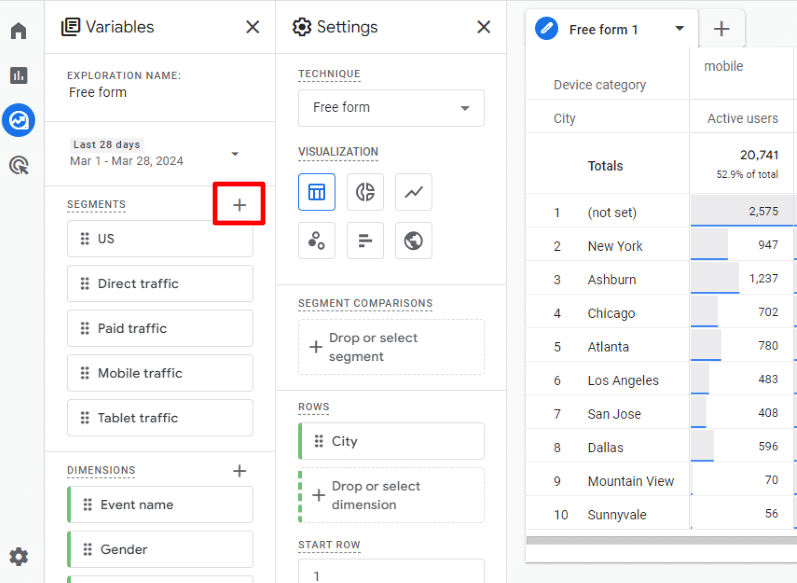
Step 2: Choose Custom Segment Type
Next, you can choose the type of segment you want to create. There are some pre-built ones down below that you can explore, but we’ll go over the custom option. For the sake of this tutorial, let’s go with a User segment:
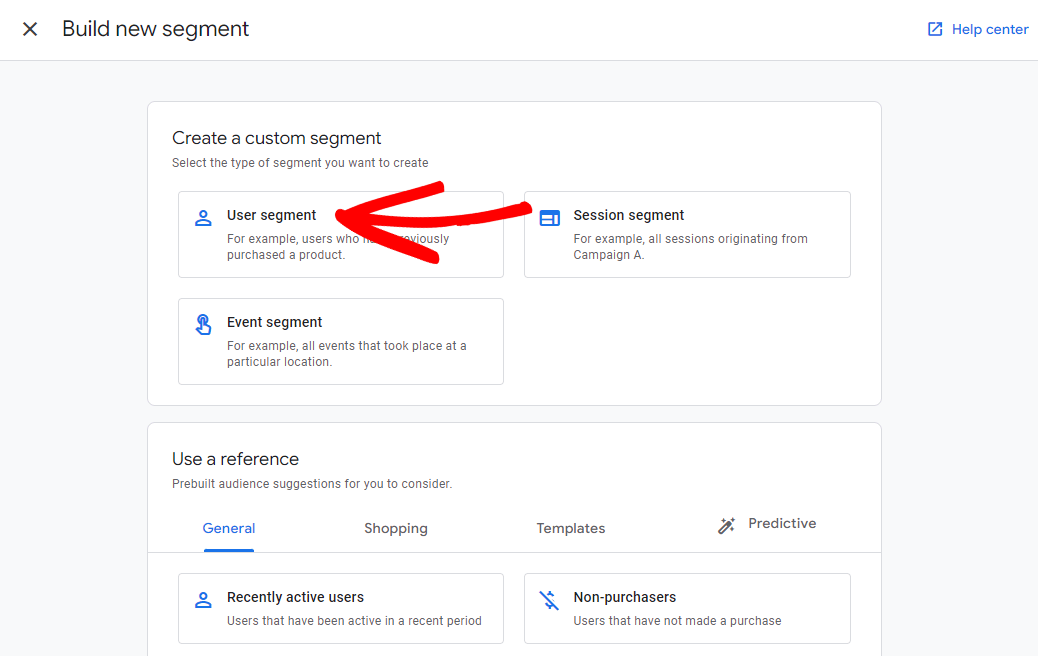
Step 3: Add Conditions
Let’s say we want to see how people behaved who landed on our top landing page.
Start by adding a title at the top and then clicking on Add new condition:
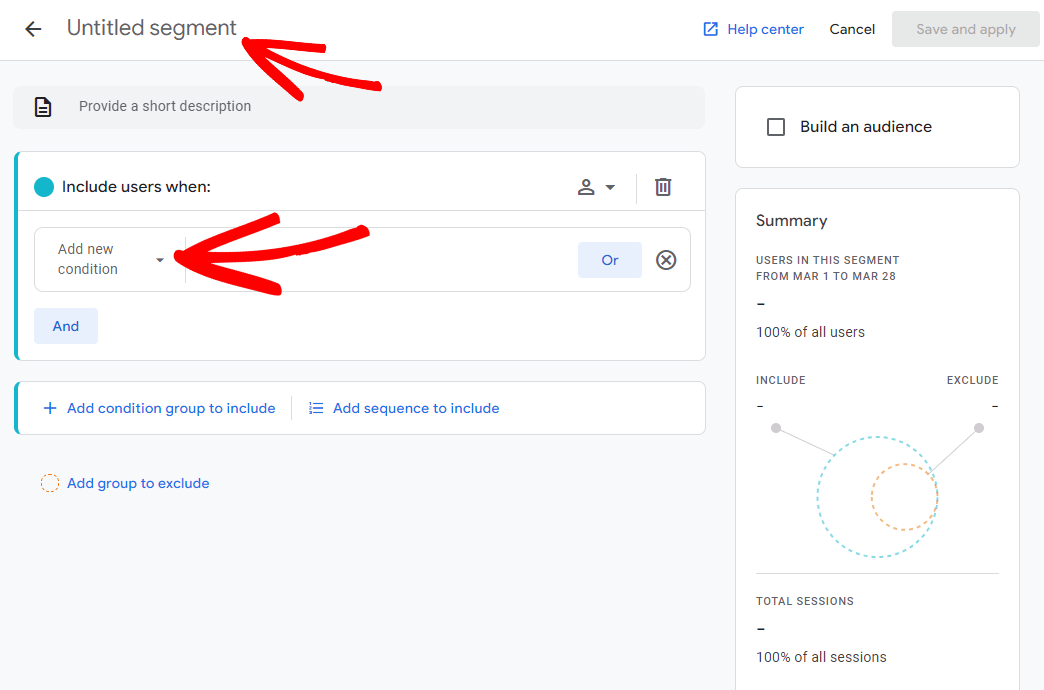
Next, since we want to segment our users by those who landed on our top landing page, select Page/screen » Landing page + query string:
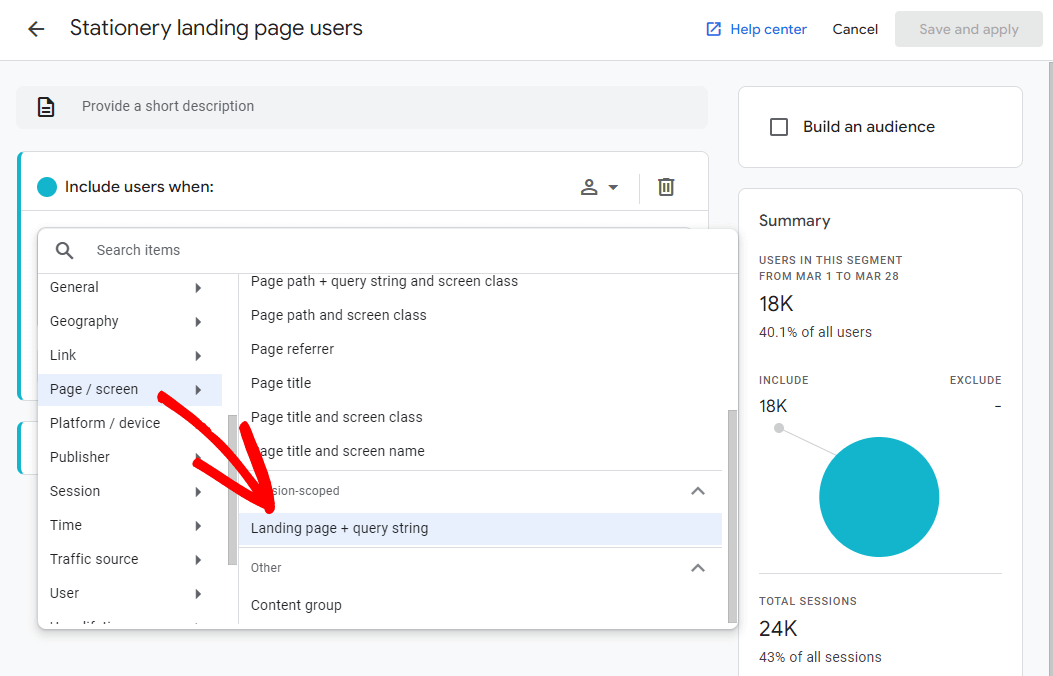
Then, we need to tell it which landing page we want. To do that, click on Add Filter:
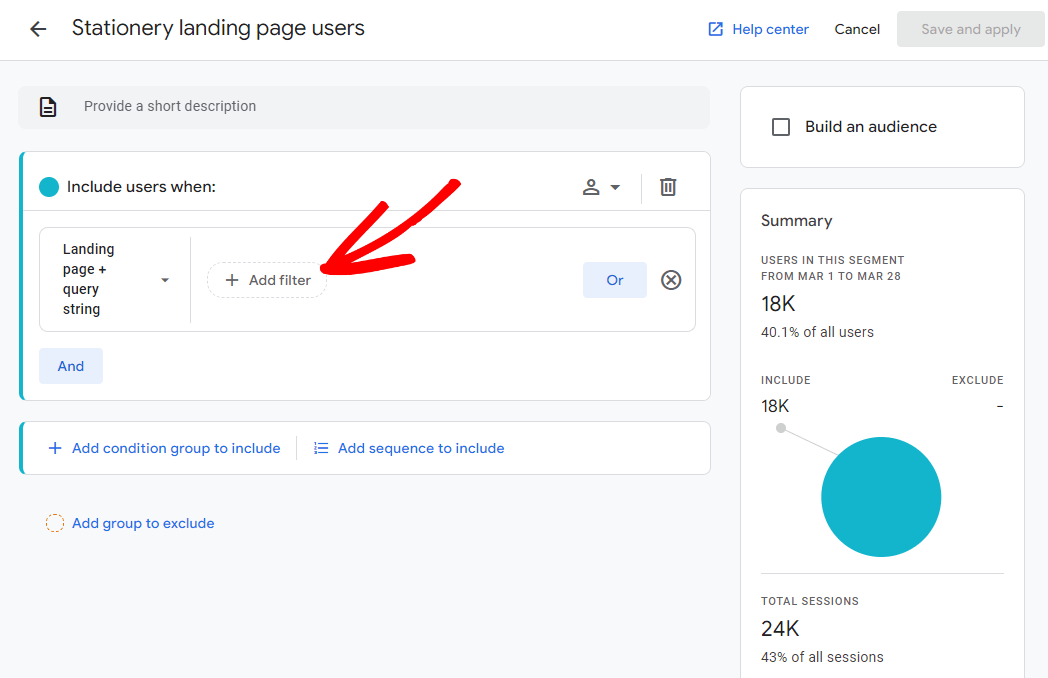
Now, tell it which landing page you want to look at and click Apply:
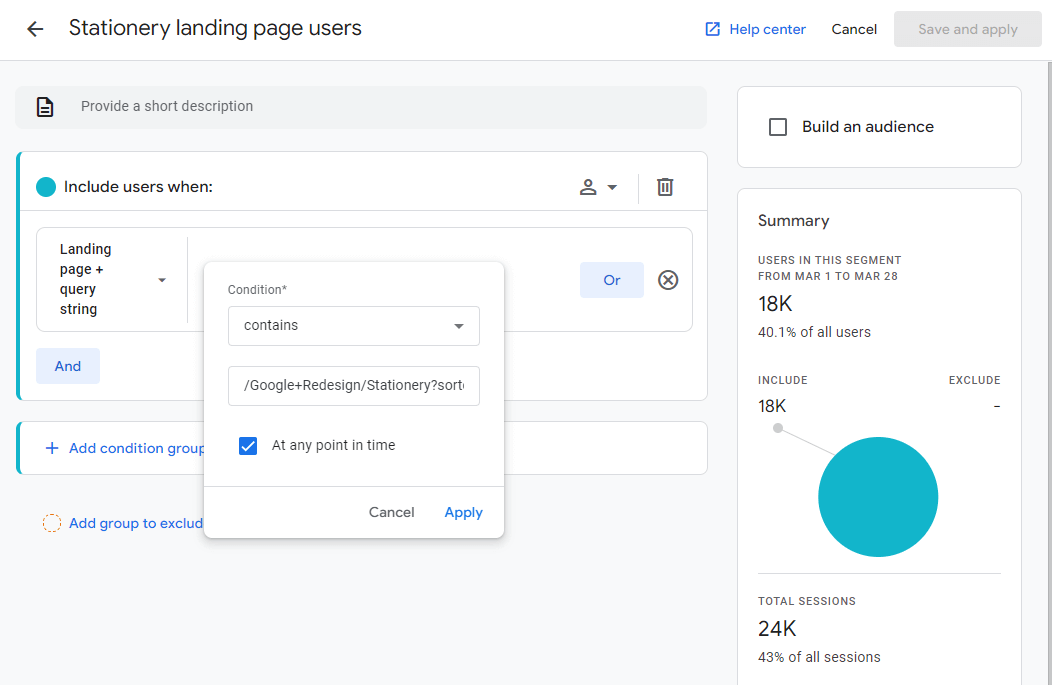
While you’re adding conditions and filters, notice that the Summary card on the side updates in real time to show you how many users are going to be in your segment. This card is really helpful, especially if you’re building a more complicated segment. You know you’ve gone wrong somewhere if you’ve suddenly got 0 users/sessions/events in your summary.
Step 4: Save and Apply Your Segment
Our summary looks good with 18K users, so we’ll go ahead and click the Save and apply button in the top right:
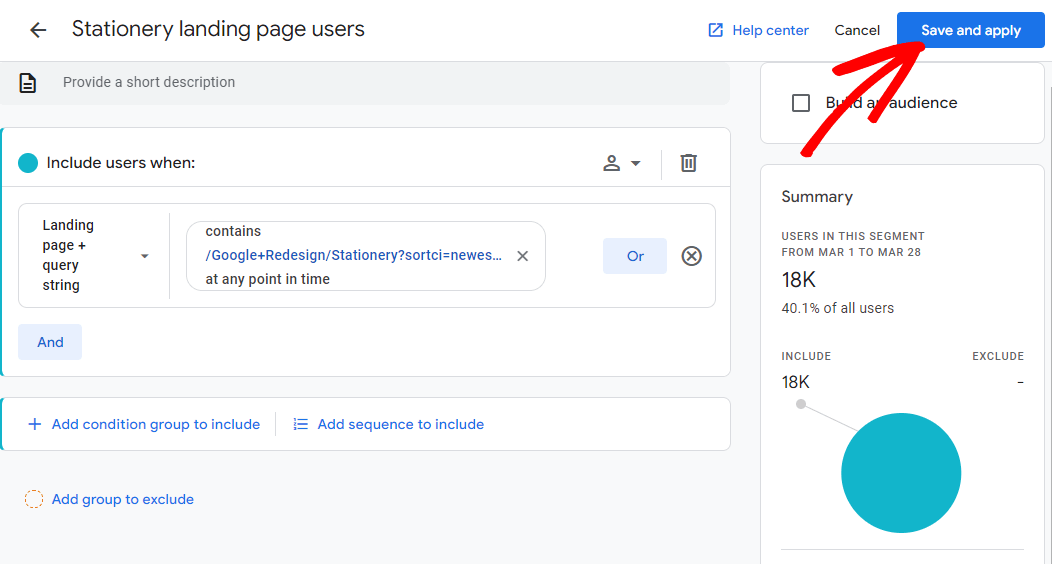
This will return you to your custom explore report, and the segment you just built will be applied to your report:
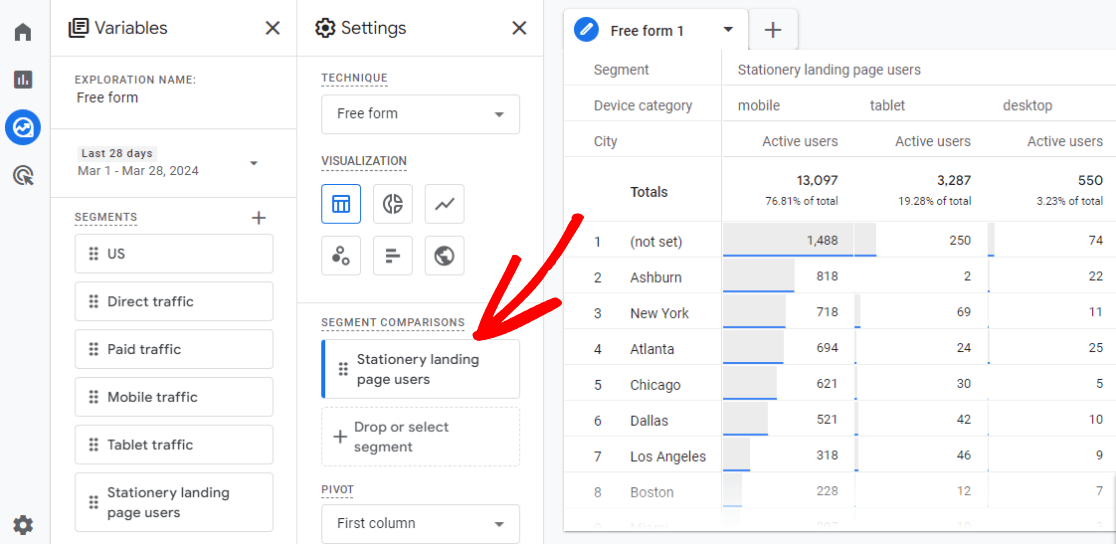
Now, the data you’re looking at in your report only includes the data for users who landed on your top landing page.
You can manipulate the custom report to show you whatever data you want to see. For a tutorial on building a custom explore report, check out How to Create Google Analytics 4 Custom Reports (Step by Step).
Advanced Google Analytics Segmentation Techniques
The basic segment we just built is an example of a segment that can be super helpful, but there are ways to build advanced segments that isolate groups of your users even more.
For example, on the Build new segment screen, open the Templates tab and click on Acquisition:
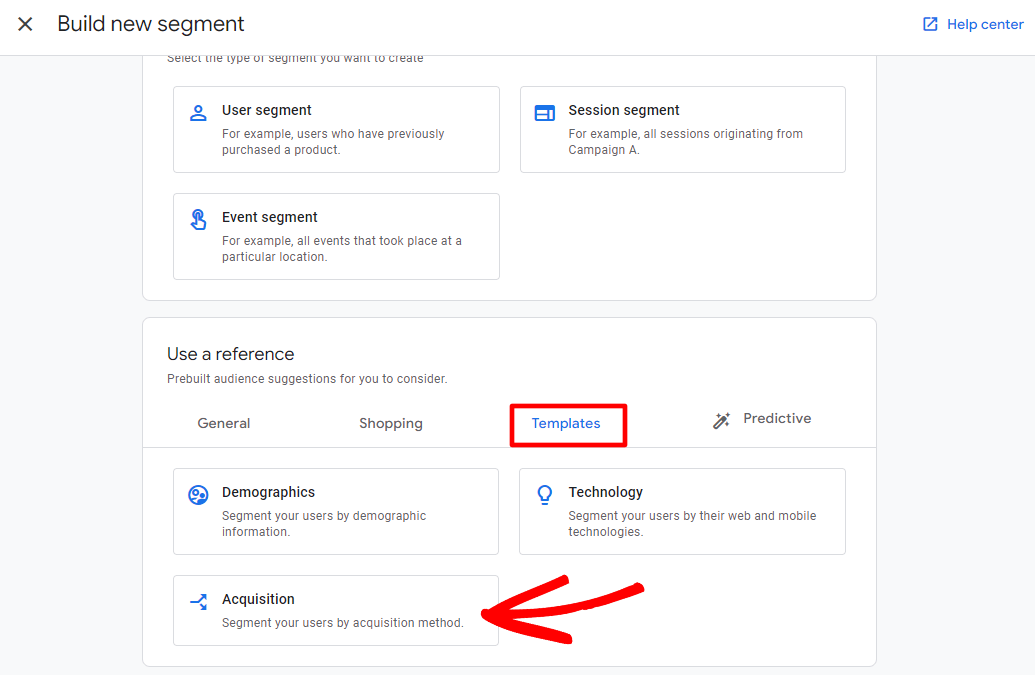
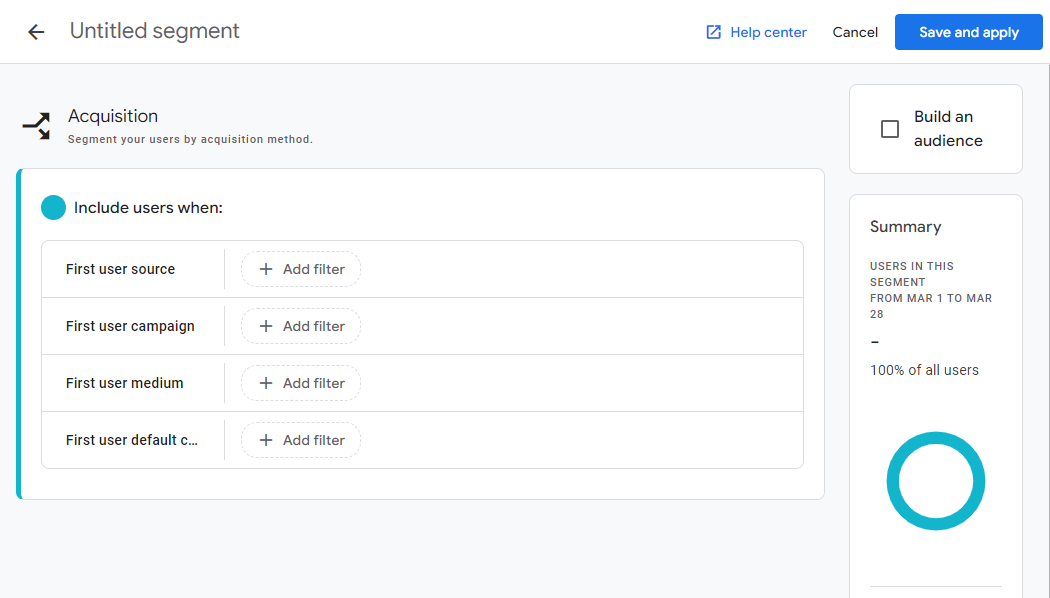
This template helps you really zero in on the exact users you want based on how they came to your website. Segment them by source, campaign, medium, and default channel group:
Another really neat thing you can do with advanced segments is, in User segments, add a sequence:
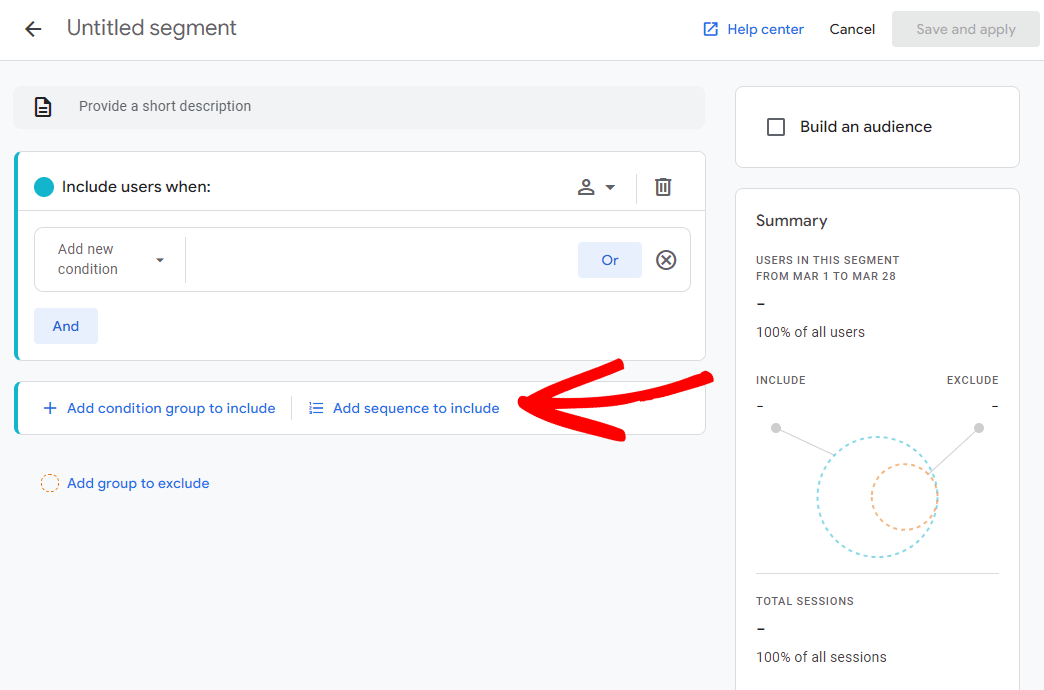
Use sequence segments to isolate users who complete events or visit pages in a certain order:
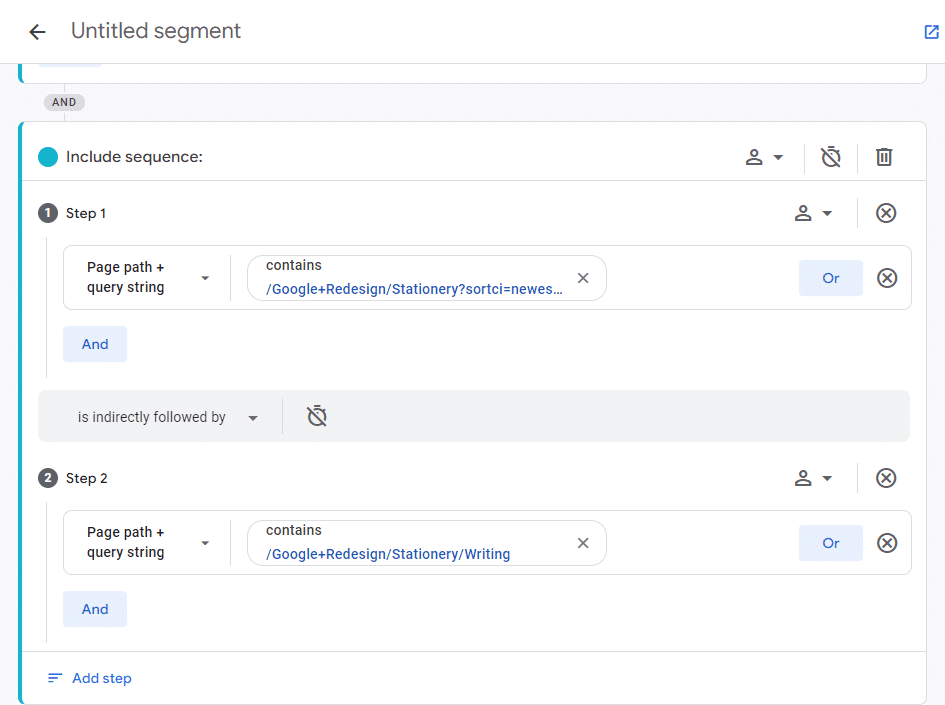
Check out Google’s segment builder documentation for a full rundown of every segment-building option.
That’s the end of our tutorial! Let’s take a look at a few frequently asked questions.
Google Analytics Segments FAQ
What are segments in Google Analytics?
Segments in Google Analytics let you look at a smaller group of visitors or sessions that share something in common. For example, you could see how visitors from a certain state or country used your website, how many people bought something after seeing your ad on social media and what pages they visited, or how visitors used their phones to browse your site. By focusing on these smaller groups, you can learn more about what kind of visitors like your website most and how they use it.
What is the difference between segments and filters in Google Analytics?
Segments and filters are both tools for refining your website traffic data in Google Analytics, but they work in slightly different ways:
Segments: Segments are temporary filters that you can apply to your reports to view specific groups of data. They don’t alter the underlying data, and you can easily switch between segments to analyze different groups of data.
Filters: Filters are permanent exclusions applied to data views. They remove unwanted data entirely, so you won’t see it in your reports. For example, you might use a filter to exclude internal traffic from your company or to exclude spam referral traffic.
How can I use segments in Google Analytics?
Segments can be applied to any custom explore report in Google Analytics. Once you create or select a segment, you can see how that specific user group interacts with your site compared to your overall traffic. This can help you understand what resonates with different audiences and optimize your website accordingly.
By understanding and using segments effectively, you can unlock a wealth of insights from your Google Analytics data and make data-driven decisions to improve your website’s performance and make more money.
If you liked this article on Google Analytics segments, you might also want to check out:
How to Easily Keep PII Out of Google Analytics
8 Ways to Get Google Analytics Help & Support
How to Set up Google Analytics Click Tracking (Step by Step)
Not using MonsterInsights yet? What are you waiting for?
And don’t forget to follow us on Twitter, Facebook and YouTube for more helpful Google Analytics tips.
