Are you thinking about adding a WordPress poll to your website?
A poll is a fun and simple way to connect with visitors. It lets you gather their opinions and preferences. This can help you understand what your audience enjoys or wants more of.
In this guide, we’ll walk you through the steps to create and add a poll to your WordPress site easily. Let’s get started!
The Benefits of Using a WordPress Poll
Let’s explore the advantages of incorporating WordPress polls onto your website and how it can positively benefit you and your audience:
- Engages your audience: Polls make your website more interactive. They encourage visitors to share their opinions, making them feel more involved and connected to your content.
- Gathers valuable feedback: By asking questions through polls, you can get insights about your audience’s thoughts. This feedback is excellent for understanding their needs and preferences.
- Increases time spent on your site: Interactive elements like polls can keep visitors on your site longer. The more engaged they are, the more time they spend exploring your content, which is good for SEO.
- Enhances user experience: Polls add a fun element to your site. They improve the overall experience for your visitors by making it more enjoyable.
- Provides insights for future content: The response you get can inspire new blog posts, products, or services. It’s a great way to keep your site fresh and relevant to your audience’s interests.
Using a WordPress poll is a great way to interact with your visitors and tailor your efforts to align with what they like the most.
Now, let’s look into how you can create a WordPress poll.
How to Create a Poll in WordPress
While many plugins and tools for embedding WordPress polls exist, they’re not all the same. Some WordPress poll plugins require you to create an account, others store data on external servers, and a few might offer a poor user experience.
In this guide, we’ll focus on using WPForms and UserFeedback. These are the best plugins for adding interactive and engaging WordPress polls to your website.
For an excellent user experience and complete control over your poll data, WPForms is the way to go. It stands out as the top WordPress form builder plugin and has a powerful surveys and polls addon.
UserFeedback is a comprehensive WordPress plugin designed for user feedback. It boasts an extensive array of powerful features. Once installed, it simplifies obtaining honest feedback from visitors, helping you grow and enhance your business.
Let’s dive into how you can easily add a WordPress poll using these two methods:
Method 1: Using WPForms
Step 1: Create Your WordPress Poll
Creating a poll in WordPress is straightforward once you have the right tools.
Start by heading to the WPForms pricing page to get the license that suits your needs. You need the pro license or above for the surveys and polls addon.
After you’ve made your purchase, install and activate the WPForms plugin on your WordPress site.
Not sure how to install a plugin? Check out this step-by-step guide on installing a plugin in WordPress.
Once you’ve activated WPForms, you’ll notice a new WPForms menu in your WordPress dashboard.
Here, you need to look for the Addons submenu. Find and select the Surveys and Polls Addon.
Click on the Install Addon button to enable the addon.
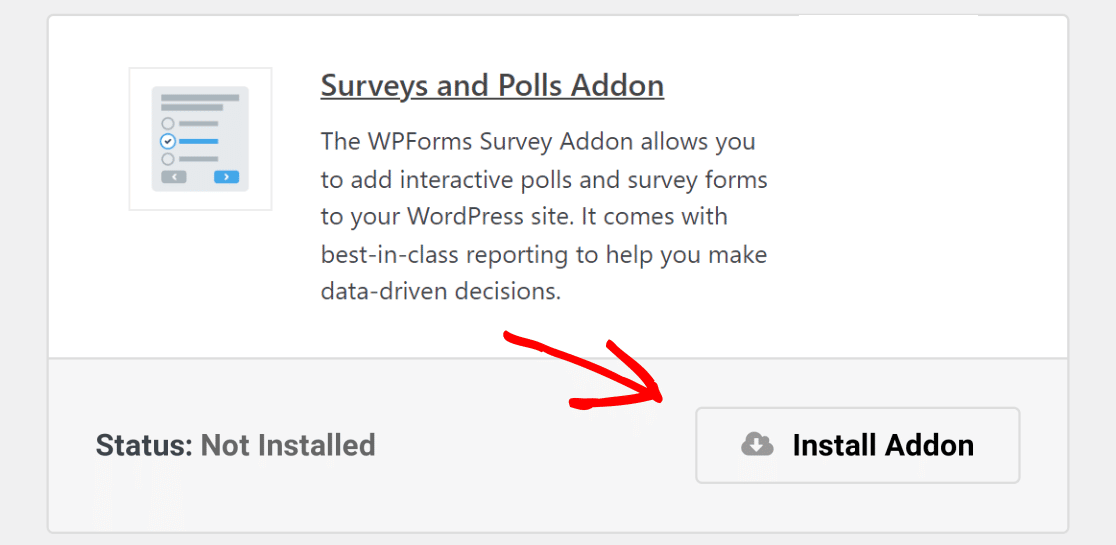
Now that you’re all set with WPForms, it’s time to create your online poll.
Begin by heading over to WPForms » Add New in your WordPress dashboard. This is where you’ll craft a new form.
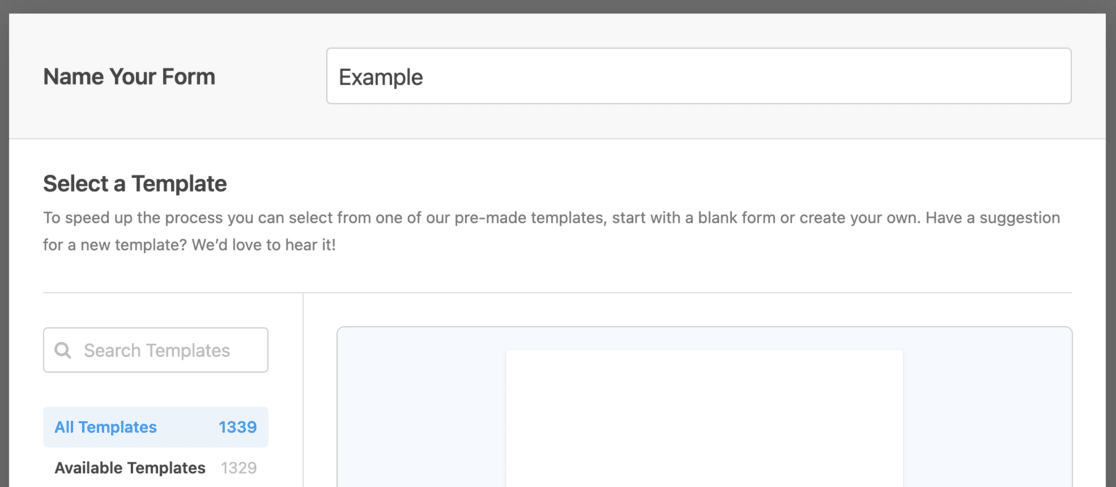
Start by giving your poll form a title, then select the Poll Form template.
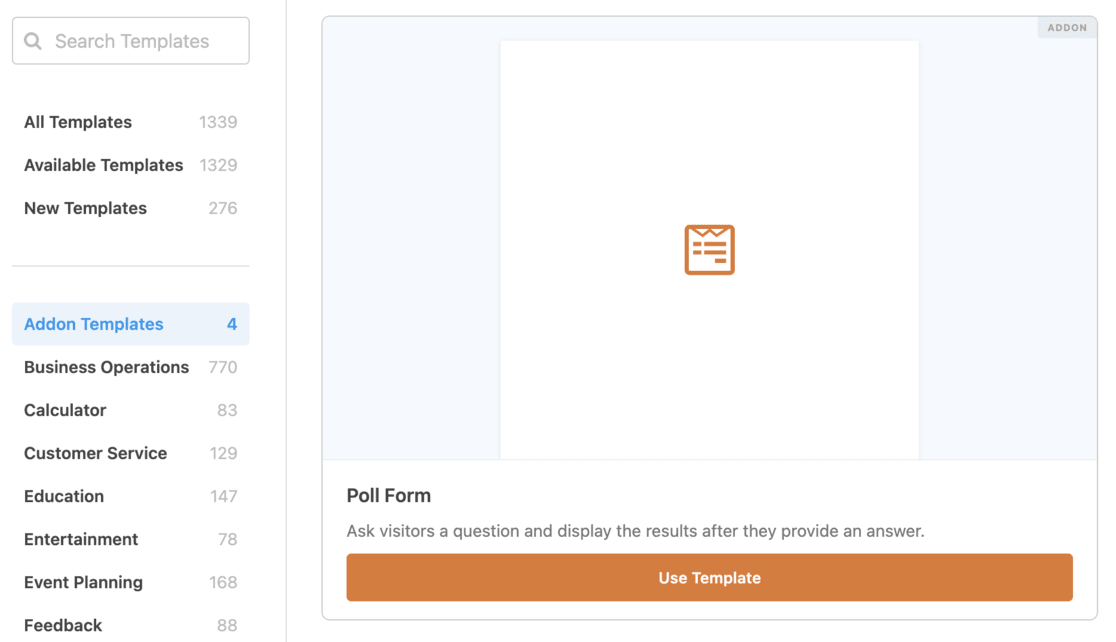
Once you select this template, WPForms’ user-friendly drag-and-drop form builder will open.
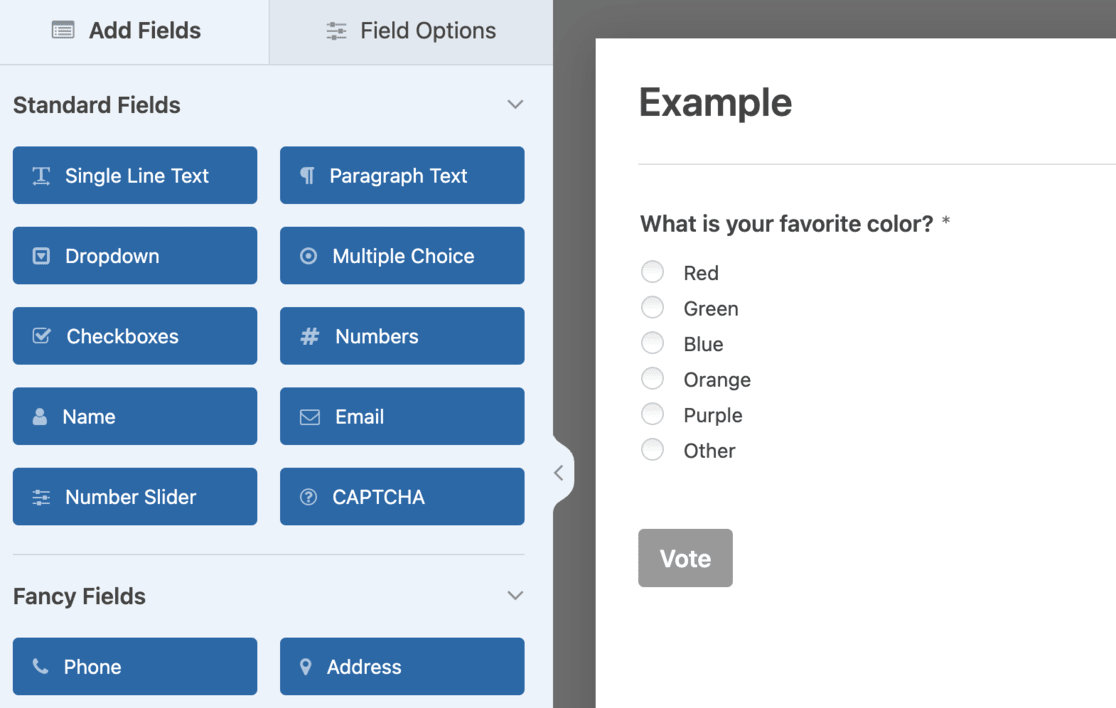
Here, you’ll see the template with some example fields already in place.
Feel free to tweak the template to suit your needs better. WPForms allows you to add new form fields easily. Just drag and drop your desired field from the left column into your form.
This customization is not just limited to adding fields; you can also edit existing ones. Simply click on any field to modify its properties, such as titles, labels, and the order of questions.
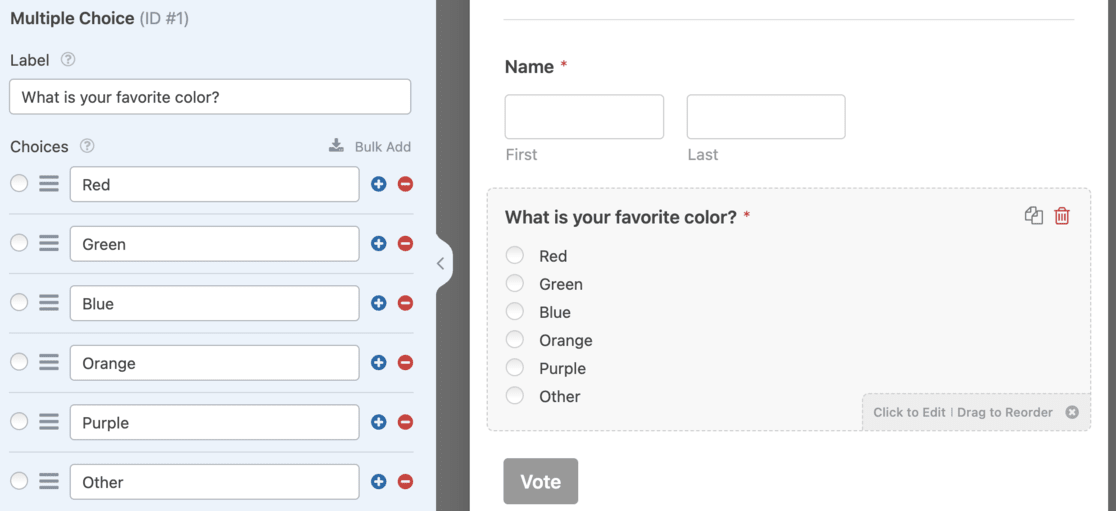
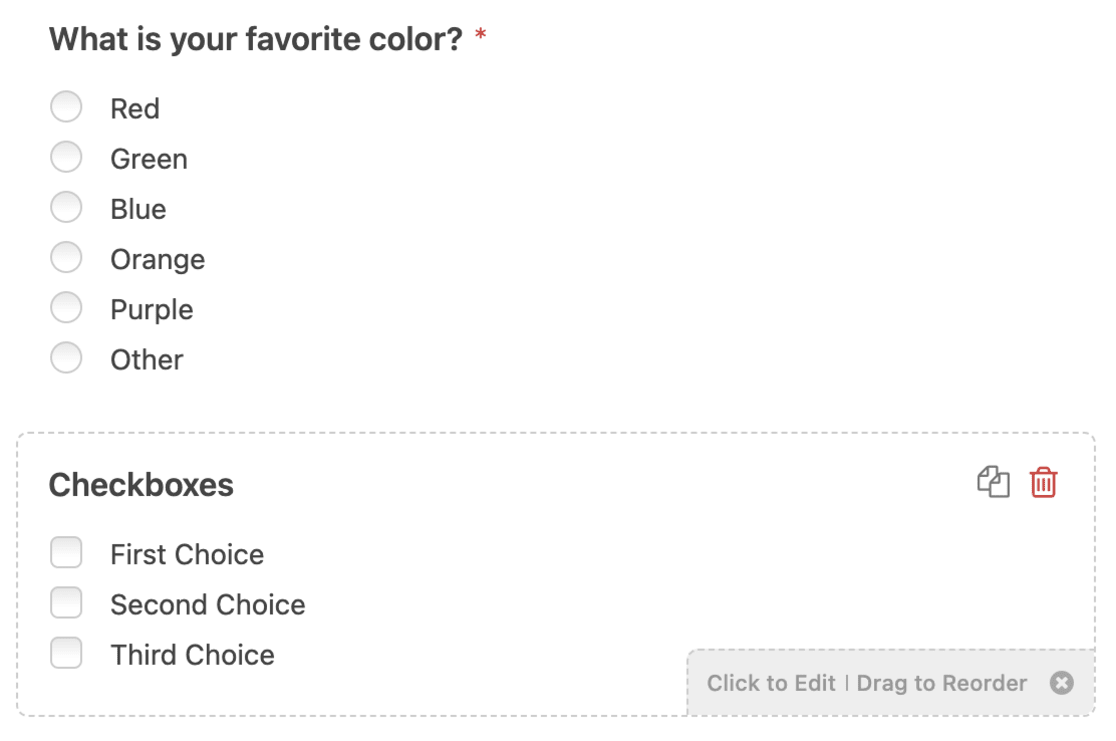
When managing the poll questions, you can rearrange them as you see fit. Click on a question and drag it to the desired position in the form.
Next, you should take a look at the poll results settings. For this, click the Settings button in the left menu and navigate to the Surveys and Polls tab.
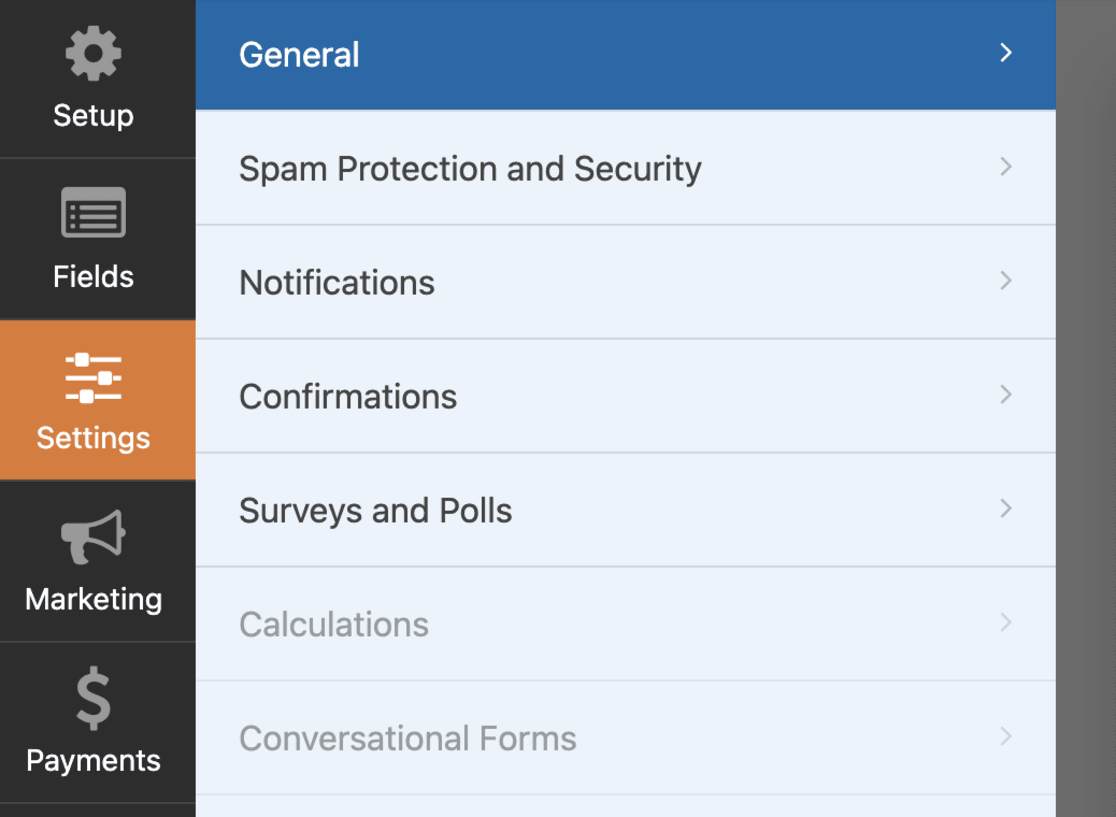
Here, you can decide whether to show the poll results to users after they submit their votes.
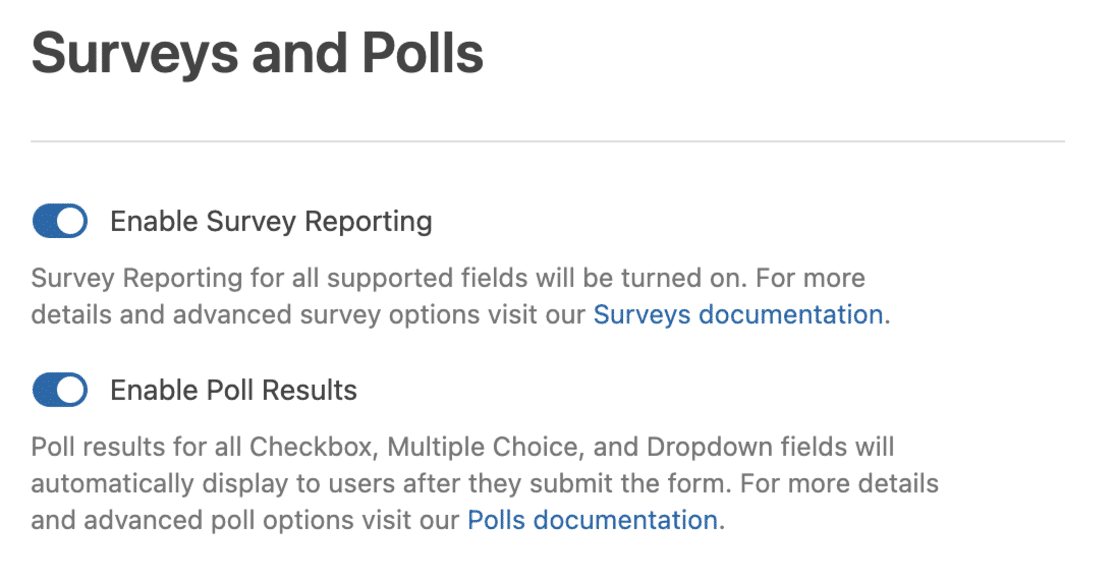
WPForms typically shows the poll results by default, but you can turn off this feature.
The Confirmation tab in the settings menu lets you control what happens after response submission. You can set up a custom message to be displayed to users or redirect them to a specific page or URL.
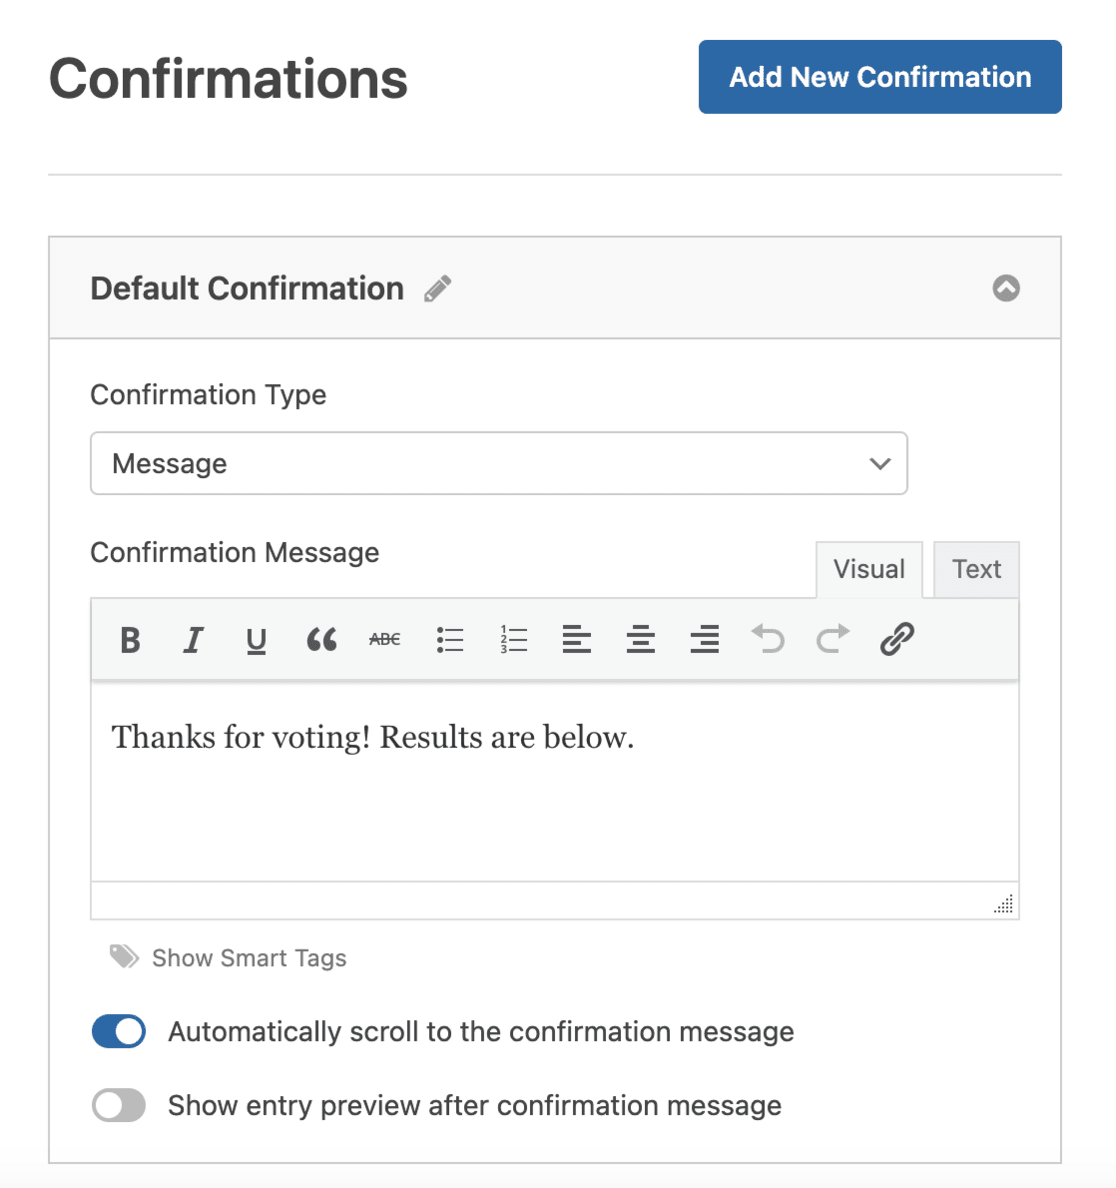
Once you’ve tailored the poll form to your liking, hit the Save button. This action saves all your form settings, ensuring your poll is ready to be added to your site.
Step 2: Embed Your WordPress Poll
After creating your poll with WPForms, the next step is to embed it into your WordPress site.
WPForms simplifies adding your online poll to various sections of your website, including posts, pages, custom post types, and sidebar widgets.
Start by clicking the Embed button located in the form builder.
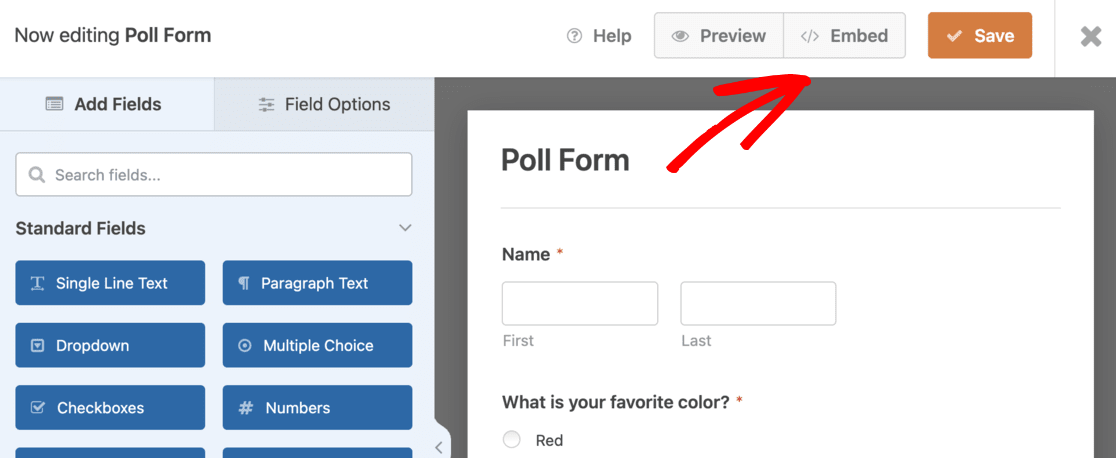
Doing so will open a new popup window. Here, you can select an existing page or create a new one to embed your poll form.
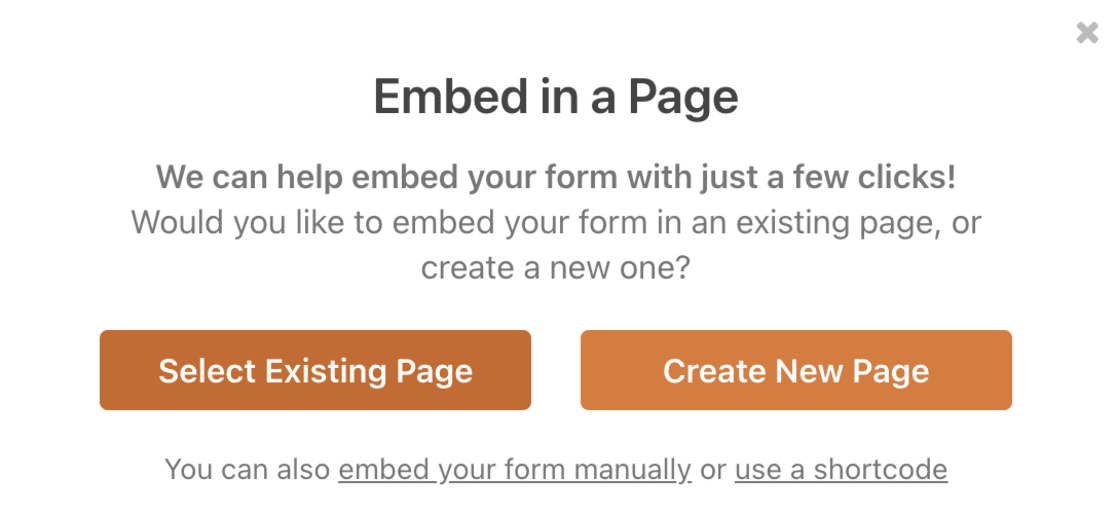
We have chosen the Create New Page button in this example.
In the WordPress editor, click the + button to add a new block and select WPForms.
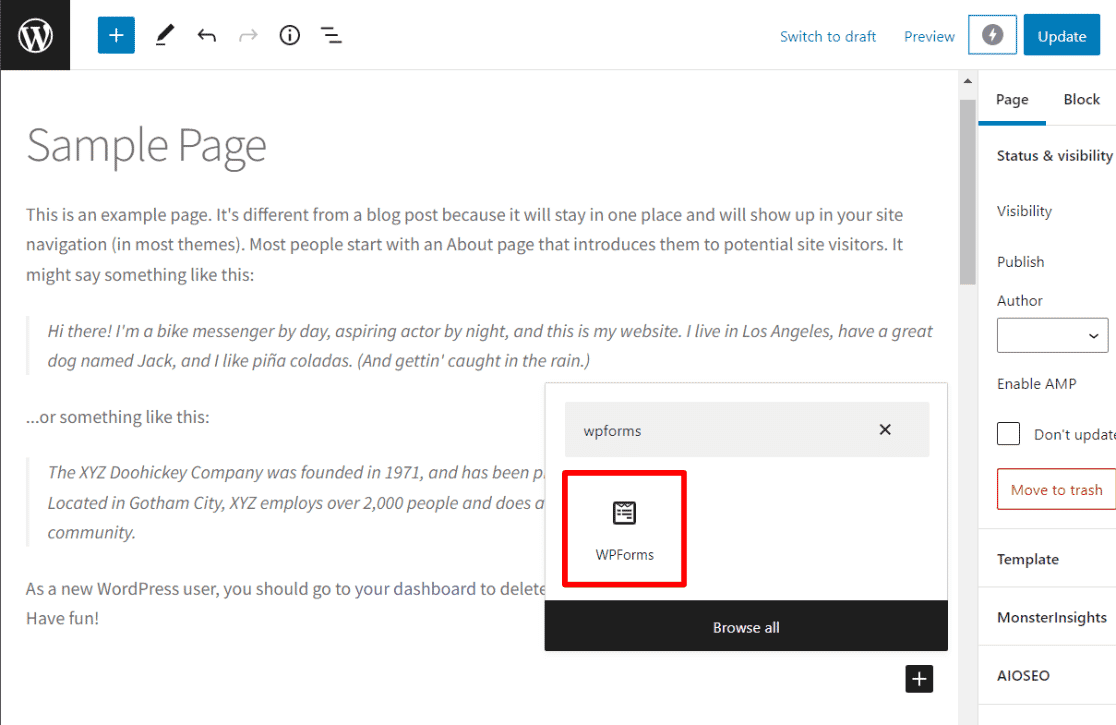
Then, choose your created poll form from the dropdown menu.

You’ll get a preview of your form right there in the editor.
Save or publish your post or page, and visit your website to see your poll live and in action.
What if you want to place your poll in a sidebar or another widget-ready area? It’s just as easy.
Navigate to Appearance » Widgets in your WordPress dashboard. Add the WPForms widget block to the sidebar or the area where you want the poll to appear.
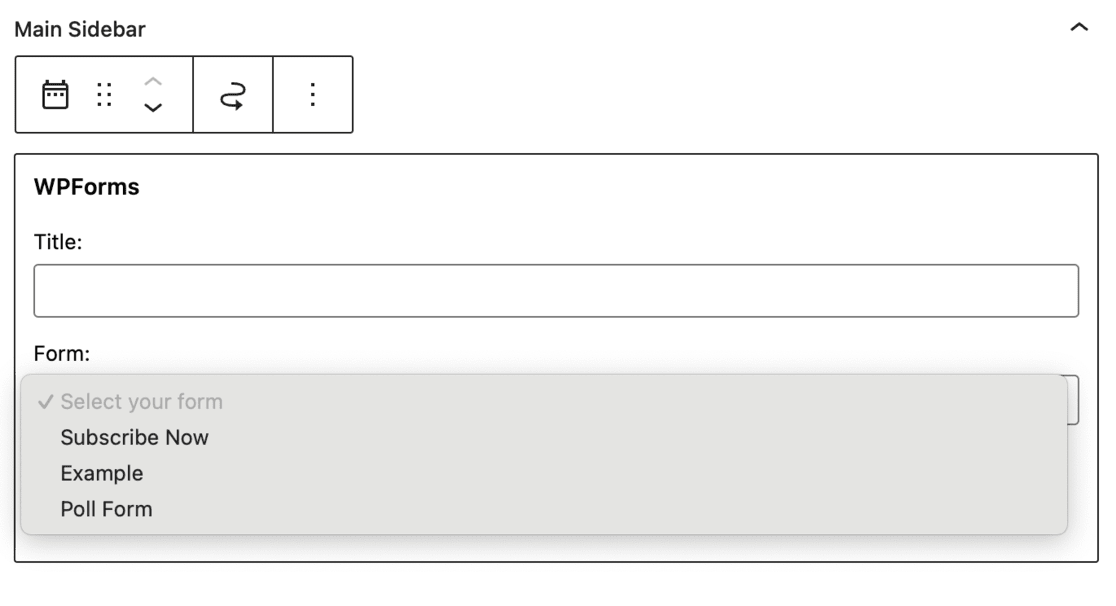
In the WPForms widget block, select the poll form you created. Remember to click the Update button to save your widget settings.
Once done, you can visit your website to see your online poll displayed in the sidebar or the chosen widget-ready area, ready to engage your visitors and gather their responses.
Step 3: View your WordPress Poll Results
Once your WordPress poll is running, the next exciting phase is viewing the results.
If you’ve enabled users to see poll results, they can view them immediately after submitting their answers.
But as the website owner, you can access these results anytime you want.
Go to WPForms » All Forms in your WordPress dashboard to do this. Look for your poll form and click the Survey Results link beneath it.
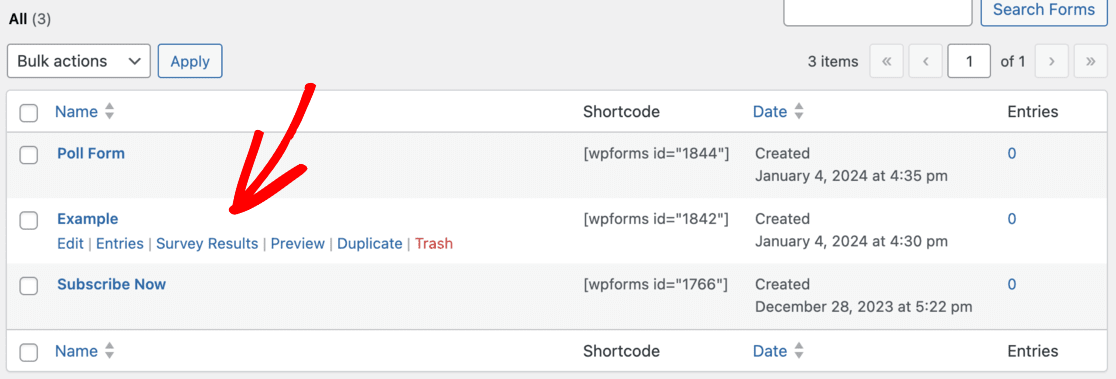
You’ll be directed to the poll results page upon clicking this link. This page displays the responses you’ve received in an interactive chart format.
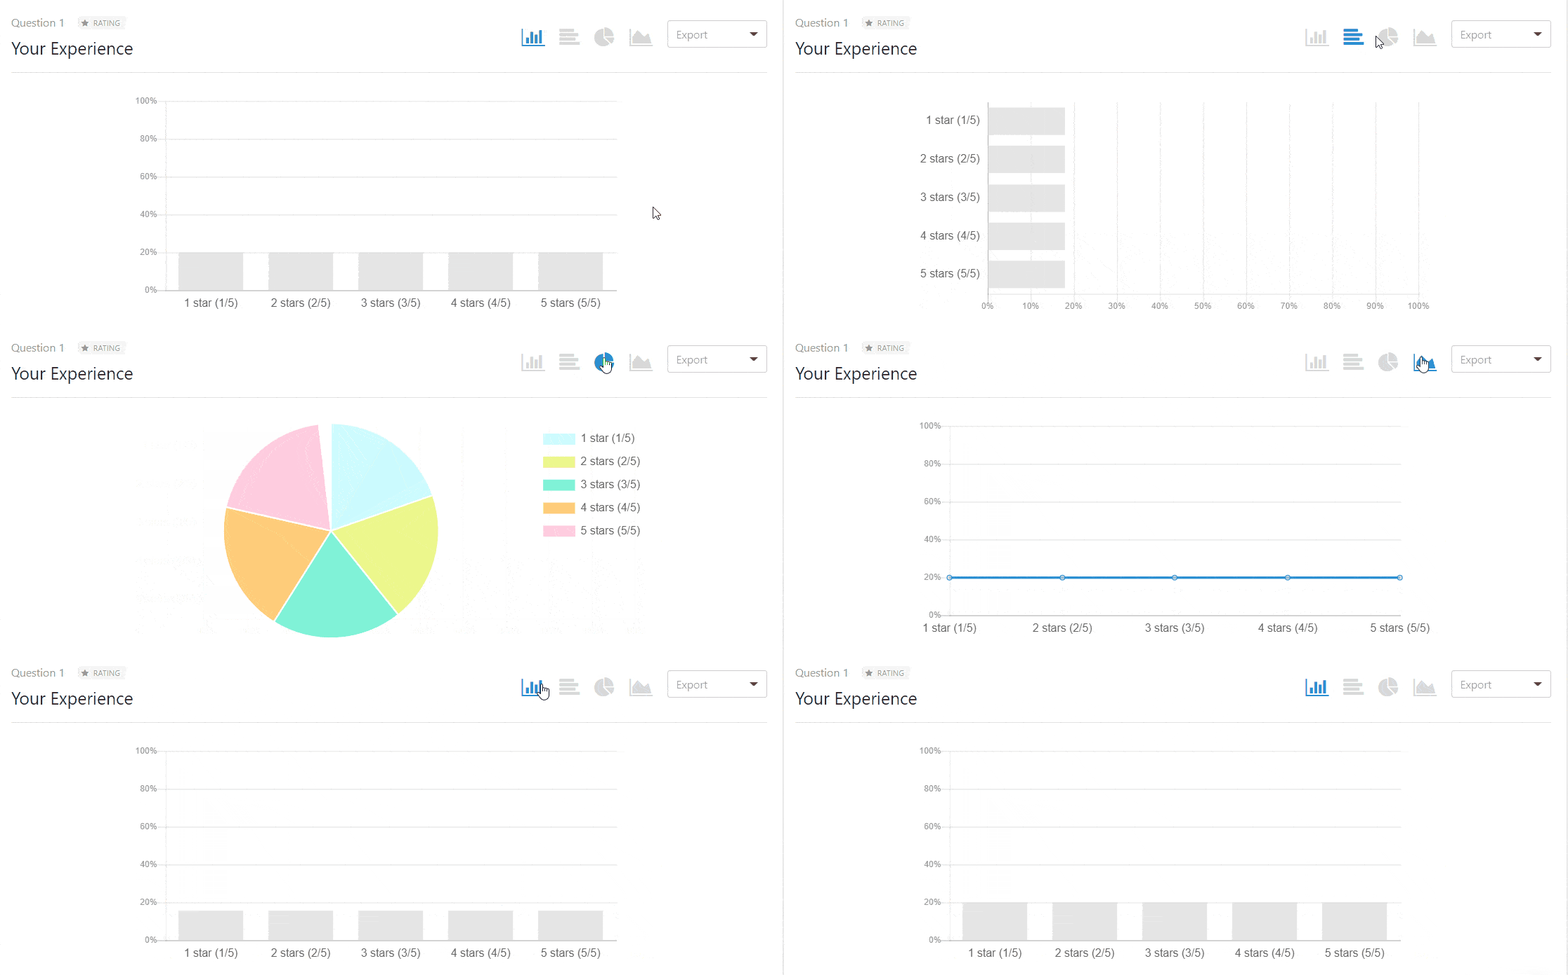
This visual representation makes it easier to understand the data and adds an engaging element to the results analysis.
Furthermore, WPForms allows you to change the chart type to suit your preference or the nature of the data.
And there’s more – you can export these results in JPEG, PDF, or printable format if you need to.
This feature is handy for sharing the results or keeping a record for future reference.
Step 4: Add Poll Results to Your WordPress Site
If you wish to showcase your poll results in a specific location on your website, there is an easy way to do so.
This feature is convenient if you’ve turned off the immediate display of poll results to users and prefer to share them later. Also, this allows you to easily include poll results in statistics articles or anywhere else where relevant.
To begin, you need to find your poll form’s ID. This is done by navigating to WPForms » All Forms on your dashboard. Look for your poll form and observe the shortcode displayed next to it.
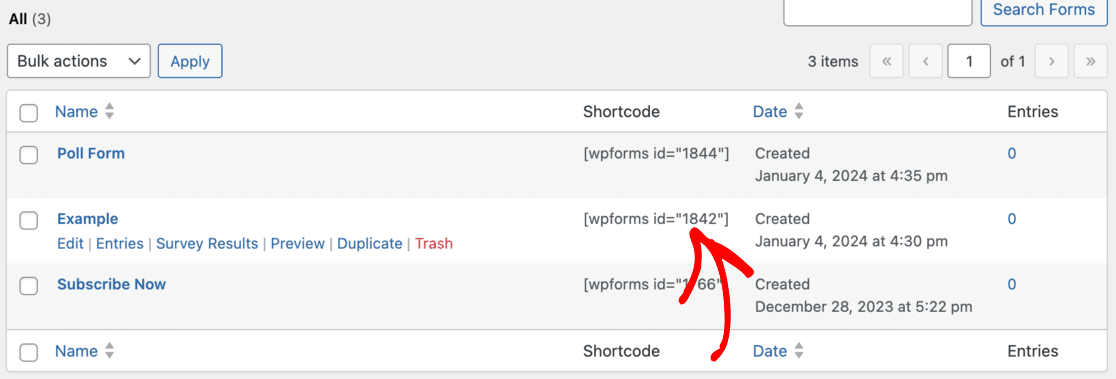
Within this shortcode, you’ll find the ID number of your poll.
The next step involves finding the field ID, the specific field in your form for which you wish to display results. Click to edit your poll form and click on the relevant poll field. The field ID will be visible in the left column.
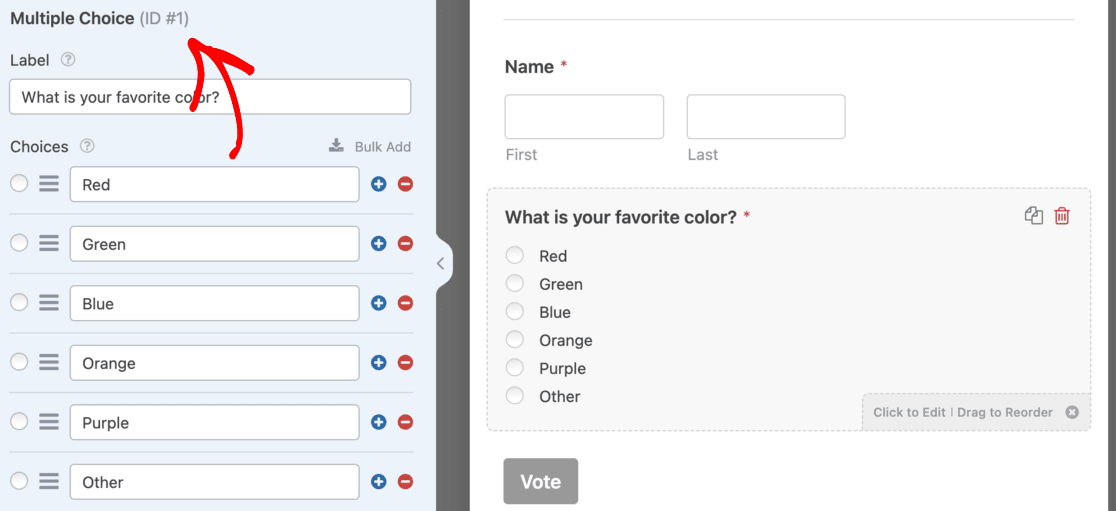
Armed with the form ID and the field ID, you’re ready to embed the poll results. Use the following shortcode format:

Make sure to replace the ID with your form ID and the field ID with your field ID. This shortcode can be added to your website’s posts, pages, and text widgets.
By inserting this shortcode, you effectively display your poll results on your website wherever you see fit. It’s a great way to share insights and findings with your audience, further enhancing the interactivity and engagement of your site.
If you are using MonsterInsights, you also have the ability to track form submissions to see how your visitors are interacting with your forms.
Method 2: Using UserFeedback
Step 1: Build Your WordPress Poll
Creating a poll on your WordPress site using UserFeedback is a straightforward process.
First, you need to get UserFeedback. Start by downloading it from the pricing page at a license level suitable for your site. They also offer a free version, which is ideal for those just starting out.
After signing up, you can download, upload, and activate the UserFeedback plugin on your WordPress site.
Once the plugin is activated, UserFeedback’s setup wizard will automatically launch.
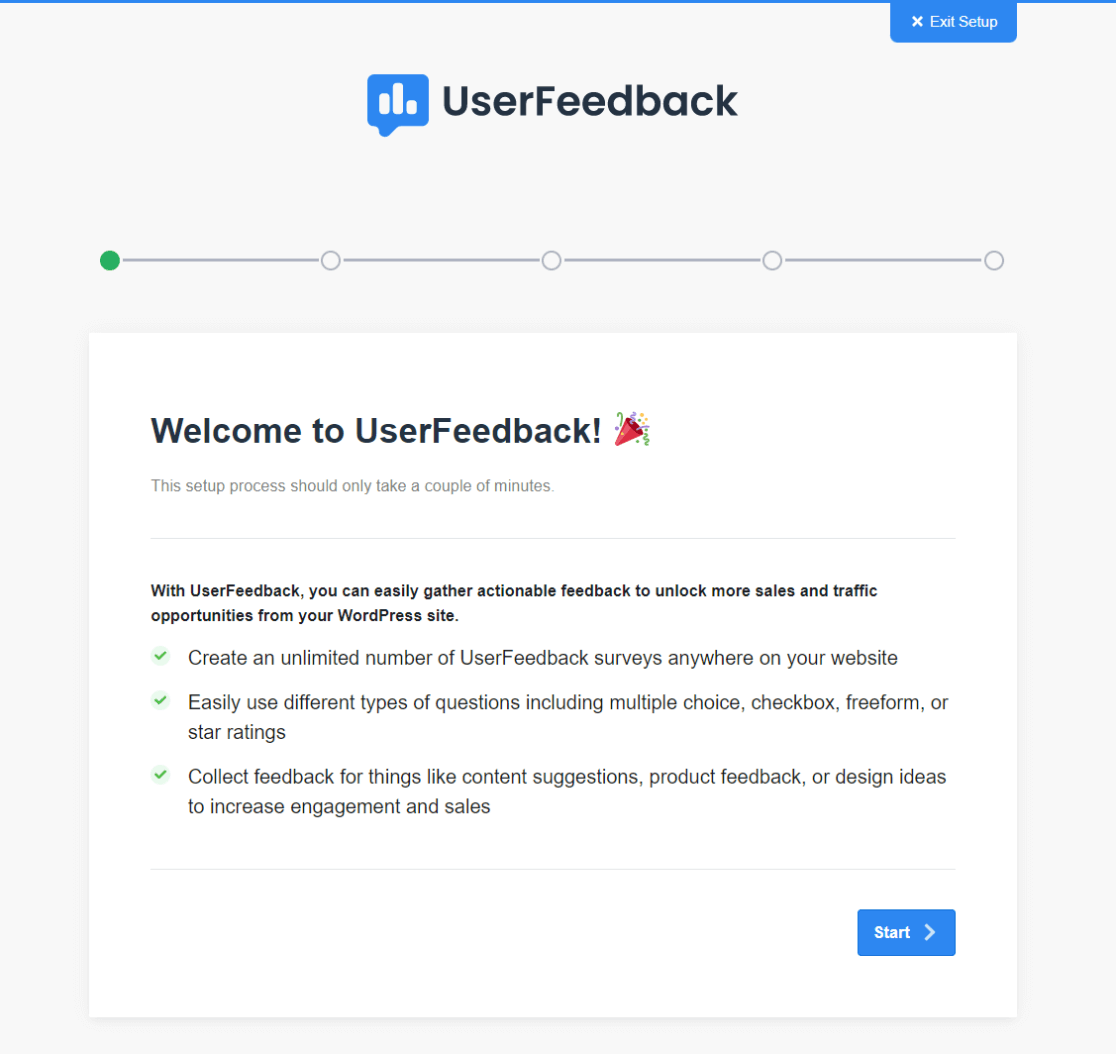
This is designed to guide you smoothly through the setup process. Click Start to begin and follow the steps provided by the wizard.
After you’ve set up the plugin through the wizard, it’s time to create your first poll. Don’t worry if you’re unsure about your question or settings; you can always come back and make changes later.
Choose a question from the preset options UserFeedback provides, or create a custom question that better suits your needs.
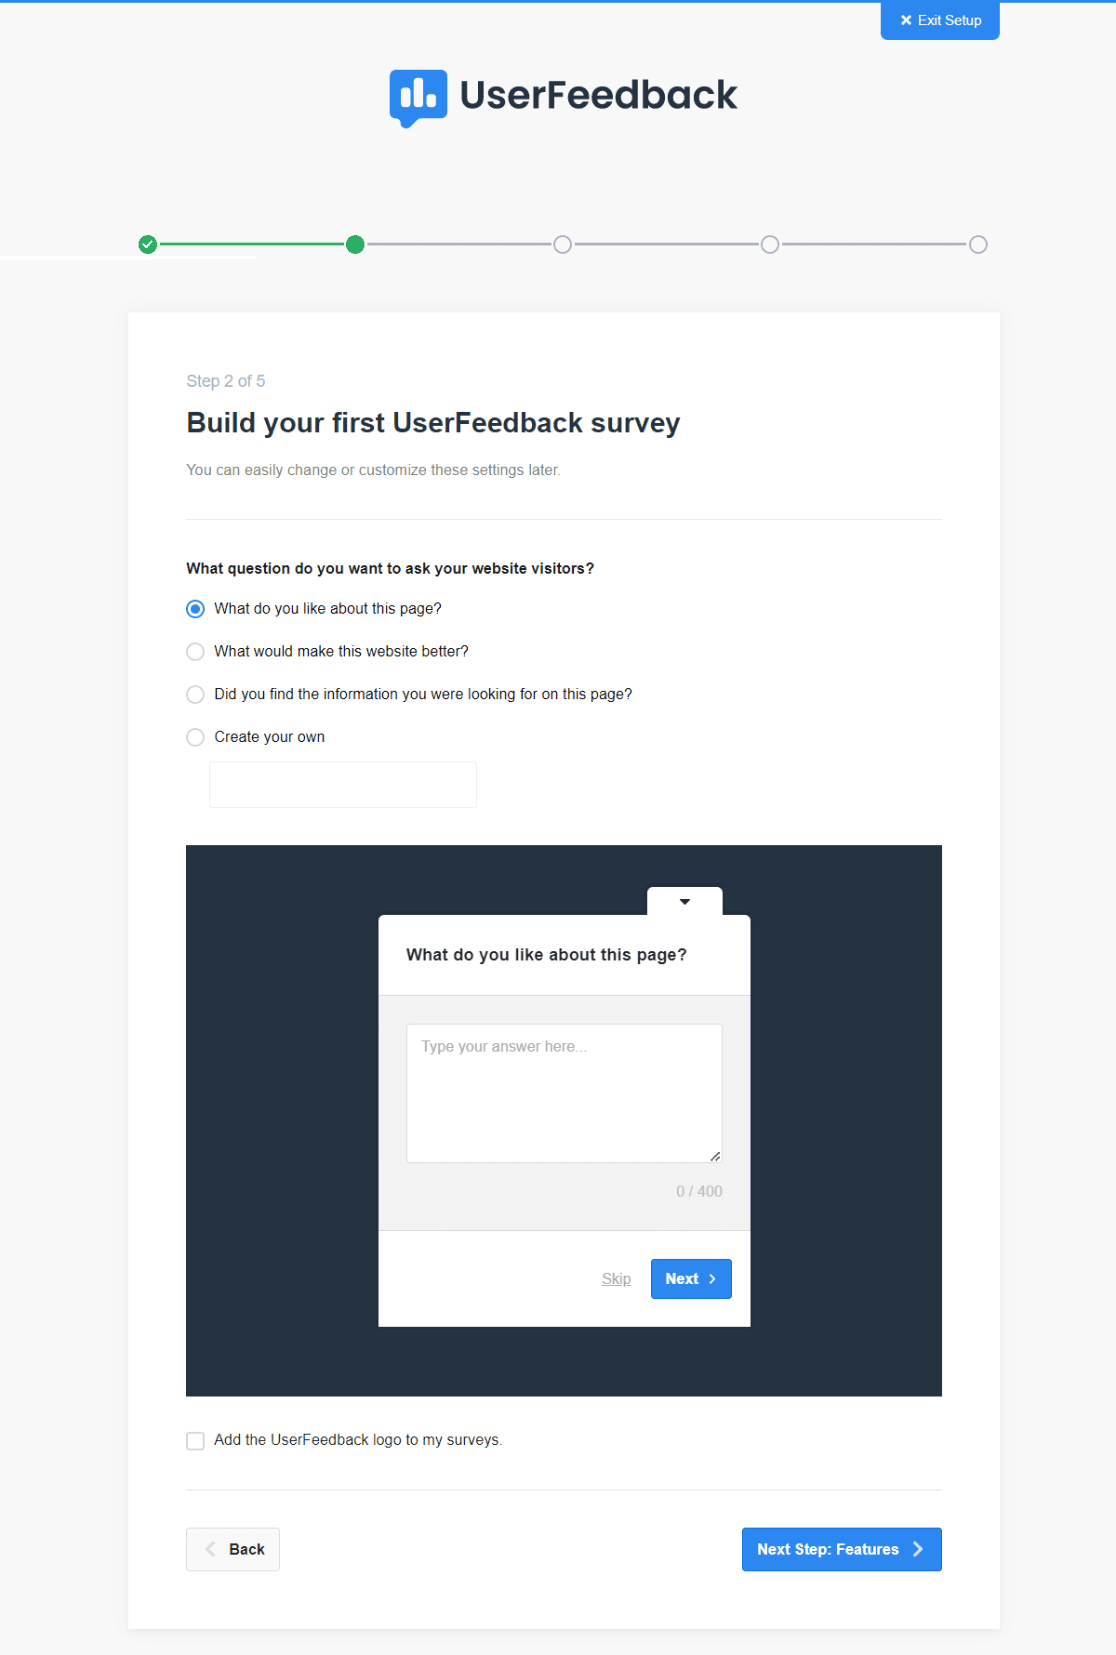
Once you have selected or created your question, click the Next Step button to proceed.
By following these steps, you’ll have a functional and engaging poll ready to gather feedback from your website visitors.
Step 2: Customize features
The next step is tailoring your poll’s features to your needs. The range of features available will depend on the license level you’ve chosen for UserFeedback.
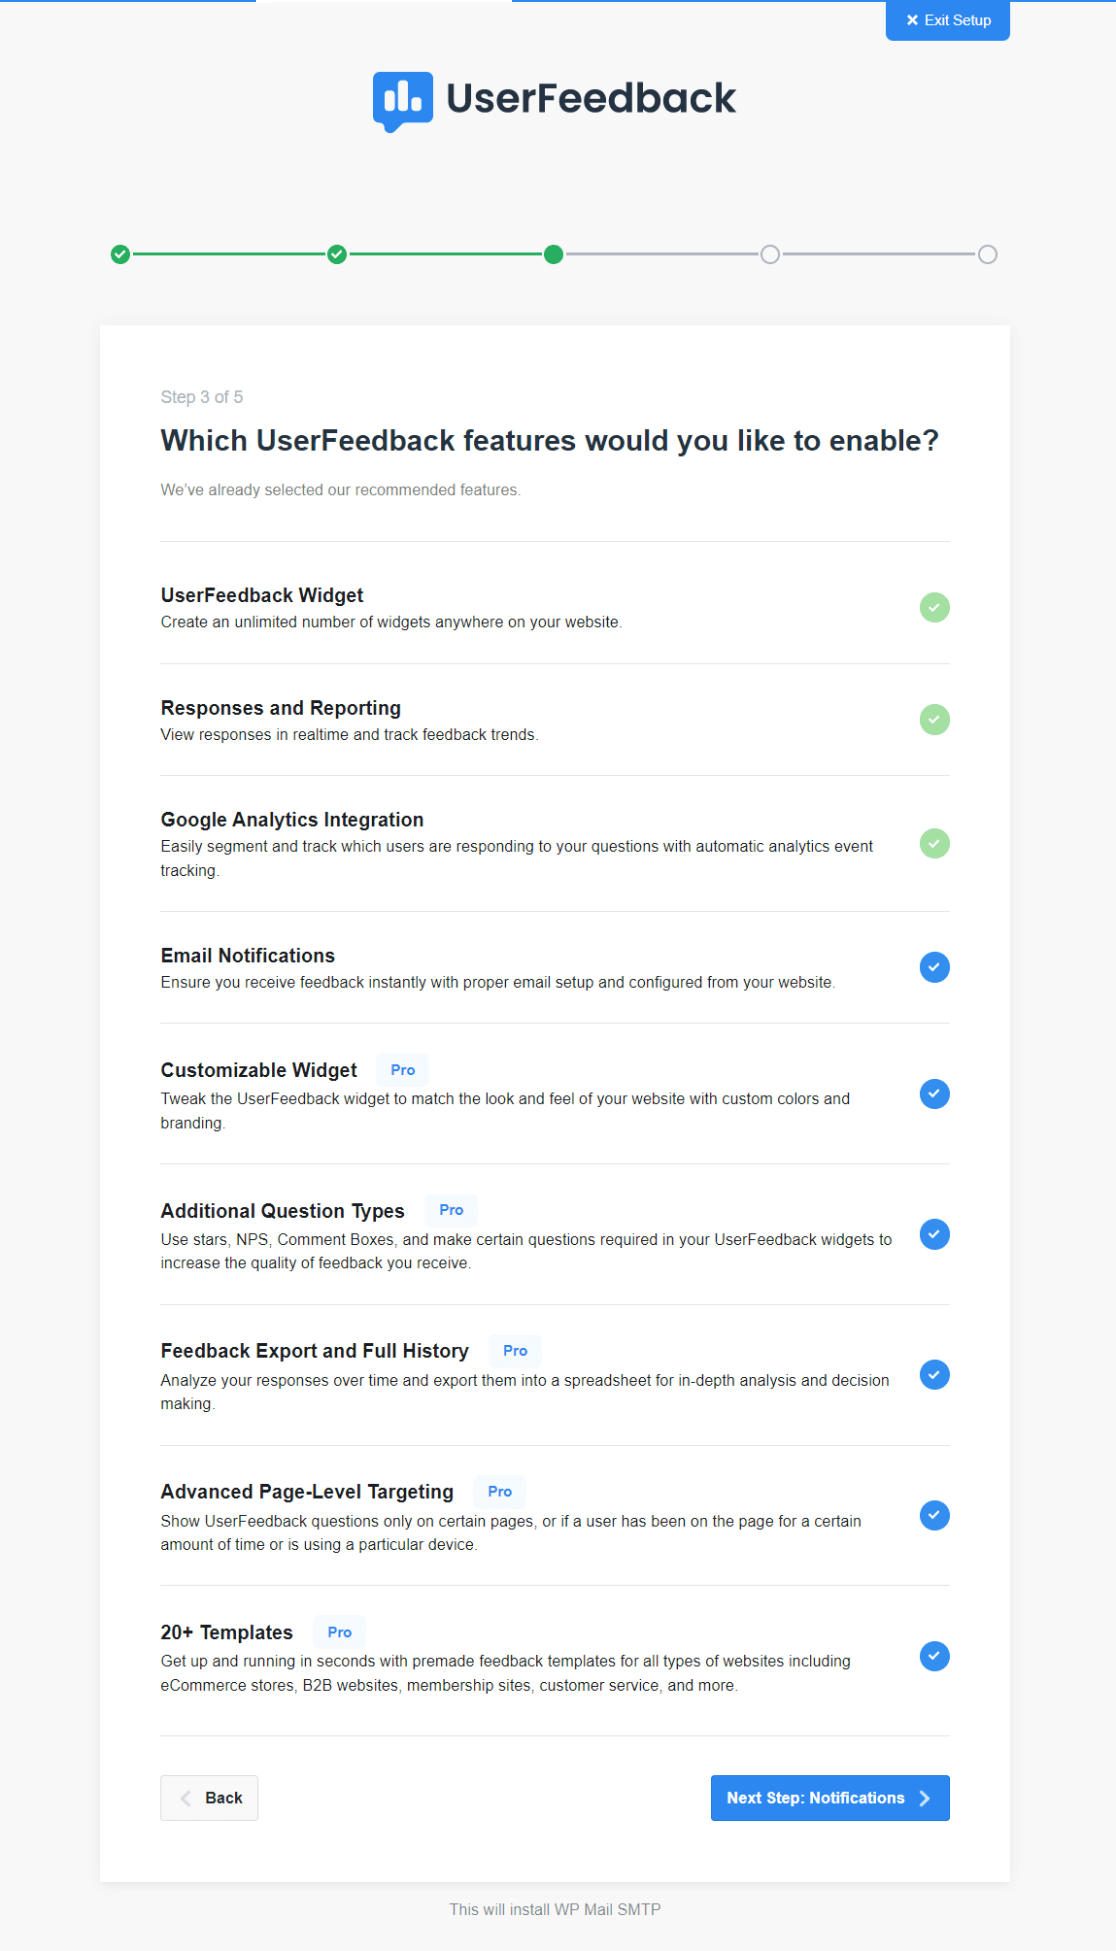
Take a moment to explore the different features that your UserFeedback license offers. You can enable as many features as you want.
This step involves making your WordPress poll functional and aligned with your goals and audience. By carefully selecting and enabling the right features, you can enhance the effectiveness of your poll and ensure it delivers the valuable insights you’re looking for.
Once you have finished, click the Next Step button.
Step 3: Select Notifications
Setting up your notification preferences is another important step. This involves selecting an email address where all your survey responses will be sent.
Ensure this is an email you access regularly to see feedback as it arrives.
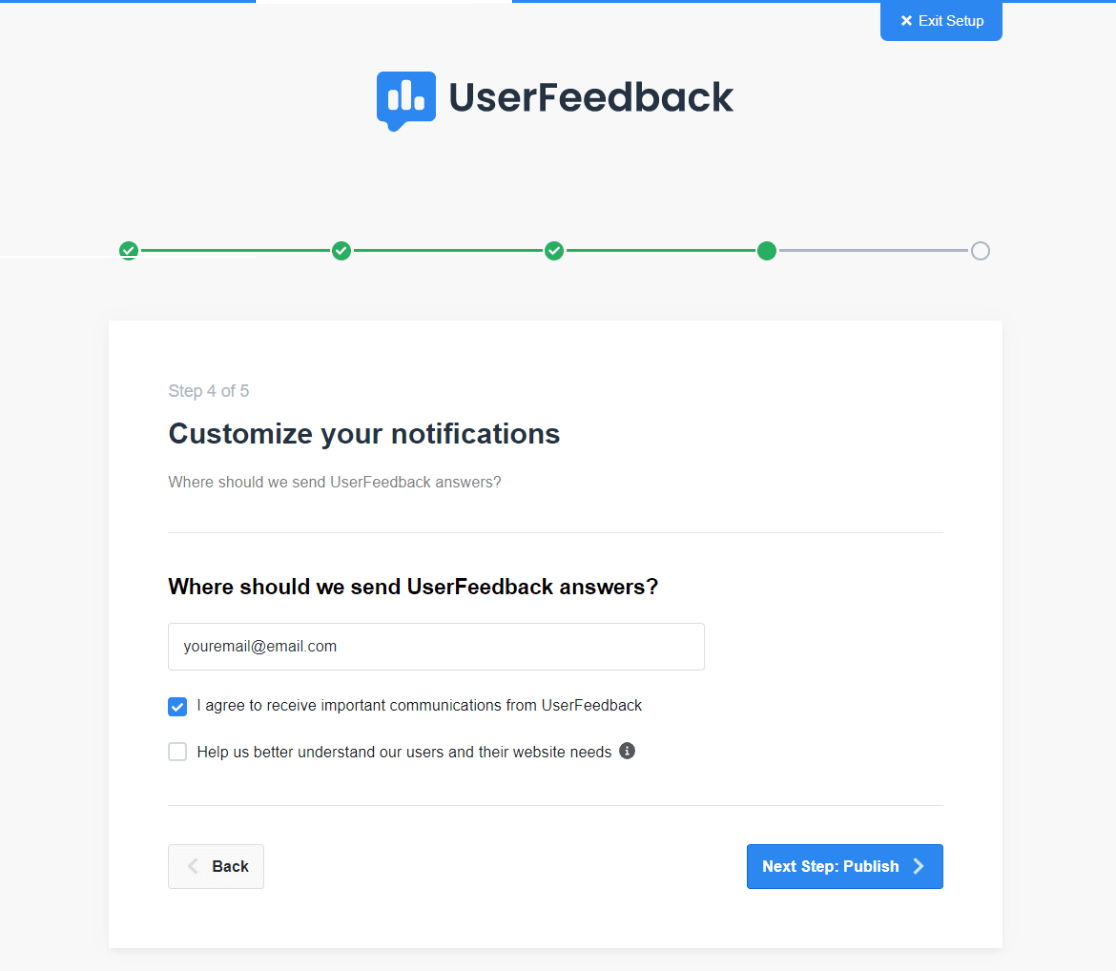
You also have the option to receive important updates and communications from the UserFeedback team. This can be a valuable source of helpful enhancement tips for effectively using the tool.
Step 4: Publish Your WordPress Poll
Now it’s time to publish your WordPress poll with UserFeedback. After creating your poll, you want everything live and running.
The add-ons and features you selected earlier will be installed at this stage.
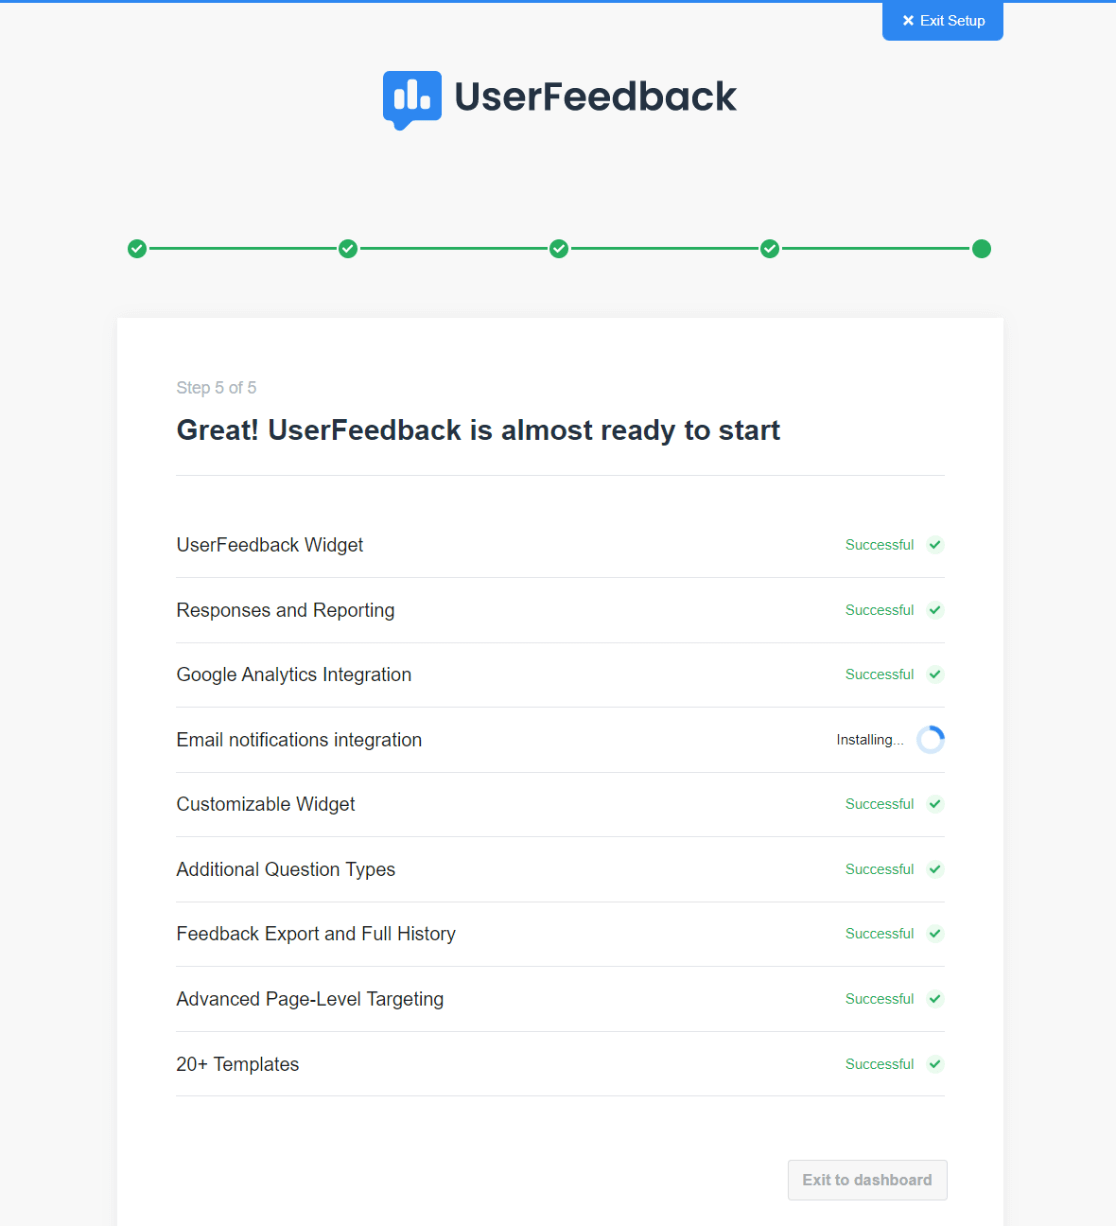
Once these settings are installed, you will be able to click the Exit to dashboard button.
Clicking this button is the last step in the setup process, and it will take you out of the setup wizard and back to your WordPress dashboard.
With this, your WordPress poll, powered by UserFeedback, is now ready and published on your site. However, in the final step, we’ll choose how, when, and where to display the poll on your website.
Step 5: Edit Your WordPress Poll
After creating your WordPress poll with UserFeedback, let’s decide how to display it. Also, you might want to make other changes or create a new poll.
First, go to UserFeedback » Surveys in your WordPress admin area. Here, find your survey and click on the Edit link.
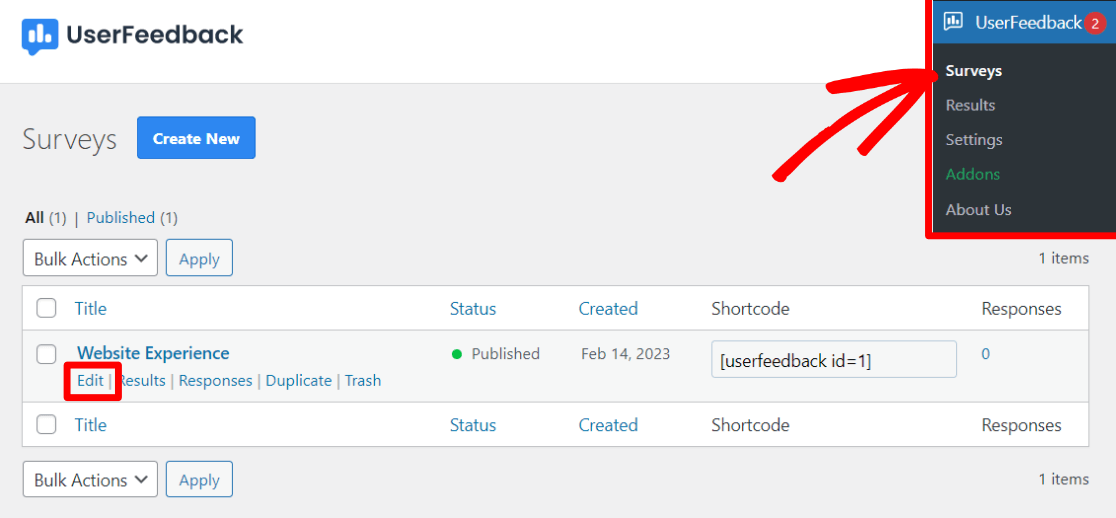
On the editing screen, you can tweak the questions and the thank you message of your survey. Feel free to add new questions or adjust the existing ones.
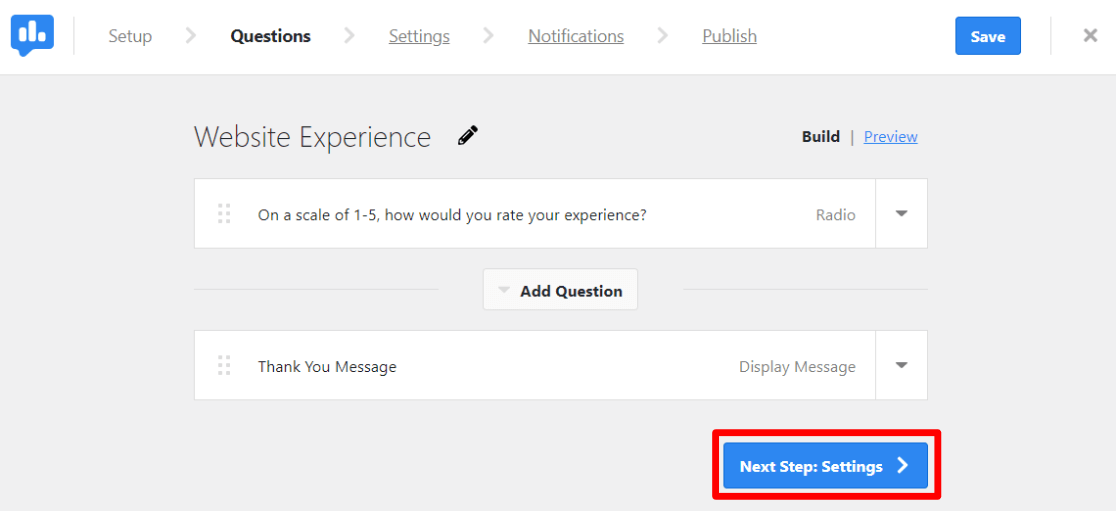
After making the necessary changes, click on the Next Step button.
On the Settings page, you’ll find several customization options.
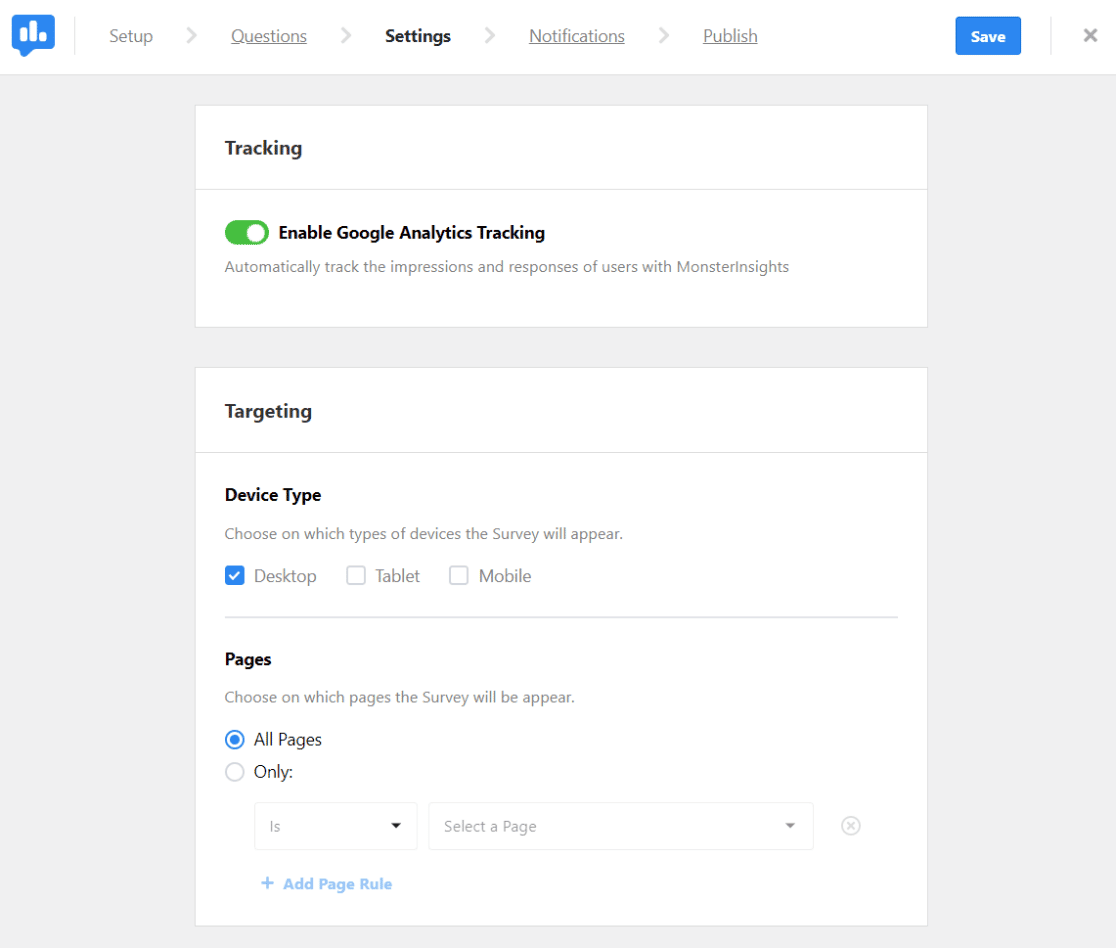
If you’re using MonsterInsights, you can manage your Google Analytics tracking here (we recommend you always keep this on).
The Targeting section lets you specify which devices and pages your survey will appear on.
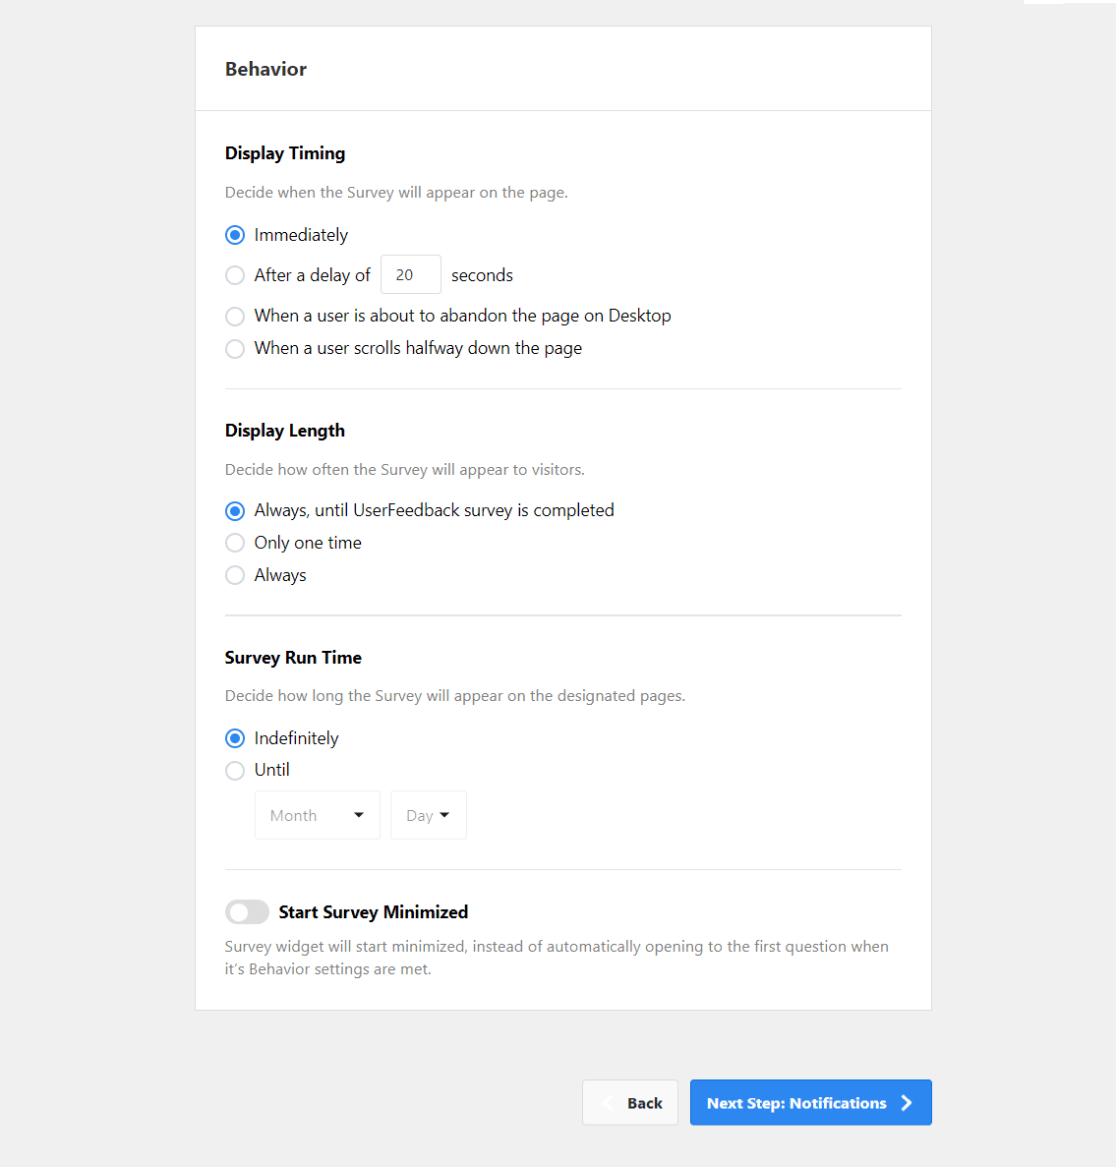
Further down, in the Behavior section, you can set preferences for your survey’s appearance, timing, duration, running period, and whether it starts minimized or not.
Next, on the Notifications screen, decide if you want to send notifications to an email address each time the survey is completed.
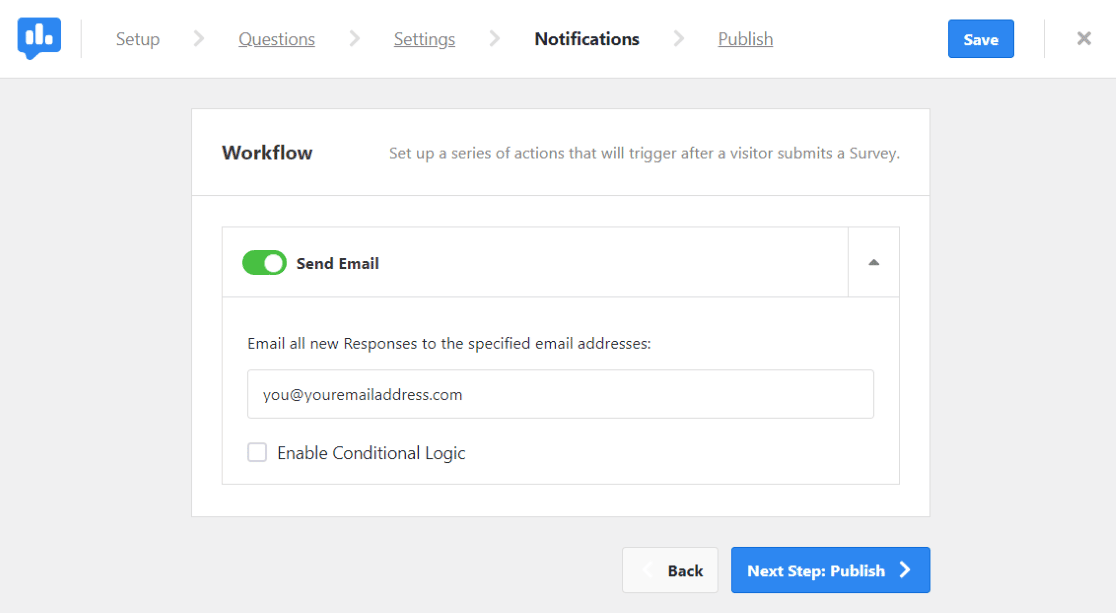
This feature keeps you informed about the engagement level of your poll.
Finally, head over to the Publish page. The default setting usually schedules your survey for later, but if you prefer it to go live immediately, just switch off the Schedule for Later option.
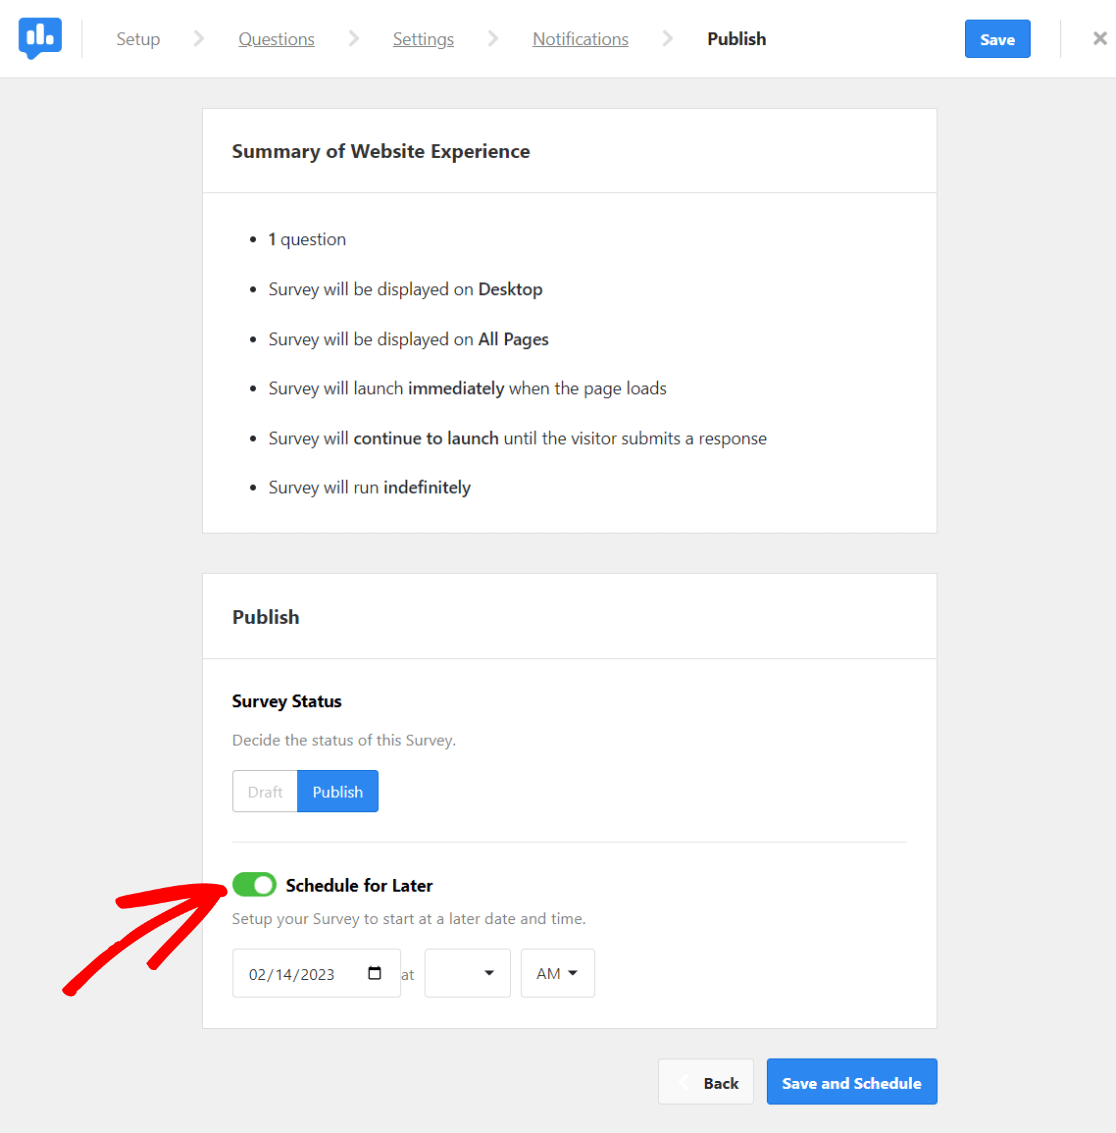
With these steps, you can edit and customize your WordPress poll in UserFeedback, tailoring it to fit your site’s needs and your audience’s preferences perfectly.
Once everything looks good, click on Publish.
And that’s it! You have now successfully created your WordPress poll and are ready to gather feedback from your visitors.
If you liked this article, you might also like to read:
How to Add a Contact Form in WordPress
How to Track Form Submissions in Google Analytics & WordPress
How to Collect User Feedback in WordPress (Super Simple)
Haven’t tried MonsterInsights yet? Today is the day to start!
Remember to follow us on Twitter, Facebook and YouTube for more tutorials and Google Analytics tips.


