Are you spending money on Meta (Facebook) Ads? If you are, it’s super important to try to maximize that spending to get more of the right kind of traffic and more conversions. You’ll want to look at some Facebook ad targeting tips — otherwise, you’re just throwing away that ad spend.
Need help with optimizing your ads? You’re in the right place!
When running Meta (Facebook) ads, you’ll want to use all the different targeting options to reach the right people at the right time. This way, you’ll make the most of your investment in ads by increasing your ROI (Return on Investment).
In this article, we’ll show you some cool Facebook ad targeting tips to reach the best possible audience and get tons of conversions.
We’ll go over tips in three different categories:
- Use Google Analytics for Facebook Ad Targeting
- Use the Meta (Facebook) Audience Builder
- Targeting Tips for Customer Retention
Use Google Analytics for Facebook Ad Targeting
Google Analytics provides loads of data about your users and customers that you can use to create highly targeted Facebook ad campaigns.
However, in order to capture that data, you need to have Google Analytics set up correctly on your site.
If you’re using WordPress, you’re in luck! MonsterInsights makes Google Analytics setup super easy for WordPress sites. It also allows you to easily set up advanced tracking, such as eCommerce tracking, form conversion tracking, media tracking, and much more.
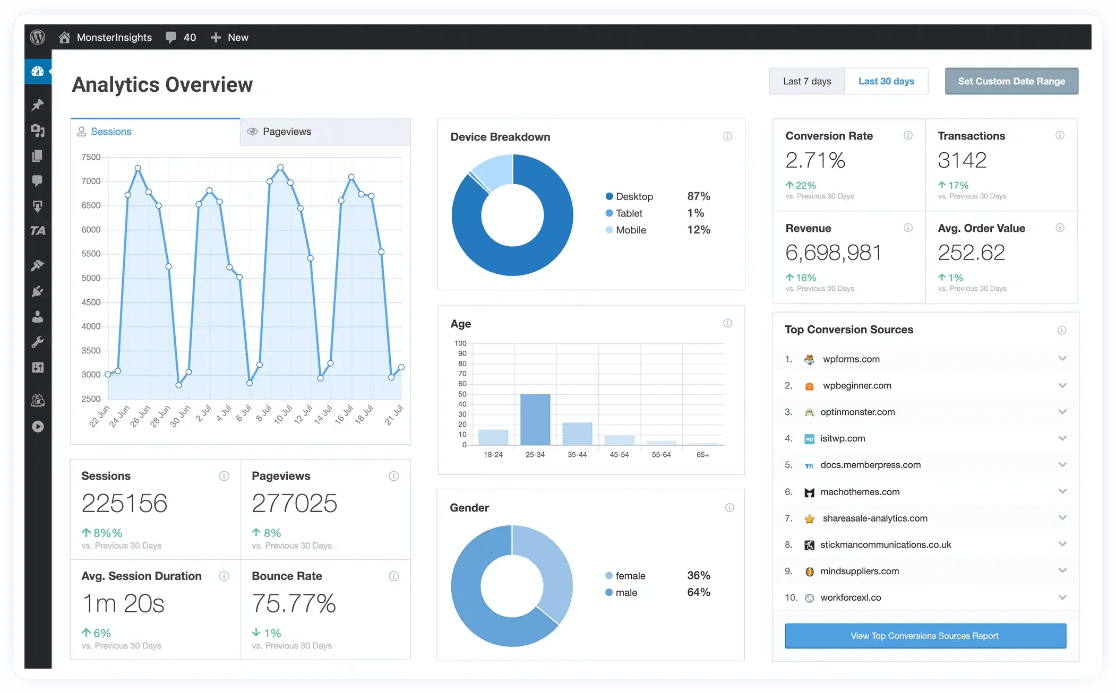
To see everything MonsterInsights can do, check out the full list of MonsterInsights features.
Now, let’s take a look at what you can do in Google Analytics to set up the best possible Facebook ad targeting.
1. Enable Demographics Reporting
To understand who your high-value customers are, it’s helpful to enable demographics collection on your site. Once you know your high-value customer groups, you can serve your ads to those specific groups to boost your return on investment.
Using the demographics report, you can identify the age group and gender of your high-value customers.
To Turn on Demographics Reporting, Enable Google Signals
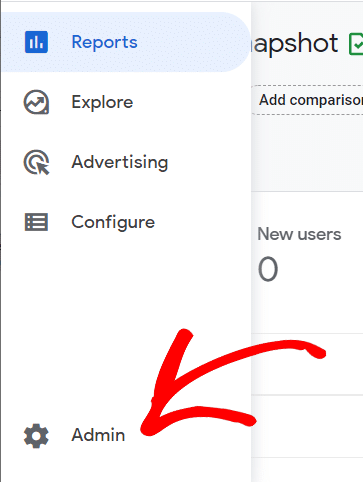
To see your demographics data inside Google Analytics 4, go ahead and open the Admin cog in the sidebar:
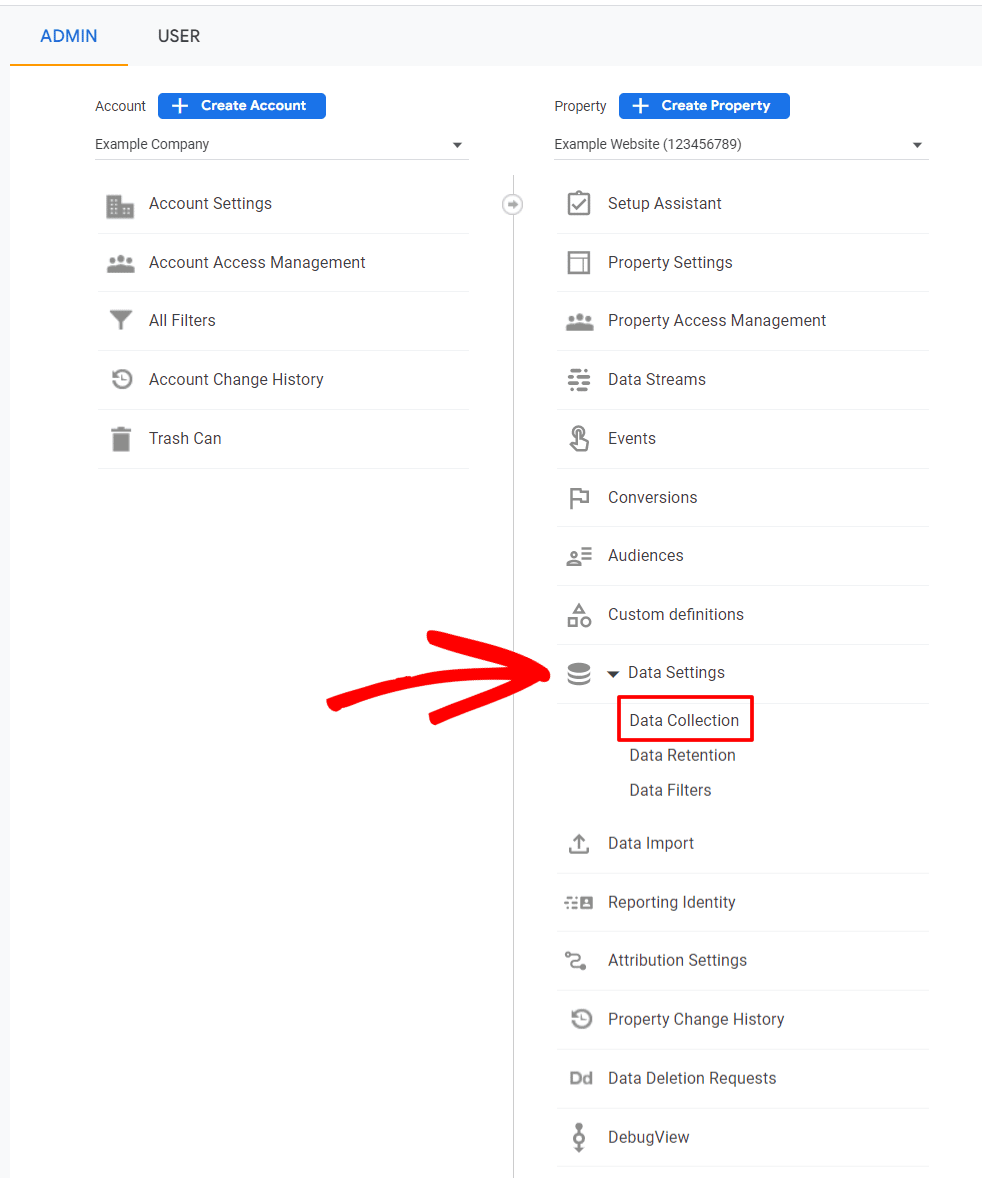
Then, in the Property column, click on Data Settings » Data Collection:
By default, Google Analytics will only collect country, city, and language demographics. If you want to see some data about the gender, age, and interest categories of your visitors, you’ll need to enable something called Google signals.
Google signals is a way to collect extra information about your visitors that Google Analytics doesn’t collect by default. When you turn on Google Signals, you’re enabling:
- Cross platform reporting
- Remarketing
- Advertising reporting features
- Demographics and interests
However, for demographics and interests reports, it’s important to note that Google can only collect that information from Google users who have ads personalization turned on. So, you’ll get a snapshot of demographics data for your audience. You won’t be seeing data for each and every user.
Another important thing to note about Google signals is that turning it on will cause Google to use data thresholds, which means that some data might be withheld from your reports (you can’t access it). This is so that Google can comply with privacy laws. For more on what this means, read more about data thresholds.
To go ahead with enabling Google signals, click on the toggle switch:
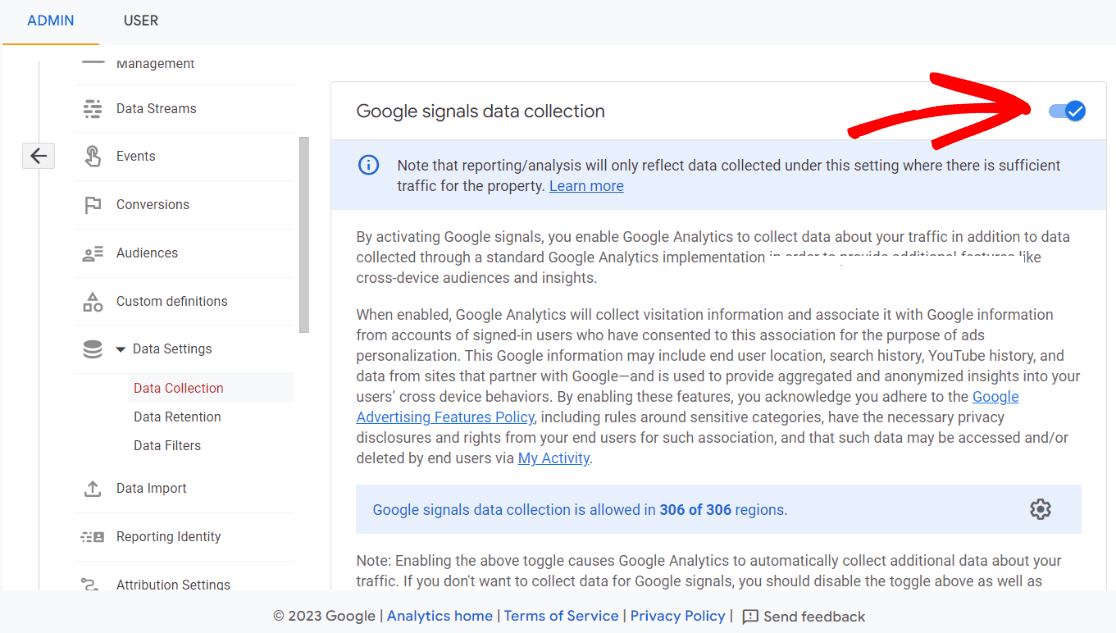
You’ve now successfully enabled extra demographics and interest reporting in Google Analytics!
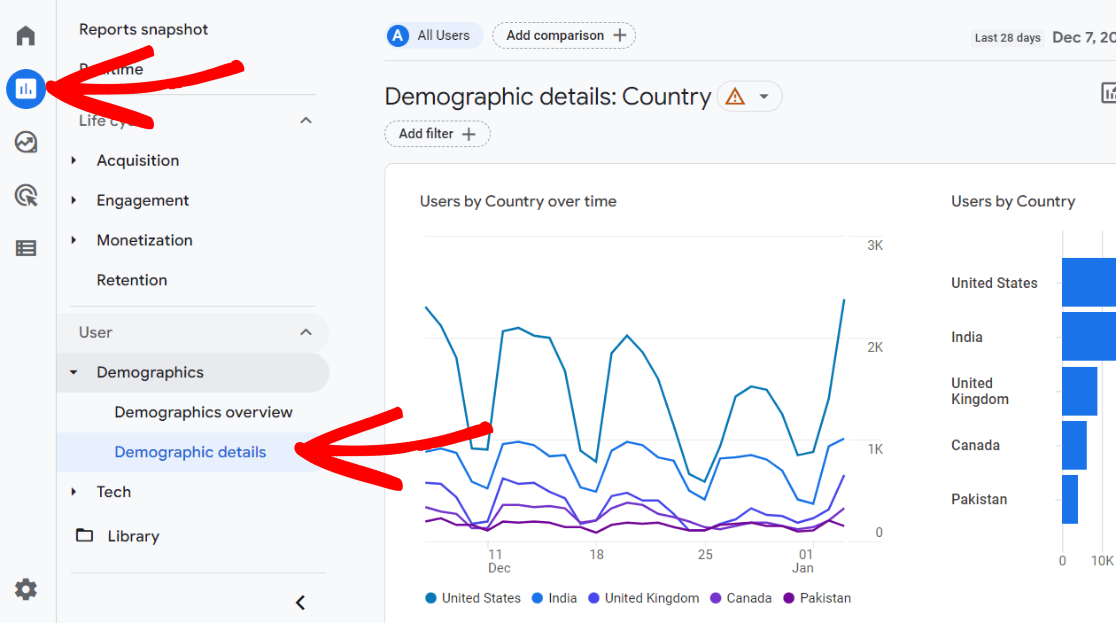
To find age and gender demographics data, open Google Analytics and navigate to Reports » Demographics » Demographic details:
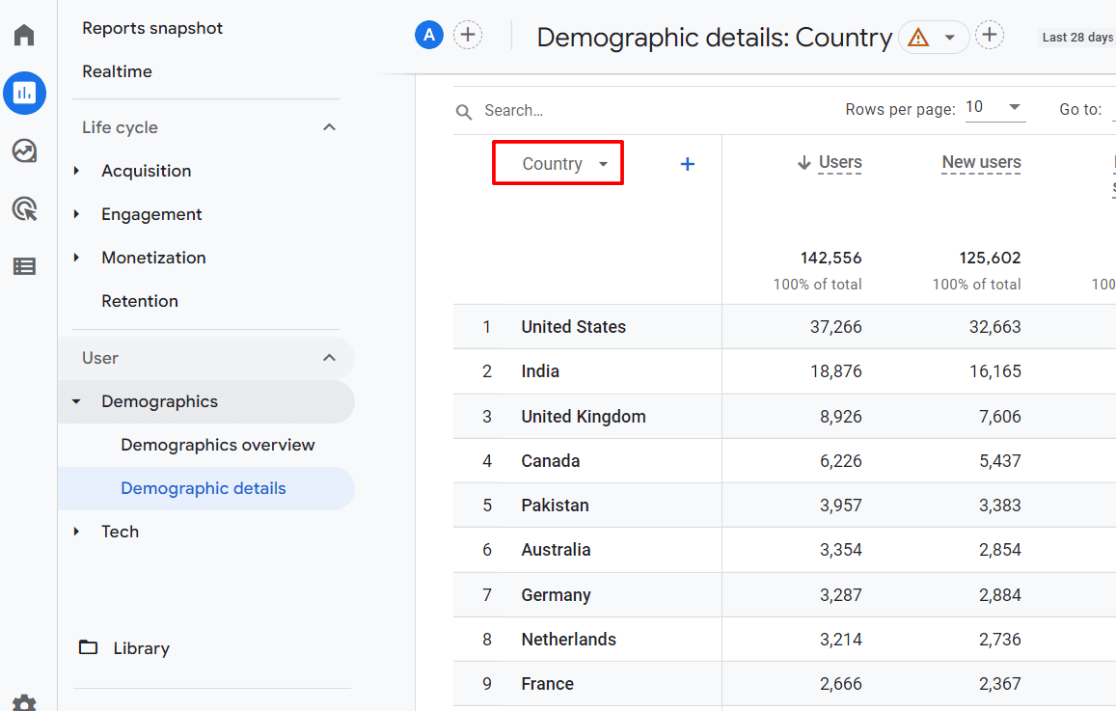
Then, scroll down to the table and click on Country:
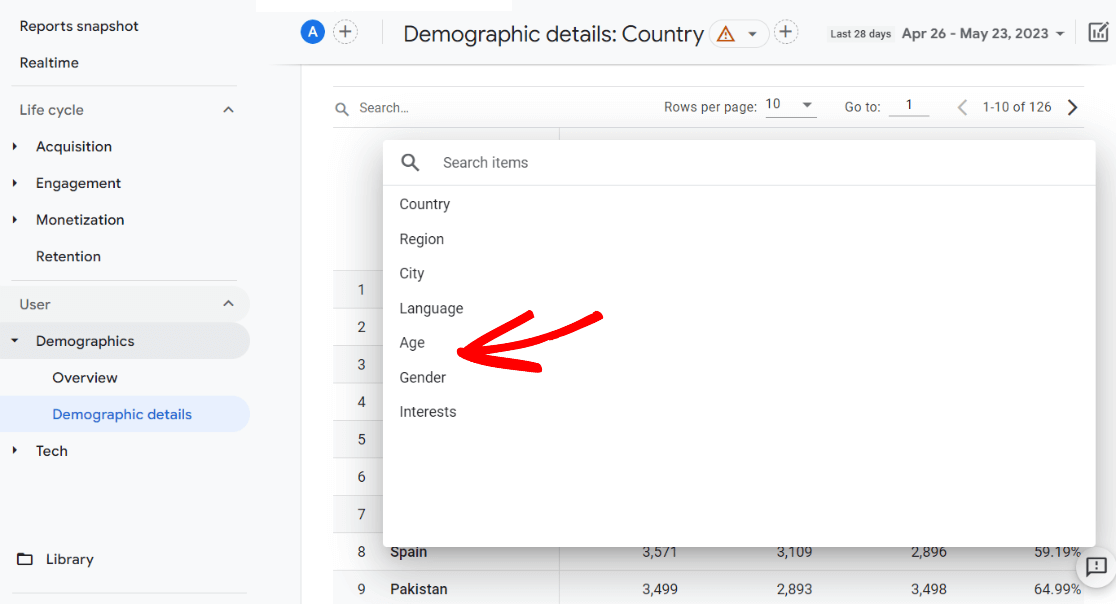
From there, you can choose to view the age or gender report:
If you’re using MonsterInsights, you can quickly see your demographics data inside your WordPress dashboard. Simply go to Insights » Reports » Publishers and view the data.

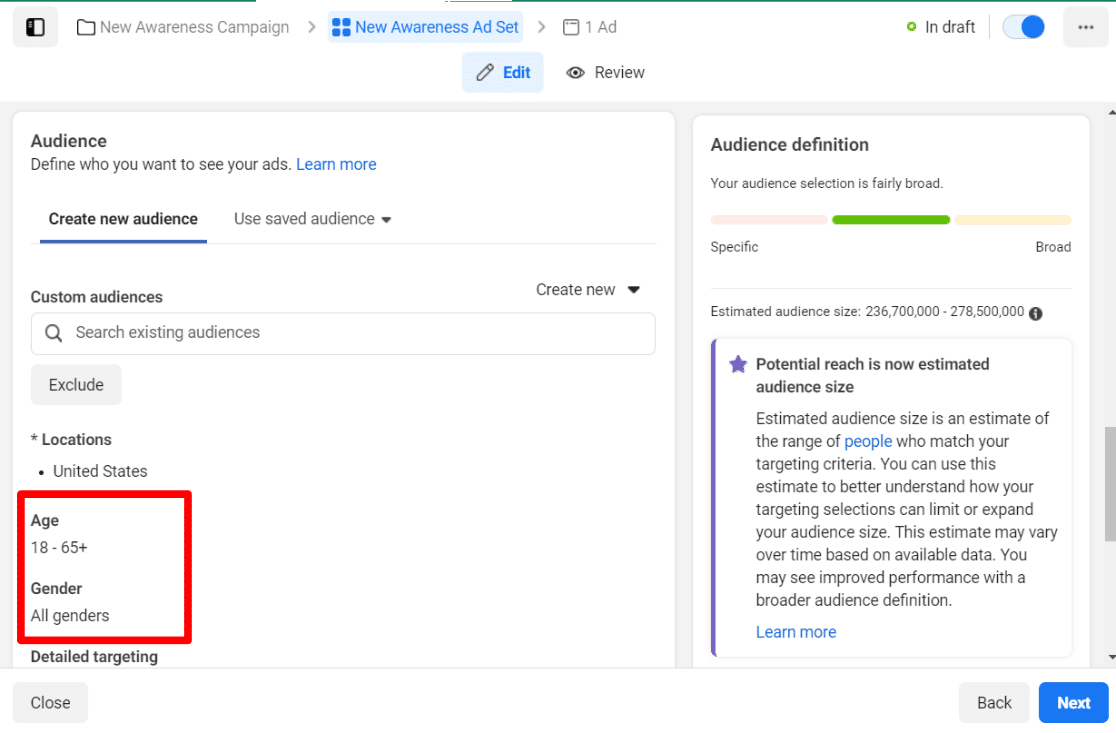
When you have some age and gender data to work with, you can use it to determine which audience to target with your Meta (Facebook) ads. Hone in the age and gender you’re targeting to make your audience smaller and more likely to convert.
To target a specific age range and gender in Meta ads, set them when you’re creating your audience:
2. Use Google Analytics Interests
Besides age and gender, you can also narrow down your target audience based on their interests using Google Analytics.
This is a great opportunity for advertisers who want to target users based on what they’re interested in.
To turn on interest tracking in Google Analytics, make sure to first follow the directions above to turn on Google signals.
Once you’ve turned on Google signals and collected some data, open Google Analytics and navigate to Reports » Demographics » Demographic details:

Then, scroll down to the table and click on Country:

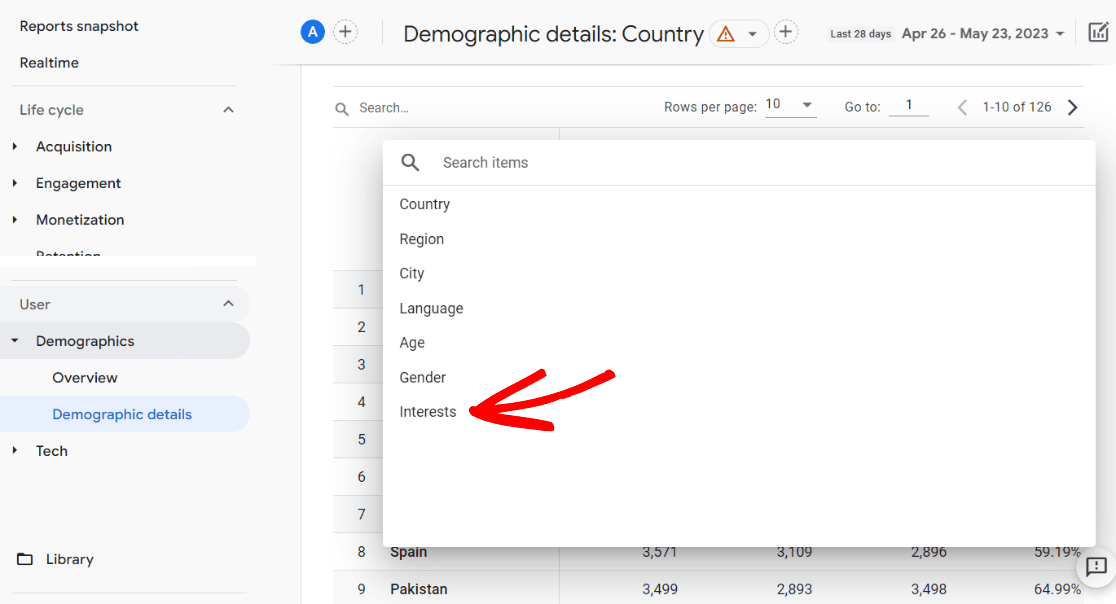
From there, you can choose to view the Interests report:
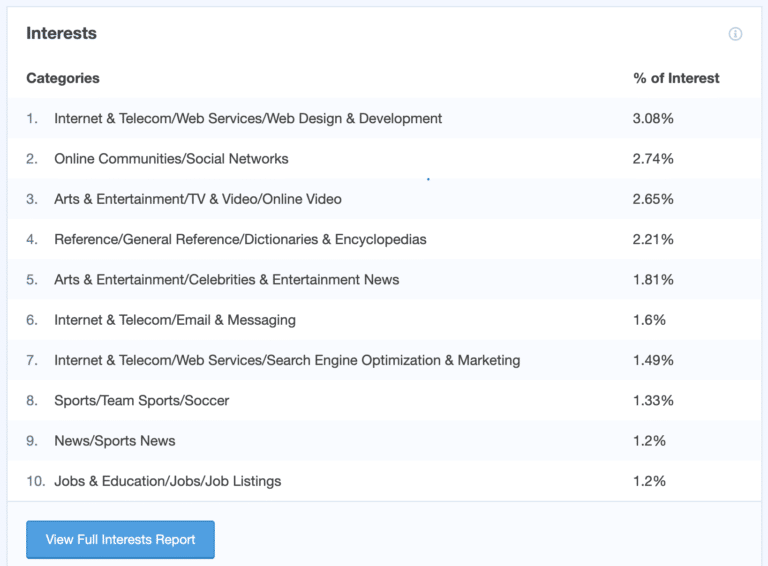
If you’re using MonsterInsights, you can quickly see your interests data inside your WordPress dashboard. Simply go to Insights » Reports » Publishers and scroll down to the Interests report:
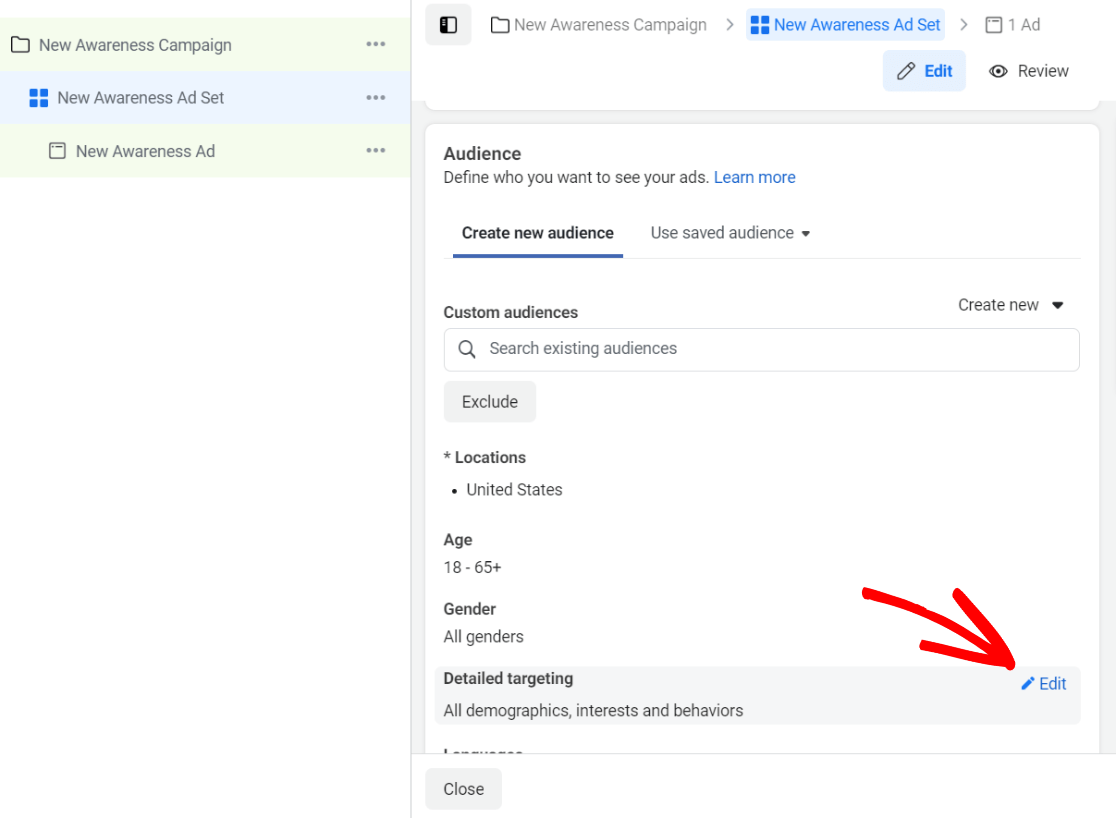
To set up Meta (Facebook) ads using interest data, click on the Edit link in the Detailed targeting section when creating a new audience:
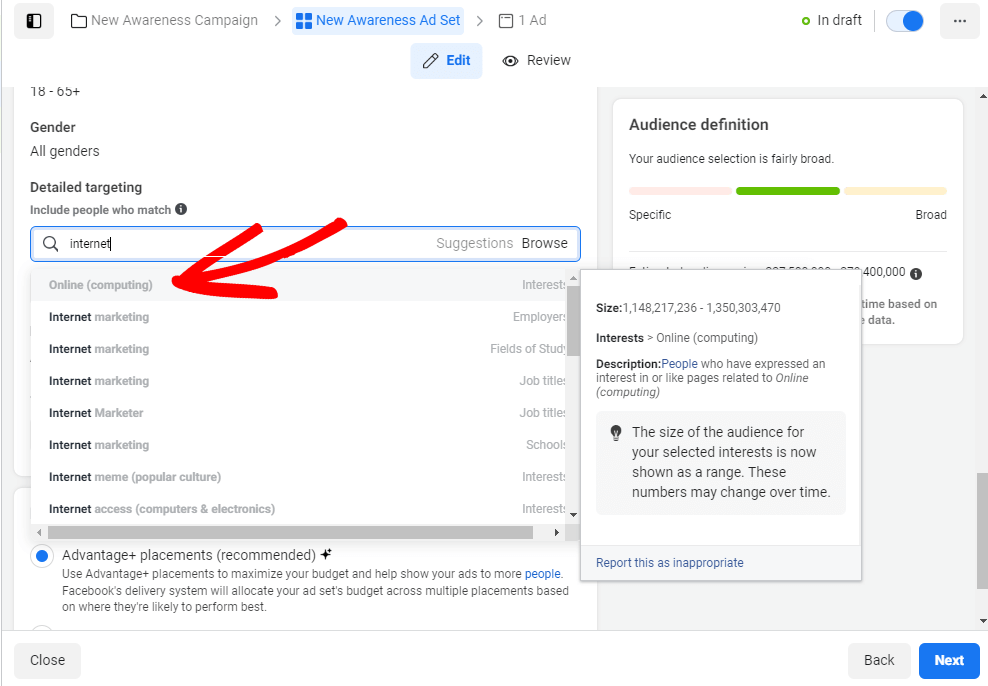
Then, start typing to find interests. In our report above, we saw that our top interests category is Internet & Telecom/Web Services/Web Design & Development. So, we’ll go ahead and add Online (computing) as an interest for our audience:
3. Use Geographic Targeting
Where are most of your users from? To build on that, where are your most engaged users from?
This is something that you can pretty easily find out using Google Analytics!
Open Google Analytics and head to Reports » Demographics » Demographic details:

Then, scroll down to the table. By default, it’ll show you a breakdown of your audience based on which country they’re from. To narrow that down, click the Country dropdown to choose City or Region:
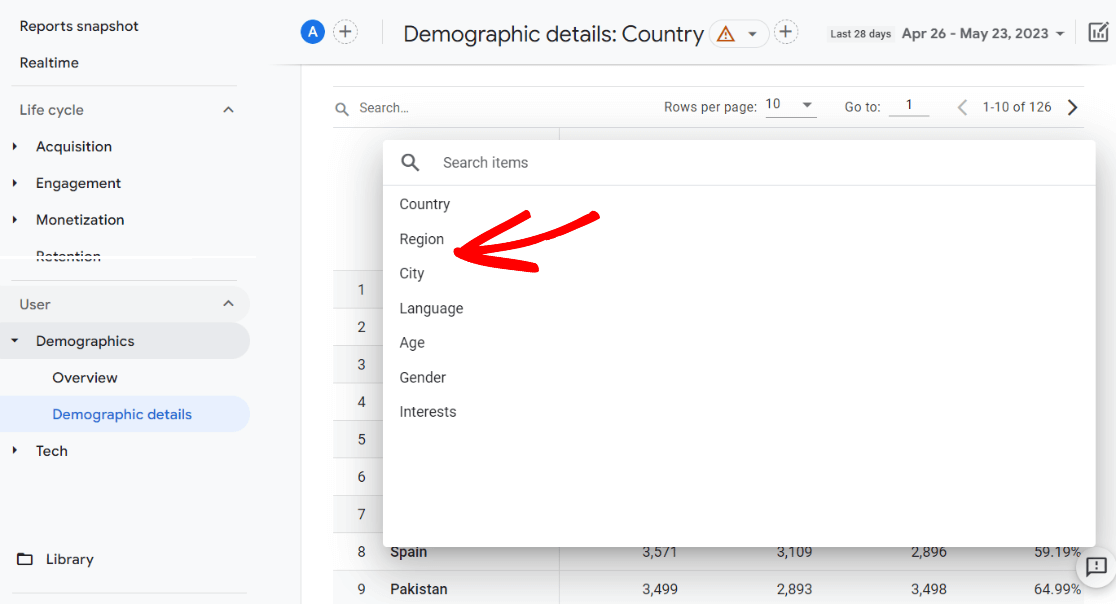
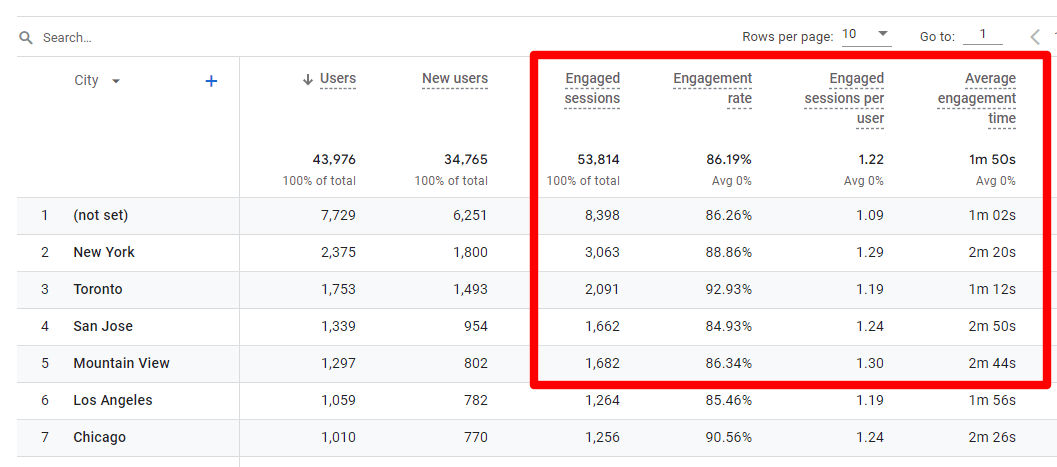
Let’s say you picked to break down your results by City. You can now look in the table to find data like engagement rate and average engagement time on a city-by-city basis to find out which cities your most engaged users are from:
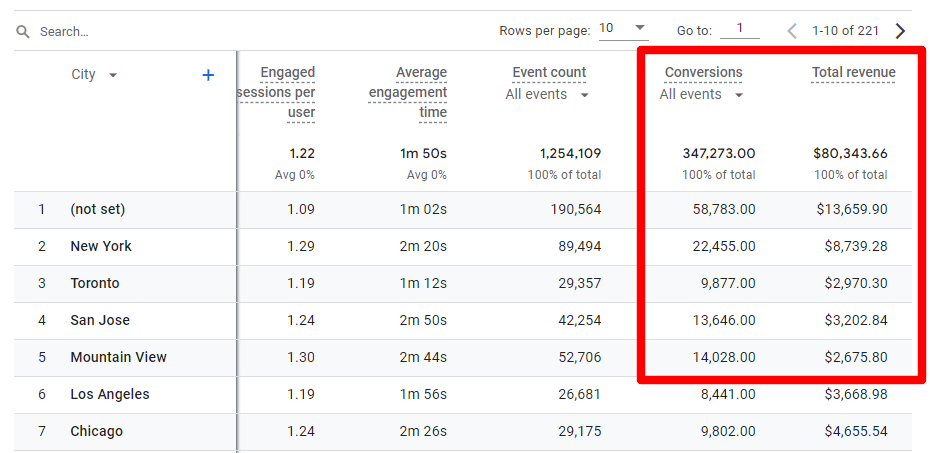
You can also scroll to the right to find out which cities the users are coming from who complete the most conversions or purchases:
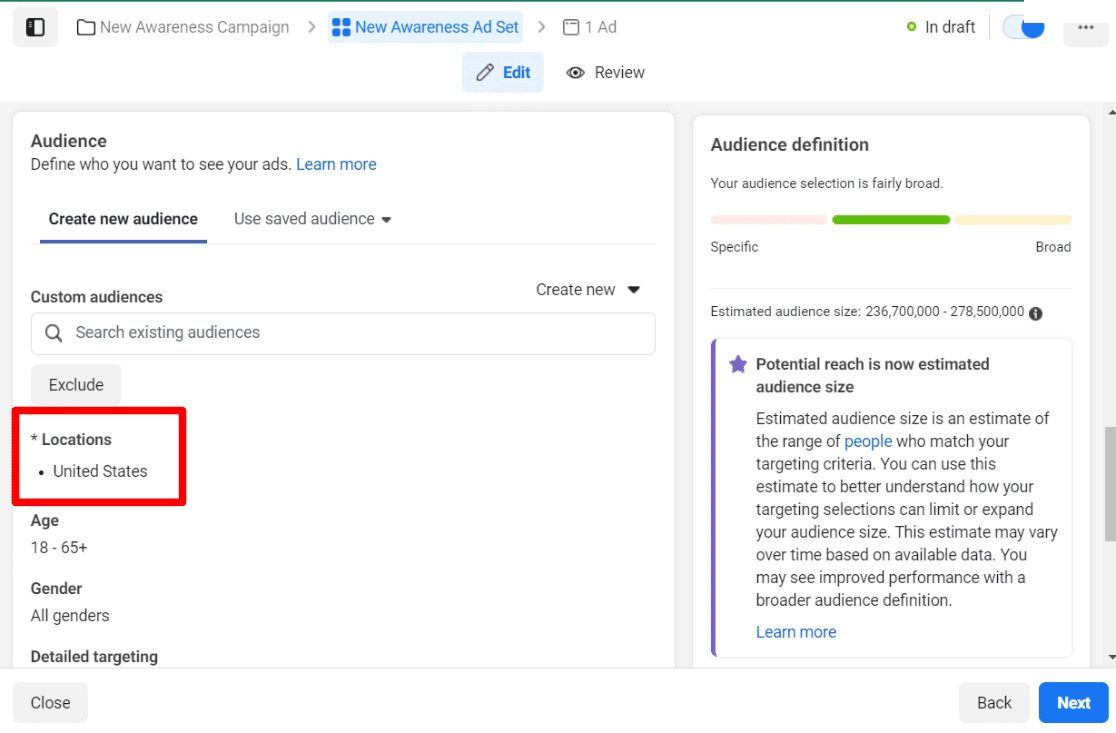
You can then serve your ads to the customers who are located at specific locations you want to target:
Find out more in our guide on how to use geomarketing to enhance your conversions.
Use the Meta (Facebook) Audience Builder
The Facebook audience builder is a great tool that allows you to create super specific, targeted audiences. Really take advantage of all of the audience builder features to refine your Facebook ad targeting!
4. Retain Customers Using Custom Audiences
With custom audiences, you could target people like your email subscribers, people who’ve visited your website, people who’ve made a purchase, and more. Simply choose Customer list or Offline activity to upload a list of emails, and you’ll be able to target them with your ads.
Or, install a Facebook pixel to target those who’ve visited your website (more on this later).
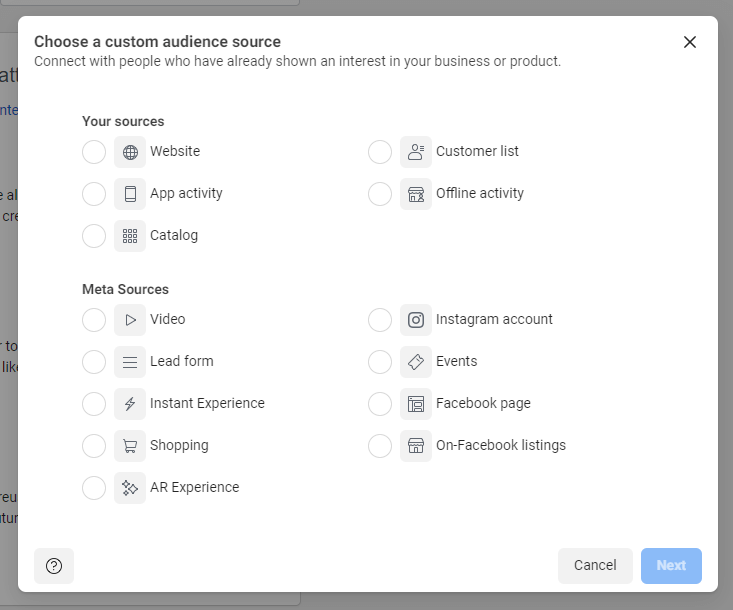
With custom audiences, you can
- Increase repeat purchases
- Re-engage your existing customers who haven’t returned to your site for a while.
- Promote seasonal offers to a specific segment of your user base who have previously interacted with your seasonal offers.
- Let your existing customers know about a recent product launch by showing off your new product.
5. Serve Ads to Your Fans
If you’ve grown an enthusiastic fan base on Facebook, you can serve ads specifically to anyone who’s interacted with your Facebook page.
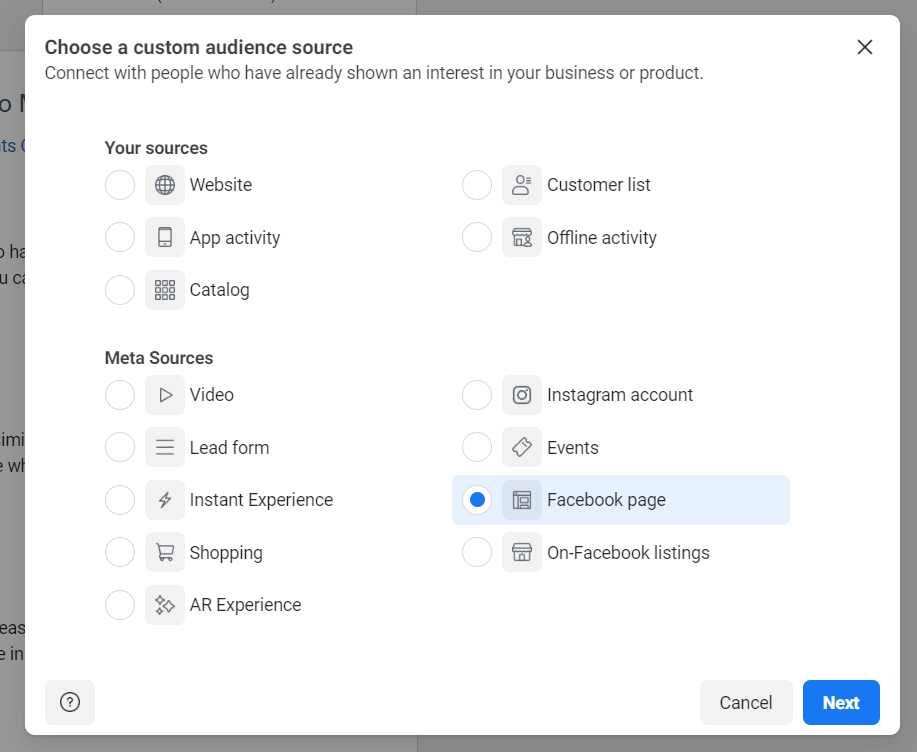
The benefit of targeting only your fans and people who’ve interacted with your page in the past is that they’ve already expressed an interest in your page and your content, making them some of the most qualified users for you to marketing to.
Keep in mind that serving your ads to your fans is only recommended if you’ve grown a loyal fan base. Or else, you’ll waste your advertising budget.
6. Set Exclusions
Now you know that Facebook allows you to specify who you want to target on the platform on a pretty granular level.
Similarly, Facebook ad targeting also allows you to exclude anyone you want from your ad campaign.
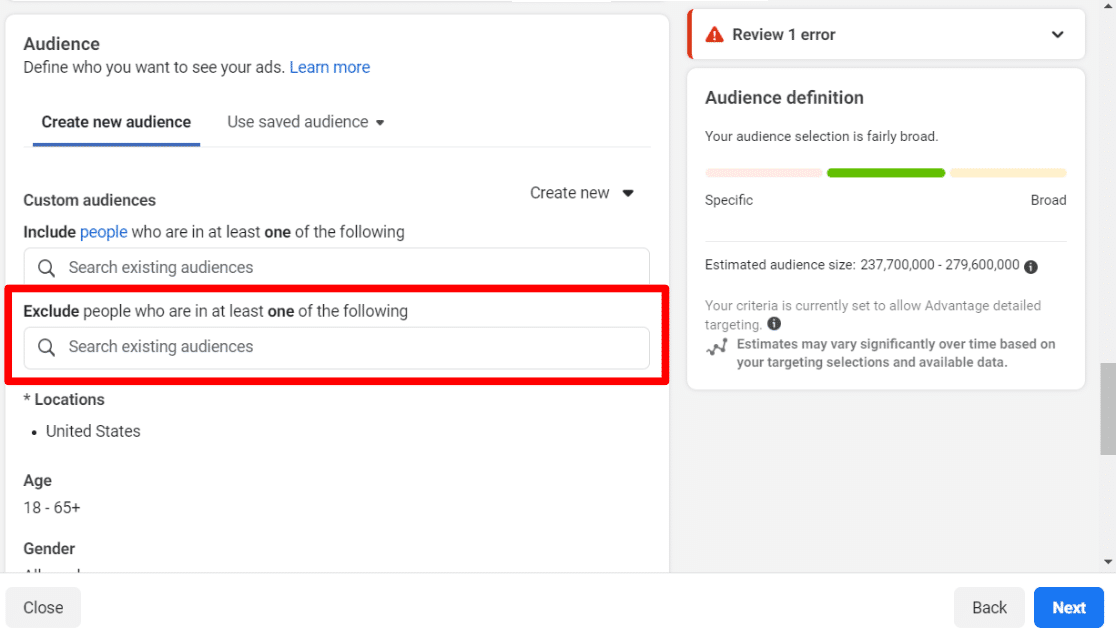
For instance, you can exclude people who have already interacted with your page or people who have made a recent purchase on your site.
This way you can save your advertising budget by not showing your ads to people you don’t want to target.
7. Use Lookalike Audiences
Want to reach a lot of new people? Try a lookalike audience.
A lookalike audience is a group of people who “look like” or have the same characteristics and interests as people who are already engaged with your brand on Facebook. Try it out to reach more people who might be interested in what you’re offering!
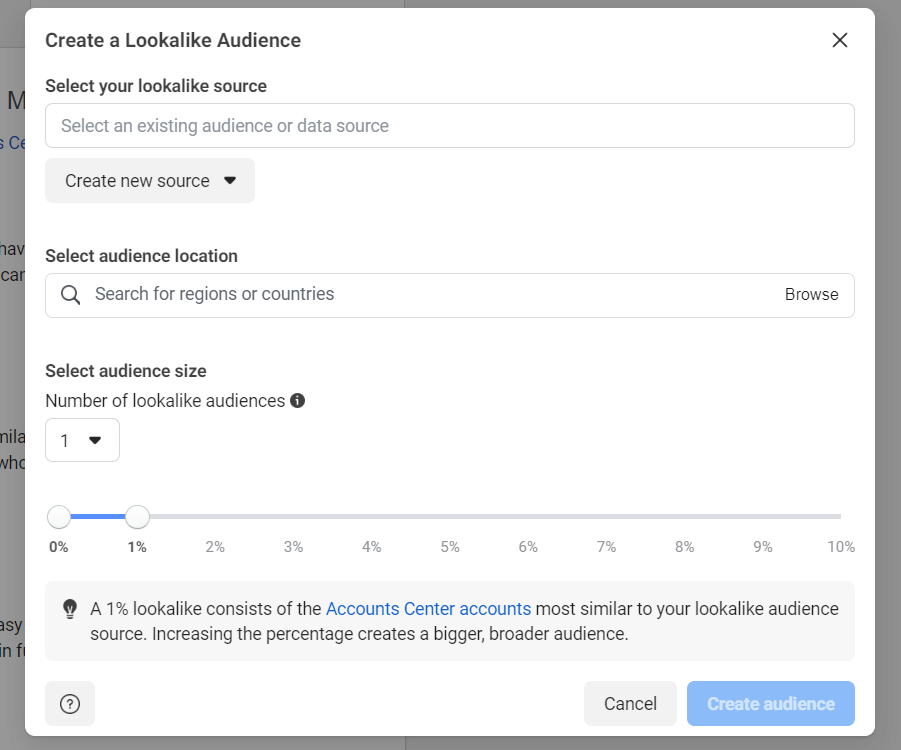
Targeting Tips for Customer Retention
Generally speaking, social media fits in top of the sales funnel, typically in the awareness stage. According to Sprout Social, 55% of consumers learn about new brands on social!
With the right strategy, you can not only reach those new consumers on social media, but also use it to retain your existing customer base. Let’s take a look at a few useful ad targeting tips for customer retention.
8. Add a Remarketing Pixel
On average, it takes 3 to 4 visits to your website for your visitors to actually think of purchasing from you. Remarketing to your potential customers on Facebook is the best way to persuade them to revisit and make a purchase on your site.
Remarketing allows you to target your potential customers on Facebook who have already shown an interest in your offer by visiting your website. To target your recent website visitors on Facebook, you’ll need to add a remarketing pixel on your site.
It simply attaches a cookie to your visitors’ browser that enables you to retarget them when they are on Facebook through a custom ad.
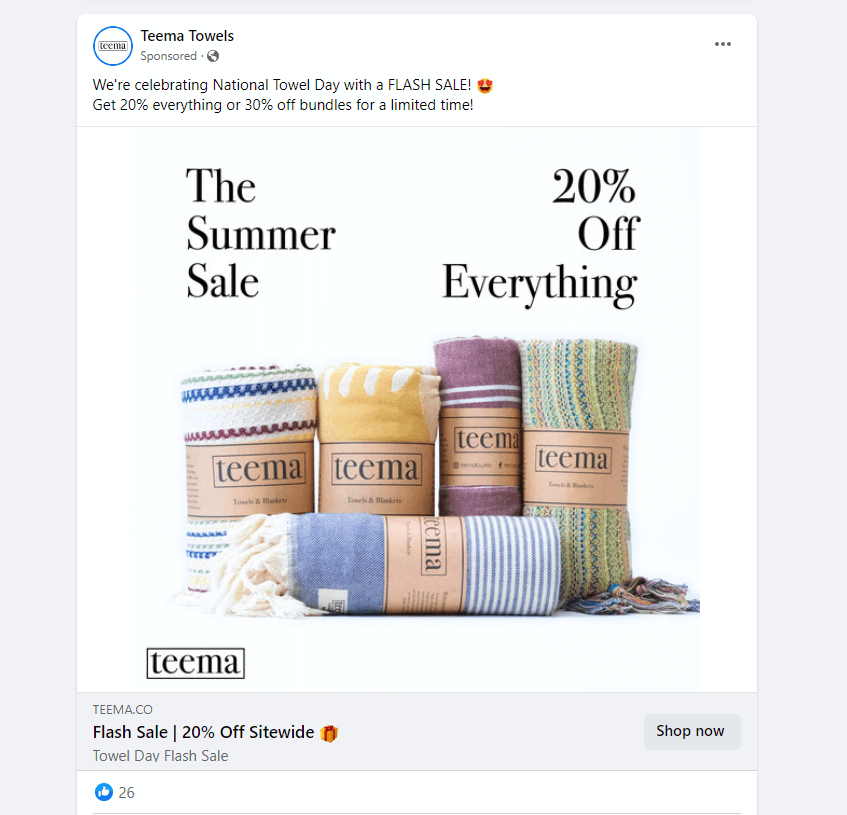
To boost clicks and drive conversions, a common strategy is to offer a special discount to entice purchases. You can also remind them of their recent activity and encourage completing an action with a custom ad.
Have a WordPress website? Install MonsterInsights now to quickly and easily install your Facebook pixel:

8. Boost Posts that Have Done Well Already
Using the boost post feature is the quickest, easiest way to drive traffic to your website from Facebook.
The key is to find your highest performing blog posts on Facebook and spend your advertising budget only to boost those blog posts. Chances are these posts will continue to perform well with the right targeting options, leading to increasing the engagement rate of your ad.
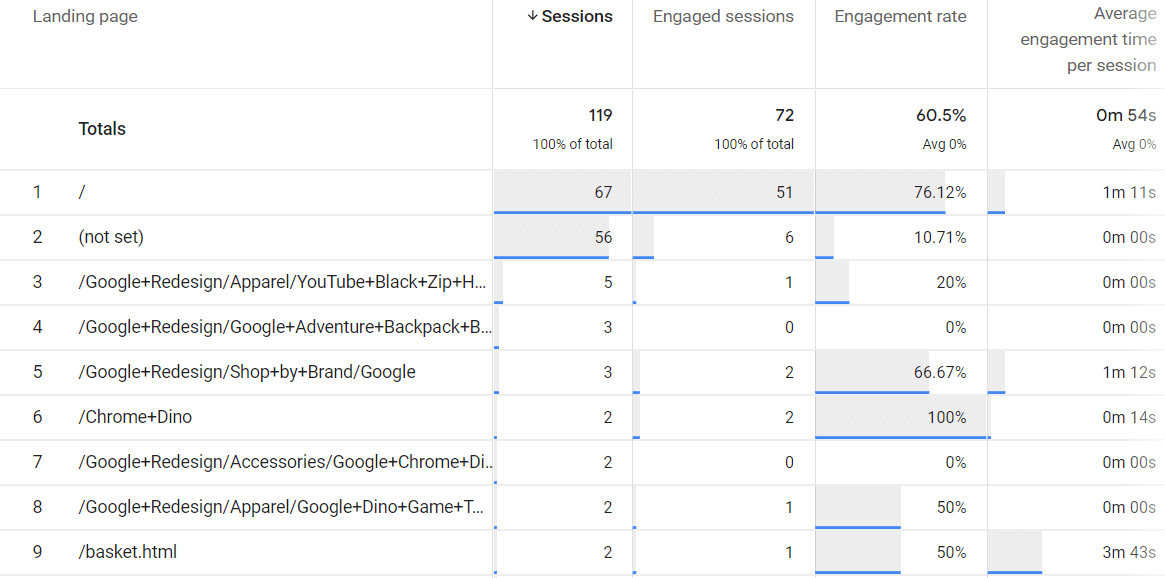
To find what works best with your Facebook audience, you’ll want to look at which pages on your website people are landing on from Facebook, and whether those people are completing any conversions or spending a lot of time engaging with your content.
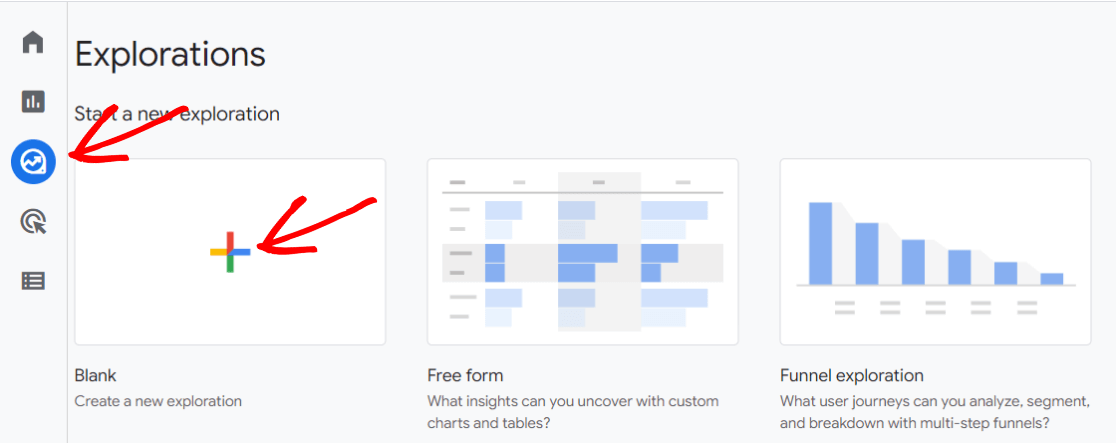
First, open GA4 and navigate to the Explore tab. Click to create a Blank report:
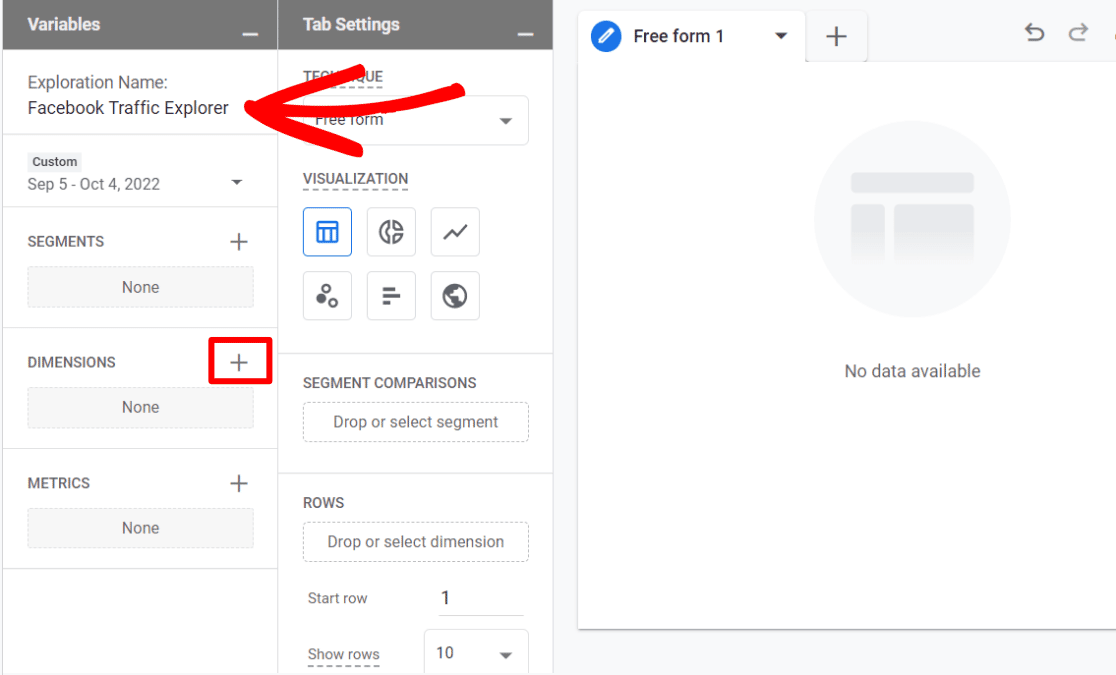
Now, name your report something meaningful, then click the plus sign in the Dimensions area:
On the selection screen that comes up, search for, select and import the Session source and Landing page dimensions:

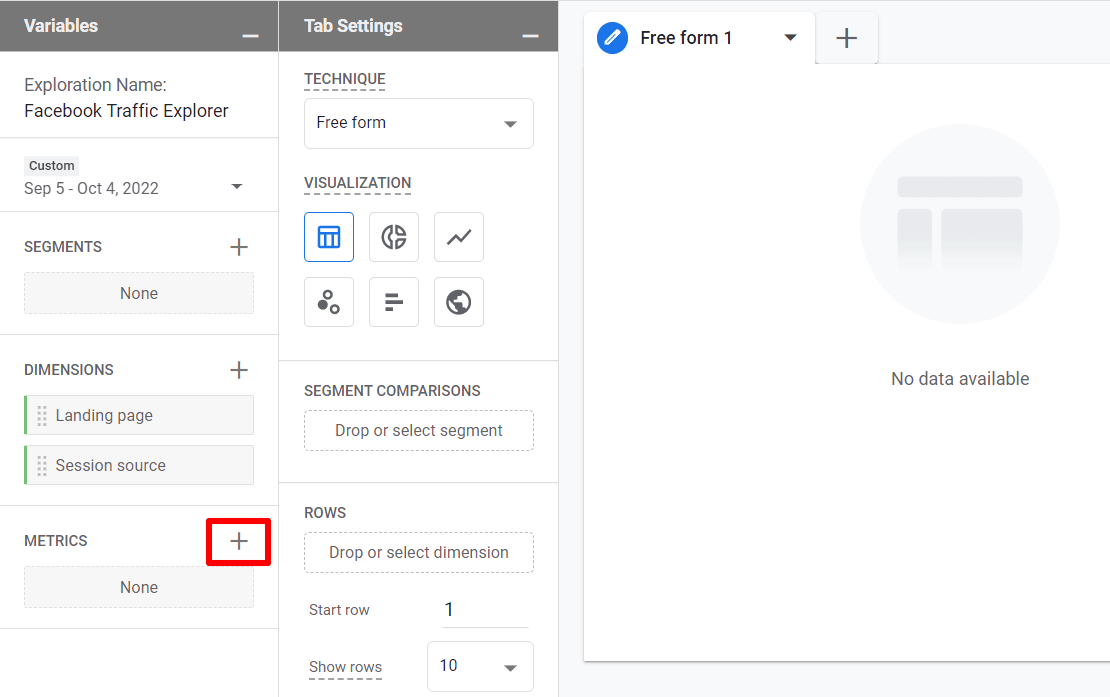
Now, click the plus sign in the Metrics area:
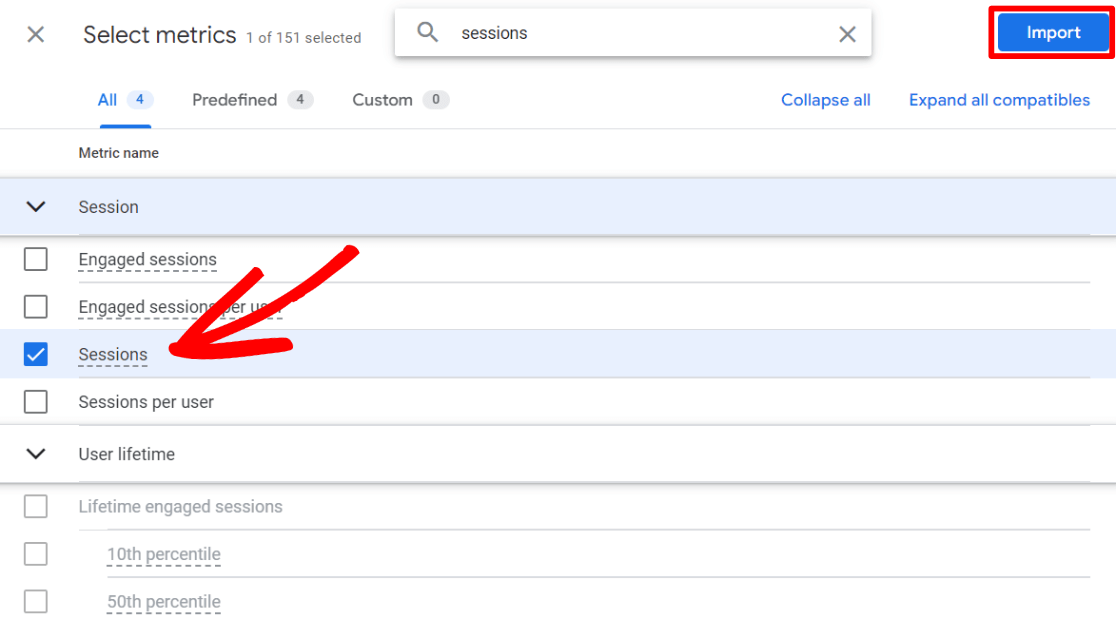
Search for, select and import all of the following metrics:
- Sessions
- Engaged sessions
- Engagement rate
- Average engagement time per session
- Conversions
- Revenue (optional – for eCommerce stores)
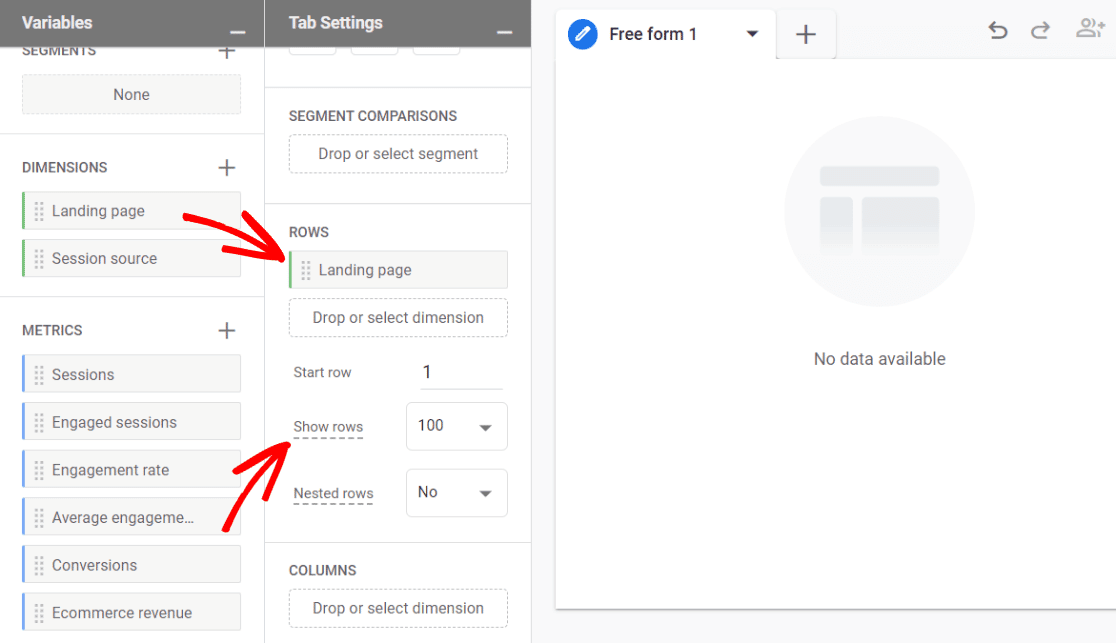
Next, click and drag the Landing page metric over into the Rows box. At this step, you can also use the Show rows dropdown to make your report show you more than the top 10 results:
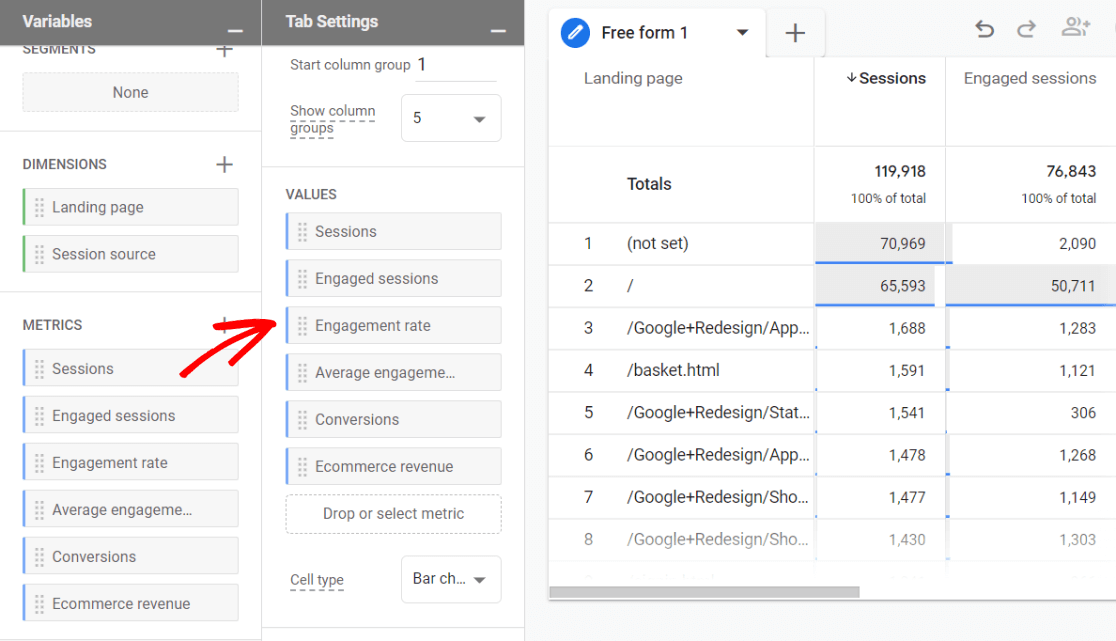
Then, click and drag all of your Metrics over into the Values box:
Finally, click and drag Session source down into the Filters box. In the dropdown, choose contains and then type in facebook, then click Apply:
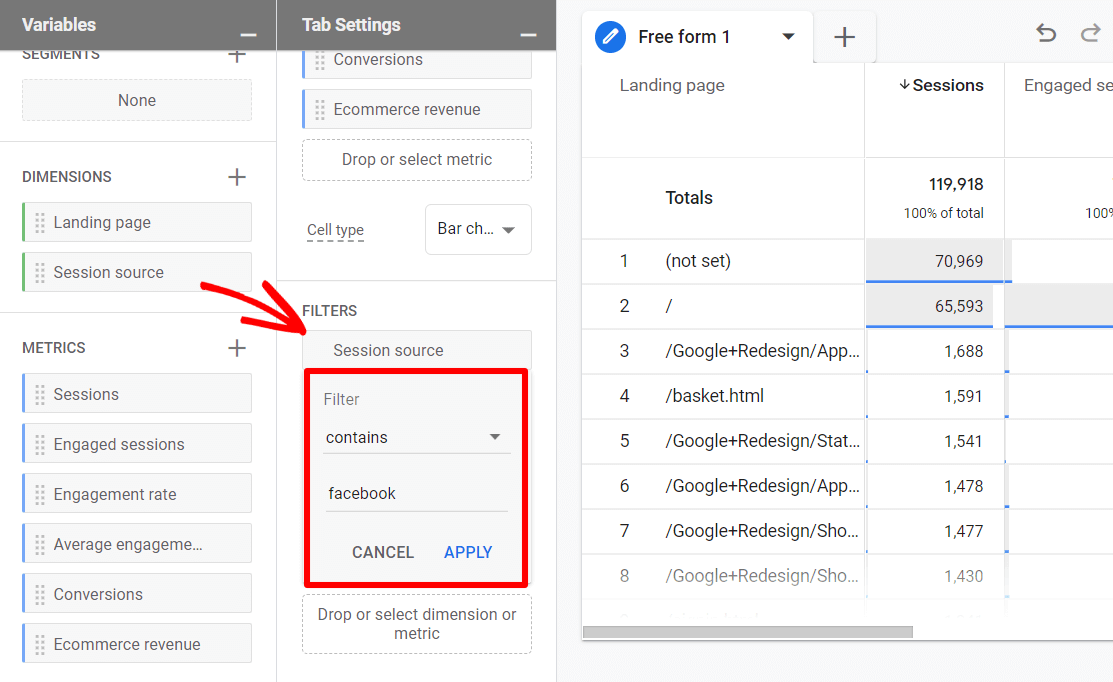
That’s it! You now have a pretty comprehensive report about which pages your Facebook traffic is landing on. Boost the posts to the landing page that’s performing the best!
That’s it!
We hope these Facebook ad targeting tips will help you to boost conversions.
Before you get started with your next ad campaign, make sure to properly set up Facebook ads tracking in Google Analytics.
And don’t forget to follow us on Twitter, Facebook and YouTube for more helpful Google Analytics tips.
Thanks, It really helped. I am definitely gonna use these ideas that you shared above.