Is your WordPress site about to undergo updates, upgrades, or maintenance? If so, you should enable WordPress maintenance mode to temporarily hide most of your site from public view while you work on it behind the scenes.
While your site is hidden from view, you need some way to tell visitors what’s going on: a maintenance mode page.
A well-designed maintenance mode page informs visitors about the planned downtime, sets expectations, and even builds anticipation for your site’s return. In this post, we’ll explore the key points about putting WordPress in maintenance mode, and we’ll walk you step-by-step through how to easily turn on maintenance mode using SeedProd.
What to Include on a Maintenance Mode Page
A well-designed maintenance mode page goes beyond just informing visitors that your site is down for maintenance. It’s also an opportunity to build anticipation for your relaunch, maintain a positive brand image, and maybe even work on building your email list.
Here’s a breakdown of the key elements to consider when creating your SeedProd maintenance mode page:
Clear and Concise Messaging
Headline: Start with a clear and concise headline that informs visitors the site is currently undergoing maintenance. Avoid technical jargon and think about making it fun. For example, “We’re Making Things Even Better!” or “We’re Under Construction – Exciting Updates Coming Soon!”
Explanation: Briefly explain the reason for the downtime. Is it for scheduled maintenance, a new site design, or the addition of exciting new features? Let visitors know what they can expect once the site is back online.
Estimated Timeline: Manage expectations by providing a realistic timeframe for when the site will be back up and running. Be honest and avoid setting unrealistic expectations. If the timeframe is uncertain, you can use phrases like “We’ll be back soon!”
Optional Contact Information
If it’s possible that visitors come to your site looking for a way to contact you, including a contact email address or form can help your downtime go smoothly. This demonstrates your commitment to addressing visitor needs at all times.
Branding Elements
Don’t let your site go dark completely! Maintain brand recognition by incorporating your logo and using a color scheme that reflects your website’s overall design. This reinforces brand familiarity and creates a sense of continuity.
Engaging Extras
Countdown Timer: Visually represent the remaining downtime with a countdown timer. This creates a sense of anticipation and lets visitors know when they can expect to see the new and improved site.
Social Media Links: Direct visitors to your social media profiles to keep them engaged during your downtime. Share teasers about the upcoming changes or use the opportunity to run a social media contest.
Email Signup Form: Capture leads by offering visitors the chance to sign up for your email list. This allows you to keep them informed about the site’s relaunch and future updates.
By incorporating these elements, you can transform your maintenance mode page from a simple notification into a valuable communication tool.
What’s the Best Maintenance Mode WordPress Plugin?
While WordPress doesn’t have a built-in maintenance mode feature, you can easily add this functionality using a plugin. We recommend SeedProd, the best landing page and full theme builder for WordPress.
SeedProd’s user-friendly interface makes it easy to create a visually appealing and informative maintenance landing page that keeps your visitors engaged during website downtime.
With SeedProd, you can quickly create professional:
- Maintenance mode pages
- Coming soon pages with countdown timers
- Custom 404 error pages
- Standalone landing pages
- Entire WordPress custom themes
- And more
Unlike basic maintenance mode plugins that only let you turn the feature on or off, SeedProd provides extensive control and customization options, including:
- Access controls to hide your entire site, specific pages, or all pages except the ones you specify
- Ability to grant maintenance mode bypass access to authorized users via secret URL, IP address, or WordPress user role
- Simple domain mapping to show landing pages for additional domains without configuring WordPress for each
Now that you understand the benefits, let’s walk through the process of enabling WordPress maintenance mode using SeedProd.
Tutorial: How to Turn On WordPress Maintenance Mode
Step 1: Install and Activate the SeedProd Plugin
For this tutorial, we’ll be using SeedProd Pro.
You can use the free version of SeedProd, SeedProd Lite, for a basic maintenance mode page. However, if you want any of the advanced blocks, including a countdown timer, contact form, optin form, social profile and sharing links, and more, you’ll need a license. Get a SeedProd license starting at just $39.50/year!
To get started, install and activate the SeedProd plugin on your WordPress site.
If you need detailed instructions, here’s our step-by-step guide to installing a WordPress plugin. After it’s installed, don’t forget to activate it.
Then, you’ll need to enter the plugin license key on the welcome page. Enter the license key you’ve copied from earlier via your account on SeedProd’s website and click the Verify Key button.

After the license key is verified, scroll further down the page and click on the Create Your First Page button.
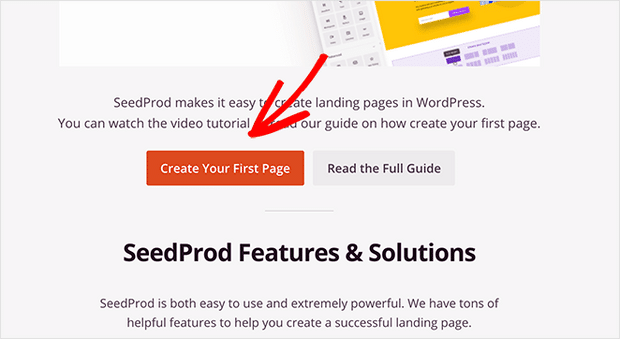
After clicking the button, you’ll be redirected to the SeedProd dashboard where you can start to create a new maintenance mode page.
Step 2: Create a Maintenance Mode Page with SeedProd
On the SeedProd dashboard, you’ll see 5 different pages you can create. At the top of the page, you’ll see options for coming soon mode, maintenance mode, login page, and 404 page. Click on the Set up a Maintenance Mode Page button:
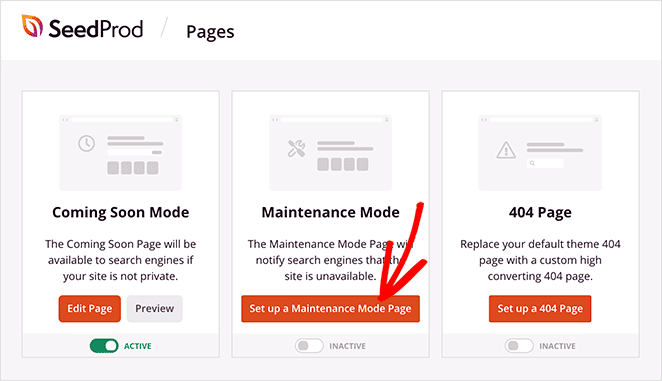
Then, choose from SeedProd’s wide selection of professionally designed maintenance mode templates to get started.
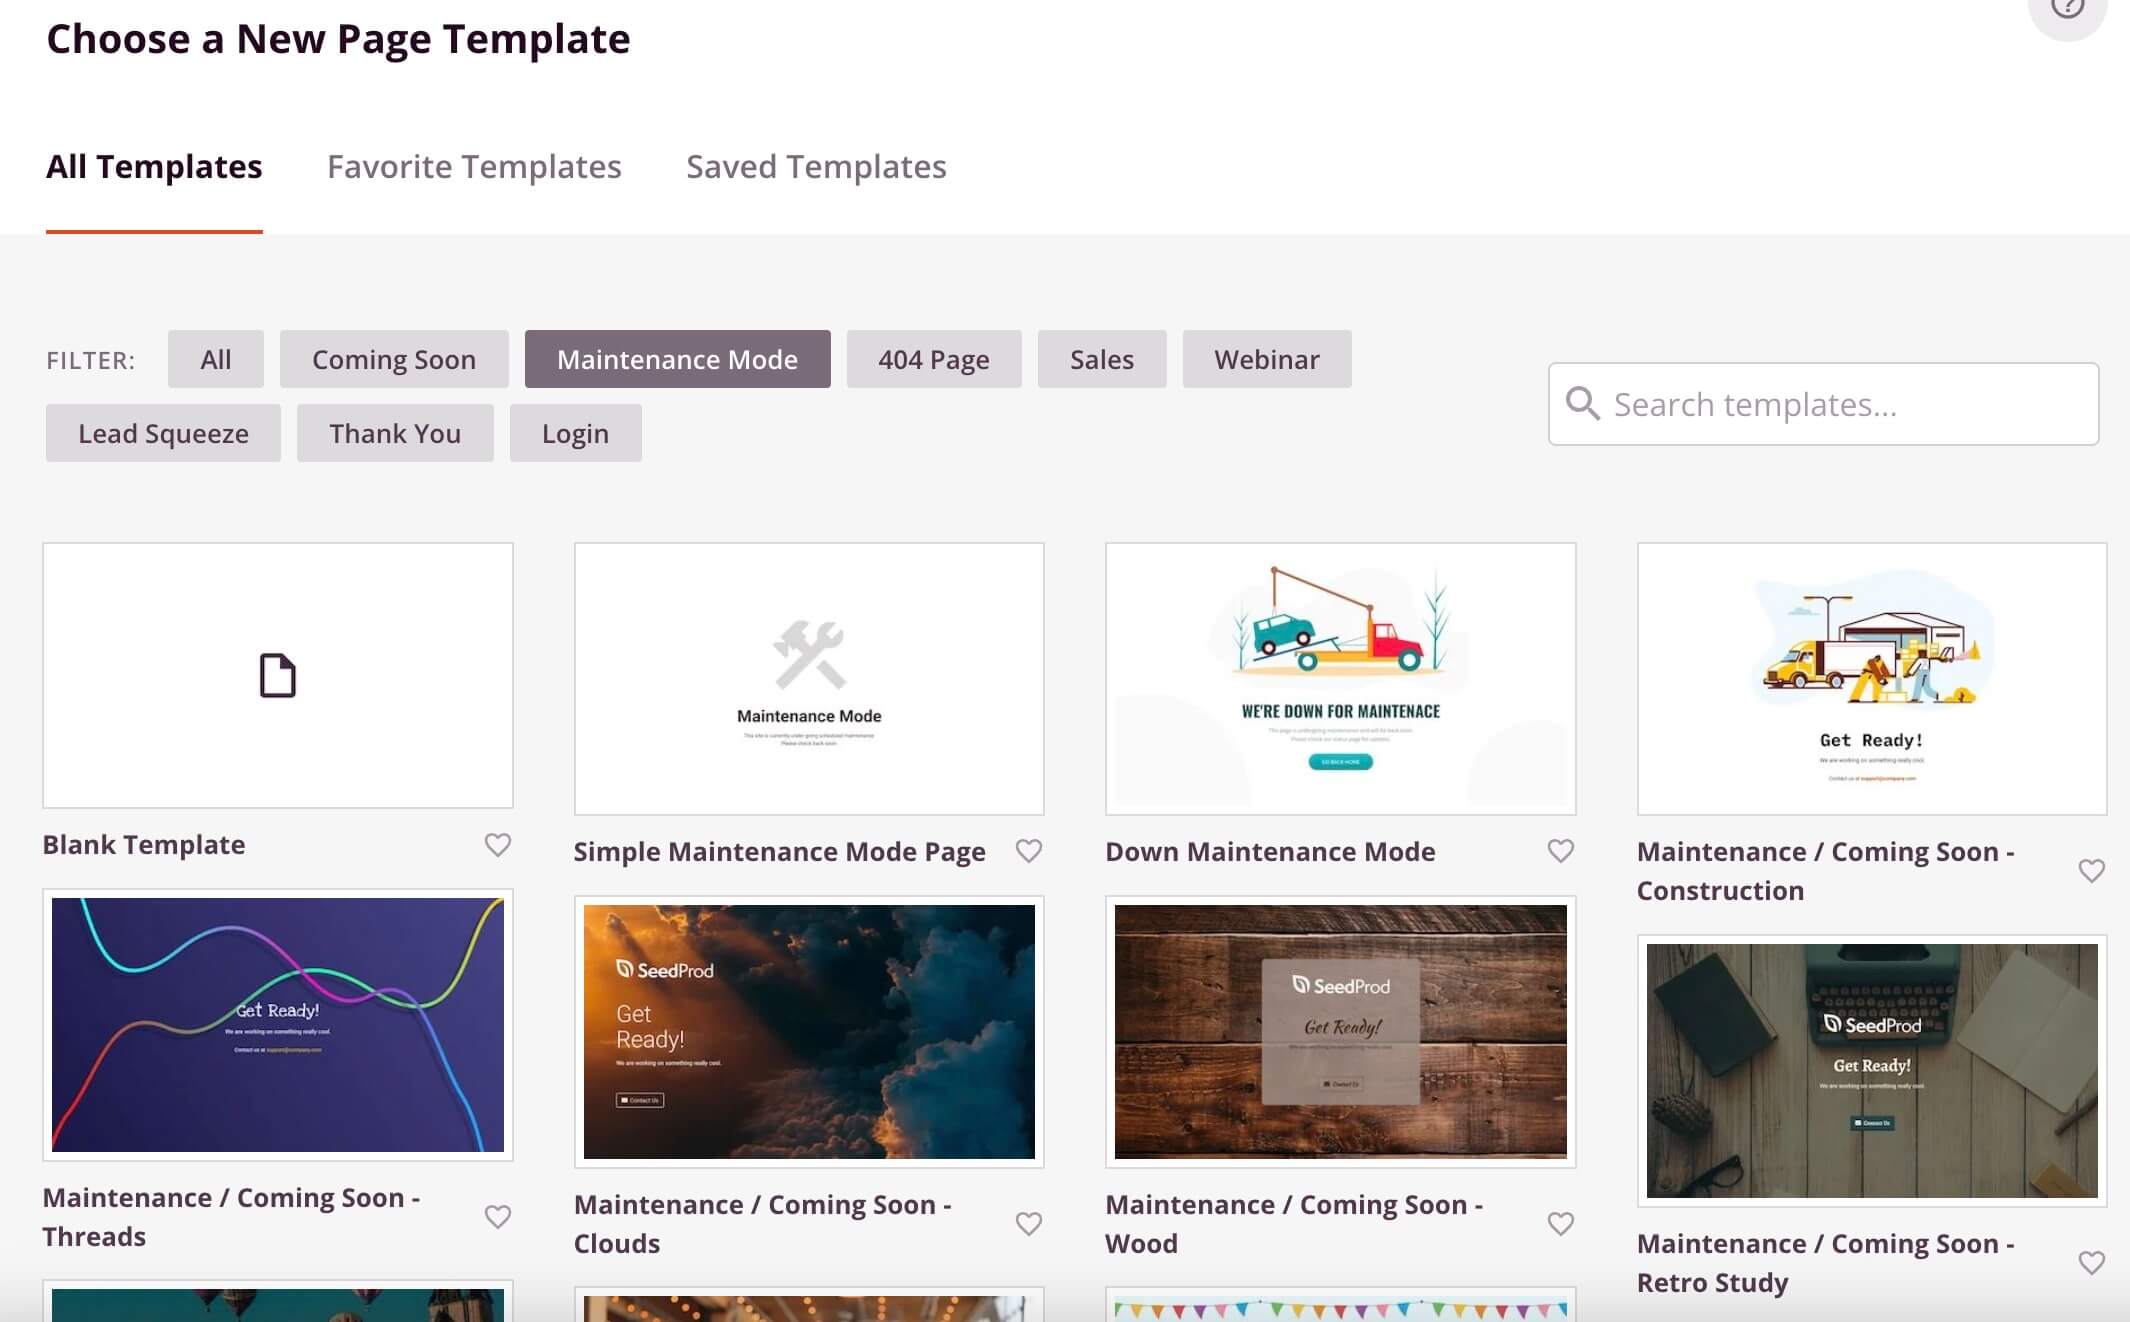
Want to start from scratch? Choose the Blank Template option.
Step 3: Customize Your Maintenance Mode Page Design
After selecting a template, it will open in SeedProd’s visual drag-and-drop page builder.
Here, you can fully customize your page without writing any code.
Some key customization options include:
- Resizing and styling header text and images
- Adding elements like buttons, countdown timers, videos, and more
- Connecting to your email marketing service to collect newsletter signups
To edit a block that’s already in the design, simply click on it and customize it in the panel that appears on the left side of your screen. Don’t forget to click the green Save button once in a while as you go.
To add new blocks, click and drag them over to your page:
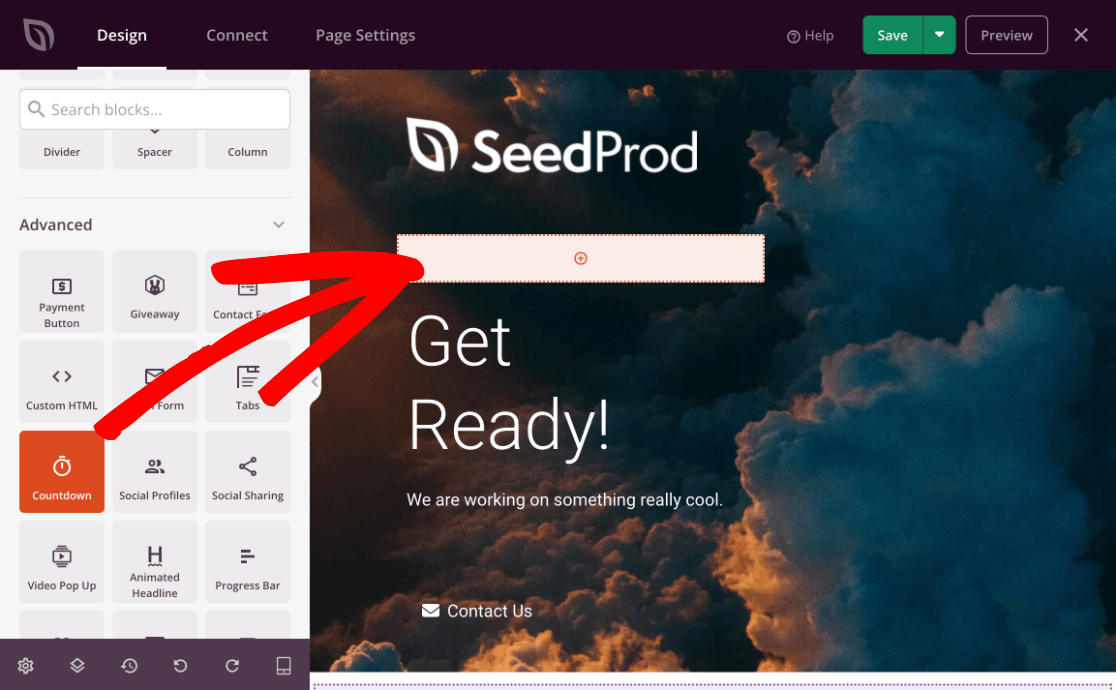
In order to optimize your page and take advantage of your website’s time in maintenance mode, I highly recommend adding a form to your page.
Already have a contact form built you’d like to use? SeedProd integrates directly with WPForms, or use the Shortcodes block to embed a form from another forms plugin.
Or, use SeedProd’s built-in Optin Form block to let visitors sign up for your email list. Simply drag and drop it onto your page:
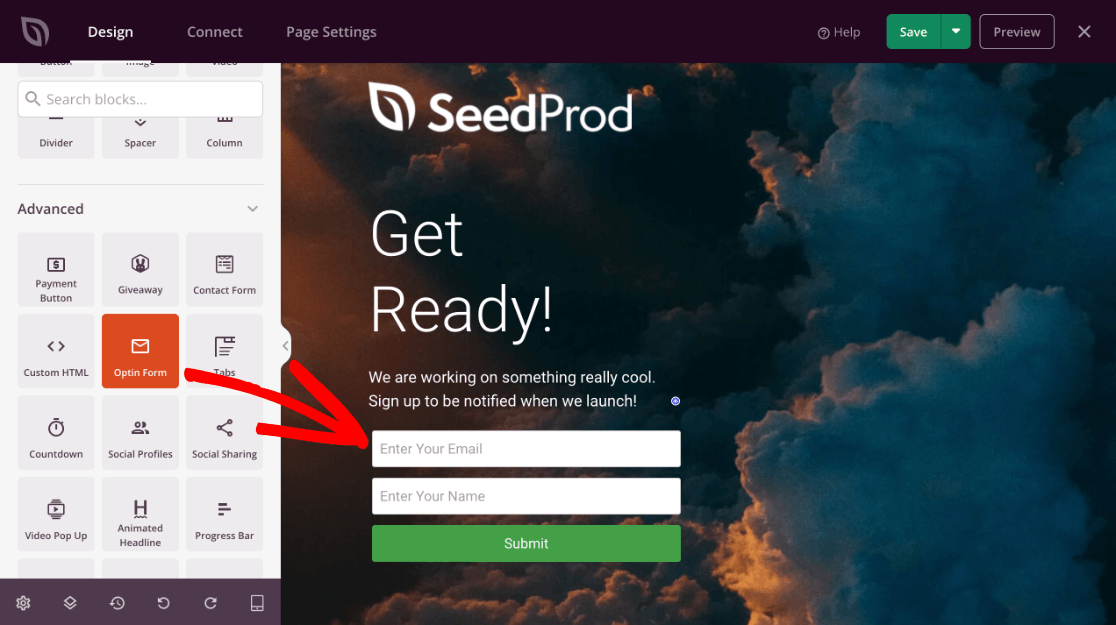
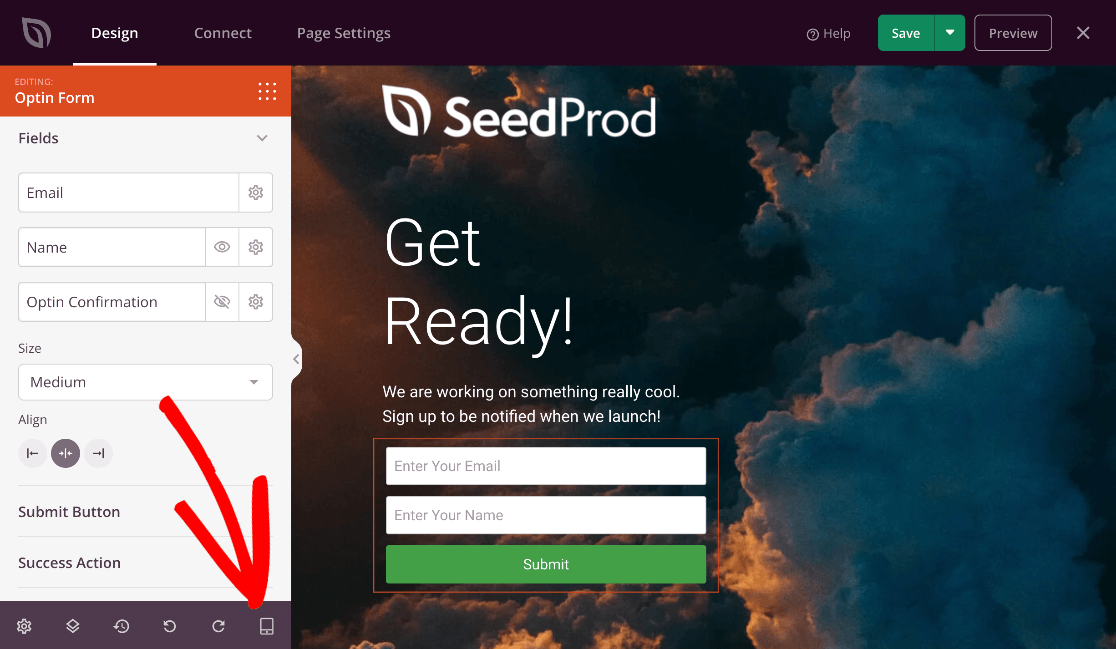
Then, you’ll be able to customize the form fields, submit button, what happens when the form is submitted, and more using the edit panel:
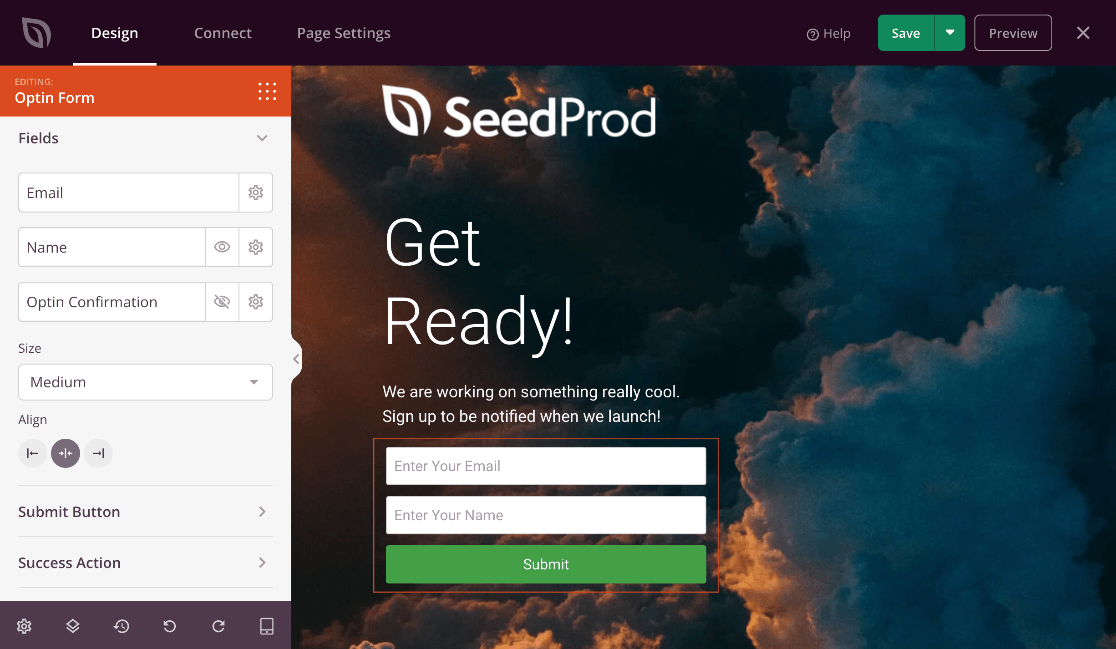
If you add a form to your page and you have an email marketing provider you’d like those email addresses to flow into, head to the Connect tab, choose your service provider, and follow the instructions to connect:
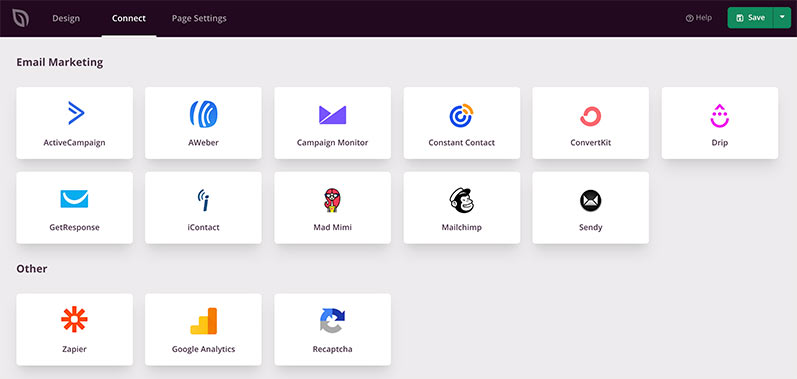
Once your design is ready and your email marketing is connected, head back to the Design tab to make sure your site looks great across all devices. To preview your design on tablets and mobile phones, toggle the device type tab:
Now that your page is designed, it’s time to set up your page settings.
Step 4: Configure Your Maintenance Mode Settings
Click the Page Settings tab to configure your maintenance mode access and visibility preferences, SEO preferences, and more.
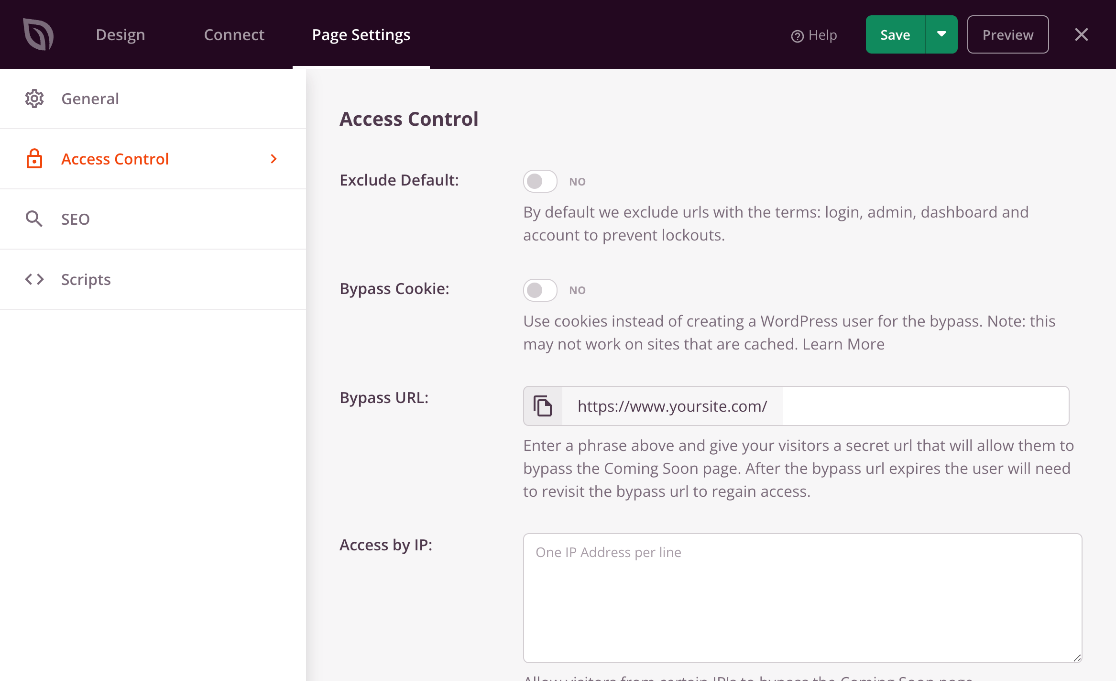
Some key settings here you’ll want to make sure you configure include:
- Page Title: Displays in the browser tab
- SEO Settings: Customize SEO title and meta description
- Access Controls: Use bypass links, IP address limits, or WordPress user roles to allow select users to view the regular site
- Include/Exclude URLs: Activate maintenance mode on your entire site, just the homepage, specific pages, or all pages except the ones you specify
Review and adjust the settings as needed. Then click Save to store them.
Step 5: Activate Maintenance Mode on Your WordPress Site
You’re ready to make your maintenance mode page live!
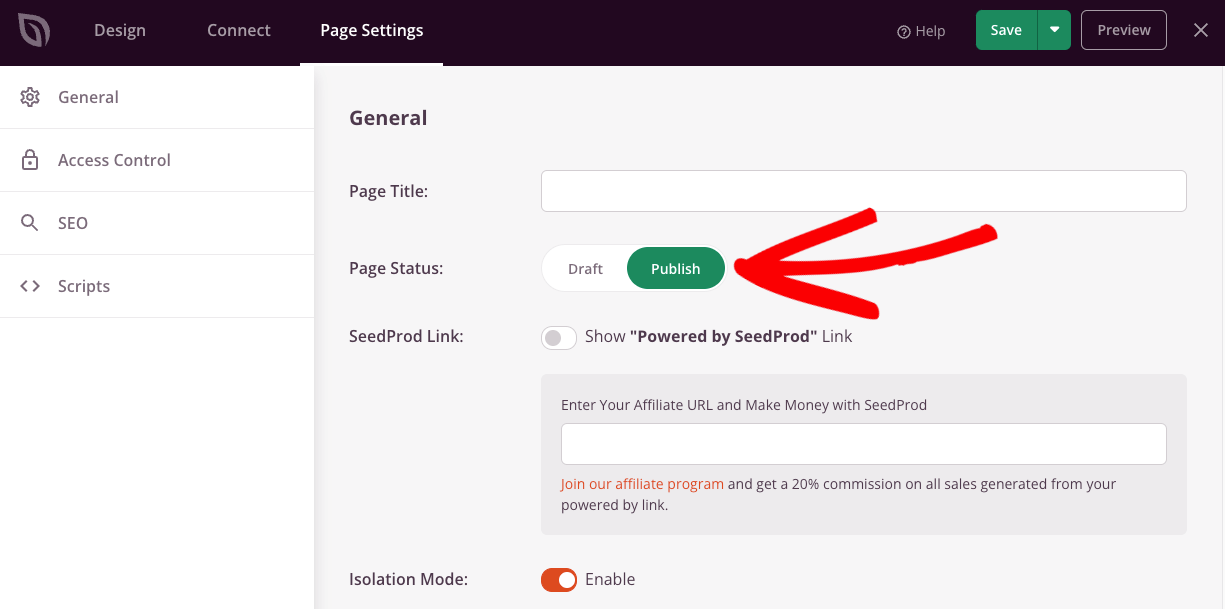
First, in the Page Settings » General tab, make sure your Page Status is toggled to Publish:
Click the Save button one more time, then click the X in the corner:
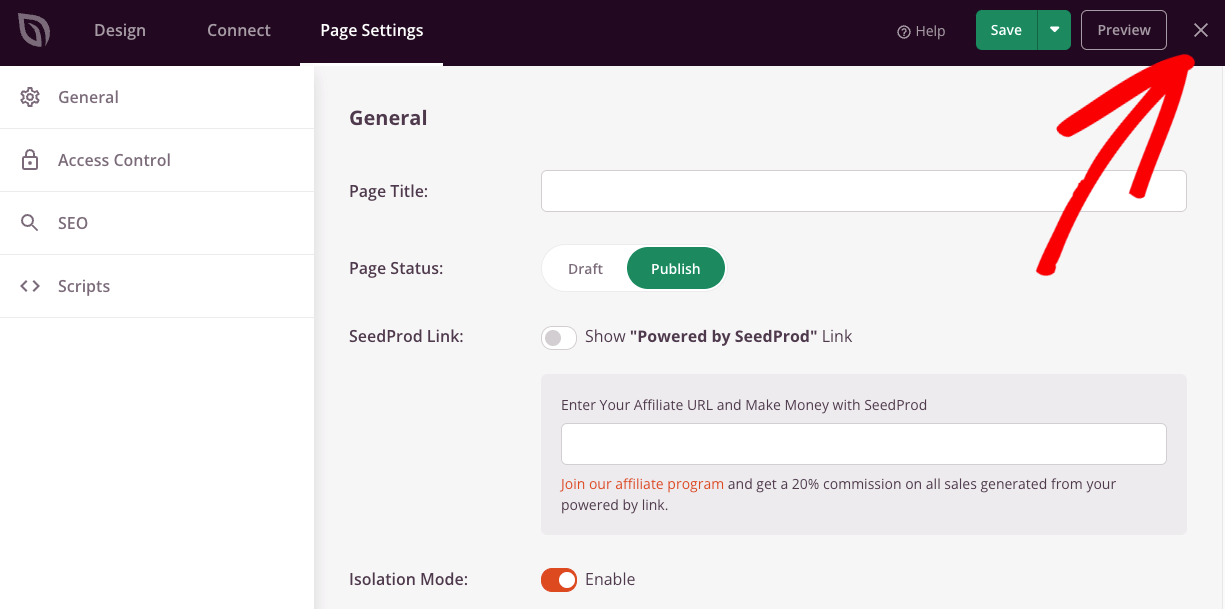
A popup will ask if you’d like to activate maintenance mode now. If you’re ready, click Yes. If not, click No.
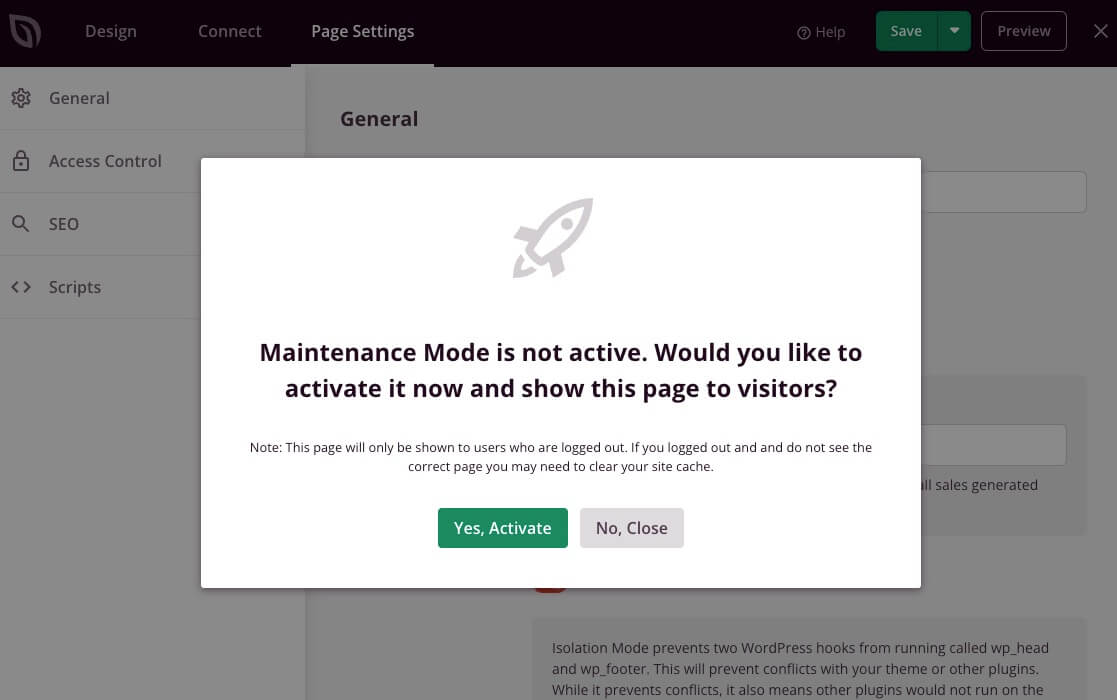
If you chose No, here’s how to activate maintenance mode when you’re ready.
In the WordPress dashboard, go to SeedProd » Landing Pages. Click the switch to change the status to Active:
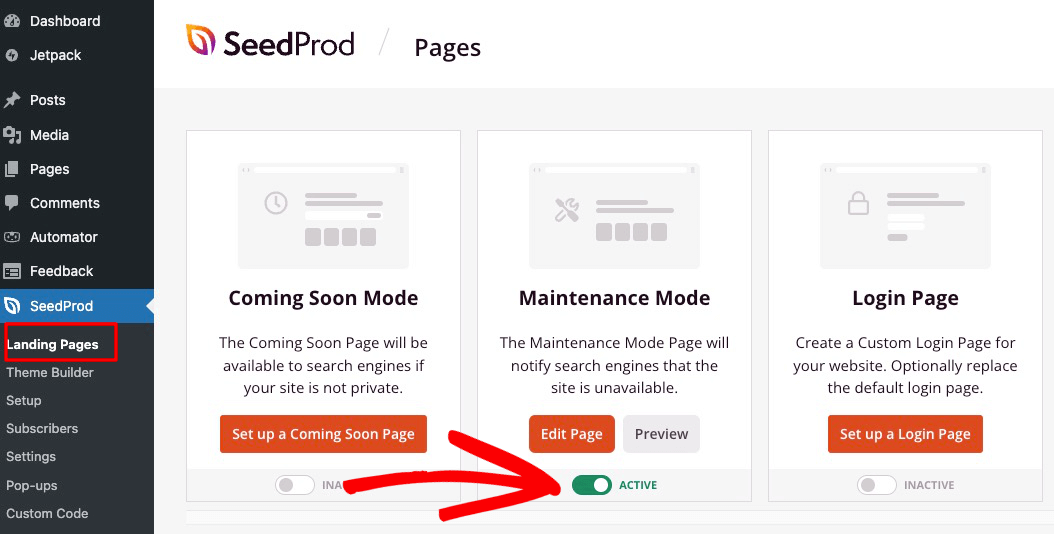
That’s it! You’ve now successfully enabled maintenance mode on your WordPress site.
How to Track WordPress Visits in Maintenance Mode
Want to know how many users are visiting your maintenance mode page? To track visitors on your website in maintenance mode, you’ll need a Google Analytics plugin.
MonsterInsights
MonsterInsights is the best Google Analytics plugin for WordPress. It installs Google Analytics on your site in just a couple of clicks, tracks all of your most important metrics, and shows you your data in easy-to-read reports right inside your WordPress dashboard.
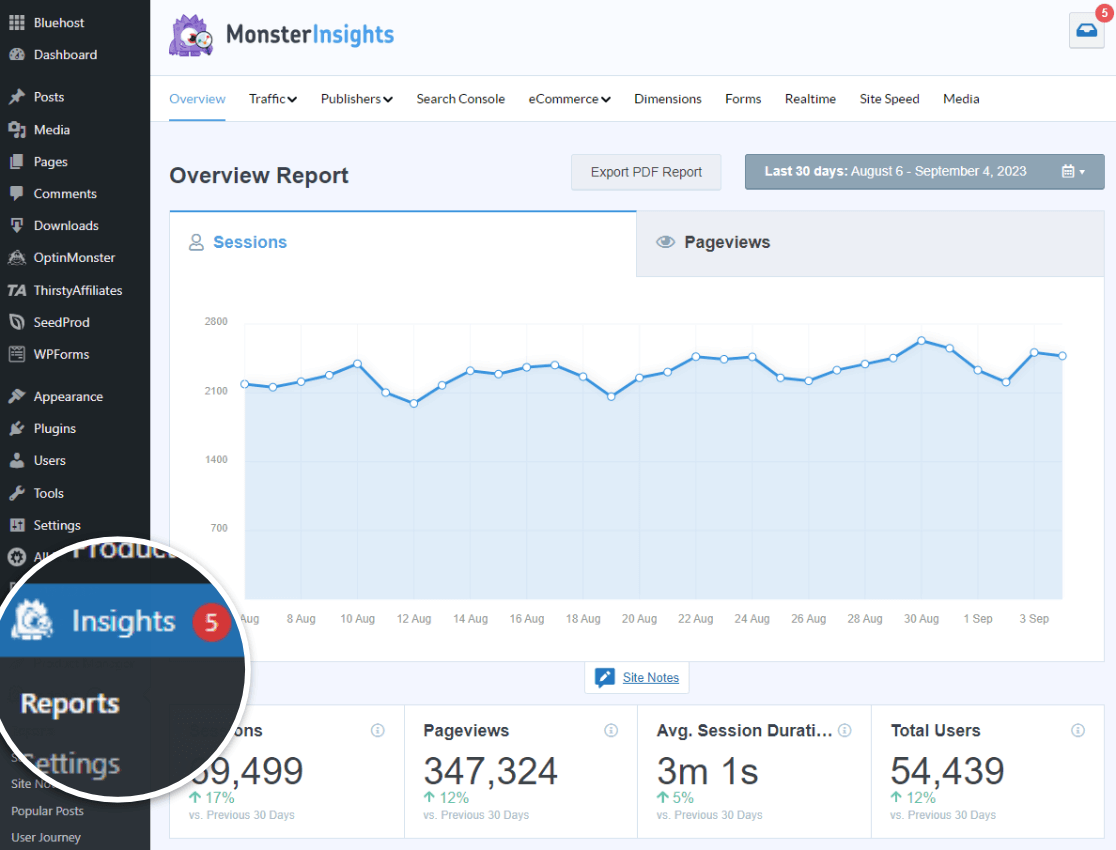
MonsterInsights tracking goes beyond what you get in Google Analytics alone. Just a few of the features and reports you get include:
- Form submission tracking (yes, even the form on your SeedProd maintenance mode page!)
- eCommerce tracking
- Campaigns report
- Author tracking
- PPC ad conversion tracking
- Media (video) tracking
- And more
To use MonsterInsights for maintenance mode page tracking, you’ll first need to install and set up MonsterInsights. For a full tutorial on that, check out How to Add Google Analytics to WordPress the Right Way.
Then, in your maintenance mode Page Settings tab, make sure that Isolation Mode is switched OFF. This makes it possible for MonsterInsights to track your page.
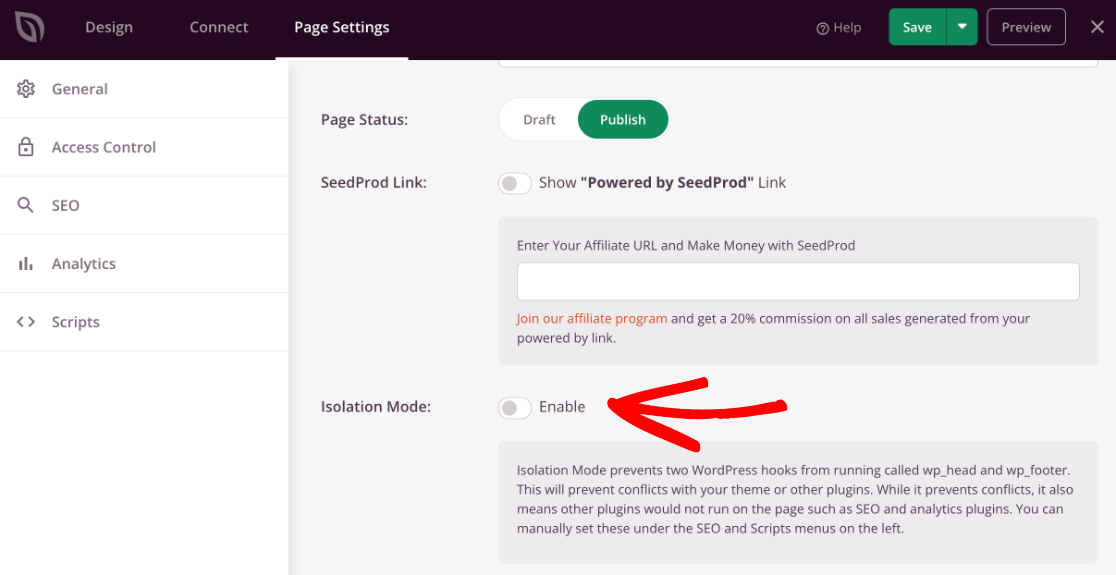
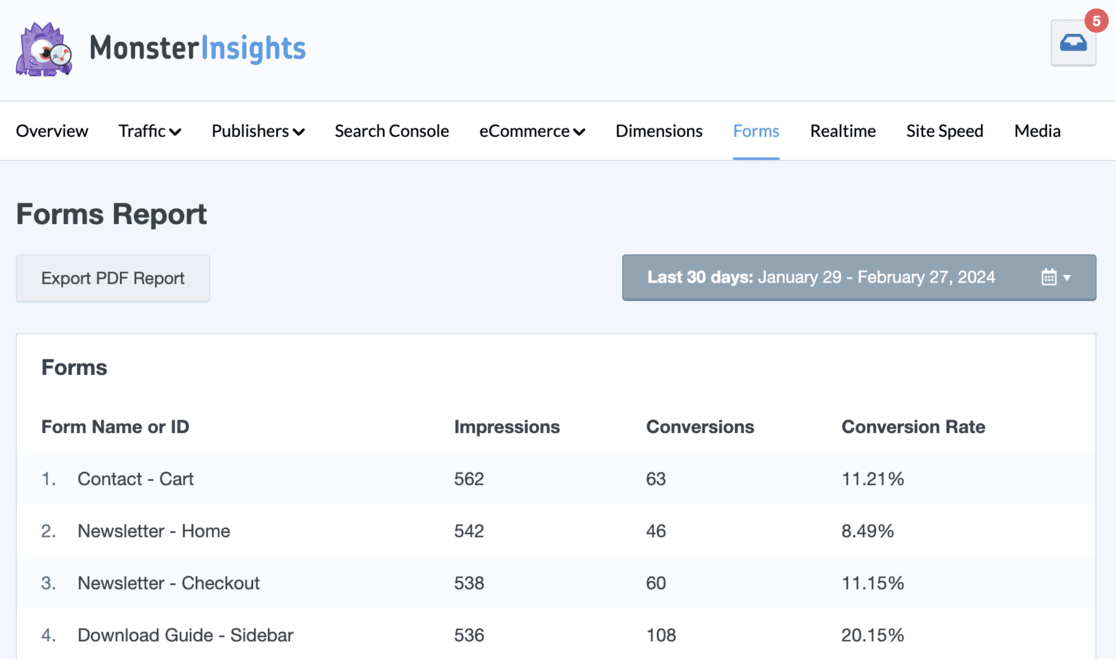
That’s it! Your page is now being tracked. If you have a form on your page and you grabbed MonsterInsights Pro, you’ll also see form submissions in your Forms report:
That’s it!
We hope you enjoyed our tutorial on putting your website in Maintenance Mode. You might also want to check out:
How to Create a Landing Page in WordPress (Step by Step)
10 Best WordPress Popup Plugins
WordPress SEO Checklist: 17 Simple Steps
Not a user of MonsterInsights yet? Get started today!
Finally, don’t forget to follow us on X, Facebook, and YouTube for more helpful SEO, website, and Google Analytics tips.
