If you’re using WPForms, setting up WPForms Google Analytics tracking is an essential step for finding out how your forms are performing.
Google Analytics is the most powerful website analytics tool, and it allows you to track nearly every piece of data for your website. However, advanced tracking options, including forms conversions, are more complex and can be overwhelming to try to track, especially if you’re not an Analytics expert.
Luckily, there’s a really easy way to set it up with a couple of clicks!
In this article, I’ll show you how to set up WPForms Google Analytics tracking in the most beginner-friendly way possible.
In this article:
Why set up WPForms Google Analytics tracking?
If you’re reading this article, you’ve probably already discovered how important it is to set up form tracking in Google Analytics. It can tell you a lot of things about how your visitors are using your website!
Tracking your WPForms in Google Analytics can tell you things like:
- Which forms your users are filling out the most
- How many times your forms are seen vs. how often they’re filled out (conversion rate)
- Which pages users were on when they filled out your forms
- How the users who filled out your forms found your site
When you know how your forms are performing and more information about the visitors who filled them out, you can improve them (and the pages they’re on) to get more conversions and increase your leads or revenue.
WPForms Google Analytics Tracking Tutorial
The easiest, fastest way to set up WPForms tracking in Google Analytics is with MonsterInsights.
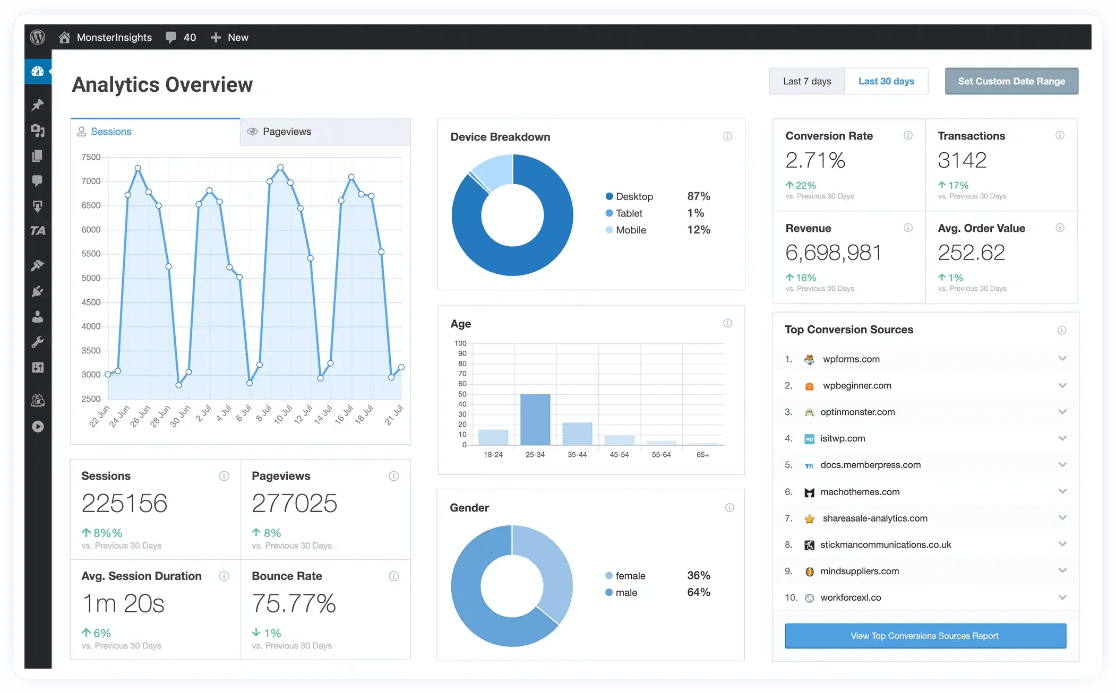
MonsterInsights is the most user-friendly plugin for setting up Google Analytics in WordPress and tracking all your important website metrics with ease. It fully supports WPForms and is packed with features to make Google Analytics easy.
Beyond form tracking, you’ll get eCommerce tracking, click tracking, video tracking, a Site Notes (annotations) tool, outbound link tracking, and much more.
Using MonsterInsights, you can easily set up forms tracking without having to worry about any coding or difficult setup, activating it in just a few clicks. Then, it’ll automatically start tracking your WordPress forms conversions and provide you with easy-to-read reports.
Forms tracking is much more convenient with MonsterInsights than with Google Analytics itself. With MonsterInsights, you can use Google Analytics like a pro, even if you’re a complete beginner.
Get started with MonsterInsights now.
Now, let’s dive into the form tracking tutorial.
Step 1: Install MonsterInsights
First, you’ll need a MonsterInsights license at the Pro level.
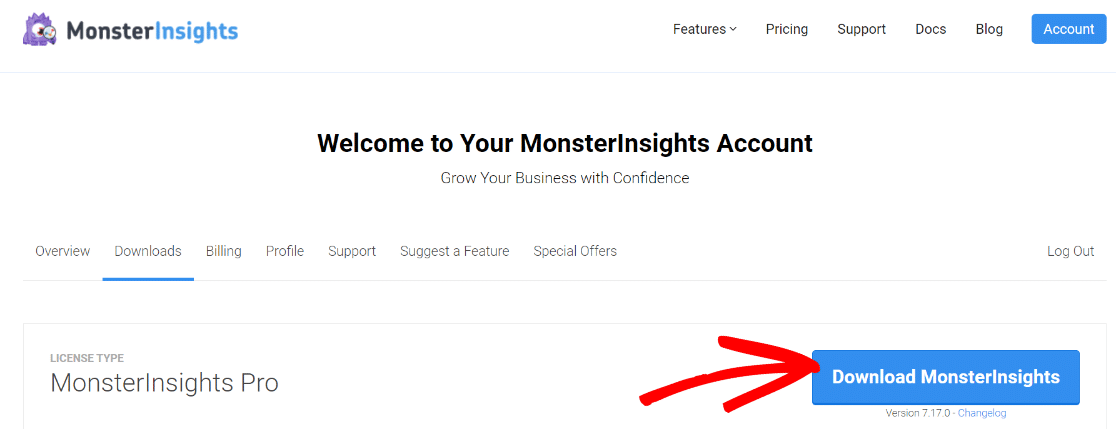
Once you have a license, download the ZIP files from your account area under the Downloads tab.
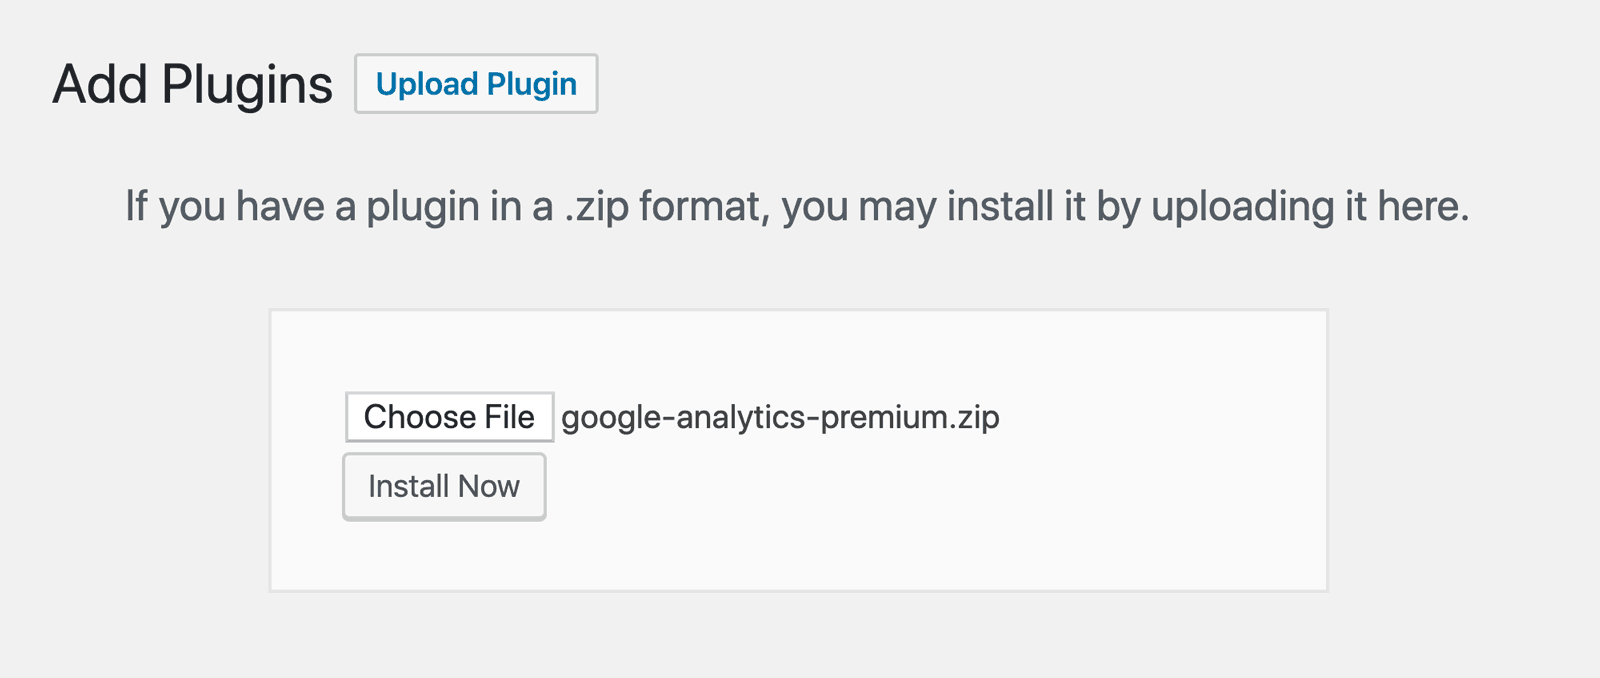
Next, upload the plugin to your WordPress website. You can do that by going to Plugins » Add New » Upload Plugins in your WordPress admin and clicking the Install Now button.
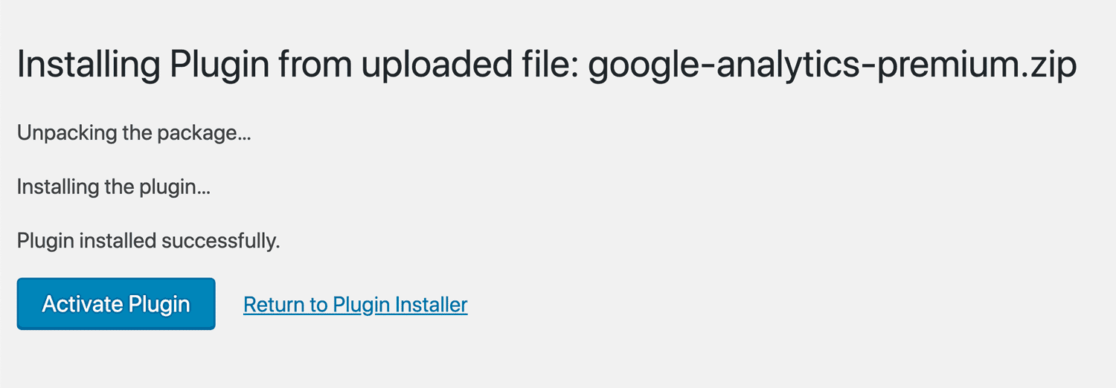
After that, click the Activate Plugin button.
Now, you’ll need to connect Google Analytics to your WordPress website. Using MonsterInsights, it’s a walk in the park. Just follow the steps in its setup wizard and the plugin will add Google Analytics to your site without the need to edit code.
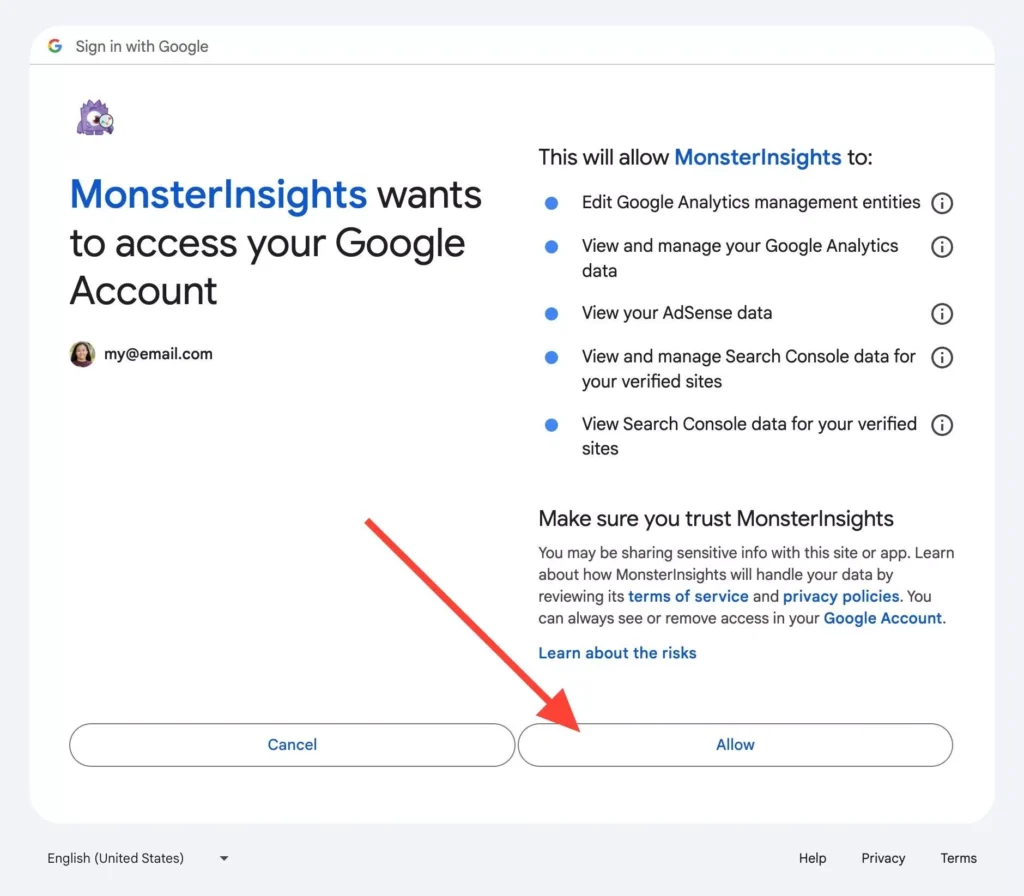
For more help getting started and a setup walkthrough, you can read our step-by-step guide on how to properly set up Google Analytics and MonsterInsights.
Step 2: Install the Forms Addon
Now, head to Insights » Addons and find Forms addon. Go ahead and click Install.
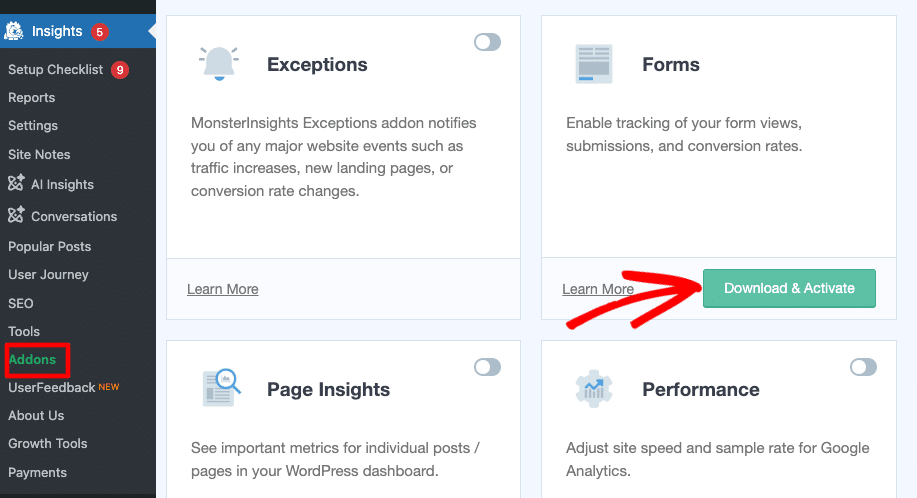
Once the addon is installed, you’ll see the button change to Active.
That’s it! You don’t need any further configuration to set up WPForms tracking. MonsterInsights will automatically start tracking your WPForms conversions.
Let’s go ahead and see how to view the forms conversion report.
How to View WPForms Conversion Reports
Now that you’ve set up forms tracking on your site, you can go check your forms conversion reports.
Note: Google Analytics takes 24 to 48 hours normally to track events like form conversions, so forms reports may not be available immediately after the setup is done.
In order to view your forms conversion reports, head to Insights » Reports in your WordPress dashboard. There, you’ll see the Overview Report for your entire site.
Next, you’ll need to click the Forms link in the top navigation.
Then, you’ll see a forms report that looks something like this:
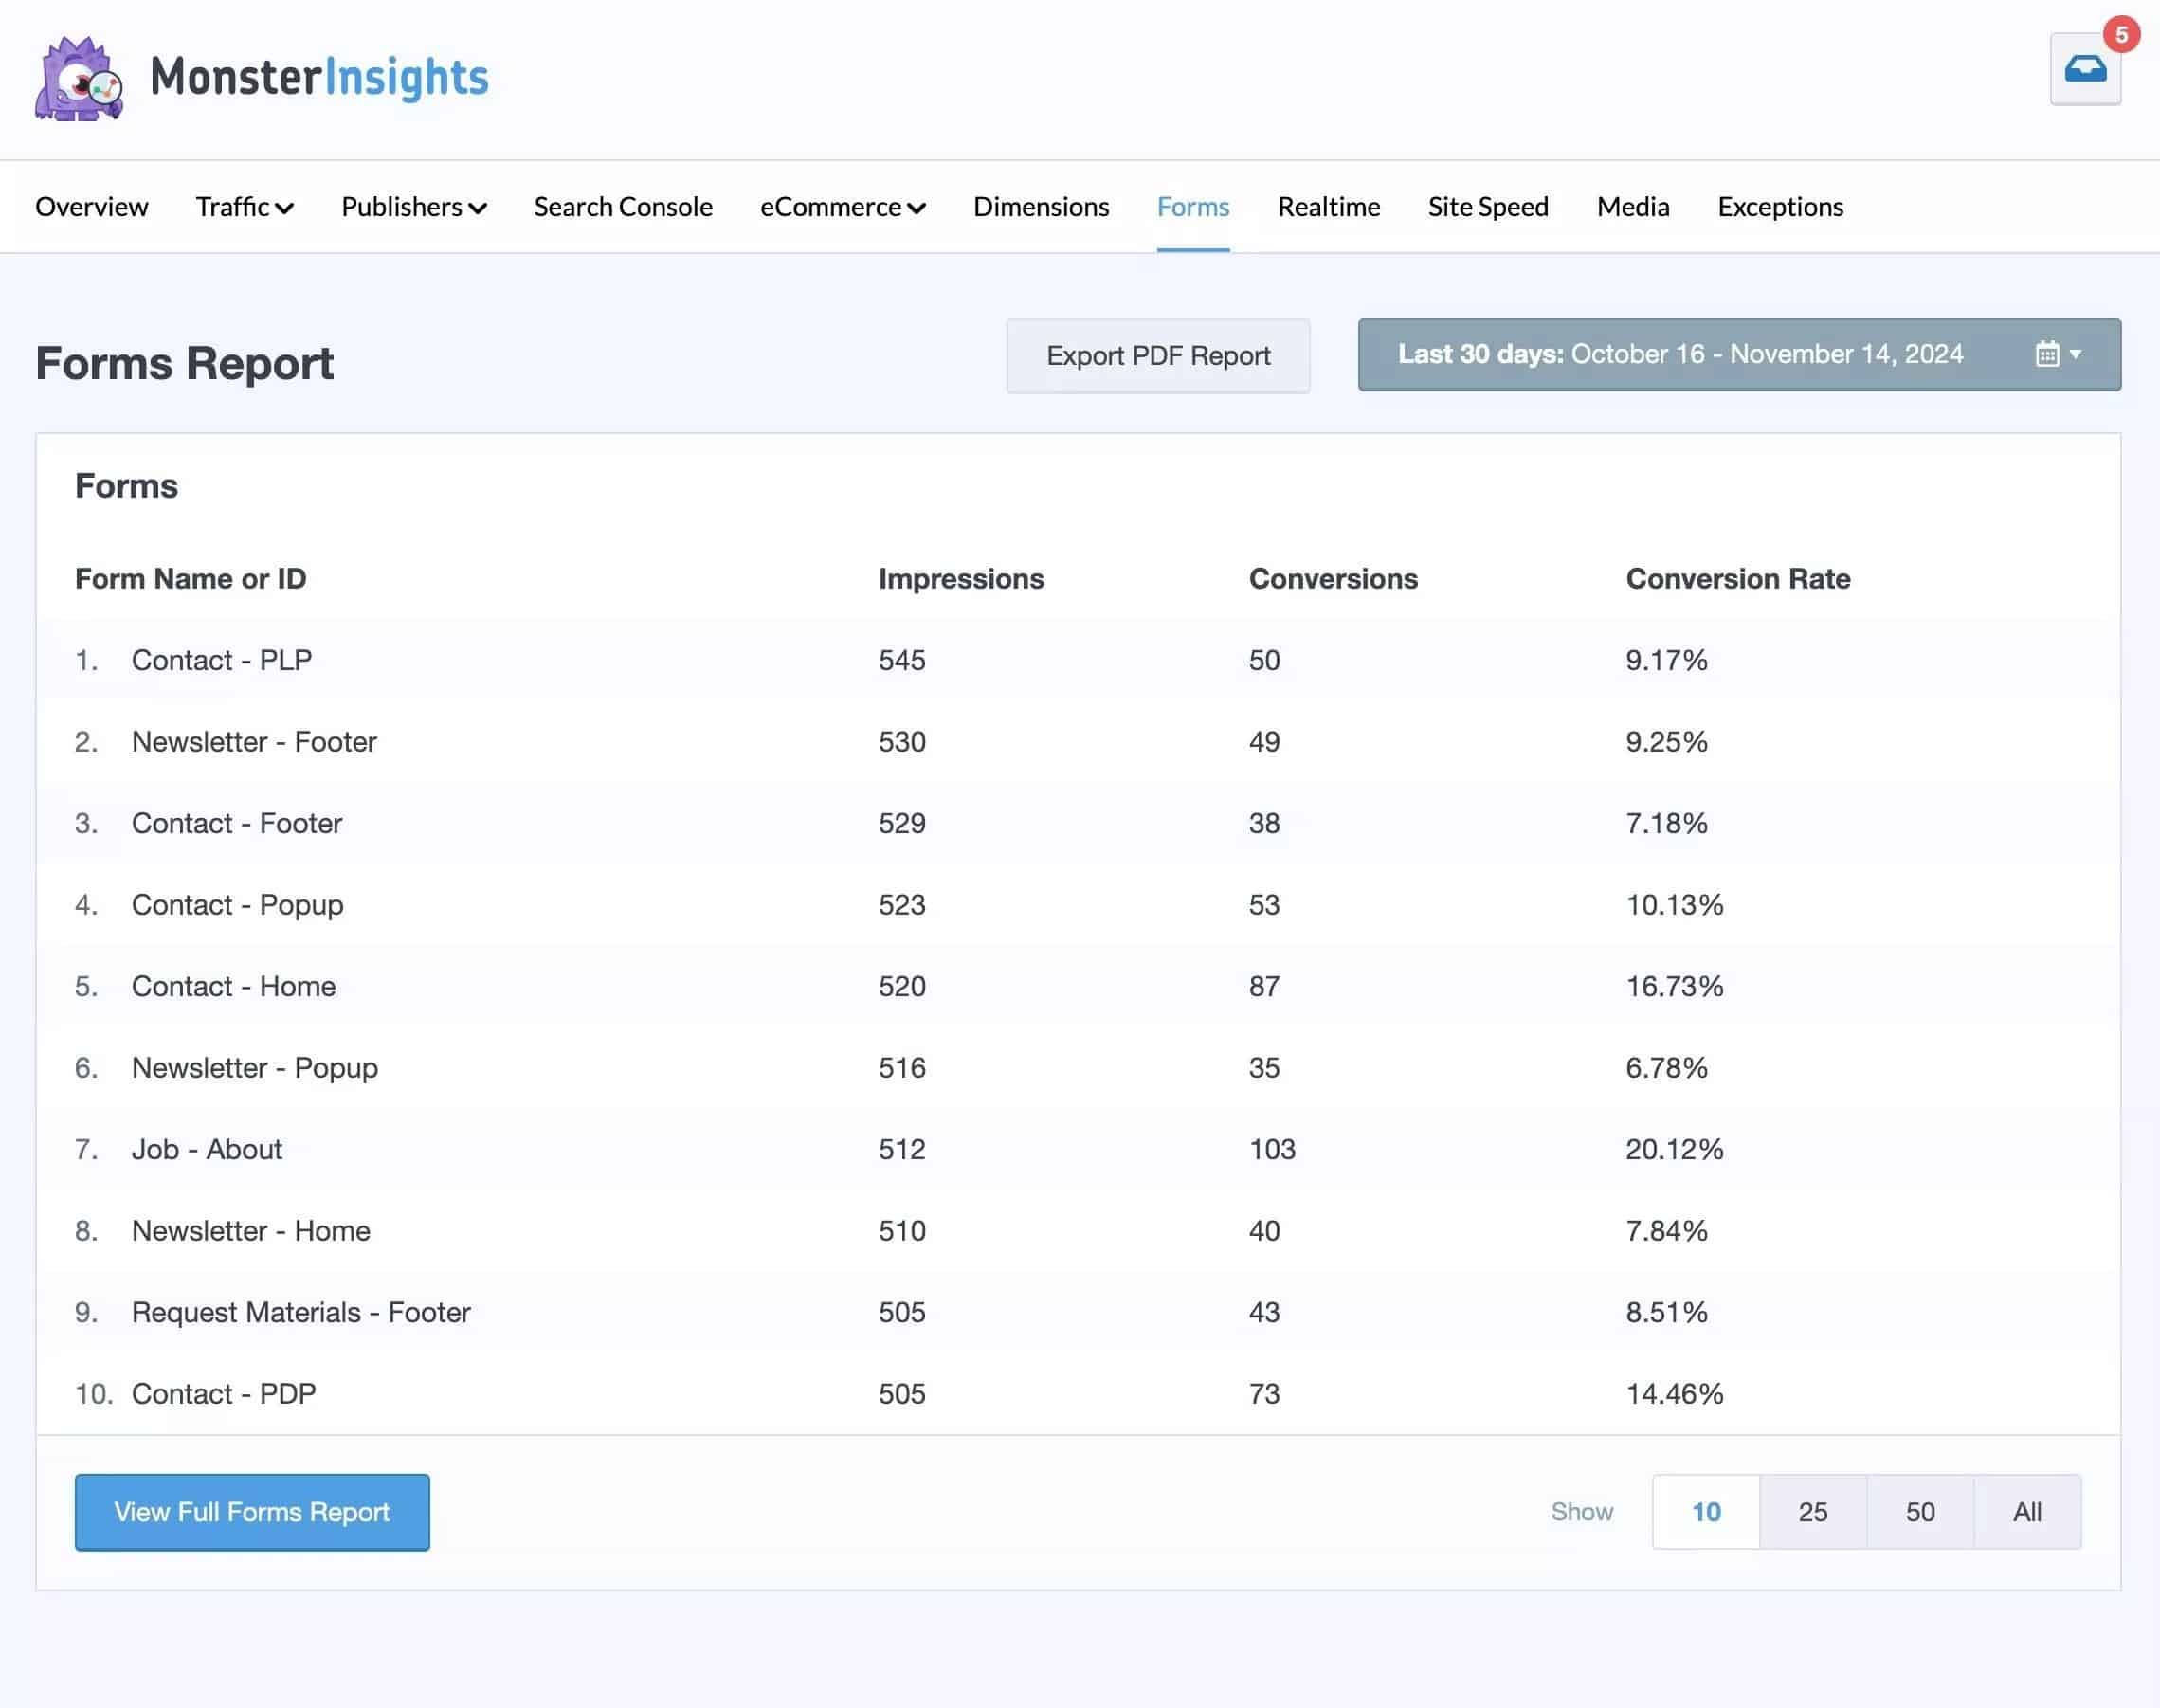
You’ll see each of your forms that have been filled out in the first column. You’ll see either the form name or form ID.
The second column is the number of times the form has been seen (impressions) and the third shows the number of successful form submissions (conversions). The last column shows the conversion rates for each of your forms.
How to Find WPForms Google Analytics Reports
To see more data about your forms in Google Analytics, you’ll want to create a custom explore report.
If you haven’t created a custom explore report yet, make sure to check out How to Create Google Analytics 4 Custom Reports (Step by Step).
Follow these steps to create your forms report.
Step 1: Create a Blank Custom Explore Report
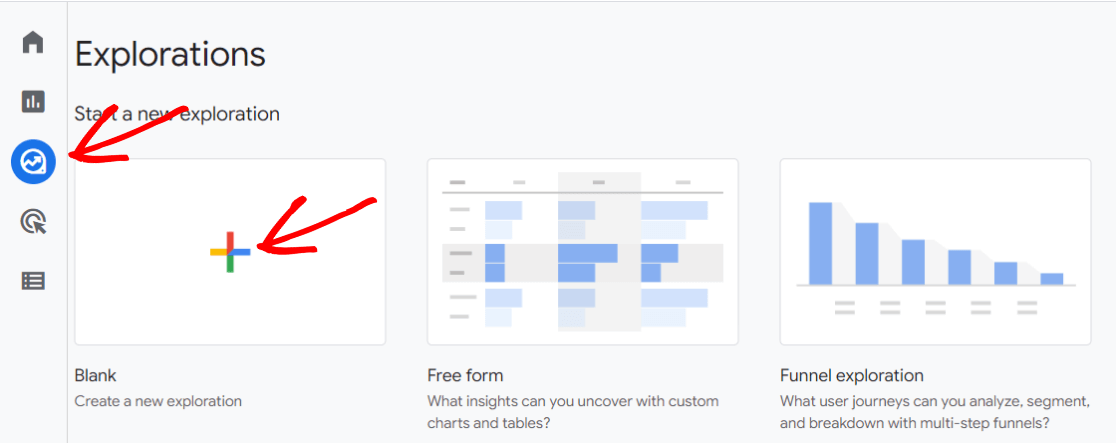
To start, open Google Analytics and head to the Explore tab. From there, click on the Blank report option.
Step 2: Import Dimensions
Now you need to add dimensions to your report. To do that, click the plus sign next to Dimensions to open the long list of possible dimensions:
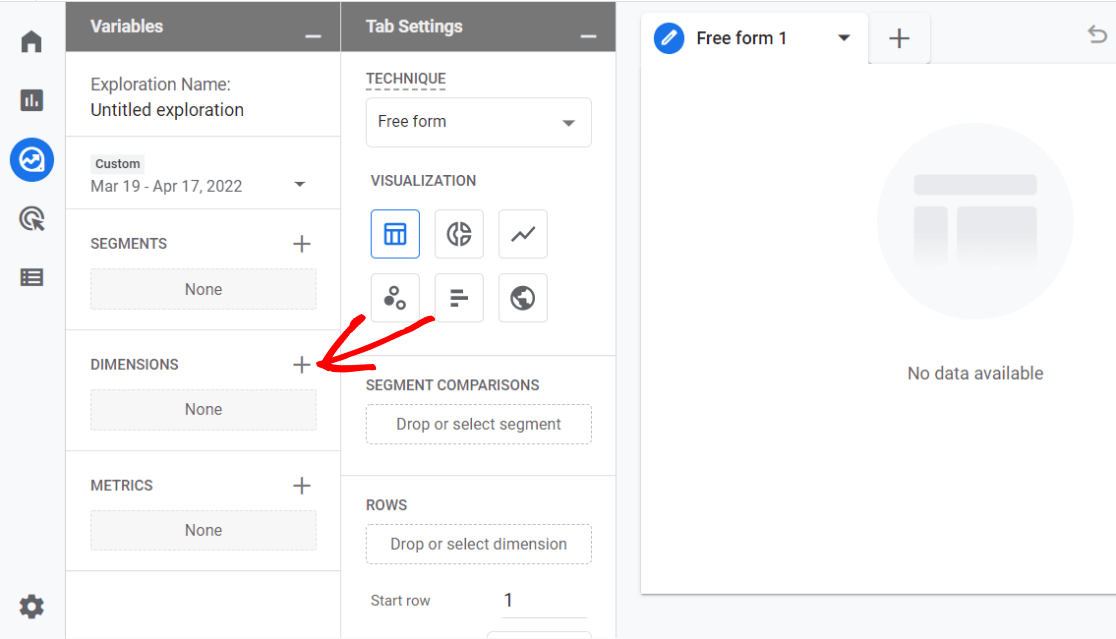
Add the following Dimensions by using the Search bar and checking each one:
- Event name
- Form ID
- Session source/medium
- Page page + query string
- New/established
Once you have them all checked, click the blue Import button in the upper right:

You can also give your report a name in this step – name it something like “Form Conversions.”
Step 3: Import Metrics
For this report, the only metric we really need is Event count. So, click the plus sign in the Metrics box, check Event count, and hit Import.

Step 4: Build the Report
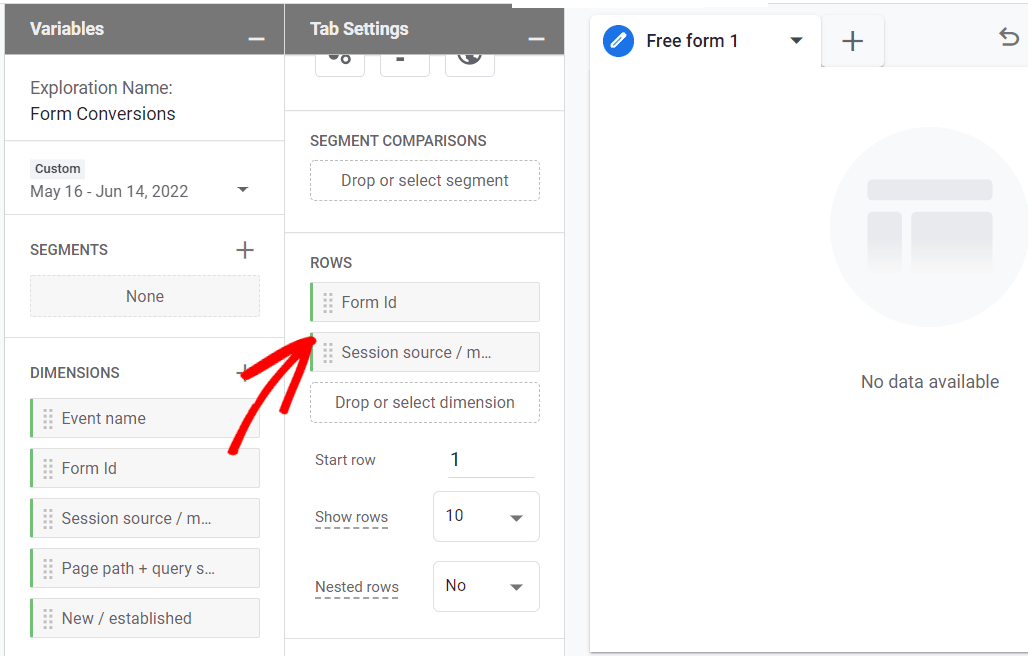
Now that you have all the dimensions and metrics you’ll need, you can build your report. To do that, click and drag Form Id and Session source/medium from your Dimensions box over into the Rows box:
Then, click and drag your Event count metric into the Values box:
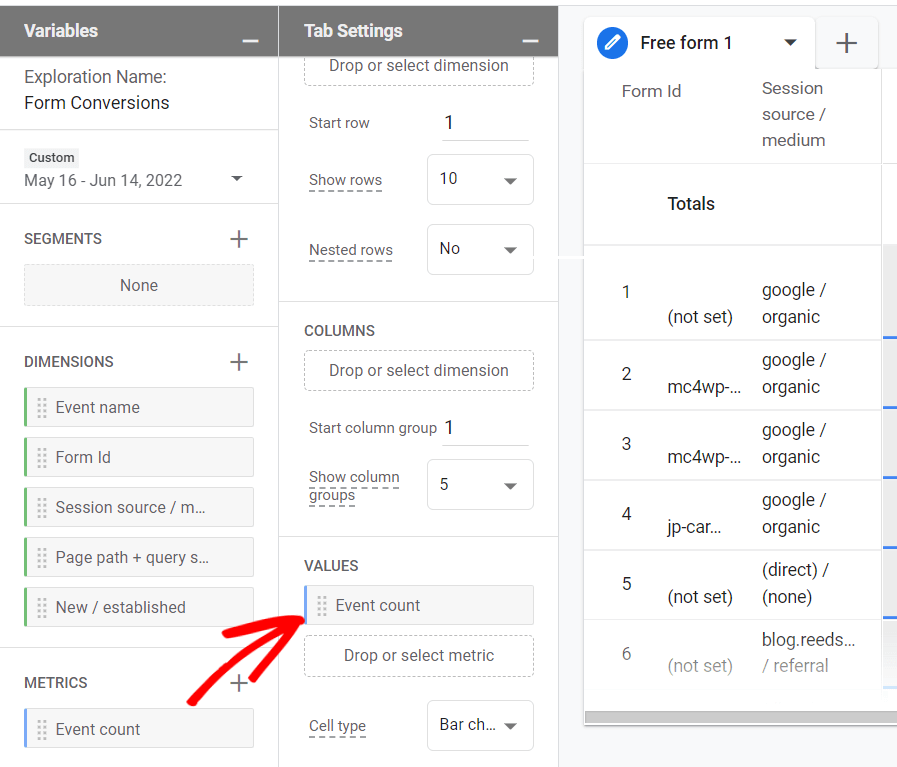
You should now have some data appearing in your report, but you have one more step to take to make it correct.
Step 5: Add a Filter
Now, you need to tell the report that you only want to see form submission events. So, click and drag Event name dimension down into the Filters box:
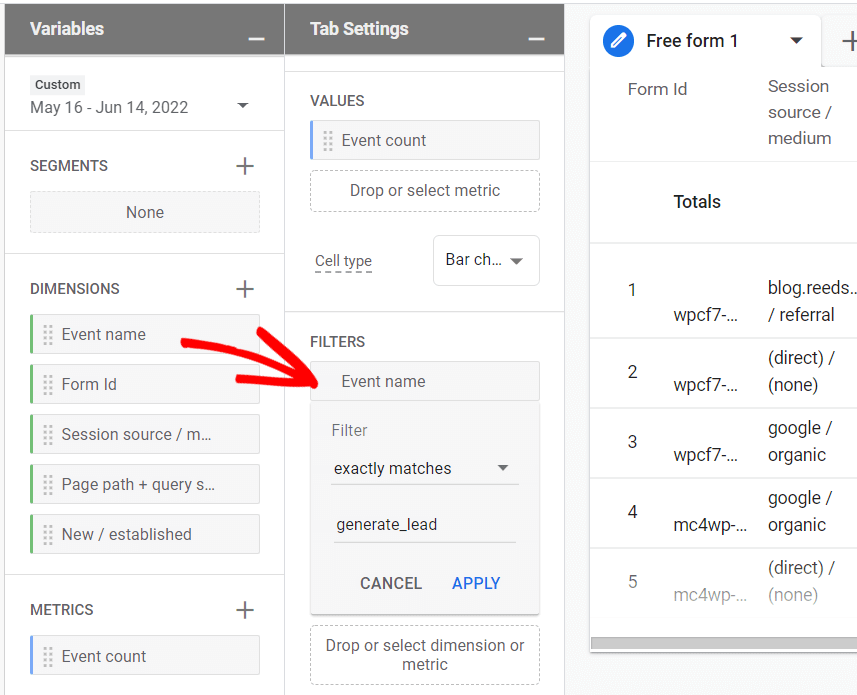
Then, choose exactly matches from the dropdown and start typing/select generate_lead in the bottom field. Then click Apply.
You now have a report that shows which forms were submitted and where your users came from (source/medium) when they came to your site and filled out the form:
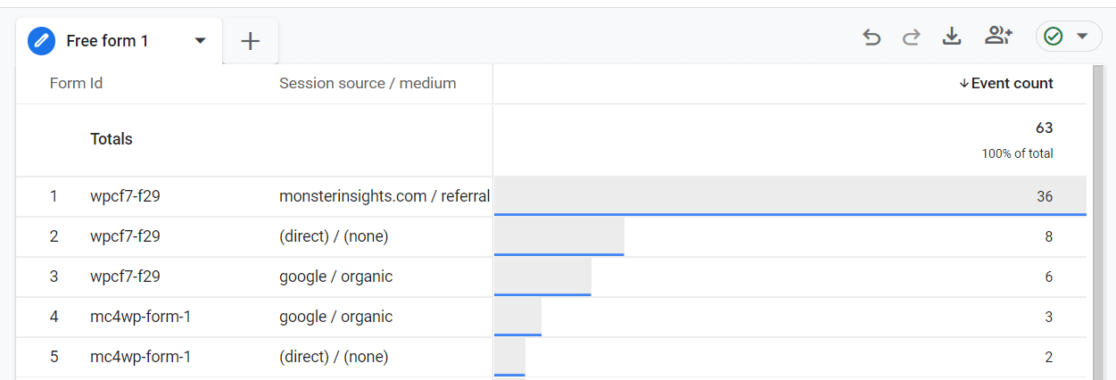
Pro tip: Want to see what pages your forms were on when they were filled out? Just replace the Session source / medium dimension with the Page path + query string dimension in your report.
That’s all. You did it!
Want to track more important things on your site? Check out How to Track Link Clicks in Google Analytics 4 and WordPress.
Not using MonsterInsights yet? What are you waiting for?
And don’t forget to follow us on Facebook and YouTube for more helpful Google Analytics tips and tutorials.
