Want to learn the differences between the Google Analytics permissions, and learn how to add a user to Google Analytics?
Understanding user permissions is crucial when sharing access to your Google Analytics account with other people. It concerns the safety, privacy, and the overall growth strategies of your business.
In this article, we’ll explain everything you need to know about Google Analytics user permissions and how to manage them easily.
Google Analytics Permissions Video Walkthrough
What Are Google Analytics Permissions for Users?
User permissions are different levels of access that you can give users to your Google Analytics account.
There are six types of user permissions you can grant:
- Administrator
- Editor
- Marketer
- Analyst
- Viewer
- None
In addition to the four permission types, there are two levels where you can apply them:
- Account level
- Property level
Each type and level of permission gives users access to different data and controls.
For example, you, as the owner of your Analytics account, can view ALL of the data, add, edit, and manage website properties, and add or manage users. However, you may not want to give that same level of access to another person, like an assistant or advertising company. That’s what user permissions were designed for.
User permissions allow you to provide a specific level of access to certain users. Using them, you can grant access to your Analytics data and share useful reports.
So, you should carefully decide whom you want to give access to. User permissions can help you to share data while also ensuring your full control over your account.
Let’s take a look at each of the permission types and levels.
Google Analytics Permission Levels
Google Analytics lets you provide permissions at 2 different levels of your Google Analytics account. The levels of user permissions are based on how every Analytics account is structured.
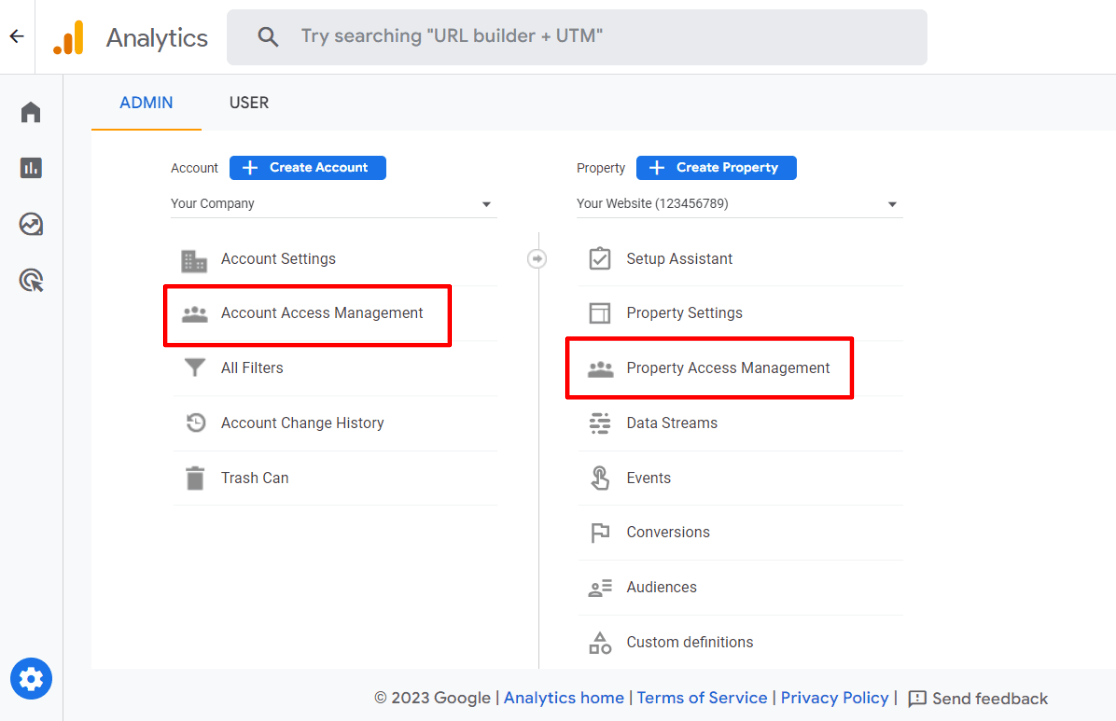
1. Account Level
An account is the top-most level of organization. It can include multiple properties (websites) and multiple views.
Providing access at the account level means allowing access to all of the properties and views in your account.
For example, let’s say your company owns a handful of restaurants. Your company is the account level, and each restaurant site is a property. If you provide access to Analytics at your account level, that user will have access to Analytics for each one of your restaurant sites in addition.
2. Property Level
A property is typically a website. In the example we used above, each of your restaurant websites is going to be set up as a property.
Providing access at property level means allowing access to all the views you have set up in your property/website.
Types of Google Analytics User Permissions
Now, let’s go over the 6 types of permissions you can grant at every level:
1. Administrator
Users with the Administrator permission can perform the following actions:
- Add and delete users
- Manage users and grant full permissions to anyone, including themselves
- Has overall full control of the account or property
2. Editor
Users with an Editor permission can perform following actions:
- Add, edit, and delete accounts, properties, and views as per the permission level
- Add, edit, and delete goals
- Create/ edit custom dimensions and metrics (Editor permission at property level is required)
- Connect Google Ads, Search Console, and other products (Editor permission at property level is required)
- Add, edit, and delete filters (Edit permission at account level permission is required)
- Can do everything except manage users
3. Marketer
Users with the Marketer permission can perform the following actions:
- Edit audiences, conversions, attribution models, lookback windows, and events within the property or account
- Create, edit, delete, and share personal assets
- Collaborate on shared assets like custom reports, dashboards, segments, etc.
- Can’t edit any settings or manage users
4. Analyst
Users with Analyst permission can perform the following actions:
- Create, edit, delete, and share personal assets
- Collaborate on shared assets like custom reports, dashboards, segments, etc.
- Can’t edit any settings or manage users
5. View
Users with this permission can perform following actions:
- View reports
- Manipulate data within reports like filtering a table, adding a secondary dimension, and creating a segment
- See shared assets but cannot collaborate on them
- Can’t edit any settings or manage users
6. None
Users with this permission have no access. A user would have the None permission level if, for instance, they have access at the Property level, but not the Account level. If you clicked on Account User Management, a user with permissions at the Property level would show in the None permissions type.
Understanding Permission Types at Permission Levels
Users can perform actions on only the levels for which they have permissions.
For example, if a user is allowed Administrator access at the Account level, they can add, manage, and delete users in the account, in all website properties and views.
However, a user with Administrator permissions at the Property level can add, manage, and delete users for only the 1 property they have permission for.
So, let’s go back to the restaurant example. For your business partner at your restaurant management company, you’d give permissions at the Account level, so he can access all of your different restaurant sites.
For a manager at one of your restaurants, you’d give access at the Property level so she can check on data just for her restaurant’s website.
How to Add a User to Google Analytics
Now that you know the user permissions and levels, you probably want to know how to get them all set up. We’ll show you how to add a user to Google Analytics.
To get started, you’ll need to sign into your Google Analytics account. Then, click the Admin option at the bottom of your Analytics panel on the left.
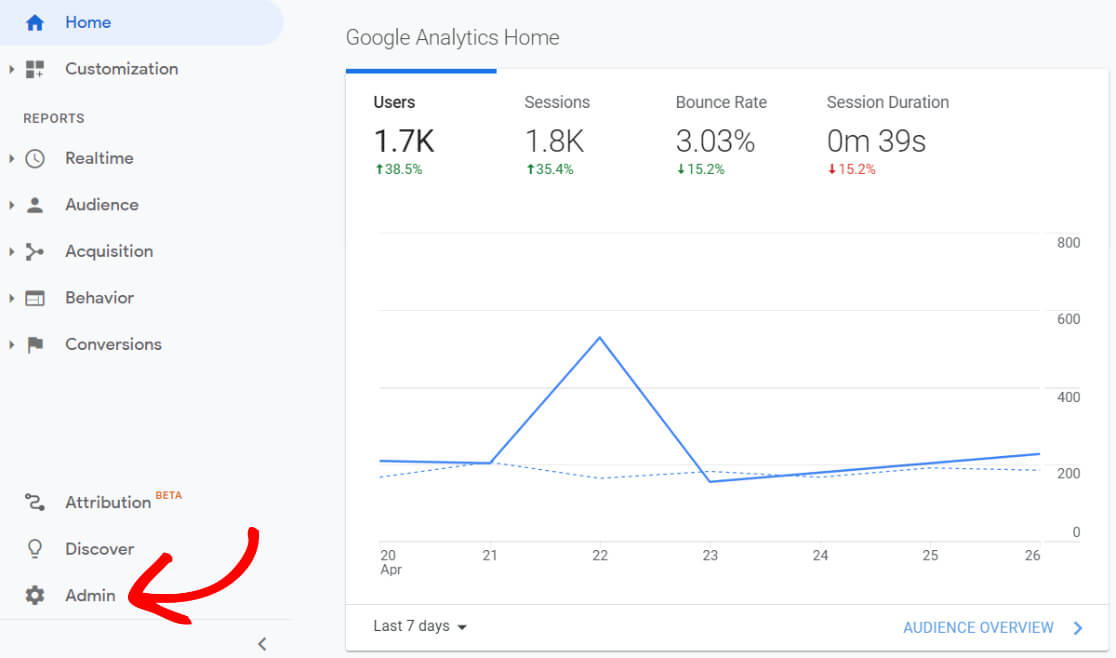
Now, you’ll see the 2 levels of access (Account and Property).

First, Click the access management option at the level where you want to provide access (we’re using Property in this example).
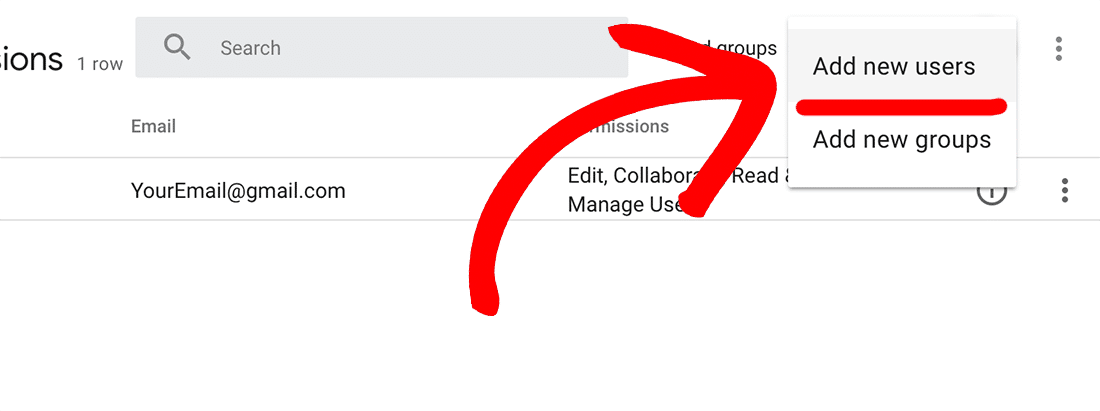
Then, you’ll see the list of your current users with a brief summary of the permissions allowed to them.
Click the + (Plus) icon to add new users. Select the Add New Users option.
Now, you’ll see a new page where you can add new users and assign permissions.
First, enter the email address you want to add. If you want to add multiple users with the same type of permissions, you can enter their email addresses separated by a comma.
Select the Notify new users by email option.
Select the permissions you want to allow.
Then, click the Add button.
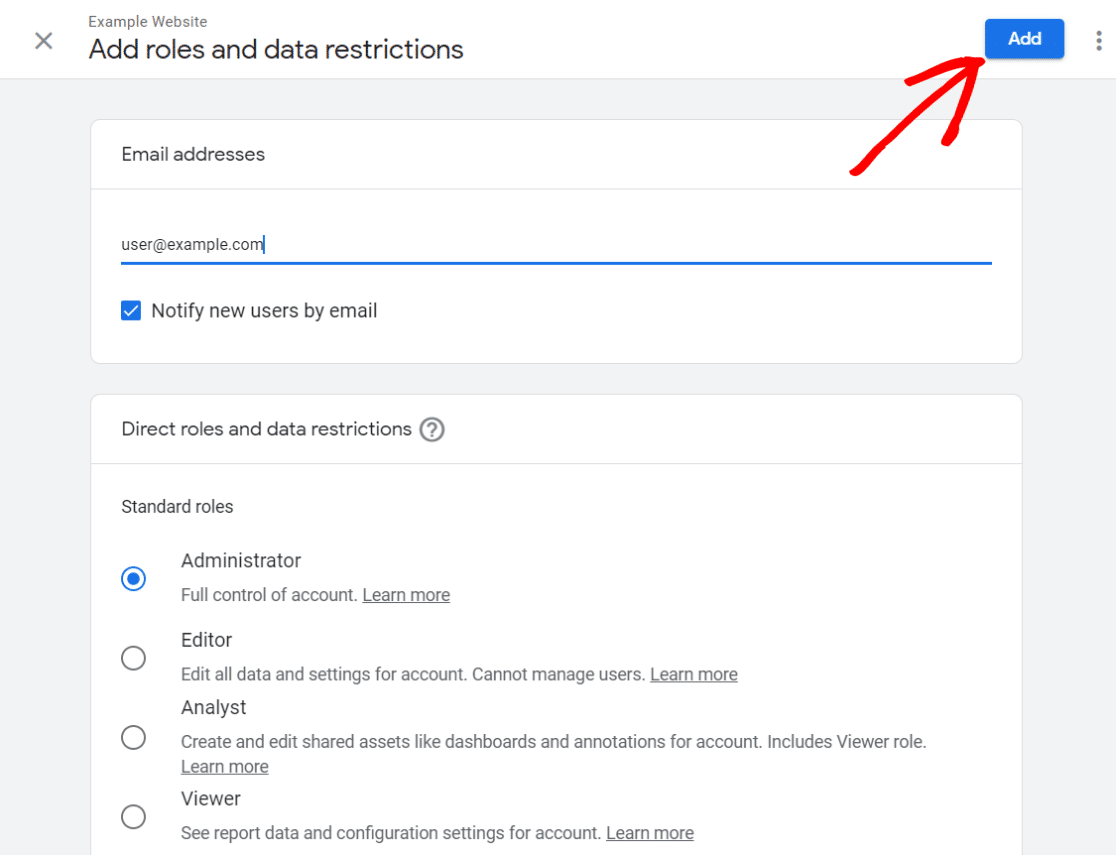
That’s it! You’ve successfully added a new user(s) to your Analytics account. Now they’ll be able to view, edit, collaborate, or manage users in your Analytics account as per the permissions you provided.
How to Edit and Delete Users in Google Analytics
If you want to edit any user’s permissions, you can go to the list of users by navigating to Admin » User Management under Account, Property, or View.
Then, navigate to the user’s name in the list you want to edit and click on it.

After that, you can select and deselect user permissions as you like. Once you add or remove permissions, click the Save button.
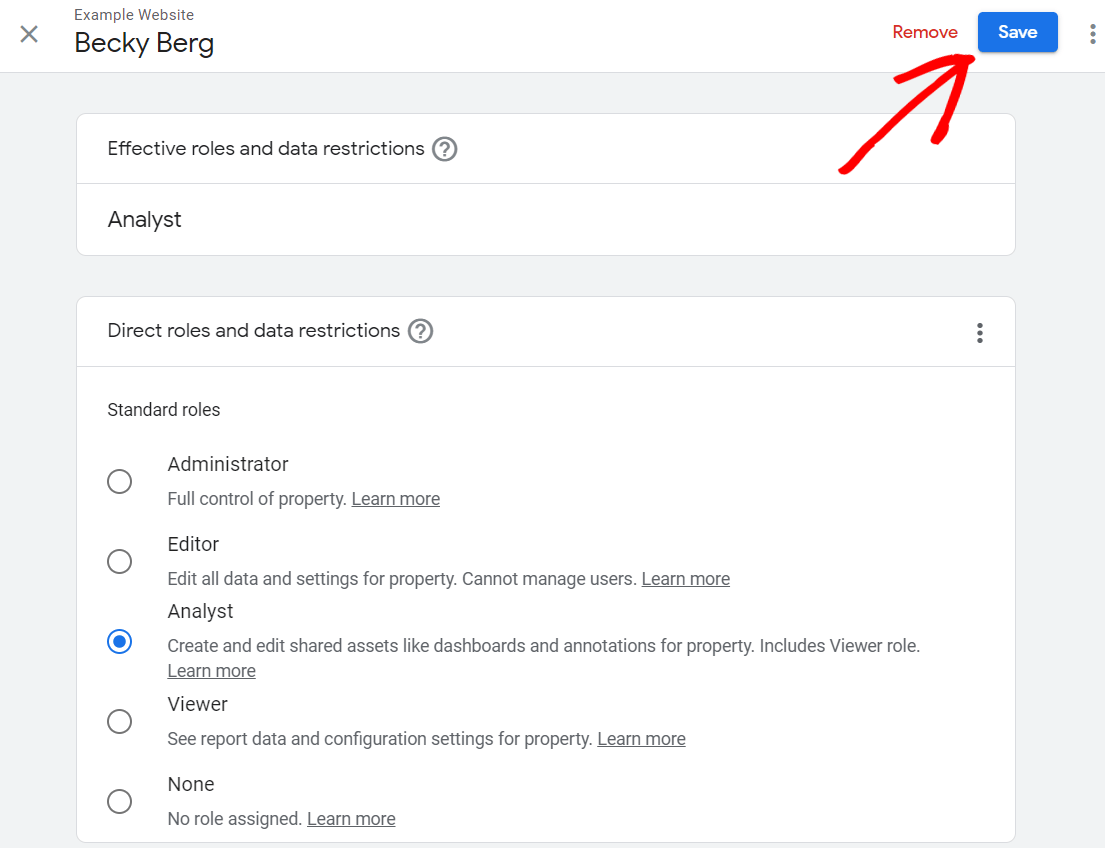
If you want to remove the user, you can click the Remove button next to the Save button.
The Easy Way to Manage User Permissions in WordPress
When you’re using the MonsterInsights plugin to display your Google Analytics data right in your WordPress dashboard, you can use the user permissions area to decide who can see the Analytics..
MonsterInsights Permissions allows you to assign your WordPress users the permission to view reports and save settings in Google Analytics dashboard reports inside WordPress.
Before we show you the steps to managing permissions, you’ll need to make sure that you’ve connected your site with your Google Analytics account using MonsterInsights. If you need instructions, here’s our step-by-step guide on how to properly set up Google Analytics in WordPress using MonsterInsights.
Once you’ve completed the setup process, you can go to Insights » Settings and click the Advanced tab. Then, scroll down to the Permissions section:
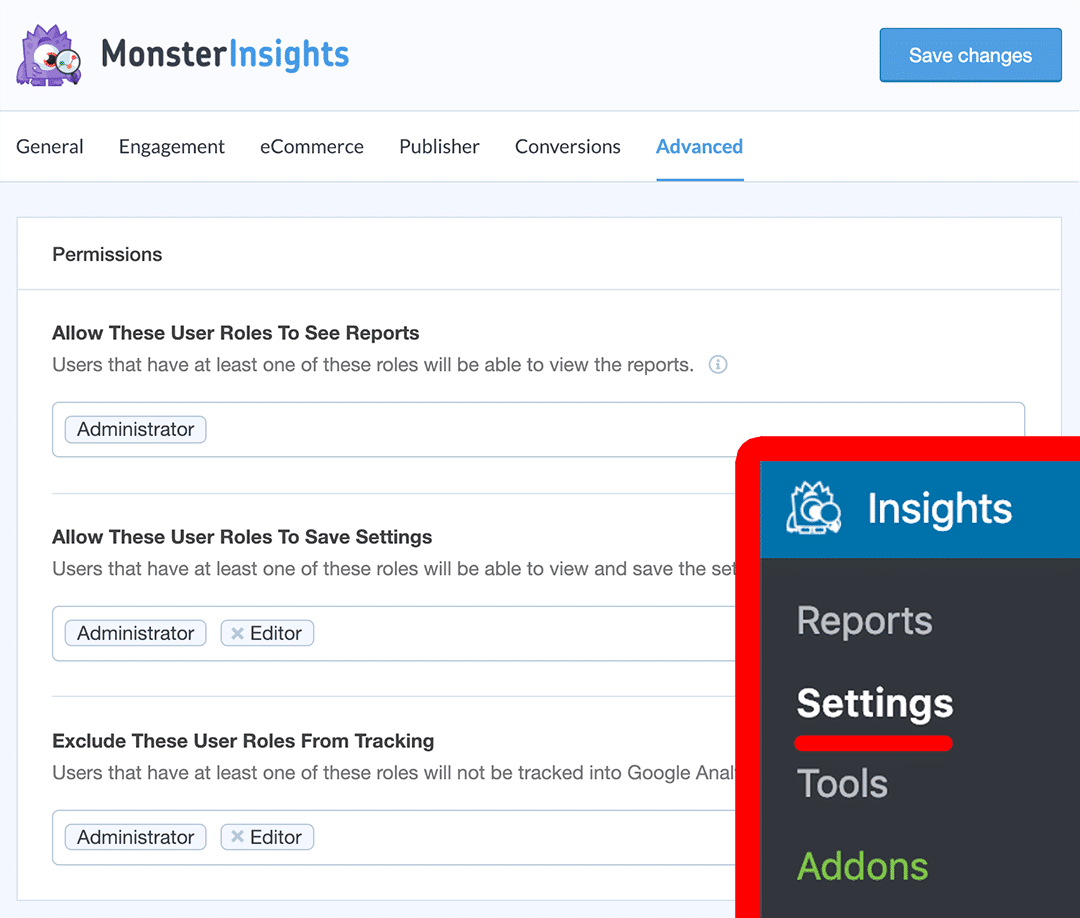
Now you can allow different permissions to different types of WordPress users.
Choose different user types that can see reports, save settings, and access form tracking.
That’s it! Now your selected user roles (administrators, editors, authors, or other user roles) will get access to your Google Analytics dashboard reports and settings by going to the Insights menu in the WordPress dashboard.
About MonsterInsights
MonsterInsights is the best Google Analytics plugin for WordPress because it allows you to easily connect your WordPress site with Google Analytics (without hiring a developer or writing any code).
With MonsterInsights installed, you can set up sophisticated tracking features such as event tracking, eCommerce tracking, form tracking, custom dimension tracking, outbound link tracking, and more with the click of a button.
It’s the most popular, user-friendly Google Analytics WordPress plugin available on the market.
Get Started with MonsterInsights Today!
We hope this article helped you learn about Google Analytics user permissions and how to manage them.
You may also want to read The Complete Beginner’s Guide to Google Analytics for WordPress.
Don’t forget to follow us on Twitter, Facebook and YouTube for more helpful Google Analytics tips.
