Want to add a countdown timer in WordPress? A countdown timer creates a sense of urgency and entices your users to take action immediately before the time is up. So, if you’re running an online store, adding a countdown timer is a smart way to invite users to buy a product at the spur of the moment. It’s a great technique to boost sales.
In this article, we’ll show you how to easily add a countdown timer in WordPress, step-by-step.
Adding a Countdown Timer in WordPress with OptinMonster
Creating a countdown timer on your online store helps tremendously to convert more visitors into customers. That’s because a countdown timer gives your users a clear deadline and a compelling reason to buy. They urge users to take action NOW.
However, while countdown timers can certainly help to boost conversions, the process of creating one and adding it to your site can be a tough task… unless you have the right tool. That’s why the world’s most popular lead generation software, OptinMonster, has come up with an easy solution.
OptinMonster is the best lead generation and conversion optimization software on the market. It has powerful tools and features to convert more visitors into subscribers and customers.
Plus, OptinMonster now comes with a pre-designed countdown timer campaign template to allow you quickly build a countdown timer for your WordPress website. You can also add the countdown element block to any template and totally transform it into a countdown campaign.
Let’s go ahead and see how to create and add a countdown timer to your WordPress site using OptinMonster (step-by-step).
Step 1: Create a Countdown Campaign
First of all, login to your OptinMonster dashboard. You’ll need a Pro plan for Countdown Timers, so make sure that you have a Pro plan license or better.
Then, click the Create Campaign button to get started.

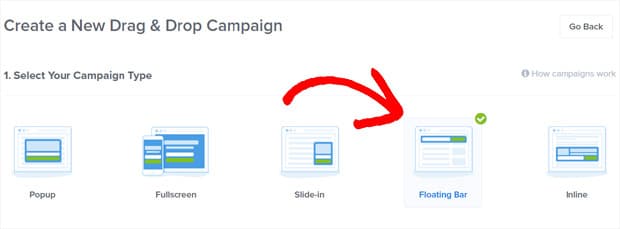
Next, you’ll need to choose a campaign type. Here, we’ll choose Floating Bar because it includes a pre-made countdown timer theme. However, you can find other themes with the countdown timer block within other campaign types as well.
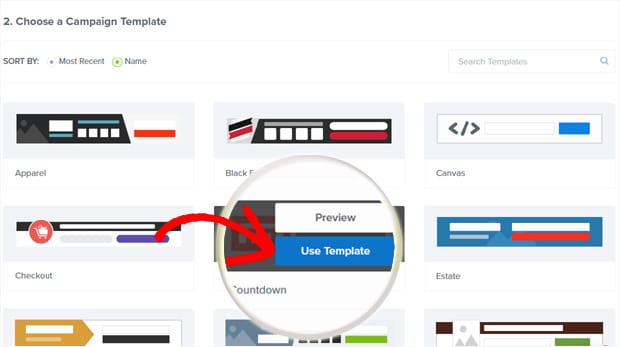
Next, choose the Countdown template by hovering over it and clicking on the Use Template button.
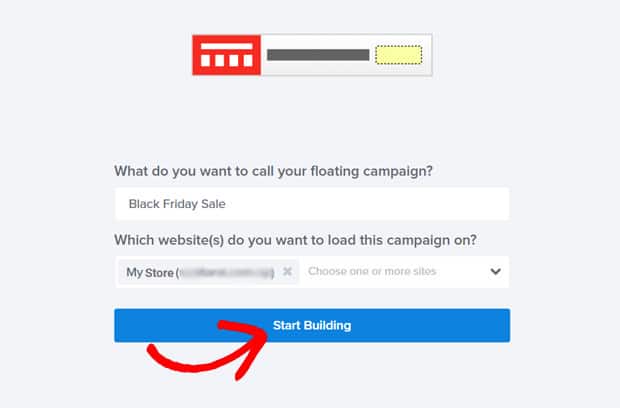
After that, a new page will appear where you’ll need to name your campaign and select the website(s) you want to load the campaign on. Then, click the Start Building button.
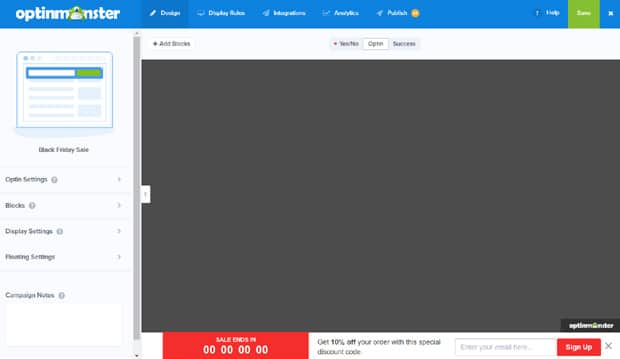
Now, you’ll see your campaign builder interface along with the default Countdown campaign.
Step 2: Configure the Design Options
At first, you’ll see the Design options are selected. Here we’ll show you how to configure them.
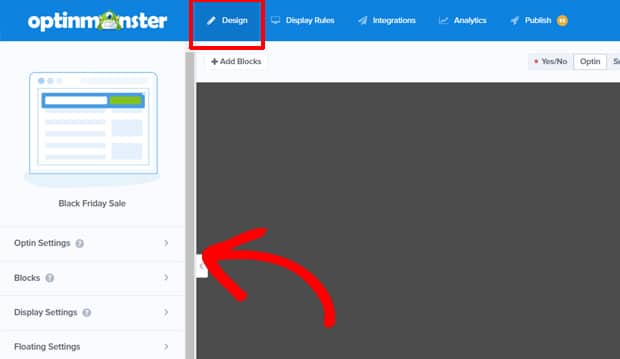
First, there’re Optin Settings which include options to change your Countdown background and styles for the close button.
Blocks include the different column blocks and element blocks including text, image, button, video, and Countdown. If you want to add more blocks to the default campaign template provided, you can drag them to the campaign template in the right-hand side.
Display Settings include options for cookies, and to display or hide the Powered by OptinMonster link, etc.
Floating Settings include an option to show the floating bar at the top of the page. All you need to do is to toggle on Load floating bar at the top of the page option.
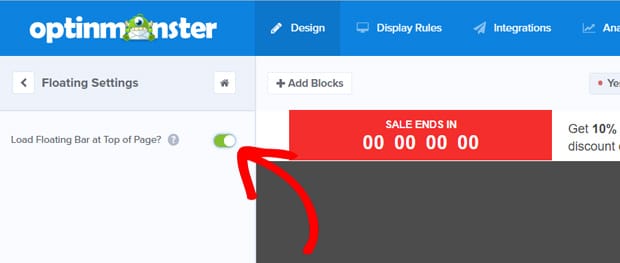
Then, click the Save button to save the changes.

Make sure to click the Save button frequently to prevent loss of your data and settings.
Step 3: Edit and customize your Countdown Campaign
Editing OptinMonster campaigns is easy as it integrates visual editor interface fully. So, you can click directly on any element to edit.
For example, click the countdown clock to edit it.
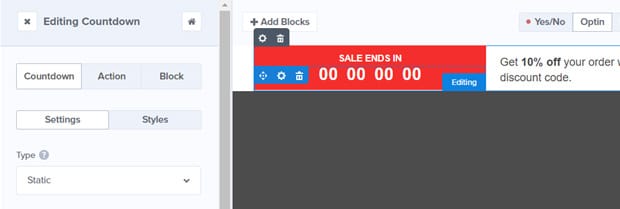
First, you can choose a countdown type. There’re 2 different countdown timer modes:
- Static: If you choose Static timer, the timer will look the same to everyone who visits your site.
- Dynamic: With a dynamic countdown, each user will see a different countdown which starts as soon as the visitor comes to the page. Instead of setting an ending date, you set the length of the timer in the number of days, hours, minutes, and seconds.
In this example, we’re choosing Static and setting up end date and time.
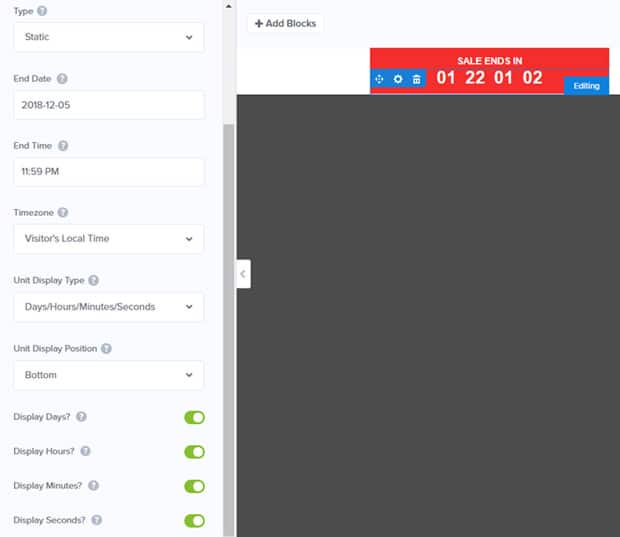
After it’s done, click the text box for editing. Then, you’ll see the editor on the left side panel. Simply customize the text, font styles, and save your changes.
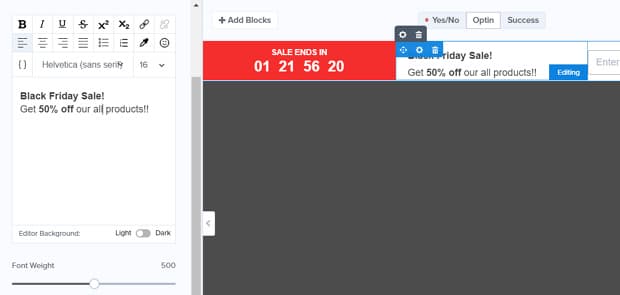
Similarly, edit your email field and submit button.
Once you’ve customized everything on your campaign template, go ahead and click the Save button again.
Step 4: Set Up Display Rules
Now the next step is to set up your countdown timer display rules.
Go to Display Rules tab on the top.
Now you can set up conditions when to display the countdown timer. By default settings, the timer will appear after a user stays at least 5 seconds on a page. You can change it from the dropdowns and also add more rule sets to display the timer.
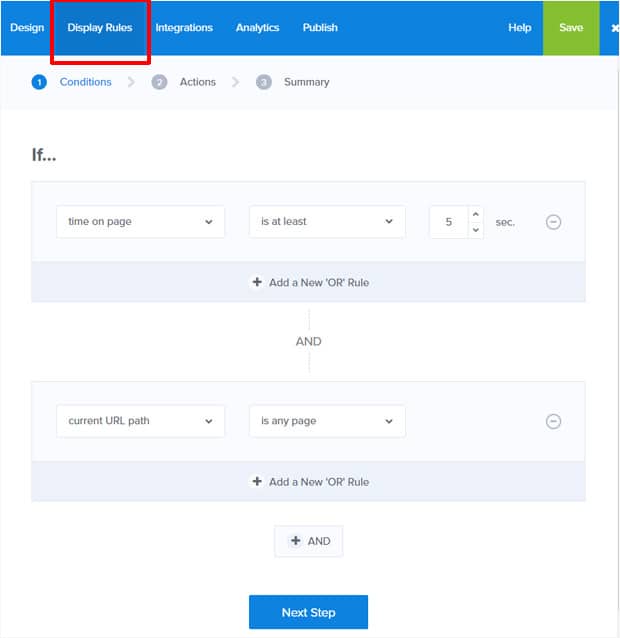
Once you set the display rules, click the Save button again.
Step 5: Connect an Email Service Provider
In order to collect emails, you need to connect your OptinMonster campaign with an email service provider. The good news is that OptinMonster has built-in integration with all the major email service providers.
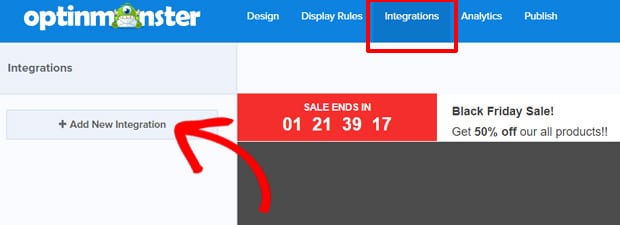
To add your email integration, click the Integrations tab on the top menu. Then click Add New Integration button in the left-hand side panel.
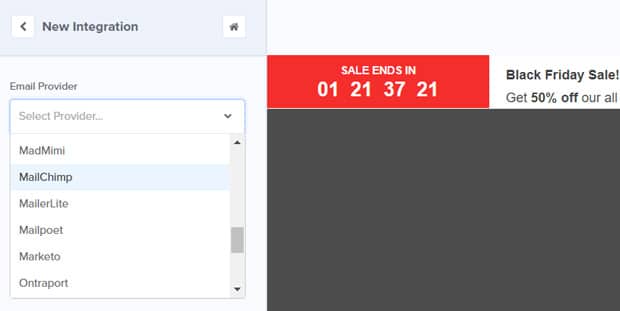
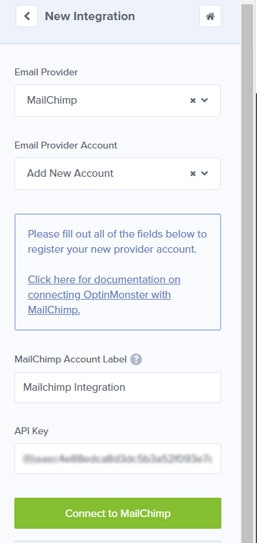
Then, select an email provider where you’ve your email list. In this tutorial, we’re choosing MailChimp.
Then, click Add New Account option. Enter a MailChimp account label and a MailChimp API key. You can find the API key on your MailChimp account page.
After that, click the Connect to Mailchimp button.
Next, you’ll need to select your email list where you want to save your new campaign emails.
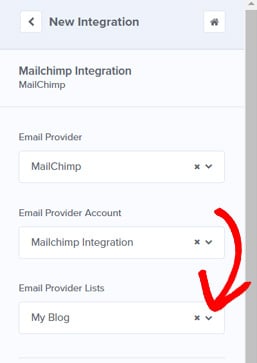
Then, click the Next button again.
Step 6: Publish Your Countdown Timer Campaign
Now that you’ve configured all the available options, you’re finally ready to publish your countdown timer on your site.
Go to Publish tab and click on it. Then toggle the Paused status to Live.
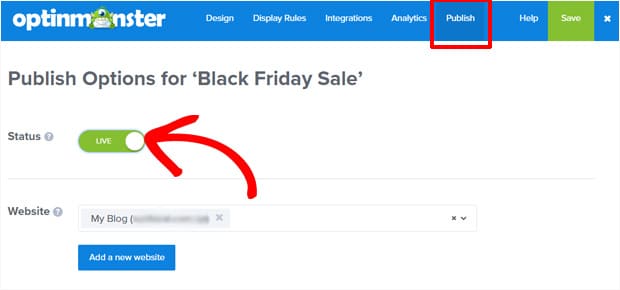
Now you can add the countdown timer to different platforms including WordPress.
Adding your OptinMonster countdown timer to WordPress is very easy with the OptinMonster API plugin. Simply install and activate the plugin on your WordPress dashboard and then click the OptinMonster menu in your WordPress dashboard panel.
Now, you’ll see the list of campaigns. If you can’t see the latest one, click the Refresh Campaigns button.
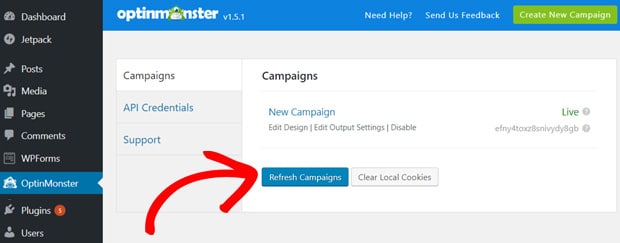
Once it appears, click the Go Live button to make the Countdown timer go live on your WordPress site.
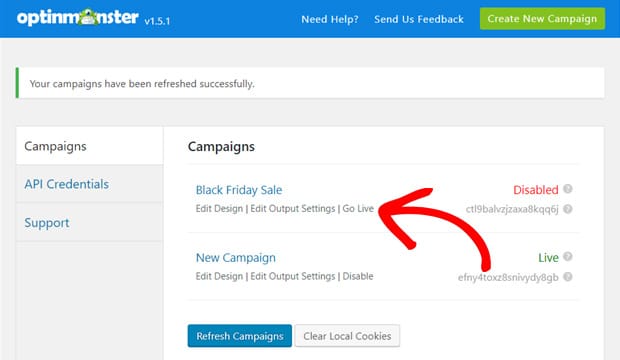
That’s it. Now you can open your website frontend and view the countdown timer you’ve just added.
Track Your Countdown Campaign with Google Analytics
OptinMonster integrates the most popular web analytics tool Google Analytics to provide you with the analytics reports on how your campaigns are performing. Now you can see the complete statistics on clicks, views, and conversion rate for each of your OptinMonster campaigns.
To enable tracking for your Countdown timer, you’ll need to connect it with your Google Analytics account.
Go to the Analytics tab from the top menu and click on it. Then, click the Connect button next to Google Analytics.
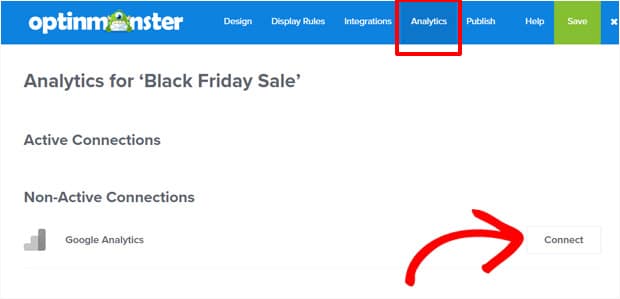
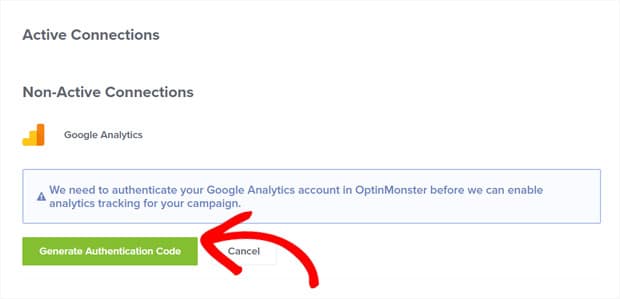
Next, you’ll see this message “We need to authenticate your Google Analytics Account with OptinMonster before we can enable Google Analytics tracking for your campaign campaigns.”
So, you’ll need to click the Generate Authentication Code button to continue.
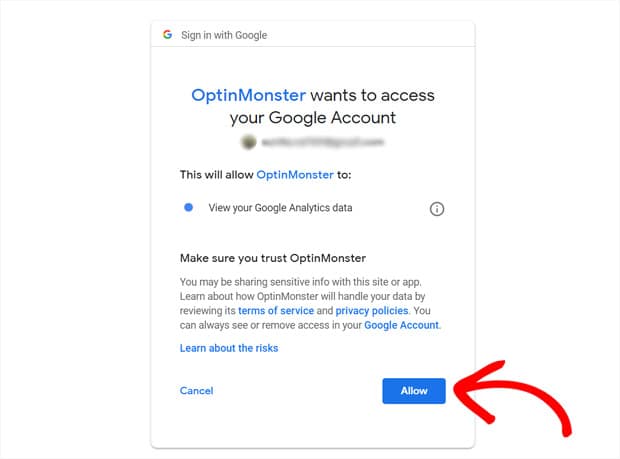
Then a new window will open asking you to continue with your Google Analytics account. If you’ve signed into multiple Google accounts, make sure to select an account associated with your Analytics account. Then, click Allow button to allow OptinMonster an access to your Analytics account.
Next, you’ll see a line of code generated. Copy the code.

Now, return to the Analytics option in your OptinMonster dashboard and paste the code in the Google Analytics authentication code field.

Also enter your Analytics account label and click Next button. Next, you can choose All Web Site Data from your website profile.

Then, go ahead and click the Next button.
After that, you’ll see a success message regarding your fully connected Google Analytics to OptinMonster.
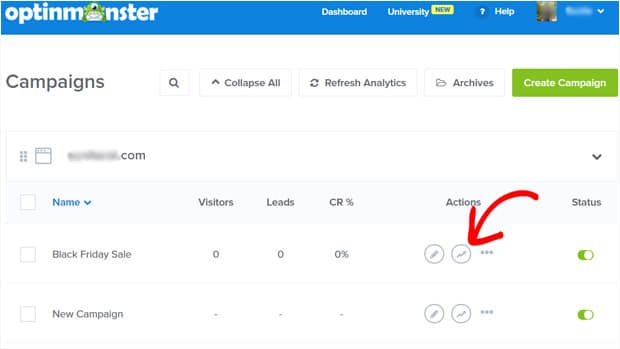
That’s it! If you’re wondering how to view your Analytics reports, you can go to Campaigns list page in your OptinMonster dashboard and click the Arrow icon beside your countdown campaign.
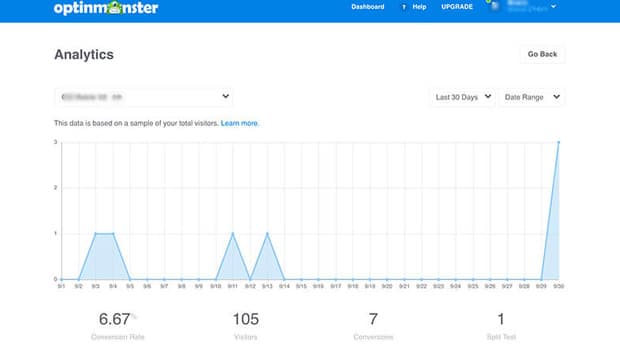
Then, a new screen will open where you can see the reports like the one below:
We hope this article helped you to learn how to add a countdown timer in WordPress to boost sales.
You may also want to see our guide on the best eCommerce email marketing practices to grow sales.
Also, don’t forget to follow us on Twitter and Facebook for more Google Analytics tutorials.

